Type
Crochet
Difficulty
beginner
Category
amigurumi
AI Thinking Process
Planning
Verification
Pattern
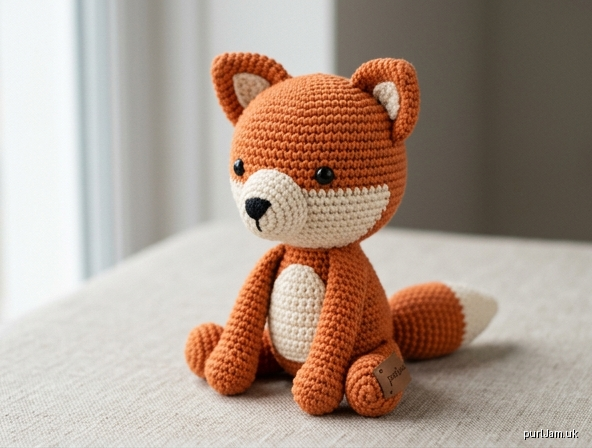
Simple Amigurumi Fox
Skill level: Beginner
Finished size: About 4–4½ in (10–11.5 cm) tall, sitting
Yarn: Worsted (4) 100% cotton
- Color A (fox orange): ~40 yd (37 m)
- Color B (cream/white): ~15 yd (14 m)
- Color C (black): scrap for nose/embroidery
Hook: US E-4 (3.5 mm) — one to two sizes smaller than the ball band for tight fabric
Notions: Stitch marker, yarn needle, polyester fiberfill, optional 6 mm safety eyes (or embroider)
Gauge
5 sc and 5 rnds = 1 in (2.5 cm) in sc, worked tightly in the round. Gauge is for fabric density (no stuffing showing), not exact size.
Abbreviations (US)
MR — magic ring
ch — chain
sc — single crochet
inc — 2 sc in same st
inv-dec — invisible decrease (sc2tog through front loops)
st(s) — stitch(es)
rnd — round
sl st — slip stitch
FO — fasten off
Work in continuous spirals unless noted. Mark the first st of each rnd.
Head (Color A)
Rnd 1: 6 sc in MR. [6]
Rnd 2: inc in each st. [12] (6 inc → 6 + 6 = 12 ✓)
Rnd 3: (sc, inc) around. [18] (6 inc → 12 + 6 = 18 ✓)
Rnd 4: (2 sc, inc) around. [24] (6 inc → 18 + 6 = 24 ✓)
Rnds 5–8: sc around. [24] (4 rnds)
Rnd 9: (2 sc, inv-dec) around. [18] (6 dec → 24 − 6 = 18 ✓)
If using safety eyes, insert between Rnds 6 and 7, about 5 sts apart.
Stuff firmly.
Rnd 10: (sc, inv-dec) around. [12] (6 dec → 18 − 6 = 12 ✓)
Rnd 11: inv-dec around. [6] (6 dec → 12 − 6 = 6 ✓)
FO, weave through remaining 6 sts, pull closed.
Muzzle (Color B)
Rnd 1: 6 sc in MR. [6]
Rnd 2: inc in each st. [12]
Rnd 3: sc around. [12]
FO, leave a long tail. Lightly stuff. Embroider a small inverted triangle nose in Color C on the front of Rnd 1–2.
Ears (make 2, Color A)
Rnd 1: 4 sc in MR. [4]
Rnd 2: (sc, inc) around. [6] (2 inc → 4 + 2 = 6 ✓)
Rnd 3: (2 sc, inc) around. [8] (2 inc → 6 + 2 = 8 ✓)
Rnd 4: sc around. [8]
FO, leave tail. Do not stuff (flat triangle).
Inner ear (optional, Color B, make 2)
Ch 3, sc in 2nd ch from hook, hdc in last ch. FO. Sew onto front of each ear.
Body (Color A, oval)
Ch 6.
Rnd 1: sc in 2nd ch from hook, sc in next 3 ch, 3 sc in last ch; working along opposite side of ch, sc in next 3, 2 sc in last (same as starting ch). [12]
Rnd 2: inc, 3 sc, inc × 3, 3 sc, inc × 2. [18] (6 inc → 12 + 6 = 18 ✓)
Rnd 3: sc, inc, 3 sc, (sc, inc) × 3, 3 sc, (sc, inc) × 2. [24] (6 inc → 18 + 6 = 24 ✓)
Rnd 4: 2 sc, inc, 3 sc, (2 sc, inc) × 3, 3 sc, (2 sc, inc) × 2. [30] (6 inc → 24 + 6 = 30 ✓)
Rnds 5–10: sc around. [30] (6 rnds)
Rnd 11: (3 sc, inv-dec) around. [24] (6 dec → 30 − 6 = 24 ✓)
Rnd 12: sc around. [24]
Stuff firmly, slightly oval (longer front-to-back).
Rnd 13: (2 sc, inv-dec) around. [18] (6 dec → 24 − 6 = 18 ✓)
Rnd 14: (sc, inv-dec) around. [12] (6 dec → 18 − 6 = 12 ✓)
Rnd 15: inv-dec around. [6]
FO, close hole.
Belly patch (Color B)
Ch 7.
Row 1: sc in 2nd ch from hook and each ch across. [6]
Rows 2–5: ch 1, turn, sc across. [6]
FO, leave tail. Sew centered on front of body.
Legs (make 4, Color A)
Rnd 1: 6 sc in MR. [6]
Rnd 2: (sc, inc) around. [9] (3 inc → 6 + 3 = 9 ✓)
Rnds 3–5: sc around. [9]
Stuff lightly. FO, leave tail.
Tail (Color A, tip Color B)
With B:
Rnd 1: 4 sc in MR. [4]
Rnd 2: (sc, inc) around. [6]
Rnd 3: sc around. [6]
Switch to A.
Rnds 4–8: sc around. [6]
Stuff lightly. FO, leave tail.
Assembly
- Sew muzzle to lower front of head (covering Rnds 7–10 area). Embroider a tiny smile and, if no safety eyes, two French-knot or satin-stitch eyes in C.
- Sew ears to top of head, slightly angled outward, spanning about Rnds 3–5.
- Sew head to the narrow top of the body, slightly forward so the fox sits.
- Sew four legs under the body: two front, two back, so it sits stably.
- Sew tail to the back, slightly to one side.
- Weave all ends. Steam-block cotton very lightly if needed; do not crush stuffing.
Finishing notes
Work tightly so cotton does not show stuffing. Invisible decreases keep the face smooth. For children under 3 years, embroider eyes instead of safety eyes.
Disclaimer: This pattern was generated by AI and should be reviewed for accuracy before use. While we strive for quality, AI-generated content may contain errors. Please verify measurements, stitch counts, charts, and instructions before beginning your project. Generated by purlJam.uk
Love this pattern?
Save this pattern to your free PurlJam libraryAccess your pattern anytime
Bookmark this page to access your pattern anytime