Type
Crochet
Difficulty
beginner
Category
amigurumi
AI Thinking Process
Planning
Verification
Pattern
Simple Crochet Pheasant Plush (Long Tail)
Finished size: Approximately 12" (30 cm) long from beak tip to tail tip
Difficulty: Beginner
Yarn weight: Worsted (4)
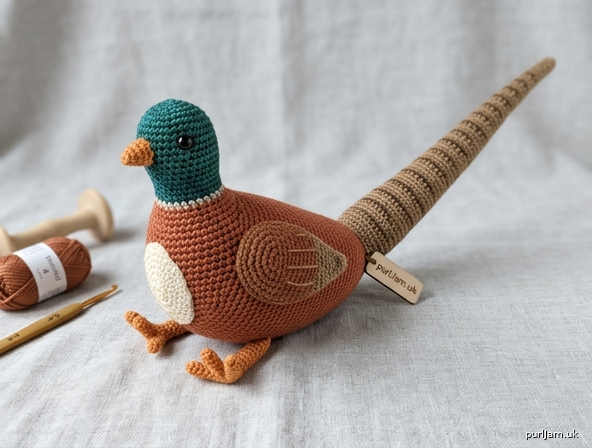
A friendly, simplified pheasant made from basic amigurumi shapes—perfect for first-time toy makers. The long tapered tail is the star feature and brings the overall length to about 30 cm.
Materials
- Worsted weight yarn (US 4):
- Main body color (e.g., copper/brown/russet): ~80 yd (73 m)
- Head/neck accent (e.g., iridescent green or dark brown): ~30 yd (27 m)
- Tail (e.g., long barred brown/tan or matching body): ~40 yd (37 m)
- Beak & legs (e.g., orange or yellow): small amount
- Optional wing accent or breast: small amount of cream or lighter brown
- US E-4 (3.5 mm) crochet hook (or size needed to obtain firm fabric; go down 1–2 sizes from yarn label)
- Fiberfill stuffing
- Yarn needle
- Stitch marker
- Optional: 6–9 mm safety eyes or black embroidery thread for eyes
- Scissors
- Pins for assembly
Abbreviations (US terms)
- ch: chain
- sc: single crochet
- inc: increase (2 sc in same stitch)
- dec: invisible decrease (sc2tog through front loops)
- st(s): stitch(es)
- rnd(s): round(s)
- MR: magic ring
- FO: fasten off
- [ ]: total stitches at end of round
- ( ) × n: repeat instructions in parentheses n times
Gauge
5 sc × 5 rnds = 1" (2.5 cm) in continuous rounds with E-4 hook.
Work tightly so stuffing does not show. Exact gauge is less critical than firm fabric; adjust hook if needed.
Pattern Notes
- Work in continuous spirals unless stated. Do not join rounds; mark the first stitch of each round with a stitch marker and move it up.
- Stuff firmly as you go, especially the body, but keep the tail lightly stuffed or un-stuffed so it drapes elegantly.
- Invisible decrease keeps the surface smooth.
- Color changes: finish the last stitch of the old color, switch to new color on the final yarn-over.
- All pieces are made separately then sewn together.
Head (make 1 – accent color)
Rnd 1: 6 sc in MR [6]
Rnd 2: inc in each st [12] (6 inc → 6 + 6 = 12 ✓)
Rnd 3: (sc, inc) around [18] (6 inc → 12 + 6 = 18 ✓)
Rnd 4: (2 sc, inc) around [24] (6 inc → 18 + 6 = 24 ✓)
Rnds 5–8: sc around [24] (4 rounds)
Rnd 9: (2 sc, dec) around [18] (6 dec → 24 – 6 = 18 ✓)
Insert safety eyes between Rnds 5–6, about 6–7 sts apart (or embroider later).
Stuff firmly.
Rnd 10: (sc, dec) around [12] (6 dec → 18 – 6 = 12 ✓)
Rnd 11: dec around [6] (6 dec → 12 – 6 = 6 ✓)
FO, leaving a long tail. Thread yarn through remaining 6 sts and pull closed. Weave in end.
Beak (make 1 – orange/yellow)
Rnd 1: 4 sc in MR [4]
Rnd 2: (sc, inc) around [6] (2 inc → 4 + 2 = 6 ✓)
Rnd 3: sc around [6]
FO, leaving a long tail for sewing. Lightly stuff or leave unstuffed. Sew to front of head centered between eyes, slightly overlapping lower face.
Body (make 1 – main body color)
Rnd 1: 6 sc in MR [6]
Rnd 2: inc in each st [12]
Rnd 3: (sc, inc) around [18]
Rnd 4: (2 sc, inc) around [24]
Rnd 5: (3 sc, inc) around [30] (6 inc → 24 + 6 = 30 ✓)
Rnds 6–14: sc around [30] (9 rounds – creates elongated oval body ~3–3.5")
Rnd 15: (3 sc, dec) around [24] (6 dec → 30 – 6 = 24 ✓)
Rnd 16: (2 sc, dec) around [18]
Stuff firmly, shaping into a plump oval.
Rnd 17: (sc, dec) around [12]
Rnd 18: dec around [6]
FO, close hole as for head. Leave long tail for sewing head on if desired.
Optional breast patch: with cream yarn, embroider a few straight stitches or surface-slip-stitch a small oval on the lower front of the body before assembly.
Wings (make 2 – main color or slightly darker)
Work flat in rows.
Row 1: ch 9, sc in 2nd ch from hook and each ch across [8]
Rows 2–4: ch 1, turn, sc across [8]
Row 5: ch 1, turn, dec, sc 4, dec [6]
Row 6: ch 1, turn, dec, sc 2, dec [4]
Row 7: ch 1, turn, (dec) twice [2]
FO, leaving long tail. Wings are unstuffed. Optional: add 2–3 surface slip-stitch “feather lines” in a contrasting shade.
Legs (make 2 – orange/yellow)
Rnd 1: 6 sc in MR [6]
Rnds 2–5: sc around [6] (4 rounds)
FO, leaving long tail. Stuff lightly. For simple feet, embroider 2–3 short straight stitches at the open end or crochet a tiny 3-sc picot foot if desired.
Long Tail (make 1 – tail color; this creates the signature length)
The tail is a long, gently tapered tube.
Rnd 1: 6 sc in MR [6]
Rnd 2: (sc, inc) around [9] (3 inc → 6 + 3 = 9 ✓)
Rnds 3–6: sc around [9]
Rnd 7: (2 sc, inc) around [12] (3 inc → 9 + 3 = 12 ✓)
Rnds 8–20: sc around [12] (13 rounds)
Rnd 21: (2 sc, dec) around [9] (3 dec → 12 – 3 = 9 ✓)
Rnds 22–30: sc around [9] (9 rounds)
Rnd 31: (sc, dec) around [6] (3 dec → 9 – 3 = 6 ✓)
Rnds 32–38: sc around [6] (7 rounds)
FO, leaving a very long tail for sewing. Stuff the widest (base) portion lightly; leave the outer half empty or barely stuffed so the tail remains flexible and long (~7–8" / 18–20 cm).
Optional barring: with a darker or lighter scrap, embroider or surface-slip-stitch a few short horizontal dashes along the tail for classic pheasant markings.
Assembly
- Pin head to the narrower/front end of the body. Sew securely with matching yarn, adding a tiny bit more stuffing at the neck join if needed for a smooth transition.
- Sew beak centered on the face.
- Position wings on either side of the body, slightly angled backward. Pin and sew along the top edge only so they can lift a little.
- Sew legs to the underside of the body, spaced evenly so the bird sits or stands stably.
- Attach the wide base of the long tail to the rear of the body, centered and slightly underslung. Sew firmly all around. The free length of the tail should bring the overall measurement (beak to tip) to approximately 12" (30 cm). Adjust sewing position or add a couple of extra plain rounds to the tail if you need a little more length.
- Embroider eyes if not using safety eyes (small black French knots or satin stitches). Add optional eyebrow or cheek marks with a few straight stitches.
- Weave in all ends securely on the inside or under pieces.
Finishing
- Steam-block gently if desired (do not crush the stuffing).
- Check that the tail hangs straight and the bird balances.
- For a hanging ornament or mobile, sew a small loop of yarn to the back.
Customization Tips
- Larger pheasant: add 1–2 more increase rounds on body (to 36 sts) and extra even rounds on tail.
- Smaller: stop body increases at 24 sts and shorten tail even rounds.
- Color play: traditional ring-necked look = copper body, green head, white neck ring (embroider or crochet a short white round between head and body), long barred tail.
- No-sew option for wings/legs: crochet them directly onto the body with surface stitches, but sewing gives cleaner beginner results.
Your simple long-tailed pheasant is ready! Enjoy your new plush friend.
Disclaimer: This pattern was generated by AI and should be reviewed for accuracy before use. While we strive for quality, AI-generated content may contain errors. Please verify measurements, stitch counts, charts, and instructions before beginning your project. Generated by purlJam.uk
Love this pattern?
Save this pattern to your free PurlJam libraryAccess your pattern anytime
Bookmark this page to access your pattern anytime