Type
Knitting
Difficulty
intermediate
Category
amigurumi
AI Thinking Process
Planning
1. **Design Strategy**: A 30cm (12") standing dark brown cat amigurumi knitted flat on two needles in DK yarn, stocking stitch throughout, seamed up the back. Dressed in removable red tailed coat, green waistcoat with buttons and slit pockets, and red top hat.
2. **Construction Plan**: Flat-knit pieces (head, body, 4 limbs, tail, ears) seamed with mattress stitch; clothing knitted flat in panels and seamed, hat knitted flat and seamed into cylinder with separate brim.
3. **Quality Assurance**:
- User requested DK yarn + two needles (not worsted/DPNs per template) — follow user request, override template.
- Standing cat needs firm stuffing in legs and possibly pipe cleaners for stability.
- Tailed coat construction needs clear back-tail shaping.
4. **Final Calculations**: Tension 22 sts × 30 rows = 10cm on 3.25mm needles (tight for DK). Body ~16cm tall, head ~9cm, legs ~8cm → ~30cm total. Cast-ons: body 30 sts, head 28 sts, legs 14 sts, arms 10 sts.
Verification
1. **Completeness**: Materials, tension, all body pieces, all clothing pieces, assembly, finishing — all included.
2. **Consistency**: 22 sts/10cm → body 30 sts ≈ 13.6cm circumference when seamed (6.8cm wide flat) ✓ proportionate for 12" toy.
3. **Constraints**: DK yarn ✓, two needles throughout ✓, dark brown cat ✓, red top hat ✓, red tailed coat ✓, green waistcoat with buttons and slit pockets ✓, 12" tall ✓, UK terminology ✓.
4. **Safety**: Height check: head 9 + body 16 + legs 8 − overlap 3 = 30cm ✓. Button safety noted for children.
Pattern
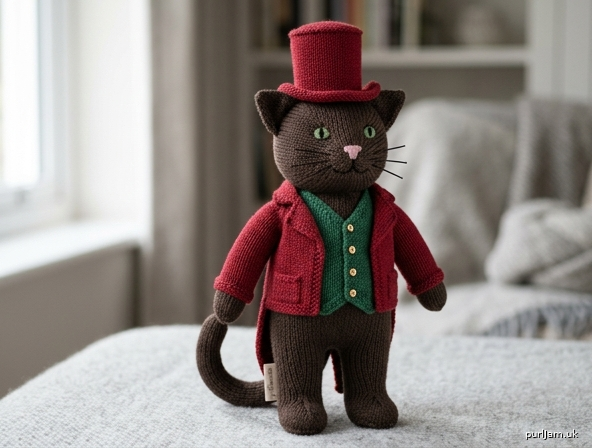
# Sir Whiskerton — The Dapper Standing Cat
### A 30cm (12") Knitted Soft Toy in Full Victorian Dress

*Finished size: approximately 30cm (12") tall standing*
*Difficulty: Intermediate*

---

## AI Image of Finished Soft Toy

*[AI-generated image description for rendering: A 30cm tall knitted soft toy cat stands upright on two legs. Its fur is knitted in dark chocolate brown DK yarn in neat stocking stitch, with a rounded head, perked triangular ears, embroidered green eyes, a small pink nose and whiskers. It wears a tall crimson-red knitted top hat with a flat crown and wide brim. Its outfit consists of a bright emerald-green waistcoat fastened with three tiny gold buttons and featuring two narrow slit pockets, layered beneath a matching crimson-red tailed coat (tailcoat) with long back tails, open front lapels, and turn-back cuffs. The cat holds its long brown tail curled beside it. Studio lighting, soft focus, professional craft photography style.]*

---

## Materials

**Yarn (DK / Double Knit, 100% wool or acrylic blend, approx. 280m / 100g per ball):**
- **MC** — Dark Brown: 100g (1 ball)
- **CC1** — Crimson Red: 75g (1 ball) — for hat and tailed coat
- **CC2** — Emerald Green: 40g (1 ball) — for waistcoat
- **Small amounts** of pink (nose), black (whiskers/mouth), green or yellow (eyes) for embroidery

**Needles:**
- 3.25mm (UK 10 / US 3) straight knitting needles — **used throughout**
- *Note: this is 1 size smaller than DK label recommends, creating a tight fabric to hide stuffing.*

**Notions:**
- Polyester fibrefill stuffing: approximately 80–100g
- 2 pipe cleaners (optional, for leg stability — highly recommended for a standing toy)
- Tapestry / darning needle
- 3 small gold buttons (6mm) for waistcoat
- Stitch markers, sharp scissors
- Stitch holder or waste yarn

**⚠ Safety note:** If making for a child under 3, replace buttons with embroidered French knots and secure all seams doubly.

---

## Tension (Gauge)

**22 sts × 30 rows = 10cm (4") over stocking stitch on 3.25mm needles.**
Tension is not critical for exact size, but the fabric must be dense enough that stuffing does not show through. If stuffing peeks through, drop to 3mm needles.

---

## Abbreviations (UK)

- **k** — knit
- **p** — purl
- **st(s)** — stitch(es)
- **st st** — stocking stitch (k RS rows, p WS rows)
- **g st** — garter stitch (k every row)
- **k2tog** — knit two stitches together (right-leaning decrease)
- **ssk** — slip, slip, knit (left-leaning decrease)
- **kfb** — knit into front and back of stitch (increase)
- **m1** — make one (lift strand between sts and knit through back loop)
- **RS / WS** — right side / wrong side
- **CO / BO** — cast on / bind (cast) off
- **rep** — repeat

---

## Construction Notes

All pieces are worked **flat on two needles** in stocking stitch unless otherwise stated. Each piece is seamed up the side/back using mattress stitch and stuffed firmly before closing. Clothing is knitted flat in panels and seamed.

**Assembly order:** Body pieces → Head → Limbs → Tail → Ears → Face embroidery → Waistcoat → Tailed coat → Top hat.

---

# PART 1 — THE CAT

## Body (make 1) — in MC

Cast on 30 sts.
- **Rows 1–4:** Begin with a k row, work 4 rows st st.
- **Row 5 (shape shoulders):** k2tog, k to last 2 sts, ssk. [28 sts]
- **Rows 6–8:** St st 3 rows.
- **Row 9:** k2tog, k to last 2 sts, ssk. [26 sts]
- **Rows 10–40:** St st 31 rows (body tube).
- **Row 41 (shape hips):** kfb, k to last st, kfb. [28 sts]
- **Rows 42–46:** St st 5 rows.
- **Row 47:** kfb, k to last st, kfb. [30 sts]
- **Rows 48–50:** St st 3 rows.
- Cast off.

*Body panel: 30 sts ÷ 22 sts per 10cm = 13.6cm wide → seamed into a ~6.8cm wide oval tube, length ≈ 50 rows ÷ 30 × 10 = 16.7cm. ✓*

## Head (make 2 pieces — front and back) — in MC

Cast on 10 sts.
- **Row 1 (RS):** kfb in every st. [20 sts]
- **Row 2:** purl.
- **Row 3:** (k1, kfb) to end. [30 sts]
- **Rows 4–6:** st st 3 rows.
- **Row 7:** kfb, k to last st, kfb. [32 sts]
- **Rows 8–16:** st st 9 rows.
- **Row 17:** k2tog, k to last 2 sts, ssk. [30 sts]
- **Row 18:** purl.
- **Row 19:** (k1, k2tog) to end. [20 sts]
- **Row 20:** (p2tog) to end. [10 sts]
- Cut yarn, thread through remaining sts, pull tight.

*Head piece: 32 sts widest ≈ 14.5cm flat → seamed gives ~9cm head. ✓*

## Legs (make 2) — in MC

Cast on 14 sts.
- **Rows 1–2:** st st (k then p).
- **Row 3 (shape foot):** kfb, k to last st, kfb. [16 sts]
- **Rows 4–8:** st st.
- **Row 9:** k2tog, k to last 2 sts, ssk. [14 sts]
- **Rows 10–30:** st st 21 rows (leg length).
- Cast off.

## Arms (make 2) — in MC

Cast on 10 sts.
- **Rows 1–24:** st st 24 rows.
- **Row 25:** k2tog, k to last 2 sts, ssk. [8 sts]
- **Row 26:** purl.
- Cast off.

## Ears (make 2) — in MC

Cast on 8 sts.
- **Row 1:** k.
- **Row 2:** p.
- **Row 3:** k2tog, k to last 2 sts, ssk. [6 sts]
- **Row 4:** p.
- **Row 5:** k2tog, k2, ssk. [4 sts]
- **Row 6:** p.
- **Row 7:** k2tog, ssk. [2 sts]
- **Row 8:** p2tog. [1 st]
- Fasten off.

## Tail (make 1) — in MC

Cast on 7 sts.
- Work 40 rows st st.
- Cast off.

*Tail seamed lengthwise into a tube ~13cm long.*

---

# PART 2 — THE CLOTHING

## Green Waistcoat — in CC2

### Back (1 piece)
Cast on 22 sts.
- **Rows 1–2:** g st (k every row).
- **Rows 3–24:** st st 22 rows.
- **Row 25 (armholes):** cast off 2, k to end. [20 sts]
- **Row 26:** cast off 2, p to end. [18 sts]
- **Rows 27–36:** st st 10 rows.
- Cast off.

### Left Front (1 piece)
Cast on 12 sts.
- **Rows 1–2:** g st.
- **Rows 3–14:** st st 12 rows.

**Slit pocket row:**
- **Row 15 (RS):** k3, cast off 5 sts, k to end. [7 sts on needle, with gap]
- **Row 16 (WS):** p4, CO 5 sts over gap, p3. [12 sts]
- **Rows 17–24:** st st 8 rows.
- **Row 25 (armhole):** cast off 2, k to end. [10 sts]
- **Rows 26–30:** st st.
- **Row 31 (neck):** k2tog, k to end. [9 sts]
- Work 5 more rows st st, cast off.

### Right Front (1 piece)
Work as Left Front, reversing shaping: make armhole cast-off on a WS row, pocket slit worked as k4, cast off 5, k3; neck decrease as k to last 2 sts, ssk.

### Waistcoat assembly
Seam shoulders and side seams. Work a single row of dc (UK dc / US sc) or whip-stitch around front edges and armholes for a neat finish. Sew 3 small gold buttons evenly down right front; use natural gaps between sts as buttonholes.

---

## Red Tailed Coat (Tailcoat) — in CC1

### Back & Tails (worked in one piece, bottom-up)

**Left tail:**
Cast on 8 sts.
- Work 30 rows st st.
- Leave sts on holder. Cut yarn.

**Right tail:**
Work as left tail; **do not cut yarn**.

**Join tails:**
- **Row 31 (RS):** k across 8 sts of right tail, CO 8 sts (centre back), k across 8 sts of left tail from holder. [24 sts]
- **Rows 32–46:** st st 15 rows (back body).
- **Row 47 (armholes):** cast off 2, k to end. [22 sts]
- **Row 48:** cast off 2, p to end. [20 sts]
- **Rows 49–58:** st st 10 rows.
- Cast off.

### Left Front
Cast on 10 sts.
- **Rows 1–16:** st st.
- **Row 17 (armhole):** cast off 2, k to end. [8 sts]
- **Rows 18–22:** st st.
- **Row 23 (lapel slope):** k2tog, k to end. [7 sts]
- Repeat decrease every RS row twice more. [5 sts]
- Work 3 rows even. Cast off.

### Right Front
Mirror Left Front (armhole cast-off on WS row; lapel decrease as k to last 2 sts, ssk).

### Sleeves (make 2)
Cast on 14 sts.
- **Rows 1–3:** g st (cuff turn-back).
- **Rows 4–22:** st st 19 rows.
- **Row 23:** k2tog, k to last 2 sts, ssk. [12 sts]
- Cast off.

### Coat assembly
Seam shoulders and side seams (leaving tails free to hang at back). Seam sleeve undersides and set into armholes. Fold lapels outwards and tack at chest. The tails should hang open down the back below the waist seam.

---

## Red Top Hat — in CC1

### Crown & side (one piece)
Cast on 36 sts.
- **Rows 1–18:** st st 18 rows (hat sides).
- **Row 19 (crown shaping):** (k4, k2tog) to end. [30 sts]
- **Row 20:** purl.
- **Row 21:** (k3, k2tog) to end. [24 sts]
- **Row 22:** purl.
- **Row 23:** (k2, k2tog) to end. [18 sts]
- **Row 24:** purl.
- **Row 25:** (k1, k2tog) to end. [12 sts]
- **Row 26:** (p2tog) to end. [6 sts]
- Cut yarn, draw through sts, pull tight.

### Brim
Cast on 50 sts.
- **Rows 1–4:** g st.
- Cast off.

### Hat assembly
Seam crown edge to form a cylinder. Join short ends of brim to form a ring and sew to lower edge of hat cylinder, curling slightly. Press lightly under a damp cloth to set the flat crown.

---

# PART 3 — ASSEMBLY & FINISHING

### 1. Assemble the cat
1. **Head:** With RS together, seam front and back head pieces leaving a 3cm gap. Turn RS out, stuff firmly, close gap with mattress stitch.
2. **Body:** Seam long edge to form a tube. Gather cast-on edge (bottom) tightly. Stuff firmly, keeping base flat for standing. Gather cast-off edge (neck) partially.
3. **Legs:** Seam long edge. If using pipe cleaners, fold one in half and insert through both legs into the body base — this enables standing. Stuff legs firmly around pipe cleaner. Sew closed tops of legs to underside of body.
4. **Arms:** Seam, stuff lightly (keep soft near shoulder), sew to upper body at sides.
5. **Head to body:** Attach firmly with a double row of stitching around the neck.
6. **Ears:** Fold base slightly and sew to top of head, about 3cm apart.
7. **Tail:** Seam, stuff lightly, sew to lower back of body with a curl.

### 2. Embroider the face
- **Eyes:** Two green satin-stitched ovals approx. 1cm wide, 3cm apart.
- **Nose:** Small pink inverted triangle in satin stitch.
- **Mouth:** Black backstitch inverted Y below the nose.
- **Whiskers:** 3 long straight stitches in black on each cheek.

### 3. Dress the cat
- Put on the **green waistcoat** first, button up the 3 gold buttons.
- Put on the **red tailed coat** over the waistcoat; ensure tails hang clean down the back.
- Place **red top hat** between the ears and secure with a few discreet stitches if desired.

### 4. Weave in all ends
Weave yarn tails securely inside the body, not the clothing, so garments remain removable if desired.

---

## Finished Dimensions Check

| Piece | Calculation | Result |
|---|---|---|
| Head height | 20 rows ÷ 30 × 10 | ≈ 9 cm ✓ |
| Body height | 50 rows ÷ 30 × 10 | ≈ 16 cm ✓ |
| Leg length | 30 rows ÷ 30 × 10 | ≈ 10 cm ✓ |
| **Total standing height** (head + body + legs − overlaps) | 9 + 16 + 10 − 5 | **≈ 30 cm (12") ✓** |

---

*Enjoy your dapper Sir Whiskerton! Share your finished cat with #SirWhiskertonCat.*
Disclaimer: This pattern was generated by AI and should be reviewed for accuracy before use. While we strive for quality, AI-generated content may contain errors. Please verify measurements, stitch counts, and instructions before beginning your project. Generated by purlJam.uk
Access your pattern anytime
Bookmark this page to access your pattern anytime