Type
Crochet
Difficulty
intermediate
Category
amigurumi
AI Thinking Process
Planning
Verification
Pattern
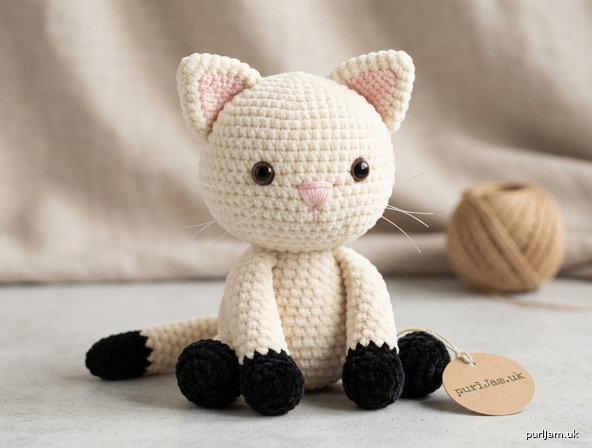
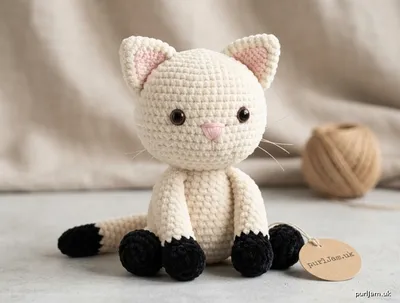
Sitting Cream Kitten
Amigurumi Crochet Pattern (US Terms)
Skill level: Intermediate
Construction: Hand-crocheted amigurumi in continuous single-crochet spirals (not joined, not turned, not machine-knit). Pieces are made separately and sewn.
Pose: Seated upright. Front paws rest flat on the ground in front of the body. Tail curls around and lies flat beside one hip.
Finished Size
Approximately 4½ inches (11.5 cm) tall when seated and 3½ inches (9 cm) wide across the hips, including paws. Head is about 2 inches (5 cm) in diameter (roughly 40% of seated height). Size will vary slightly with chenille loft, stuffing firmness, and hook size.
Materials
Yarn — worsted-weight (4) plush, velvet, or chenille-style yarn (soft halo; not cotton, not acrylic worsted with high stitch definition):
- Color A (cream / off-white): 60 yd (55 m) — head, body, legs, ear outer, tail base
- Color B (black): 20 yd (18 m) — paw socks, tail tip
- Color C (pale pink): 8 yd (7 m) — inner ears, nose
Suggested yarns: Yarn Bee Velvety Smooth, Himalaya Dolphin Fine, or any worsted plush/chenille that gives the gauge below.
Hook: US G-6 / 4.0 mm for a dense, gap-free fabric. If stuffing shows through, switch to US E-4 / 3.5 mm. Go down from the yarn-label hook; amigurumi must be tight.
Notions:
- 10 mm round safety eyes in dark brown or black (12 mm for an extra-large look)
- Polyester fiberfill
- Stitch marker
- Yarn needle (blunt, large eye)
- Straight pins
- Scissors
- Clear fishing line (6–10 lb / 0.25–0.30 mm) or white embroidery floss, for whiskers
- Optional: small amount of black embroidery floss for mouth; dry pastel or makeup blush for cheeks
Safety note: Safety eyes and fishing-line whiskers are not suitable for children under 3. For a baby-safe toy, embroider the eyes in Color B and omit fishing line (use floss whiskers stitched through and knotted inside).
Gauge
5 sc and 5 rnds = 1 inch (2.5 cm) in single crochet in the round, worked tightly with US G-6 / 4.0 mm and plush worsted.
Chenille halo adds bulk; the stuffed toy will read slightly larger than the stitch fabric alone. Match density (no visible holes) rather than exact stitch count. If your swatch is looser than 5 sc = 1 inch, drop to 3.5 mm.
Abbreviations (US)
- MR — magic ring (adjustable ring)
- ch — chain
- sc — single crochet
- hdc — half double crochet
- dc — double crochet
- tr — treble crochet
- inc — increase (2 sc in the same stitch)
- dec — invisible decrease: insert hook in front loop only of the next 2 stitches, yarn over, pull through both loops, yarn over, pull through 2
- sl st — slip stitch
- st(s) — stitch(es)
- rnd(s) — round(s)
- FO — fasten off
- ( ) — work the stitches in parentheses the number of times stated
- [ ] — stitch count at the end of the round
Pattern Notes
- Work in a continuous spiral. Do not join rounds and do not turn. Place a stitch marker in the first stitch of every round and move it up as you go. Chenille hides stitch definition; counting without a marker will cause missed increases.
- The right side is the outside of the spiral (the side facing you as you crochet).
- Invisible decrease is required so the fabric stays smooth.
- Stuff as you go. Head and body are stuffed firmly (firm-but-squishy). Limbs are stuffed firmly in the black paw and lightly in the cream leg. Tail is stuffed very lightly so it can curl.
- Weave chenille ends to the inside and bury them in the stuffing. Chenille does not frog cleanly — avoid ripping back.
- Color changes for the black “socks” and tail tip are crocheted, not glued or embroidered. See Color Change, below.
- Numbers in parentheses after a round (for example, 6 inc → 6 + 6 = 12 ✓) confirm the new stitch count.
Color Change (Paw Socks and Tail Tip)
Work the last sc of the old color until 2 loops remain on the hook. Yarn over with the new color and pull through both loops to complete that sc. Drop the old color. Work the following round entirely in the new color.
Make the change in the last stitch of the round so the jog sits at the back or underside. After one round in the new color, cut the old color, leaving 4 inches (10 cm), and bury the tail inside the piece.
Head
Color A. Start at the crown. Do not close the bottom — the 18-st opening is sewn to the body for a wide, almost neckless join.
Rnd 1: 6 sc in MR. [6]
Rnd 2: inc in each st around. (6 inc → 6 + 6 = 12 ✓) [12]
Rnd 3: (sc, inc) 6 times. (6 inc → 12 + 6 = 18 ✓) [18]
Rnd 4: (2 sc, inc) 6 times. (6 inc → 18 + 6 = 24 ✓) [24]
Rnd 5: (3 sc, inc) 6 times. (6 inc → 24 + 6 = 30 ✓) [30]
Rnds 6–10: sc in each st around. [30] — 5 even rounds
Place eyes now, before the opening gets small: insert 10 mm safety eyes between Rnds 9 and 10, 7 stitches apart, centered on the face. This sits them wide and slightly low. Snap the washers on the inside. Do not wait until after stuffing.
Rnd 11: (3 sc, dec) 6 times. (6 dec → 30 − 6 = 24 ✓) [24]
Rnd 12: (2 sc, dec) 6 times. (6 dec → 24 − 6 = 18 ✓) [18]
Stuff the head firmly, pushing filling up into the crown so the sphere stays round. Add extra filling behind the eyes so they do not sink. FO, leaving a 12-inch (30 cm) tail for sewing. Leave the 18-st opening open.
Body
Color A. Start at the sitting base (bottom) and work toward the neck.
Rnd 1: 6 sc in MR. [6]
Rnd 2: inc in each st around. (6 inc → 6 + 6 = 12 ✓) [12]
Rnd 3: (sc, inc) 6 times. (6 inc → 12 + 6 = 18 ✓) [18]
Rnd 4: (2 sc, inc) 6 times. (6 inc → 18 + 6 = 24 ✓) [24]
Rnd 5: (3 sc, inc) 6 times. (6 inc → 24 + 6 = 30 ✓) [30]
Rnd 6: (4 sc, inc) 6 times. (6 inc → 30 + 6 = 36 ✓) [36]
Rnds 7–13: sc in each st around. [36] — 7 even rounds (plump belly and sitting seat)
Begin stuffing now. Pack the base very firmly so the kitten sits without rolling.
Rnd 14: (4 sc, dec) 6 times. (6 dec → 36 − 6 = 30 ✓) [30]
Rnd 15: (3 sc, dec) 6 times. (6 dec → 30 − 6 = 24 ✓) [24]
Rnd 16: (2 sc, dec) 6 times. (6 dec → 24 − 6 = 18 ✓) [18]
Finish stuffing firmly — the torso should feel dense and squishy, not baggy. FO, leaving a 12-inch (30 cm) tail. Leave the 18-st opening open (this matches the head).
Legs / Paws (make 4)
All four limbs use the same pattern. Color B for the sock, then Color A. The black section is a worked color-change round, not a glued or embroidered patch.
Rnd 1 (B): 6 sc in MR. [6]
Rnd 2 (B): inc in each st around. (6 inc → 6 + 6 = 12 ✓) [12]
Rnd 3 (B): sc in each st around. [12]
On the last sc of Rnd 3, change to Color A.
Rnds 4–7 (A): sc in each st around. [12] — 4 cream rounds
FO, leaving a 10-inch (25 cm) tail for sewing. Stuff the black paw firmly so it holds a rounded pad. Stuff the cream section lightly to moderately so the leg stays short and stubby and can be posed flat. Do not close the opening.
Tail
Start at the tip with Color B so the base is cream and the tip is a solid black “sock.”
Rnd 1 (B): 6 sc in MR. [6]
Rnds 2–5 (B): sc in each st around. [6] — 4 even black rounds
On the last sc of Rnd 5, change to Color A.
Rnds 6–14 (A): sc in each st around. [6] — 9 cream rounds
FO, leaving a 10-inch (25 cm) tail. Stuff very lightly — a thin pencil-line of fiberfill is enough. The tail must stay flexible so it can curl. Do not close the opening.
Ears (make 2)
Color A, worked in the round, then flattened into a tall triangle with a gently rounded tip. Do not stuff (or put a pinch of filling only at the base).
Rnd 1: 4 sc in MR. [4]
Rnd 2: (sc, inc) 2 times. (2 inc → 4 + 2 = 6 ✓) [6]
Rnd 3: (2 sc, inc) 2 times. (2 inc → 6 + 2 = 8 ✓) [8]
Rnd 4: (3 sc, inc) 2 times. (2 inc → 8 + 2 = 10 ✓) [10]
Rnd 5: (4 sc, inc) 2 times. (2 inc → 10 + 2 = 12 ✓) [12]
Rnds 6–7: sc in each st around. [12]
FO, leaving a 10-inch (25 cm) tail. Flatten the tube so Rnd 1 forms the rounded tip and the 12-st opening forms the base (6 sts at the front, 6 at the back). The long sides become the triangle.
Inner Ears (make 2)
Color C, worked flat.
Ch 5.
Row 1: sc in 2nd ch from hook, hdc in next ch, dc in next ch, tr in last ch. [4 sts]
FO, leaving an 8-inch (20 cm) tail. The piece is a small elongated triangle. Sew it to the inner (forward-facing) side of each flattened ear, tip toward the ear tip, using Color C and small whip stitches. Weave ends inside the ear.
(Alternative: skip the crocheted inner ear and satin-stitch a pale-pink triangle on the inner ear with Color C.)
Assembly
Pin every piece and stand the kitten on a table before sewing. The pose is sitting: bottom of the body, hind paws, and front paws should all rest on the same surface.
Use matching yarn and a yarn needle. Ladder stitch (mattress stitch) for the head–body join; whip stitch for limbs, ears, and tail. Keep stitches small and pull snug so chenille fibers hide the seam.
1. Head to body (minimal neck)
Match the 18-st body opening to the 18-st head opening, face forward. Add a last pinch of stuffing through the join so the neck does not dent. Ladder-stitch all 18 stitches, stitch-to-stitch. The join is wide on purpose — there is no skinny neck tube.
2. Ears
Pin ears on top of the head, inner edges 2 stitches apart at the crown, spanning approximately Rnds 3–7. Angle them slightly outward (about 10–15 degrees) so they read as alert, not folded. Whip-stitch the 12-st base through both layers of the flattened ear. The pink inner faces forward.
3. Hind legs
Pin the two hind legs to the lower sides of the body, openings against the body, centered around Body Rnds 5–9, slightly toward the back. The black paws point down and a little forward so the pads sit on the table and help the kitten sit. The legs should look short and tucked, not standing. Whip-stitch the 12-st openings in place. If a leg wants to splay, take 2–3 extra tacking stitches on the inner thigh.
4. Front legs
Pin the two front legs to the front of the body, centered around Body Rnds 8–12, about 4 stitches apart, so they extend straight forward. Rotate each leg so the black paw pad faces the table. The paws must rest flat on the ground directly in front of the body, at the same level as the sitting base. Whip-stitch the openings. Tack the first cream round of each front leg to the chest with 2–3 small stitches so the paws stay down and do not lift.
5. Tail
Pin the open cream end to the lower back, just above the sitting base (around Body Rnds 6–8), slightly off-center toward the hip you want the curl to rest on. Whip-stitch in place. Curve the tail around the hip so it lies flat on the table beside the body. Tack the black tip (and one or two points along the cream section) to the hip and/or the table-facing side of a hind leg with tiny Color A stitches. Do not stuff more — a stiff tail will not curl.
6. Face
Nose: With Color C, embroider a small triangle centered on the face, 2 rounds below the eyes (about Rnds 11–12 of the head). Use satin stitch or 3 straight stitches that meet at a lower point. Keep it small — about 2 stitches wide and 2 rounds tall.
Mouth (optional): With 1 strand of black floss, a tiny inverted Y or a single short stitch under the nose.
Cheeks (optional): Brush a little dry pastel or makeup blush onto the chenille beside the nose.
7. Whiskers
Use 6 to 8 strands (3 or 4 per cheek), clear fishing line or white embroidery floss, about 2 inches (5 cm) long after trimming.
Thread a strand on a yarn needle. Enter from the inside of the head (or from the far cheek), exit at a cheek stitch beside the nose, level with or just below the nose, leave a long tail, take a tiny locking stitch in the same hole (or the next stitch), and exit again so two whiskers sit as a pair. Repeat for a second (and optional third) pair on that cheek, stacked slightly above and below. Mirror on the other cheek.
If using fishing line, a tiny overhand knot on the inside of the head, buried in stuffing, keeps the whiskers from pulling out. Trim all whiskers to an even 1½–2 inches (4–5 cm). They should read as long, fine, and slightly fanned.
Finishing
- Check that the kitten sits level. If it tips, add a little extra stuffing through a seam at the base, or take one tacking stitch between the two front paws.
- Snip any halo fibers caught in seams.
- Steam is not recommended on most chenille; shape with your hands only.
- Store stuffed toys out of direct sun so cream plush does not yellow.
Troubleshooting
| Issue | Fix |
|---|---|
| Stuffing shows through | Re-work that piece with a 3.5 mm hook; stuff in smaller pinches |
| Head looks pointed | Push more filling into Rnds 1–5 before the neck join |
| Kitten rolls | Pack Body Rnds 1–8 denser; splay hind paws a little wider |
| Front paws hover | Sew them lower on the chest and tack Rnd 4 of each leg to the body |
| Color-change jog is obvious | Rotate the start of the round to the underside of the paw/tail |
| Chenille splits | Use a blunt-tipped hook and do not yank the working yarn |
Yarn-Weight and Hook Recap
| Item | Spec |
|---|---|
| Yarn weight | Worsted (4), plush / velvet / chenille |
| Hook | US G-6 / 4.0 mm (US E-4 / 3.5 mm if gaps) |
| Gauge | 5 sc × 5 rnds = 1 inch (2.5 cm), tight sc in the round |
| Seated height | 4–5 inches (10–13 cm) |
| Head | 30 sts max, 12 rnds, 18-st neck opening |
| Body | 36 sts max, 16 rnds, 18-st neck opening |
This pattern is written for an experienced hand-crocheter comfortable with magic ring, invisible decrease, spiral rounds, clean color changes, and sewn amigurumi assembly. No machine-knitting steps are used.
Disclaimer: This pattern was generated by AI and should be reviewed for accuracy before use. While we strive for quality, AI-generated content may contain errors. Please verify measurements, stitch counts, charts, and instructions before beginning your project. Generated by purlJam.uk
Love this pattern?
Save this pattern to your free PurlJam libraryAccess your pattern anytime
Bookmark this page to access your pattern anytime