Type
Crochet
Difficulty
intermediate
Category
amigurumi
AI Thinking Process
Planning
Verification
Pattern
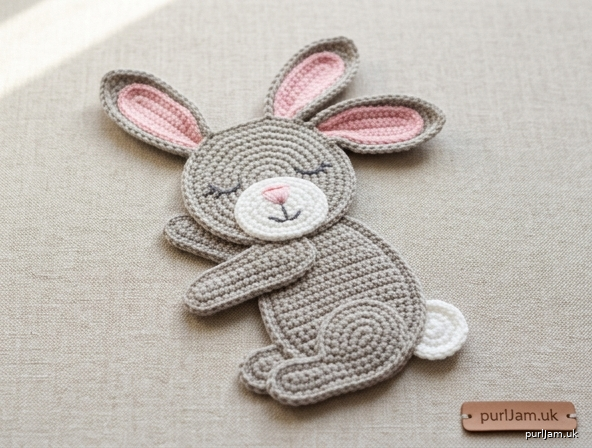
Sleeping Baby Bunny Appliqué
Advanced Crochet Pattern (Flat Amigurumi-Style)
Finished Size: Approximately 5" tall × 4" wide (12.5 cm × 10 cm)
Difficulty: Advanced
Yarn Weight: Worsted (4)
A sweet sleeping bunny appliqué worked with amigurumi techniques but constructed completely flat and unstuffed. Perfect for sewing onto baby blankets, onesies, bibs, or nursery décor. Dimensional layered ears, muzzle, and limbs give a soft 3-D look while remaining baby-safe.
Materials
- Worsted weight yarn (4):
– Main Color (MC): Soft gray or cream – 40 yd (37 m)
– Contrast Color (CC): White or pale pink – 15 yd (14 m)
– Accent: Light pink – 5 yd (5 m) for inner ears & nose - Hook: US E-4 (3.5 mm) – go down a size from yarn label for dense fabric
- Yarn needle
- Stitch marker
- Scissors
- Optional: Fabric glue or matching sewing thread for extra security on baby items
Gauge
5 sc = 1" (2.5 cm) worked tightly in continuous rounds.
Gauge is critical for a firm, non-gaping appliqué. Adjust hook if needed.
Abbreviations (US Terms)
- MR: magic ring
- sc: single crochet
- inc: 2 sc in same st
- invdec: invisible decrease (insert hook FLO of next 2 sts, yo, pull through both, yo, pull through 3 loops)
- BLO: back loop only
- FLO: front loop only
- ch: chain
- sl st: slip stitch
- st(s): stitch(es)
- rnd(s): round(s)
- FO: fasten off
- [ ]: total stitches at end of round
Pattern Notes
- Work in continuous spirals unless stated. Do not join rounds. Use stitch marker to mark first st of each rnd; move up each rnd.
- Keep tension tight so fabric is dense and holds shape without stuffing.
- All pieces are worked flat (no fiberfill).
- Color changes: work last yo of previous st in new color.
- Invisible decrease keeps surface smooth for appliqué.
- Weave in ends as you go on the wrong side.
- Safety first: embroider all facial features; sew every piece securely with multiple passes.
HEAD (MC)
Worked in continuous rounds to form a slightly flattened sphere shape.
Rnd 1: 6 sc in MR [6]
Rnd 2: inc in each st around [12]
Rnd 3: (sc, inc) around [18]
Rnd 4: (2 sc, inc) around [24]
Rnds 5–8: sc in each st around [24] (4 rnds even)
Rnd 9: (2 sc, invdec) around [18]
Rnd 10: (sc, invdec) around [12]
Rnd 11: invdec around [6]
FO, leaving 12" tail. Thread tail through FLO of remaining 6 sts and pull closed. Weave end to WS. Head measures ~2.25" diameter.
MUZZLE (CC)
Rnd 1: 6 sc in MR [6]
Rnd 2: inc in each st around [12]
Rnd 3: (sc, inc) around [18]
Rnd 4: sc in each st around [18]
FO, leaving 10" tail for sewing. Lightly flatten into oval.
EARS (make 2)
Outer Ear (MC)
Rnd 1: 6 sc in MR [6]
Rnd 2: inc in each st around [12]
Rnds 3–10: sc in each st around [12] (8 rnds)
Rnd 11: (sc, invdec) around [8]
FO, leaving 8" tail. Flatten ear into long oval; do not close bottom.
Inner Ear (Accent pink)
Ch 8.
Row 1: sc in 2nd ch from hook and each ch across [7]
Rows 2–3: ch 1, turn, sc across [7]
FO, leaving 6" tail. Sew centered onto outer ear with pink yarn, leaving 1-st border of MC visible. Flatten completed ear.
BODY (MC)
Creates a soft oval for the sleeping pose.
Rnd 1: 6 sc in MR [6]
Rnd 2: inc in each st around [12]
Rnd 3: (sc, inc) around [18]
Rnd 4: (2 sc, inc) around [24]
Rnd 5: (3 sc, inc) around [30]
Rnds 6–11: sc in each st around [30] (6 rnds even)
Rnd 12: (3 sc, invdec) around [24]
Rnd 13: (2 sc, invdec) around [18]
Rnd 14: (sc, invdec) around [12]
FO, leaving 14" tail. Thread through FLO of remaining 12 sts, pull gently to close into soft oval (do not close tightly—leave slight dome). Weave end to WS. Body ~2.75" wide × 2.5" tall.
ARMS (make 2 – MC)
Rnd 1: 6 sc in MR [6]
Rnd 2: (sc, inc) around [9]
Rnds 3–6: sc in each st around [9]
FO, leaving 8" tail. Flatten. Do not close opening.
FEET (make 2 – MC)
Rnd 1: 6 sc in MR [6]
Rnd 2: inc in each st around [12]
Rnds 3–4: sc in each st around [12]
FO, leaving 8" tail. Flatten into small oval.
TAIL (CC)
Rnd 1: 6 sc in MR [6]
Rnd 2: inc in each st around [12]
Rnd 3: sc in each st around [12]
FO, leaving 8" tail. Flatten into small pom-pom shape; run yarn through last rnd and cinch slightly for fluff.
Assembly
All sewing uses matching yarn tails and whip stitch or ladder stitch through both loops for invisible joins. Work from WS when possible. Pin every piece before sewing.
- Muzzle to Head: Center muzzle on lower half of head (covering rnds 6–10). Whip stitch around edge with CC tail.
- Facial Features (embroidery with Accent pink & MC):
– Nose: Satin-stitch a small inverted triangle (3–4 sts wide) at top center of muzzle.
– Mouth: With MC, embroider a gentle “Y” or curved smile below nose using backstitch (2–3 sts each side).
– Closed Sleeping Eyes: With MC, embroider two gentle curved lines (or tiny “U” shapes) above muzzle, spaced ~6 sts apart, between head rnds 5–6. Add 2–3 short eyelashes on outer edge of each eye if desired.
Keep stitches short and secure on WS; tie off firmly. - Ears to Head: Position ears at top of head (rnds 3–5), angled slightly outward and backward for sleeping look. Sew bottom 4 sts of each ear securely to head.
- Body Placement: Lay body flat. Position head overlapping top of body by ~½" (head sits slightly above body center). Sew neck edge of head to body with MC, adding 2–3 extra passes for strength.
- Arms: Splay arms horizontally along upper sides of body (sleeping pose). Sew open edges and long sides of arms to body so they lie flat.
- Feet: Position feet at bottom of body, slightly splayed outward and overlapping lower edge by ¼". Sew flat.
- Tail: Sew flattened tail to lower back/side of body so it peeks out cutely.
- Final Security: Weave all remaining ends to WS. For baby items, add a few extra whip stitches or a tiny dab of fabric glue under high-stress points (ears, head-body join). Steam-block lightly if needed (do not press flat—preserve gentle dimension).
Finishing
- Overall appliqué should lie reasonably flat with soft raised ears, muzzle, and limbs.
- Sew onto project with matching yarn or invisible thread, anchoring through all layers around the outer edge and at key stress points.
- Spot clean only.
Stitch Count Validation Summary
- Head: 6 → 12 → 18 → 24 (peak) → 18 → 12 → 6 ✓
- Body: 6 → 12 → 18 → 24 → 30 (peak) → 24 → 18 → 12 ✓
- Ears: 6 → 12 (even 8 rnds) → 8 ✓
- Muzzle: 6 → 12 → 18 ✓
- Arms: 6 → 9 ✓
- Feet: 6 → 12 ✓
All increases/decreases divisible and symmetrical.
Enjoy your adorable Sleeping Baby Bunny Appliqué—perfect for gifting or personalizing baby treasures!
Disclaimer: This pattern was generated by AI and should be reviewed for accuracy before use. While we strive for quality, AI-generated content may contain errors. Please verify measurements, stitch counts, charts, and instructions before beginning your project. Generated by purlJam.uk
Love this pattern?
Save this pattern to your free PurlJam libraryAccess your pattern anytime
Bookmark this page to access your pattern anytime