Type
Machine Knitting
Difficulty
intermediate
Category
hat
AI Thinking Process
Planning
Verification
Pattern
Sleeping Tabby Kitten
Machine-Knit Amigurumi-Style Plush · Intermediate
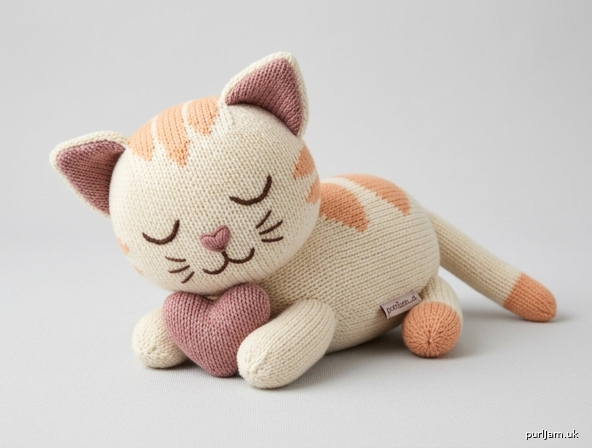
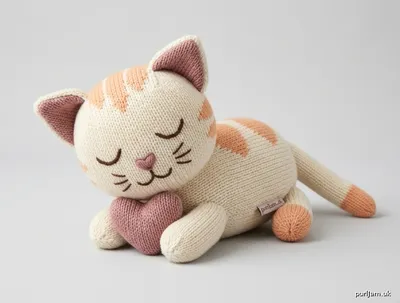
A loafing kitten in cream worsted with peach tabby patches, dusty-rose inner ears, and a small dusty-rose heart hugged between the front paws. Worked on any flat-bed machine (mid-gauge preferred); ribber is optional for seamless tubes. One size.
Inspired by crochet amigurumi proportions — oversized head, short stubby limbs, dense stuffing — but fully machine-knit.
Finished Measurements
- Head width, stuffed: about 3½" (9 cm)
- Body length (chest to hip): about 5½" (14 cm)
- Overall length, front paws to tail base: about 9" (23 cm)
- Overall length including tail: about 11" (28 cm)
- Heart pillow: about 1¼" (3 cm) across
- Height at head (chin on heart): about 3½–4" (9–10 cm)
Gauge (Tension Swatch — do this first)
Work a swatch before you cast on the kitten.
- Bring 40 needles to WP, centered (L20–R20).
- Cast on with waste yarn; knit 6 rows. Knit 1 row ravel cord. Set RC000.
- With MC at MT (T7 mid-gauge as a starting point; T5–6 bulky), e-wrap or knit-on, and knit 40 rows stockinette. COR. Hang claw weights at each end and at center; move them up every 20 rows.
- Bind off. Rest the swatch. Steam lightly; do not stretch.
- Measure the center 4" × 4" (10 × 10 cm).
Target gauge: 18 sts and 24 rows = 4" (10 cm) in stockinette at MT, measured after steaming.
- If you have more than 18 sts in 4", fabric is too tight — raise tension one click (e.g. T7 → T8) and reswatch.
- If you have fewer than 18 sts in 4", fabric is too loose (stuffing will show) — lower tension one click and reswatch.
- Row gauge may be 22–26 rows = 4"; if you are off by more than 2 rows, adjust MT or accept a slightly longer/shorter body and follow RC counts as written.
Firm fabric is mandatory. You should not see light through the swatch. If you do, drop MT one full number even if stitch gauge is exact.
Optional nubby surface (closer to amigurumi sc): a 1×1 tuck punchcard may be substituted only if you swatch in tuck and recast all stitch counts to the new gauge. The numbers below are for stockinette only.
Yarn (Worsted / Aran, CYC 4)
| Color | Role | Amount |
|---|---|---|
| MC Soft cream / ivory | Body, head, muzzle, most limbs, tail base, outer ears | 150 yd / 137 m (about 70 g) |
| CC1 Warm peachy-orange | Crown, ear bases, saddle patch, one hind foot, tail tip | 60 yd / 55 m (about 30 g) |
| CC2 Dusty rose-pink | Heart, inner ears, nose | 30 yd / 27 m (about 15 g) |
| CC3 Dark brown or black (worsted scrap or 6-strand floss) | Eyes, muzzle dots, whiskers, mouth | 5 yd / 5 m |
Use a soft acrylic or cotton-blend worsted that will not split badly on machine needles (e.g. Brava Worsted, Cotton-Ease, or similar). Slippery superwash can drop stitches off latches — avoid it for a first toy.
Notions
- Polyester fiberfill, about 2–3 oz (60–85 g)
- Tapestry needle
- Sharp embroidery needle
- Scrap cotton waste yarn in a contrast color, plus ravel cord (smooth nylon or crochet cotton)
- Matching sewing thread (cream, peach, rose) optional for face and heart
- Blocking pins and a towel
- Stitch markers or safety pins for pose assembly
Machine, Tools, and Settings
Machine: Mid-gauge flat bed (6.5 mm pitch) is the intended machine for worsted. A bulky (9 mm) machine will make a larger kitten unless you drop needle count; a standard-gauge (4.5 mm) bed is not recommended with worsted — the stitches will jam.
Optional ribber: Used only if you want tubular (seamless) body, head, paws, and tail. The written pattern is flat on the main bed, seamed up the underside, matching the construction of a flat-bed beanie body.
Required tools (used inside the instructions)
- Cast-on comb and wire
- Claw weights (4–6) and, if you have them, a ribber comb / large weight
- 1-prong and 2-prong transfer tools
- Latch tool
- Decker comb (optional, for even rehanging)
- Intarsia carriage or a second yarn mast / clips if you prefer knit-in patches; not required (duplicate stitch and appliqué are written as the default)
Default settings (Brother / Knitking / similar; Silver Reed: use equivalent cam positions)
| Dial / lever | Setting |
|---|---|
| Tension, main yarns (MC, CC1, CC2) | MT = T7 mid-gauge (tune to gauge) |
| Tension, waste yarn | T8 (one number looser than MT) |
| Tension, ravel cord | T6 (slightly snug so it pulls freely) |
| Cam / stitch dial | Stockinette (plain knit) |
| Side (part) levers | Both off (needles knit both directions) |
| Russel / holding levers | N (normal) unless a hold row is specified |
| Weaving brushes | Down if your machine needs them to seat the comb; otherwise up |
| Punchcard / electronics | None (plain stockinette) |
Carriage start: Unless a line says otherwise, each piece begins COR after the ravel-cord row, so the first MC row travels right → left.
Abbreviations
| MB | main bed |
| RB | ribber bed (optional) |
| WP | working position (needles out, latches open) |
| NWP | non-working position (needles back, out of work) |
| HP | holding position |
| COR / COL | carriage on right / left |
| RC | row counter |
| MT | main tension |
| WY | waste yarn |
| ndl(s) | needle(s) |
| st(s) | stitch(es) |
| EON | every other needle |
| BO | bind off (latch-tool or transfer bind-off) |
| CO | cast on |
Pattern Notes
- Center every piece on the bed. Needle counts assume a Brother-style numbering with no needle 0: L26–R26 = 52 ndls (26 + 26 ✓).
- Hang claw weights at both edges and every 10–12 stitches. Rehang every 20–30 rows so the work does not flare or drop a latch.
- Do not cut MC between cream pieces; you may break and rejoin at each piece if that is cleaner.
- Stuff firmly for head, paws, and heart; stuff the body slightly softer so it loafs flat on its belly.
- All facial features are embroidered. Do not use beads, buttons, or safety eyes if the toy could go to a child under 3.
- Steam only to set seams. Do not press the stuffed kitten flat.
Machine Setup (do this at the start of every piece)
- Bed: MB only. Ribber lowered / stored unless you are using the Optional Tubular Method.
- Needles: Push the stated needle range to WP; all other needles in NWP. Check that every latch is open.
- Cast-on comb: Hang the comb and wire under the WP needles.
- Waste yarn + ravel cord (closed start):
- Thread WY. Tension T8. Carriage COR.
- E-wrap right → left across all WP needles (or use your machine’s closed cast-on).
- Knit 6–8 rows WY. Hang claw weights on the comb.
- Cut WY. Thread ravel cord. Tension T6. Knit 1 row ravel cord. COL.
- Main yarn: Thread the color named in the piece. Tension MT. Set RC000. Carriage is COL after ravel cord; knit the first main-yarn row left → right so you end COR at RC001, or move the carriage to the right without knitting and e-wrap COR → COL, then knit. The instructions below assume: e-wrap COR → COL with main yarn, RC000, first knit row is COL → COR = RC001.
- E-wrap (main yarn): Starting COR, e-wrap each WP needle toward the left so the wrap sits in the hook. Hang two extra claw weights on the e-wrap row. Knit across (COL → COR). That knitted row is RC001.
PIECES
Knit in this order so you can stuff and assemble as you go: Body → Head → Ears → Paws & feet → Tail → Saddle patch → Heart → Nose.
1. Body (make 1 — MC cream)
Loaf tube. After seaming: 11½" (29 cm) circumference × 5⅔" (14.5 cm) long
(52 sts ÷ 18 sts × 4" = 11.56" ✓; 34 rows ÷ 24 rows × 4" = 5.67" ✓).
Needles: 52 ndls to WP, centered L26–R26 (26 + 26 = 52 ✓).
Setup: Follow Machine Setup with MC. RC000, COR after e-wrap, ready to knit.
| RC | Direction | Work |
|---|---|---|
| 000 | COR | E-wrap complete; weights hung |
| 001–034 | knit even | Stockinette, MC, MT. Rehang claw weights at RC010, RC020, RC030. End COR at RC034 |
RC034, COR. Latch-tool bind off loosely (or transfer-tool chain bind-off). Leave a 24" (60 cm) tail for the long seam.
Remove WY by pulling the ravel cord. The CO edge is open live-look loops (or a tidy e-wrap edge) — this is the chest end. The BO edge is the hip end.
Set body aside.
2. Head (make 1 — CC1 peach crown, then MC cream)
Tube gathered at both ends. After seaming: 10¼" (26 cm) circumference → stuffed diameter about 3¼–3½"
(46 sts ÷ 18 × 4" = 10.22" ✓; 10.22" ÷ 3.14 ≈ 3.25" ✓).
24 rows = 4" (10 cm) of height before gathering ✓ — slightly tall on purpose for an oversized amigurumi head.
Needles: 46 ndls to WP, L23–R23 (23 + 23 = 46 ✓).
Setup: Waste + ravel as usual. E-wrap with CC1 (peach). RC000.
| RC | Yarn | Work |
|---|---|---|
| 000 | CC1 | E-wrap, COR |
| 001–008 | CC1 peach | Stockinette. This peach block is the crown. Rehang weights at RC006. End COR at RC008 |
| 009 | change to MC | Knit 1 row MC to lock. COR |
| 010–024 | MC cream | Stockinette. Rehang weights at RC018. End COR at RC024 |
RC024, COR. Do not bind off. Break MC leaving 18" (45 cm). Thread a tapestry needle and take the 46 live stitches off the machine onto this yarn (or use a transfer tool onto a length of waste, then onto MC). Pull up loosely — this gathered end is the neck.
Remove ravel cord. Thread a second 18" (45 cm) MC (or CC1) tail through the peach CO loops and pull up firmly — this gathered end is the crown.
The peach sits on the crown and will show between the ears; the cream is the face and back of the head.
3. Outer Ears (make 2 — CC1 peach base, MC cream tips)
Pointed triangles. Base 8 sts = 1¾" (8 ÷ 18 × 4" = 1.78" ✓). About 2" tall after seaming to inner ear.
Needles: 8 ndls to WP, L4–R4 (4 + 4 = 8 ✓).
Setup: Waste + ravel. E-wrap CC1. Light claw weights on both edges. RC000.
| RC | Yarn | Shaping (always transfer with 1-prong tool, empty ndl to NWP) |
|---|---|---|
| 000 | CC1 | E-wrap, COR |
| 001–004 | CC1 | Knit even, 8 sts. Peach = ear base (sewn to head). End COR RC004 |
| 005 | change MC | Knit 1 row MC. COL at RC005 if you started COR… reset so RC005 ends COR by treating the color-change row as traveling COL→COR. Hang weights |
| 006, COR | MC | Dec 1 each side: transfer L4 onto L3; R4 onto R3. L4 & R4 to NWP. 6 sts remain (8 − 2 = 6 ✓). Knit 1 row. COL |
| 007 | MC | Knit 1 row even. COR |
| 008, COR | MC | Dec 1 each side: L3 onto L2; R3 onto R2. 4 sts remain (6 − 2 = 4 ✓). Knit 1 row. COL |
| 009 | MC | Knit 1 row even. COR |
| 010, COR | MC | Dec 1 each side: L2 onto L1; R2 onto R1. 2 sts remain (4 − 2 = 2 ✓). Knit 1 row. COL |
| 011–012 | MC | Knit 2 rows even on 2 sts. End COR RC012 |
Break MC, draw through 2 sts, pull up to a point. Remove ravel cord. Make 2.
4. Inner Ears (make 2 — CC2 dusty rose)
Slightly smaller lining.
Needles: 6 ndls, L3–R3 (3 + 3 = 6 ✓).
Setup: Waste + ravel. E-wrap CC2. RC000.
| RC | Shaping |
|---|---|
| 001–002 | Knit even, 6 sts |
| 003, COR | Dec 1 each side (L3 onto L2, R3 onto R2) → 4 sts (6 − 2 = 4 ✓). Knit 1 row |
| 004 | Knit 1 row even |
| 005, COR | Dec 1 each side → 2 sts (4 − 2 = 2 ✓). Knit 1 row |
| 006–008 | Knit even on 2 sts. Draw through and pull up |
Remove ravel cord. Make 2.
5. Front Paws (make 2 — MC cream)
Stubby tubes. 18 sts = 4" circumference → stuffed diameter about 1¼" (18 ÷ 18 × 4" = 4.00" ✓; 4" ÷ 3.14 ≈ 1.27" ✓). 12 rows = 2" long (12 ÷ 24 × 4" = 2.00" ✓).
Needles: 18 ndls, L9–R9 (9 + 9 = 18 ✓).
Setup: Waste + ravel. E-wrap MC. RC000.
Knit RC001–012 even, stockinette, MC, MT. Rehang a claw weight on each edge at RC006. End COR RC012.
Take 18 live sts off onto an 12" MC tail (paw pad end — will be gathered closed). Remove ravel cord; the CO edge is the leg end that sews to the chest. Make 2. Do not stuff yet.
6. Hind Foot, cream (make 1 — MC)
Needles: 14 ndls, L7–R7 (7 + 7 = 14 ✓).
14 sts = 3.1" circ → about 1" stuffed (14 ÷ 18 × 4" = 3.11" ✓). 8 rows = 1⅓" (8 ÷ 24 × 4" = 1.33" ✓).
Setup: Waste + ravel. E-wrap MC. Knit RC001–008 even. Take live sts off on a tail and gather (pad). CO edge sews to hip. Remove ravel cord.
7. Hind Foot, peach (make 1 — CC1)
Work exactly as Hind Foot, cream, using CC1 throughout. This is the foot that shows a tabby splash.
8. Tail (make 1 — MC base → CC1 tip)
Tapered tube, about 6½" long before stuffing (40 rows ÷ 24 × 4" = 6.67" ✓), cream at the body, peach toward the tip.
Needles: 10 ndls, L5–R5 (5 + 5 = 10 ✓).
10 sts = 2.2" circ → about ¾" stuffed (10 ÷ 18 × 4" = 2.22" ✓).
Setup: Waste + ravel. E-wrap MC (this CO is the body end of the tail). RC000.
| RC | Yarn | Shaping |
|---|---|---|
| 001–024 | MC cream | Knit even, 10 sts. Rehang weights at RC010 and RC020. End COR RC024 (24 rows cream ✓) |
| 025, COR | MC | Dec 1 each side: L5 onto L4, R5 onto R4 → 8 sts (10 − 2 = 8 ✓). Knit 1 row. COL |
| 026 | change CC1 | Knit 1 row peach. COR |
| 027–034 | CC1 | Knit even, 8 sts. End COR RC034 |
| 035, COR | CC1 | Dec 1 each side: L4 onto L3, R4 onto R3 → 6 sts (8 − 2 = 6 ✓). Knit 1 row |
| 036–040 | CC1 | Knit even, 6 sts. End COR RC040 (16 peach rows: RC025 is still cream; peach RC026–040 = 15 rows of peach fabric plus the tip — visually the last ~2½" are peach ✓) |
Take 6 live sts off on a CC1 tail and pull up firmly (tip). Remove ravel cord. Do not stuff yet.
9. Tabby Saddle Patch (make 1 — CC1 peach)
Soft marbled rectangle, sewn over the back and hips. 18 sts × 18 rows = 4" × 3" (18 ÷ 18 × 4" = 4.00" ✓; 18 ÷ 24 × 4" = 3.00" ✓). It will look like a blended tabby splash, not sharp stripes.
Needles: 18 ndls, L9–R9.
Setup: Waste + ravel. E-wrap CC1. Knit RC001–018 even. Latch-tool BO loosely. Remove ravel cord. Steam flat. Corners will be rounded when sewn down.
10. Heart Pillow (make 2 pieces — CC2 dusty rose)
Two small diamonds, seamed, stuffed, then indented at the top to form a heart. Max 6 sts = 1⅓" wide (6 ÷ 18 × 4" = 1.33" ✓); about 1¼" after stuffing — roughly one-third of the 3½" head, reading as a small pillow.
Needles: start 2 ndls at center, L1–R1.
Setup: No wide waste bed needed. Bring L1–R1 to WP. E-wrap CC2 on those 2 needles (you may skip WY on this tiny piece and e-wrap closed). Hang two very light claw weights or finger-weight the first rows. RC000.
| RC | Action | Stitch count |
|---|---|---|
| 001–002 | Knit even on 2 sts | 2 |
| 003, COR | Inc 1 each side: bring L2 and R2 from NWP to WP; pick up the purl bump from the row below with the 1-prong tool and hang it on the new needle (or e-wrap the empty needle). Knit across | 4 (2 + 2 = 4 ✓) |
| 004 | Knit 1 row even | 4 |
| 005, COR | Inc 1 each side (bring L3, R3 to WP; fill as above). Knit across | 6 (4 + 2 = 6 ✓) |
| 006–007 | Knit 2 rows even | 6 |
| 008, COR | Dec 1 each side: L3 onto L2, R3 onto R2; empty ndls to NWP. Knit | 4 (6 − 2 = 4 ✓) |
| 009 | Knit 1 row even | 4 |
| 010, COR | Dec 1 each side: L2 onto L1, R2 onto R1. Knit | 2 (4 − 2 = 2 ✓) |
| 011 | Knit 1 row. Draw yarn through 2 sts and pull up | 2 |
Make 2 identical diamonds. Steam lightly.
11. Nose (make 1 — CC2)
Tiny triangle.
Needles: 4 ndls, L2–R2.
E-wrap CC2. Knit RC001–002 on 4 sts. RC003, COR: dec 1 each side → 2 sts. RC004: knit 1. Draw through. This is a rounded triangle / mini-heart nose.
OPTIONAL RIBBER METHOD (seamless tubes)
Use this instead of flat + mattress stitch for Body, Head, Front Paws, Hind Feet, Tail if you have a ribber. Ears, saddle, heart, and nose stay flat.
Circular rehanging (toy version): this is the same idea as rehanging a beanie brim — you are splitting a waste-yarn row onto two beds to set up a tube, not knitting a true one-pass circle with a cylinder machine.
- Knit the waste + ravel start on MB only, EON (every other needle) for the piece’s stitch count (Body: 26 MB ndls EON to stand in for 52 circular sts; Head: 23 MB EON for 46; etc.).
- Drop the ribber comb. Raise RB to knitting position. Tension both beds to MT.
- Transfer alternate waste-row stitches to RB with a transfer tool (1×1 rib configuration). This is the circular rehang.
- Set carriages for circular knitting (Brother: left part button on MB carriage, right part button on RB, or your manual’s circular setting so each pass knits one bed only).
- Hang the ribber comb + large weight. RC000.
- Knit double the written RC in circular (each full circuit = 2 carriage passes = 1 “row” of the tube). Example: Body knit until the row counter shows 68 passes = 34 circular rows.
- Color changes and decreases: to decrease, transfer 1 st from each bed inward and move empty needles to NWP on both beds, then knit 2 circular rows even.
- To finish, take remaining stitches onto yarn and gather — no mattress-stitch long seam.
If circular settings confuse you, ignore this section and seam the flat pieces. The toy looks the same.
FINISHING
A. Seams (mattress stitch)
Work on the purl side facing you only if you prefer a reverse-stockinette “nubby” toy; the default is stockinette (knit side) out for a clean commercial look with visible stitch definition.
Body: Mattress-stitch the 34-row selvedges into a tube. Seam sits on the belly (underside of the loaf). Leave the chest (CO) and hip (BO) ends open.
Head: Mattress-stitch the 24-row selvedges into a tube. Place the seam at the underside of the head (it will hide at the neck). Peach CO is already gathered = crown. Cream live edge is loosely gathered = neck, still open for stuffing.
Paws, feet, tail: Mattress-stitch the long selvedges. Gather the pad/tip end closed. Leave the CO (body) end open.
Ears: For each ear, place one inner (rose) on one outer (cream/peach), wrong sides together so the rose shows on the inside. Mattress-stitch the two sloped sides. Leave the 8-st (outer) / 6-st (inner) base open. The inner ear is smaller — ease it to the outer base. Steam the ear so it points.
Heart: Mattress-stitch the two diamonds together around the edge, leaving a ¾" gap. Stuff firmly. Close the gap. With CC2, take a stitch through the stuffed pillow 1/3 of the way down from the top point, cinch slightly, and wrap once to indent the heart cleft. Secure.
Weave all extra tails except those you need for attaching.
B. Stuff
- Head: Firm. Round it with your thumbs so the peach crown is smooth and the cream muzzle area can be pinched into two small cheeks later.
- Body: Medium. Fill so the tube is plump but can still lie flat on its belly in a loaf. Do not pack the chest so hard that the head cannot tuck down.
- Front paws: Firm little sausages. Gather the pad end tight.
- Hind feet: Firm, short.
- Tail: Light stuffing — a pipe of fill, not a stiff rod, so it can curve off to the right. Gather the peach tip.
- Heart: Already stuffed.
Close the hip end of the body with running stitch and gather until the loaf end is rounded, not pointed. Leave the chest end open for the neck join.
C. Assemble the sleeping pose
Pin everything before sewing. The pose is the pattern.
-
Head to body, three-quarter angle.
The kitten lies on its belly, body running roughly left-to-right as you look at it, head turned toward you.
Set the neck gather onto the open chest of the body, rotated so:- the head seam is down,
- the peach crown is up,
- the face looks at the camera, not straight along the body axis.
Ladder-stitch all the way around with MC, stuffing the neck join as you close so there is no dent. Chin should be able to drop toward the chest.
-
Front paws + heart.
The two cream paws stretch forward on either side of the heart, stubby ends past the nose line.
Pin the heart between them so the paws “hug” it. The kitten’s chin rests gently toward the heart, not on the floor.
Sew each paw CO edge to the chest/shoulder with MC. Then tack the inner side of each paw to the heart with a few hidden CC2 stitches so the hug holds. Tack the chin to the top of the heart with one or two hidden cream stitches if it wants to lift. -
Hind feet.
Both extend backward, relaxed, close to the hip. One cream, one peach — put the peach foot on the side that will show (the camera-right hip is typical). Sew CO edges to the body near the hip gather. -
Tail.
Sew the cream CO end to the body at the hip, just above the hind feet, angling off to the right. Curve the stuffed tail along the hip; tack it in two places with hidden stitches so it stays relaxed and striped (cream nearest the body, peach at the tip). -
Ears.
Sew open bases to the peach crown, cream outer / rose inner, slightly angled out. They sit on the peach patch. Space them about 1¼" (3 cm) apart at the inner corners. -
Saddle patch.
Center the peach rectangle over the back and hips, slightly toward the camera so it reads as a tabby splash (soft blended patch, not a sharp stripe). Sew down with CC1, turning the corners under for an oval. A few extra tacking stitches through the stuffing keep it from lifting. -
Nose.
Sew the tiny rose triangle to the lower center of the cream face, point down (rounded heart/triangle).
D. Face embroidery (CC3 dark brown / black, plus a little CC2)
Use a sharp needle. Keep stitches small. The head is cream; peach is only at the crown.
Placement on the stuffed 3½" head (adjust by eye):
- Eyes: two sleepy crescents, each about ½" (1.3 cm) wide, curved downward (like a closed, peaceful )( pair). Inner corners about ¾" (2 cm) apart, sitting just above the widest part of the head, well below the ears. Two or three wraps of stem stitch or a lazy-daisy arc for each eye.
- Muzzle / cheeks: With MC, take a few short gathering stitches on either side of the nose and pull gently to swell two round cream cheeks. Tie off inside the neck.
- Whisker dots: three tiny satin dots on each cheek, above the muzzle line, in a small triangle (3 per side ✓).
- Whiskers: three straight stitches per side, radiating out and slightly back, each ¾–1" (2–2.5 cm). Do not pull tight or the face will pucker.
- Mouth: one dark stitch down from the bottom of the nose, then a shallow curve each side into a subtle smile.
- Forehead tabby: with CC1, duplicate-stitch a soft 2-st-wide stripe down the center of the forehead from the peach crown toward the nose, stopping above the eyes (about 8 duplicate-stitch rows). Add two or three short duplicate-stitch dashes on the cream cheeks/crown join if you want more tabby marbling.
- Optional hip/back marbling: a few CC1 duplicate stitches along the edge of the saddle so the patch looks blended, not appliquéd.
E. Steam, block, and close
- Weave every remaining tail to the inside with a tapestry needle. Do not leave tails inside unsecured — they migrate out of stuffed toys.
- Mattress-stitch check: if any seam grins, restitch from the outside with matching yarn, catching the bars between the first and second stitch columns.
- Steaming: Hold a steam iron 2–3" (5–8 cm) above the toy. Steam the ears so they stand, the saddle so it lies, and the tail curve. Do not rest the iron on the stuffed body. Let dry fully.
- Blocking weights: If the loaf will not lie flat, pin the belly to a towel around the body (not the head) and steam again; leave pins until cold.
- Rehanging for a seam-free body (optional, instead of mattress stitch): before stuffing, hang one long selvedge of the body back onto MB needles (34 loops, one per row-edge bar), knit one loose row at T8, then latch-tool bind off through the opposite selvedge — a machine-joined seam. This is the toy equivalent of rehanging a hat back seam. Only do this if you are comfortable picking up 34 edge bars evenly; mattress stitch is more forgiving.
- Pom-pom: none. The heart is the accessory. Do not add a pom.
Set the kitten on a white surface: belly down, both front paws forward around the rose heart, chin dropped toward the heart, hind legs and striped tail relaxed off to the right, head turned to the camera. Adjust tacking stitches until the pose holds without props.
Yarn / number recap (for your notes)
| Piece | Needles | Rows | Yarn |
|---|---|---|---|
| Body | 52 (L26–R26) | 34 | MC |
| Head | 46 (L23–R23) | 8 CC1 + 16 MC = 24 | CC1 then MC |
| Outer ear ×2 | 8 → 2 | 12 | 4 CC1 + 8 MC |
| Inner ear ×2 | 6 → 2 | 8 | CC2 |
| Front paw ×2 | 18 | 12 | MC |
| Hind foot | 14 | 8 | MC |
| Hind foot | 14 | 8 | CC1 |
| Tail | 10 → 6 | 24 MC + 16 CC1 = 40 | MC then CC1 |
| Saddle | 18 | 18 | CC1 |
| Heart ×2 | 2 → 6 → 2 | 11 | CC2 |
| Nose | 4 → 2 | 4 | CC2 |
Stitch-count checks used above: 52, 46, 18, 14, 10, 8, 6 all match L/R needle pairs with no needle 0 ✓.
End of pattern.
Disclaimer: This pattern was generated by AI and should be reviewed for accuracy before use. While we strive for quality, AI-generated content may contain errors. Please verify measurements, stitch counts, charts, and instructions before beginning your project. Generated by purlJam.uk
Love this pattern?
Save this pattern to your free PurlJam libraryAccess your pattern anytime
Bookmark this page to access your pattern anytime