Type
Crochet
Difficulty
intermediate
Category
amigurumi
AI Thinking Process
Planning
Verification
Pattern
Sleepy Sloth with Scarf
Amigurumi sitting sloth · intermediate · UK terminology
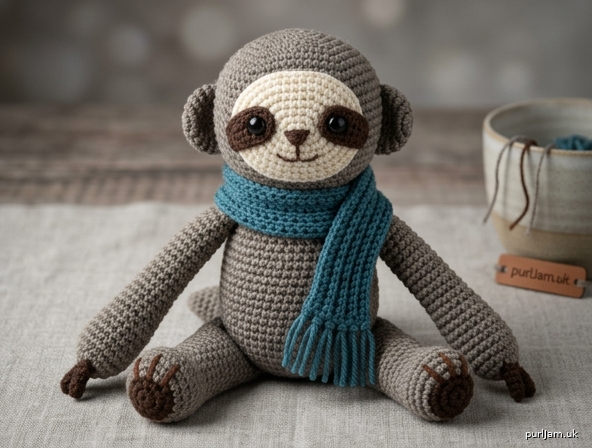
A round-headed three-toed sloth in a sitting pose, with a cream face, dark eye patches, long draping arms, short legs and a tiny tail. He wears a ribbed scarf. Worked in continuous spirals of tight double crochet.
Skill level: Intermediate (magic ring, invisible decreases, colour changes, multi-piece assembly, embroidery).
Finished size: Approximately 16 cm (6¼ in) tall sitting, with arms about 12 cm (4¾ in) long, using aran/worsted yarn and a 3.5 mm hook. Scarf measures 3.5 cm × 48 cm (1⅜ in × 19 in) excluding fringe.
Materials
- Aran / worsted weight yarn (UK aran, approx. 10-ply; approx. 200–220 m / 100 g):
- Colour A (main — grey-brown or mushroom): 50 g
- Colour B (face — cream or beige): 15 g
- Colour C (patches, claws, embroidery — dark brown): 20 g
- Colour D (scarf — teal, rust or mustard): 25 g
- 3.5 mm crochet hook (amigurumi pieces)
- 4.0 mm crochet hook (scarf only, for a softer drape)
- Pair of 9 mm safety eyes
- Polyester fibre filling
- Yarn needle
- Stitch marker
- Pins
- Scissors
- Small amount of black embroidery thread (optional, for mouth)
Yarn note: Any aran/worsted that gives a dense fabric is suitable. Acrylic or a wool blend both work; avoid lofty or fluffy yarns that hide stitch definition.
Tension (gauge)
22 dc and 24 rounds = 10 × 10 cm (4 × 4 in) over unstuffed dc fabric using 3.5 mm hook.
Tension is used to keep the fabric dense so filling does not show. If your swatch is larger than 10 cm, use a smaller hook. If it is smaller, use a slightly larger hook. Exact height may vary; stuffing firmness also affects size.
Abbreviations (UK)
| Abb. | Meaning |
|---|---|
| BLO | back loop only |
| ch | chain |
| dc | double crochet (US sc) |
| dc2tog | double crochet 2 together (invisible decrease) |
| dtr | double treble (US tr) |
| FLO | front loop only |
| FO | fasten off |
| htr | half treble (US hdc) |
| inc | increase — 2 dc in the same stitch |
| MR | magic ring (adjustable ring) |
| rnd(s) | round(s) |
| ss | slip stitch |
| st(s) | stitch(es) |
| tr | treble (US dc) |
| yrh | yarn round hook |
Special stitches
Invisible dc2tog: Insert hook through the FLO of the next 2 sts, yrh, pull through both loops (2 loops on hook), yrh, pull through both loops. Counts as 1 dc.
Inc: 2 dc in the same stitch.
Magic ring: Wrap yarn around finger, insert hook, yrh, pull up a loop, ch 1 (does not count as a st), work the stated dc into the ring, then pull the tail to close.
Pattern notes
- Work amigurumi pieces in continuous spirals unless stated. Do not join rounds. Mark the first stitch of every round and move the marker up.
- All amigurumi pieces use the 3.5 mm hook. The scarf uses 4.0 mm.
- Keep stitches tight. The fabric should feel firm and have no visible gaps.
- Change colour on the last yrh of the final stitch of the old colour.
- Stuff as you go, especially before openings become too small.
- Stitch counts are given in square brackets at the end of each round, e.g.
[42]. - Leave long tails (30–40 cm / 12–16 in) on pieces that will be sewn.
- Pin every piece in place and check both sides before sewing.
- Use matching yarn and a whip stitch or ladder stitch for seams.
Head
With A and 3.5 mm hook.
Rnd 1: 6 dc in MR. [6]
Rnd 2: Inc in each st around. [12] (6 increases → 6 + 6 = 12 ✓)
Rnd 3: (1 dc, inc) 6 times. [18] (6 increases → 12 + 6 = 18 ✓)
Rnd 4: (2 dc, inc) 6 times. [24] (6 increases → 18 + 6 = 24 ✓)
Rnd 5: (3 dc, inc) 6 times. [30] (6 increases → 24 + 6 = 30 ✓)
Rnd 6: (4 dc, inc) 6 times. [36] (6 increases → 30 + 6 = 36 ✓)
Rnd 7: (5 dc, inc) 6 times. [42] (6 increases → 36 + 6 = 42 ✓)
Rnds 8–16: Dc in each st around. [42] (9 rounds even)
Place eyes later, after the face and eye patches are prepared: they sit between Rnds 11 and 12, 8 stitches apart, centred on the face. Do not close the head until the eyes are locked.
Rnd 17: (5 dc, dc2tog) 6 times. [36] (6 decreases → 42 − 6 = 36 ✓)
Rnd 18: (4 dc, dc2tog) 6 times. [30] (6 decreases → 36 − 6 = 30 ✓)
Rnd 19: (3 dc, dc2tog) 6 times. [24] (6 decreases → 30 − 6 = 24 ✓)
Stuff the head firmly, keeping a round shape. Continue stuffing as you decrease.
Rnd 20: (2 dc, dc2tog) 6 times. [18] (6 decreases → 24 − 6 = 18 ✓)
Rnd 21: (1 dc, dc2tog) 6 times. [12] (6 decreases → 18 − 6 = 12 ✓)
Rnd 22: Dc2tog 6 times. [6] (6 decreases → 12 − 6 = 6 ✓)
FO, leaving a 20 cm (8 in) tail. Weave the tail through the FLO of the remaining 6 sts, pull closed, and hide the end inside the head.
Face
With B and 3.5 mm hook. Worked as a continuous oval.
Ch 6.
Rnd 1: 2 dc in 2nd ch from hook, dc in next 3 ch, 4 dc in last ch; working along the opposite side of the foundation chain, dc in next 3 ch, 2 dc in the remaining loop of the first worked ch. [14] (2 + 3 + 4 + 3 + 2 = 14 ✓)
Do not join. Mark the first stitch.
Rnd 2: Inc in next 2 sts, 3 dc, inc in next 4 sts, 3 dc, inc in next 2 sts. [22] (8 increases → 14 + 8 = 22 ✓)
Rnd 3: (1 dc, inc) twice, 3 dc, (1 dc, inc) 4 times, 3 dc, (1 dc, inc) twice. [30] (used 4 + 3 + 8 + 3 + 4 = 22 sts; made 6 + 3 + 12 + 3 + 6 = 30 ✓)
Rnd 4: Dc in each st around. [30]
Ss in the next st. FO, leaving a 40 cm (16 in) tail for sewing.
Eye patches (make 2)
With C and 3.5 mm hook.
Rnd 1: 6 dc in MR. [6]
Rnd 2: (1 dc, inc) 3 times. [9] (3 increases → 6 + 3 = 9 ✓)
Ss in the next st. FO, leaving a 25 cm (10 in) tail. Flatten each patch into a small oval.
Ears (make 2)
With A and 3.5 mm hook.
Rnd 1: 6 dc in MR. [6]
Rnd 2: Inc in each st around. [12] (6 increases → 6 + 6 = 12 ✓)
Rnd 3: Dc in each st around. [12]
Ss in the next st. FO, leaving a 25 cm (10 in) tail. Flatten each ear into a disc; the sewn edge will form a gentle semicircle against the head.
Body
With A and 3.5 mm hook.
Rnd 1: 6 dc in MR. [6]
Rnd 2: Inc in each st around. [12] (6 + 6 = 12 ✓)
Rnd 3: (1 dc, inc) 6 times. [18] (12 + 6 = 18 ✓)
Rnd 4: (2 dc, inc) 6 times. [24] (18 + 6 = 24 ✓)
Rnd 5: (3 dc, inc) 6 times. [30] (24 + 6 = 30 ✓)
Rnd 6: (4 dc, inc) 6 times. [36] (30 + 6 = 36 ✓)
Rnd 7: (5 dc, inc) 6 times. [42] (36 + 6 = 42 ✓)
Rnd 8: (6 dc, inc) 6 times. [48] (42 + 6 = 48 ✓)
Rnds 9–18: Dc in each st around. [48] (10 rounds even)
Rnd 19: (6 dc, dc2tog) 6 times. [42] (48 − 6 = 42 ✓)
Rnd 20: Dc in each st around. [42]
Rnd 21: (5 dc, dc2tog) 6 times. [36] (42 − 6 = 36 ✓)
Rnd 22: (4 dc, dc2tog) 6 times. [30] (36 − 6 = 30 ✓)
Rnd 23: (3 dc, dc2tog) 6 times. [24] (30 − 6 = 24 ✓)
Stuff very firmly, shaping a slightly flattened base so the sloth will sit. Keep stuffing as you decrease.
Rnd 24: (2 dc, dc2tog) 6 times. [18] (24 − 6 = 18 ✓)
Rnd 25: (1 dc, dc2tog) 6 times. [12] (18 − 6 = 12 ✓)
Rnd 26: Dc2tog 6 times. [6] (12 − 6 = 6 ✓)
FO, weave through FLO of remaining sts, pull closed, and hide the end.
Arms (make 2)
Begin at the paw.
With C and 3.5 mm hook.
Rnd 1: 6 dc in MR. [6]
Rnd 2: Inc in each st around. [12] (6 + 6 = 12 ✓)
Rnds 3–5: Dc in each st around. [12] (3 rounds)
Change to A.
Rnds 6–28: Dc in each st around. [12] (23 rounds)
Stuff lightly in Rnds 1–10 only (the paw and lower arm). Leave the upper arm empty or with the lightest wisp of filling so the arms drape. FO, leaving a 30 cm (12 in) tail. Do not close the opening.
Claws (make 6 — 3 per arm)
With C and 3.5 mm hook.
Ch 6.
Ss in 2nd ch from hook, dc in next ch, htr in next ch, tr in next ch, dtr in last ch.
FO, leaving a 15 cm (6 in) tail. Each claw is a small tapered strip.
Legs (make 2)
Begin at the foot.
With C and 3.5 mm hook.
Rnd 1: 6 dc in MR. [6]
Rnd 2: Inc in each st around. [12] (6 + 6 = 12 ✓)
Rnd 3: (1 dc, inc) 6 times. [18] (12 + 6 = 18 ✓)
Rnds 4–6: Dc in each st around. [18] (3 rounds)
Change to A.
Rnds 7–13: Dc in each st around. [18] (7 rounds)
Stuff moderately — firmer than the arms, but not as firm as the body. FO, leaving a 35 cm (14 in) tail. Leave the opening unclosed for sewing.
Tail
With A and 3.5 mm hook.
Rnd 1: 6 dc in MR. [6]
Rnds 2–3: Dc in each st around. [6]
Ss in the next st. FO, leaving a 20 cm (8 in) tail. Stuff very lightly.
Scarf
With D and 4.0 mm hook. Worked flat in BLO rib.
Ch 9.
Row 1: Dc in 2nd ch from hook and in each ch to end. [8]
Row 2: Ch 1 (does not count as a st), turn, dc BLO in each st across. [8]
Repeat Row 2 until the scarf measures 48 cm (19 in) from the foundation chain — approximately 110 rows, depending on your tension.
FO and weave in ends.
Optional fringe: Cut 16 strands of D, each 10 cm (4 in) long. Attach 2 strands in each of the 8 sts at both short ends with a lark’s-head knot. Trim level.
Assembly
Use pins throughout. Check the face from the front and both sides before committing to stitches. Matching yarn; whip stitch or ladder stitch.
1. Face, eye patches and eyes
- Pin the cream face onto the front of the head so it covers roughly Rnds 10–18, centred, with the longer axis of the oval running horizontally. The upper edge of the face should sit just below the eye line (between Rnds 11 and 12).
- Pin the two eye patches so they overlap the top edge of the cream face, 8 sts apart at their centres, angled very slightly downward toward the nose (a gentle “sleepy” slant).
- Insert the safety-eye shanks through the eye patches and into the head between Rnds 11 and 12, 8 sts apart. Check spacing, then fix the washers on the inside.
- Sew the eye patches down with C, then sew the cream face down with B, working under the overlapping patches so no cream shows through the dark ovals.
- Alternative for children under 3 years: omit safety eyes. Embroider two small filled ovals in C on the patches instead.
2. Nose and mouth
With C (or black embroidery thread) and a yarn needle:
- Embroider a small filled triangle or inverted Y for the nose, centred on the lower third of the cream face.
- Add a shallow curved smile beneath, with optional tiny outer ticks for a gentle sloth expression. Do not pull so tight that the face puckers.
3. Ears
Pin the flattened ears to the sides of the head, centred over Rnds 8–11, slightly toward the back. The inner edges sit about 4–5 sts behind the eye patches. Sew around the lower half of each disc so they cup forward a little.
4. Head to body
Add a little extra filling at the neck if needed so the head does not wobble. Pin the head onto the body, slightly toward the front of the top closing, so the sloth looks down a touch. Sew securely all the way around, going through both fabrics twice if the toy will be handled often.
5. Legs (sitting pose)
The sloth sits. Pin the open edge of each leg to the lower front-sides of the body, spanning roughly Rnds 20–24, with the feet pointing forward and slightly out. The inner edges of the two legs should be about 4–6 sts apart at the front. This splayed placement, plus the flattened stuffed base, stops the toy rolling.
Sew all around each opening, adding a pinch of extra filling just before closing the last few stitches if the thigh looks hollow.
Foot claws (embroidery): With C, embroider 3 short, slightly radiating straight stitches on the front of each Colour-C foot.
6. Arms and claws
Sew 3 claws in a small fan to the Colour-C end of each arm, tips pointing away from the body. Secure each claw through the paw several times.
Pin the open end of each arm to the sides of the body, just below the head seam (shoulder line, roughly body Rnds 9–11). The arms should hang forward and down so they can rest over the tummy or dangle beside the legs. Sew all around each opening.
7. Tail
Sew the tail to the lower centre-back of the body, just above the base, so it peeks out when the sloth is sitting.
8. Scarf
Wrap the scarf once around the neck, crossing at the front or tying a loose knot at one side. Tack it invisibly with a few stitches of D at the back of the neck if you do not want it to come off.
Finishing
- Weave in every remaining end, burying them inside the stuffed pieces.
- Roll the head and body between your palms to even out the filling.
- If any seam dimples, tease a little extra filling toward it with the blunt end of the needle.
- Steam the scarf lightly from the reverse if it curls (do not press the stuffed toy).
Safety
- Safety eyes are a choking hazard for children under 3 years. Embroider the eyes instead, and sew every piece (especially claws, ears and tail) through the fabric several times until nothing can be pulled off.
- Test limbs with a firm tug before gifting.
- This pattern is a decorative/toy item; supervise young children during play.
Making notes (quick reference)
| Piece | Colour | Max sts | Key shaping |
|---|---|---|---|
| Head | A | 42 | Inc to 42, 9 even rnds, dec to 6 |
| Body | A | 48 | Inc to 48, 10 even rnds, dec to 6 |
| Face | B | 30 | Oval: 14 → 22 → 30 |
| Eye patch | C | 9 | Flattened oval |
| Ear | A | 12 | Flattened disc |
| Arm | C then A | 12 | 28 rnds total; stuff paw only |
| Leg | C then A | 18 | Leave open; sew to sit |
| Claw | C | — | 6 strips (3 per hand) |
| Tail | A | 6 | 3 rnds |
| Scarf | D | 8 sts | BLO dc, 48 cm long |
Enjoy your sleepy sloth — he is happiest draped over a shelf edge or sitting with his scarf slightly askew.
Disclaimer: This pattern was generated by AI and should be reviewed for accuracy before use. While we strive for quality, AI-generated content may contain errors. Please verify measurements, stitch counts, charts, and instructions before beginning your project. Generated by purlJam.uk
Love this pattern?
Save this pattern to your free PurlJam libraryAccess your pattern anytime
Bookmark this page to access your pattern anytime