Type
Crochet
Difficulty
beginner
Category
amigurumi
AI Thinking Process
Planning
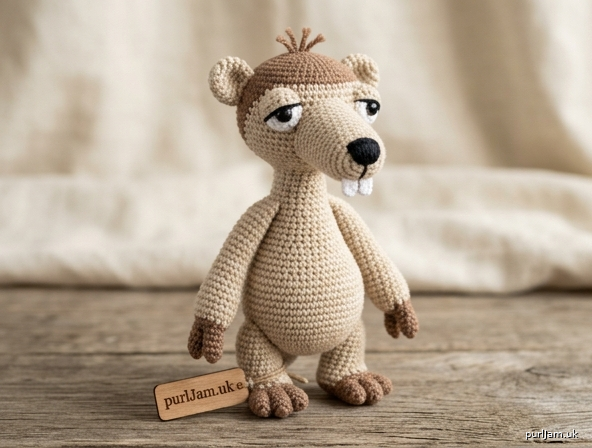
1. **Design Strategy**: Sid is a ground sloth, so I'll build him from simple amigurumi shapes (spheres, ovals, cylinders) in beige/tan and brown worsted yarn. Beginner-friendly using only UK dc, increases, decreases, and basic assembly. Distinctive features: large slanted eyes on raised eye bumps, a long snout, big buck teeth, two-finger hands and big feet, and tan tufty top.
2. **Construction Plan**: Seamless worked-in-the-round bottom-up: pear-shaped body and separate oversized head sewn together, with appendages (arms, legs, snout, eyes, ears) made separately and attached.
3. **Quality Assurance**:
- Eye bumps must be symmetrical — pin before sewing.
- Snout protrudes; stuff lightly so it doesn't sag.
- Stuff body firmly enough to stand (weighted base optional).
4. **Final Calculations**: Tension 4mm hook, worsted: 4 dc & 4 rnds = 2.5cm. Body max 30 sts ≈ 12cm tall finished. Head sphere max 24 sts ≈ 8cm. Total height ~16cm. UK terms throughout (dc = US sc).
Verification
[PRE-FLIGHT CHECKS]
1. **Completeness**: Includes materials, tension, abbreviations, all body parts (body, head, snout, eyes, ears, arms, legs, teeth), assembly, and finishing — all template sections present.
2. **Consistency**: Body increases 6→12→18→24→30, even rounds, then decreases verified each round below. Head sphere matches template sphere counts. All counts re-checked inline.
3. **Constraints**: UK terminology (dc), metric-first, colour spelling, worsted weight, beginner level, all features of Sid honoured (slanted eyes, snout, buck teeth, two fingers, big feet).
4. **Safety**: Increase/decrease maths balanced; magic ring start; invisible decrease recommended. No count jumps unexplained.
Pattern
# Sloth Friend — "Sid" Crochet Plush
*A beginner-friendly amigurumi inspired by the goofy ground sloth from the Ice Age films*

> **Note on likeness:** This is an original, fan-inspired design using simple shapes to capture Sid's look — a pear-shaped body, oversized head, long snout, big buck teeth, droopy slanted eyes, and two-fingered hands. Made entirely from spheres, ovals and tubes, so it's perfect for confident beginners.

---

## Finished Size
Approximately **16 cm** tall (6¼ in) using worsted yarn and a 4 mm hook.

## Tension (Gauge)
4 dc and 4 rounds = 2.5 cm (1 in) worked tightly.
Exact tension is not critical for toys, but work tightly so stuffing does not show.

## Materials
- **Worsted weight (4) yarn:**
  - Main colour (MC): light beige/tan — approx. 60 g
  - Contrast A: medium brown — approx. 25 g (head top, snout tip, hands/feet)
  - Small amounts: white (teeth), black (eyes/nose) or use safety eyes
- **Hook:** 4 mm (UK 8 / US G-6)
- Polyester fibre toy stuffing
- Yarn needle (for assembly)
- Stitch marker
- Optional: two 8 mm safety eyes
- Scissors

## UK Abbreviations
- **dc** = double crochet (US single crochet)
- **inc** = 2 dc into one stitch
- **dec** = double crochet 2 together (invisible decrease recommended)
- **st(s)** = stitch(es)
- **MR** = magic ring
- **rnd** = round
- **sl st** = slip stitch
- **[ ]** = stitch count at end of round

> Work in continuous spirals (no joining) unless stated. Move your stitch marker up each round.

---

## 1. Body (make 1, in MC)
Pear-shaped, worked bottom-up.

- **Rnd 1:** 6 dc in MR **[6]**
- **Rnd 2:** inc in each st **[12]** *(6 inc → 6+6=12 ✓)*
- **Rnd 3:** (dc, inc) around **[18]** *(6 inc → 12+6=18 ✓)*
- **Rnd 4:** (2 dc, inc) around **[24]** *(6 inc → 18+6=24 ✓)*
- **Rnd 5:** (3 dc, inc) around **[30]** *(6 inc → 24+6=30 ✓)*
- **Rnds 6–12:** dc around **[30]** (7 rounds)
- **Rnd 13:** (3 dc, dec) around **[24]** *(6 dec → 30−6=24 ✓)*
- **Rnd 14:** dc around **[24]**
- **Rnd 15:** (2 dc, dec) around **[18]** *(6 dec → 24−6=18 ✓)*
- **Rnd 16:** dc around **[18]**
- Begin stuffing firmly.
- **Rnd 17:** (dc, dec) around **[12]** *(6 dec → 18−6=12 ✓)*
- Top up stuffing. Leave the 12-st opening — the head sits on top.
- Fasten off, leaving a long tail for sewing.

---

## 2. Head (make 1) — sphere
Start in MC, change to Contrast A for the top.

- **Rnd 1:** 6 dc in MR **[6]**
- **Rnd 2:** inc in each st **[12]** *(✓ 6+6=12)*
- **Rnd 3:** (dc, inc) around **[18]** *(✓ 12+6=18)*
- **Rnd 4:** (2 dc, inc) around **[24]** *(✓ 18+6=24)*
- **Rnds 5–8:** dc around **[24]** (4 rounds)
- **Rnd 9:** (2 dc, dec) around **[18]** *(✓ 24−6=18)*
- *(Optional: switch to Contrast A from Rnd 9 for a brown crown.)*
- Stuff firmly.
- **Rnd 10:** (dc, dec) around **[12]** *(✓ 18−6=12)*
- **Rnd 11:** dec around **[6]** *(✓ 12−6=6)*
- Fasten off, weave tail through last 6 sts, pull closed.

---

## 3. Snout (make 1, in MC) — small oval cone
This protrudes forward to give Sid his long muzzle.

- **Rnd 1:** 4 dc in MR **[4]**
- **Rnd 2:** (dc, inc) around **[6]** *(2 inc → 4+2=6 ✓)*
- **Rnd 3:** (2 dc, inc) around **[8]** *(2 inc → 6+2=8 ✓)*
- **Rnds 4–5:** dc around **[8]** (2 rounds)
- **Rnd 6:** (3 dc, inc) around **[10]** *(2 inc → 8+2=10 ✓)*
- Stuff lightly (keep it soft so it doesn't sag).
- **Rnd 7:** dc around **[10]**
- Fasten off, leaving a long tail.

> Using Contrast A or black, embroider a small nose at the tip.

---

## 4. Eye Bumps (make 2, in MC) — small spheres
Sid's eyes sit on raised bumps.

- **Rnd 1:** 6 dc in MR **[6]**
- **Rnd 2:** (dc, inc) around **[9]** *(3 inc → 6+3=9 ✓)*
- **Rnds 3–4:** dc around **[9]** (2 rounds)
- Do not stuff (or stuff very lightly).
- Fasten off, leaving a long tail.

> Add eyes: insert an 8 mm safety eye near the top of each bump **before** stuffing, OR embroider a black slanted oval with white. Sid's eyes are heavy-lidded — embroider a small horizontal lid line above each for the goofy look.

---

## 5. Ears (make 2, in MC) — flat
- **Rnd 1:** 5 dc in MR **[5]**
- **Rnd 2:** inc in each st **[10]** *(5 inc → 5+5=10 ✓)*
- Flatten, do not stuff.
- Fasten off, leaving a tail.

---

## 6. Arms (make 2, in MC, fingers in Contrast A) — tubes
- **Rnd 1:** 6 dc in MR **[6]**
- **Rnds 2–7:** dc around **[6]** (6 rounds)
- Stuff lightly.
- Flatten the open end and dc across 3 sts to close (this creates two "fingers" at the tip).
- *Optional two fingers:* with Contrast A, ch 3, sl st back down to make a second finger nub at the tip.
- Fasten off, leaving a tail.

---

## 7. Legs/Feet (make 2, in MC, feet in Contrast A) — short fat cylinders
- **Rnd 1:** 6 dc in MR (Contrast A) **[6]**
- **Rnd 2:** inc in each st **[12]** *(✓ 6+6=12)*
- **Rnds 3–4:** dc around **[12]** (2 rounds, foot)
- Change to MC.
- **Rnd 5:** (2 dc, dec) around **[9]** *(3 dec → 12−3=9 ✓)*
- **Rnds 6–7:** dc around **[9]** (leg, 2 rounds)
- Stuff firmly (feet help him stand).
- Flatten open end, dc across 4–5 sts to close.
- Fasten off, leaving a tail.

---

## 8. Teeth (make 2, in white) — Sid's famous buck teeth
- Ch 3. Starting in 2nd ch from hook: 2 dc. **[2]**
- Fasten off, leaving a tail. (A tiny white rectangle.)

---

## Assembly

1. **Head to body:** Position the head over the 12-st opening of the body and pin. Sew firmly all the way around with the body tail. Sid's head should sit slightly forward.
2. **Snout:** Pin the snout to the centre-front of the head, low down. Sew around the open edge.
3. **Buck teeth:** Tuck the two white teeth just under the bottom edge of the snout, side by side, and sew in place.
4. **Eye bumps:** Pin the two eye bumps above and slightly behind the snout, set close together and angled outward for the sleepy slanted look. Sew around each base.
5. **Ears:** Sew one ear to each side of the head, set fairly high.
6. **Arms:** Pin to each side of the upper body, finger-ends down. Sew the flattened tops in place.
7. **Legs:** Sew both legs to the underside-front of the body so the feet point forward and Sid can sit/stand.
8. **Face details:** With black yarn, embroider heavy slanted eyelids and a wide curved smile under the snout if not already added.

---

## Finishing & Tips
- Weave in all ends invisibly into the stuffing.
- Pin **everything** before sewing — symmetry of the eyes and snout is what makes Sid recognisable.
- For a firmer stand, push extra stuffing into the feet and lower body.
- Brush a little Contrast A "tuft" of loose yarn strands on the crown for Sid's spiky hair, then trim.

## Size Adjustments
- **Larger Sid:** Add one more increase round to the body (work to **[36]**) and head (work to **[30]**); add extra plain rounds.
- **Keychain Sid:** Stop the body at **[18]** and head at **[18]**, use DK yarn and a 3.5 mm hook; attach a keychain finding to the crown.

Enjoy your goofy little sloth! 🦥
Disclaimer: This pattern was generated by AI and should be reviewed for accuracy before use. While we strive for quality, AI-generated content may contain errors. Please verify measurements, stitch counts, and instructions before beginning your project. Generated by purlJam.uk
Access your pattern anytime
Bookmark this page to access your pattern anytime