Type
Crochet
Difficulty
intermediate
Category
amigurumi
AI Thinking Process
Planning
Verification
Pattern
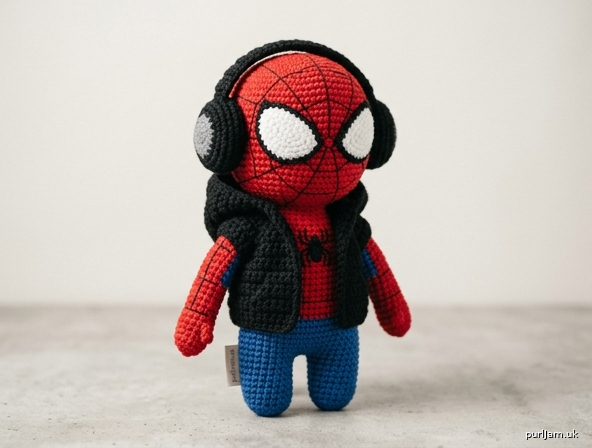
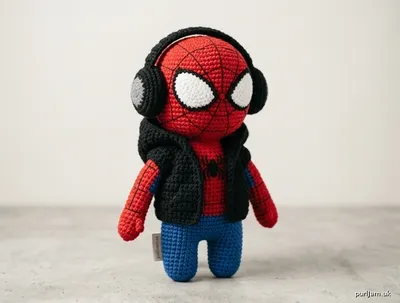
Spider-Man Amigurumi with Hoodie & Headphones
Intermediate Crochet Pattern – Worsted Weight
A classic red-and-blue Spider-Man-inspired amigurumi, approximately 8–9 inches (20–23 cm) tall, finished with a removable black hoodie and chunky headphones. Worked in continuous spirals of single crochet.
Materials
- Yarn (worsted weight / category 4):
- Red (suit & mask): ~80 yd (73 m)
- Blue (suit): ~60 yd (55 m)
- Black (hoodie, headphones, web details): ~70 yd (64 m)
- White (eye patches): ~15 yd (14 m)
- Small amount of gray or dark gray (headphone details, optional)
- Hook: US E-4 (3.5 mm) – go down a size from yarn label for dense fabric
- Notions:
- Stitch marker
- Yarn needle
- Polyester fiberfill
- 2 black safety eyes 8–10 mm (optional; embroidery recommended for mask look)
- Pins for assembly
- Scissors
- Gauge: 5 sc × 5 rnds = 1" (2.5 cm) in continuous sc (tight). Exact gauge not critical but fabric must be dense so stuffing does not show.
- Finished Size: Approx. 8–9" (20–23 cm) tall when standing.
Abbreviations (US Terms)
- MR: magic ring (adjustable ring)
- sc: single crochet
- inc: 2 sc in same stitch
- dec: invisible decrease (insert hook in FLO of next 2 sts, yo, pull through both, yo, pull through 3 loops)
- ch: chain
- sl st: slip stitch
- st(s): stitch(es)
- rnd(s): round(s)
- FLO: front loop only
- BLO: back loop only
- [ ] : stitch count at end of round
- ( ) : work instructions in parentheses as a set
- **: repeat between asterisks
Work in continuous spiral unless noted. Do not join rounds. Move stitch marker up each round.
Head (make 1 – Red)
Stuff firmly as you go, especially before final decreases. Eye patches are added before closing.
Rnd 1: 6 sc in MR. [6]
Rnd 2: inc in each st around. (6 inc → 6 + 6 = 12 ✓) [12]
Rnd 3: (sc, inc) around. (6 inc → 12 + 6 = 18 ✓) [18]
Rnd 4: (2 sc, inc) around. (6 inc → 18 + 6 = 24 ✓) [24]
Rnd 5: (3 sc, inc) around. (6 inc → 24 + 6 = 30 ✓) [30]
Rnd 6: (4 sc, inc) around. (6 inc → 30 + 6 = 36 ✓) [36]
Rnds 7–14: sc in each st around. [36] (8 even rounds for height)
Rnd 15: (4 sc, dec) around. (6 dec → 36 – 6 = 30 ✓) [30]
Rnd 16: (3 sc, dec) around. (6 dec → 30 – 6 = 24 ✓) [24]
Place eye patches now (see Eye Patches below). If using safety eyes, insert them through the white patches and into the head between Rnds 10–12, spaced about 6–7 sts apart, then secure backs. Embroider black outlines around patches if desired.
Rnd 17: (2 sc, dec) around. (6 dec → 24 – 6 = 18 ✓) [18]
Stuff head firmly, shaping into a smooth sphere.
Rnd 18: (sc, dec) around. (6 dec → 18 – 6 = 12 ✓) [12]
Rnd 19: dec around. (6 dec → 12 – 6 = 6 ✓) [6]
Fasten off, leaving a long tail. Thread tail through remaining 6 sts and pull tight to close. Weave in end.
Eye Patches (make 2 – White)
Worked in continuous rounds.
Rnd 1: 6 sc in MR. [6]
Rnd 2: inc in each st around. [12]
Rnd 3: (sc, inc) around. [18]
Sl st in next st. Fasten off, leaving long tail for sewing.
Flatten slightly into elongated ovals (Spider-Man eye shape). Sew or glue firmly to head between Rnds 9–13, angled slightly upward and outward. With black yarn, embroider a thin outline around each patch and a small curved “lens” line if desired. Optional: add tiny white highlight stitches.
Body (make 1 – Blue with Red accent)
Starts at the bottom (hips) in blue, changes to red for upper torso if desired, or keep mostly blue with red spider emblem area. Classic look: blue lower body/legs area, red chest. For simplicity this body is blue with a red chest band.
Rnd 1: 6 sc in MR. [6]
Rnd 2: inc around. [12]
Rnd 3: (sc, inc) around. [18]
Rnd 4: (2 sc, inc) around. [24]
Rnd 5: (3 sc, inc) around. [30]
Rnd 6: (4 sc, inc) around. [36]
Rnd 7: (5 sc, inc) around. (6 inc → 36 + 6 = 42 ✓) [42]
Rnds 8–12: sc around. [42] (blue)
Rnd 13: Change to red. sc around. [42]
Rnds 14–18: sc around in red. [42]
Rnd 19: (5 sc, dec) around. (6 dec → 42 – 6 = 36 ✓) [36]
Rnd 20: (4 sc, dec) around. (6 dec → 36 – 6 = 30 ✓) [30]
Stuff body very firmly, especially the base so the figure stands.
Rnd 21: (3 sc, dec) around. [24]
Rnd 22: (2 sc, dec) around. [18]
Fasten off, leaving a long tail for sewing to head. Stuff neck area extra firmly before attaching head.
Optional: with black yarn, embroider a simple spider emblem on the red chest (small oval body + 8 legs).
Arms (make 2 – Red)
Lightly stuff lower half only; leave top open for sewing.
Rnd 1: 6 sc in MR. [6]
Rnd 2: (sc, inc) around. [9]
Rnds 3–12: sc around. [9] (10 even rounds ≈ 2" length)
Rnd 13: (sc, dec) around. [6]
Fasten off, leaving long tail. Stuff hand/lower arm lightly. Flatten open top edge.
Legs (make 2 – Blue)
Stuff moderately firmly so legs support the body.
Rnd 1: 6 sc in MR. [6]
Rnd 2: inc around. [12]
Rnd 3: (3 sc, inc) around. [15]
Rnds 4–5: sc around. [15] (foot shaping)
Rnd 6: (3 sc, dec) around. [12]
Rnds 7–16: sc around. [12] (10 even rounds for leg length)
Fasten off, leaving long tail. Stuff firmly. Flatten open top.
Hoodie (Black) – Removable
Worked flat in rows for the body, then seamed. Hood worked separately and attached. Designed to fit snugly over the 42-st body.
Hoodie Body
Ch 29 (foundation for width that wraps ~42-st circumference when seamed).
Row 1: sc in 2nd ch from hook and each ch across. [28]
Rows 2–16: ch 1, turn, sc in each st across. [28]
(Adjust rows 14–18 if you want a longer/shorter hoodie.)
Armhole shaping (optional simple version):
On next 2 rows, sc across first 6 sts, ch 8 for armhole, skip 8 sts, sc remaining 6 sts on each side—or keep as a simple open-front or pullover tube.
For easy pullover hoodie (recommended):
After Row 16, fold rectangle and whip-stitch short side seam, leaving a 1.5" neck opening at top and two 1" arm openings if desired. Or leave front open as a jacket and add 2–3 small button or tie closures with black yarn.
Fasten off and weave ends.
Hood
Rnd 1: 6 sc in MR. [6]
Rnd 2: inc around. [12]
Rnd 3: (sc, inc) around. [18]
Rnd 4: (2 sc, inc) around. [24]
Rnd 5: (3 sc, inc) around. [30]
Rnds 6–11: sc around. [30]
Rnd 12: (3 sc, dec) around. [24]
Flatten hood into a half-dome. Fasten off, leaving long tail. Sew curved edge of hood to the neckline of the hoodie body, centering it at the back. Leave front of hood open so it can sit on the amigurumi’s head.
Optional pocket: ch 10, work 6 rows sc, sew to lower front of hoodie.
Headphones (Black + Gray accents)
Ear Cups (make 2)
Rnd 1: 6 sc in MR. [6]
Rnd 2: inc around. [12]
Rnd 3: (sc, inc) around. [18]
Rnd 4: sc around in BLO. [18] (creates a slight rim)
Rnd 5: sc around. [18]
Sl st, fasten off, leaving tail. Lightly stuff. With gray, embroider a small inner circle or sew a tiny gray sc circle (6 sc MR) to the center of each cup for the speaker look.
Headband
Ch 22 (or length to arch over head + reach both cups).
Row 1: sc in 2nd ch and each ch across. [21]
Rows 2–3: ch 1, turn, sc across. [21]
Fasten off, leaving tails at both ends. Sew one end of headband securely to the top edge of each ear cup. Curve the band so it sits naturally on the head. Optional: wrap a bit of gray yarn around the center of the band for a logo detail.
Assembly
- Head to Body: Pin head onto open neck of body. Add final stuffing through neck. Whip-stitch securely all around with matching yarn (red or blue). Reinforce the join.
- Legs: Pin legs to bottom of body (Rnd 1–3 area), angled slightly forward for standing stability. Whip-stitch firmly. Make sure both legs are equal length and the figure stands without tipping.
- Arms: Pin arms to sides of body at approx. Rnd 18–20 (shoulder height). Attach at a slight downward angle. Whip-stitch. For a “hands on hips” or relaxed pose, position accordingly before sewing.
- Hoodie: Dress the finished figure in the hoodie. Adjust hood so it sits behind or partially over the head. If made as a jacket, close front loosely.
- Headphones: Place ear cups over the sides of the head (covering upper edges of eye patches slightly or sitting just above). The headband arches over the top of the head. Tack in place with a few hidden stitches if you want them permanent, or leave removable.
- Web details (optional): With black yarn and yarn needle, embroider light web lines on the red head and arms using long straight stitches in a classic Spider-Man web pattern (radial lines from a center point + connecting arcs). Keep stitches surface-level so they do not pull the fabric.
- Final shaping: Adjust stuffing if needed. Smooth all seams. Weave in every remaining end securely.
Finishing & Care
- Embroider a small red or black spider on the hoodie chest if desired.
- Check that all parts (especially eyes, headphones, limbs) are firmly attached.
- Surface clean only; do not machine wash.
- Store in a dry place away from direct sunlight to prevent fading.
Safety Notes
- For children under 3 years, embroider all facial features instead of using safety eyes, and ensure every piece is sewn on extremely securely (no removable headphones or loose hoodie parts that could detach).
- Test limb and head attachments with a firm tug.
- This is a decorative/collectible amigurumi; supervise play.
Tips for Success
- Maintain consistent tight tension so the suit looks smooth and no stuffing shows.
- Stuff the body and legs more firmly than the arms for good posture.
- If the hoodie feels loose, add 1–2 sc decreases on the side seam; if tight, add a few chains to the foundation.
- Customize colors freely (e.g., black suit with red hoodie for a different Spider-variant look).
Enjoy your Spider-Man amigurumi complete with hoodie and headphones!
Disclaimer: This pattern was generated by AI and should be reviewed for accuracy before use. While we strive for quality, AI-generated content may contain errors. Please verify measurements, stitch counts, charts, and instructions before beginning your project. Generated by purlJam.uk
Love this pattern?
Save this pattern to your free PurlJam libraryAccess your pattern anytime
Bookmark this page to access your pattern anytime