Type
Crochet
Difficulty
intermediate
Category
amigurumi
AI Thinking Process
Planning
Verification
Pattern
Teal Snake Devil Fruit
An intermediate amigurumi pattern
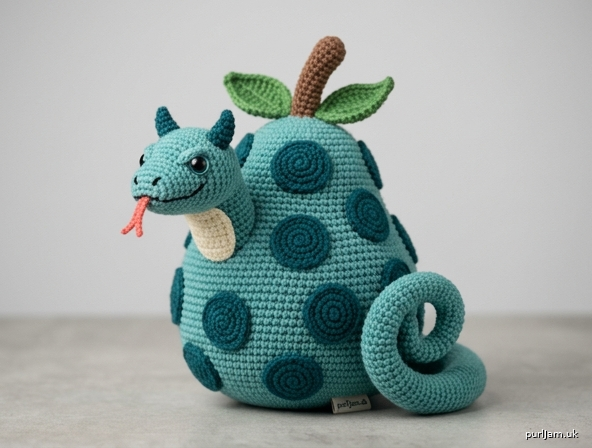
A plump teal fruit covered in raised devil-fruit swirls, with a mischievous snake head, coiling tail, forked tongue and a pair of little devil horns. Worked in worsted yarn with UK double crochet.
Skill level: Intermediate
Finished size: About 15 cm (6 in) tall when seated (base to stem tip) and about 22 cm (8¾ in) from horn tips to the end of an extended tail. Fruit body about 9 cm (3½ in) tall and 8.5 cm (3¼ in) wide.
Materials
Yarn — worsted / Aran (medium weight 4; approx. 180–200 m per 100 g)
| Colour | Role | Amount |
|---|---|---|
| A Teal | Head, body, tail | 80 g (approx. 150 m) |
| B Dark teal / petrol | Swirl motifs | 20 g (approx. 40 m) |
| C Chocolate brown | Stem | 8 g |
| D Leaf green | Leaves | 8 g |
| E Cream | Throat patch | 5 g |
| F Coral or red | Tongue | 2 g (scrap) |
| G Black | Nostrils, brows, mouth | 2 g (scrap) |
| Pink (optional) | Cheek embroidery | scrap |
Any worsted/Aran acrylic or cotton-blend with similar metreage will work (for example Stylecraft Special Aran or Paintbox Yarns Simply Aran).
Hook: 3.5 mm (US E-4). If stuffing shows through, drop to 3.0 mm.
Notions
- Pair of 9 mm safety eyes (see Safety)
- Polyester toy stuffing
- Stitch marker
- Yarn needle
- Scissors
- Optional: pink dry pastel or cosmetic blush for cheeks; sewing pins
Tension (gauge)
11 dc and 11 rounds = 5 cm × 5 cm (2 in × 2 in), worked in the round in dc on 3.5 mm hook.
Amigurumi tension should be firm enough that stuffing does not show. Do not worry if your square is slightly smaller; a dense fabric is the goal. If your fabric is loose and gappy, use a 3.0 mm hook.
Abbreviations (UK)
| Abbreviation | Meaning |
|---|---|
| BLO | back loop only |
| ch | chain |
| dc | double crochet (US sc) |
| dc2tog | double crochet 2 together (decrease) |
| dec | invisible decrease (see Special stitches) |
| dtr | double treble (US tr) |
| FLO | front loop only |
| FO | fasten off |
| htr | half treble (US hdc) |
| inc | 2 dc in the same stitch (increase) |
| MR | magic ring (magic loop) |
| rnd(s) | round(s) |
| sl st | slip stitch |
| st(s) | stitch(es) |
| tr | treble (US dc) |
| yrh | yarn round hook |
Work in continuous spirals unless the pattern says otherwise. Do not join or turn at the end of a round. Mark the first stitch of every round and move the marker up as you go.
Special stitches
Invisible decrease (dec): Insert hook under the front loop only of the next stitch, then under the front loop only of the following stitch (3 loops on hook). Yrh and pull through both front loops (2 loops on hook). Yrh and pull through both loops. Counts as 1 dc.
Magic ring: Wrap yarn around a finger to form a loop, work the stated dc into the loop, then pull the tail to close. If you prefer, ch 2 and work the dc into the second ch from the hook, then sew the hole shut later.
Pattern notes
- Stuff as you go. The fruit body must be very firmly stuffed so it holds a round, apple-like shape under the swirl motifs.
- Leave long tails (30–40 cm / 12–16 in) on pieces that will be sewn on.
- The swirl motifs are the signature of this fruit. Sew them on before attaching the head, tail and stem, leaving clear patches for those joins.
- Colour A is used for the snake and the fruit flesh so they read as one creature.
Safety
Safety eyes contain small parts and are not suitable for children under 3 years. For a baby-safe toy, embroider the eyes with G (black) after stuffing, using satin stitch ovals about 8 mm tall with a tiny cream highlight.
Pieces
Head (A, teal)
Worked from the snout-back of a slightly tall sphere.
Rnd 1: 6 dc in MR. (6)
Rnd 2: 6 inc. (6 increases → 6 + 6 = 12 ✓)
Rnd 3: (1 dc, inc) 6 times. (6 increases → 12 + 6 = 18 ✓)
Rnd 4: (2 dc, inc) 6 times. (6 increases → 18 + 6 = 24 ✓)
Rnd 5: (3 dc, inc) 6 times. (6 increases → 24 + 6 = 30 ✓)
Rnd 6: (4 dc, inc) 6 times. (6 increases → 30 + 6 = 36 ✓)
Rnds 7–12: 1 dc in each st around. (6 rounds at 36 sts ✓)
Place eyes now: Insert 9 mm safety eyes between Rnds 9 and 10, with 8 stitches between the posts, on the front of the head. Do not fix the washers until you are happy with the expression; the eyes should sit slightly low and close enough to look cheeky.
Rnd 13: (4 dc, dec) 6 times. (6 decreases → 36 − 6 = 30 ✓)
Rnd 14: (3 dc, dec) 6 times. (6 decreases → 30 − 6 = 24 ✓)
Rnd 15: (2 dc, dec) 6 times. (6 decreases → 24 − 6 = 18 ✓)
Stuff the head firmly, pushing extra stuffing into the cheek area at each side of the eyes.
Rnd 16: (1 dc, dec) 6 times. (6 decreases → 18 − 6 = 12 ✓)
Rnd 17: 6 dec. (6 decreases → 12 − 6 = 6 ✓)
FO. Thread the tail through the front loops of the remaining 6 sts, pull closed, weave in. Head is about 5 cm (2 in) across and a little taller than it is wide.
Fruit body (A, teal)
The main sphere. Worked from the top (stem end) down.
Rnd 1: 6 dc in MR. (6)
Rnd 2: 6 inc. (6 increases → 6 + 6 = 12 ✓)
Rnd 3: (1 dc, inc) 6 times. (6 increases → 12 + 6 = 18 ✓)
Rnd 4: (2 dc, inc) 6 times. (6 increases → 18 + 6 = 24 ✓)
Rnd 5: (3 dc, inc) 6 times. (6 increases → 24 + 6 = 30 ✓)
Rnd 6: (4 dc, inc) 6 times. (6 increases → 30 + 6 = 36 ✓)
Rnd 7: (5 dc, inc) 6 times. (6 increases → 36 + 6 = 42 ✓)
Rnd 8: (6 dc, inc) 6 times. (6 increases → 42 + 6 = 48 ✓)
Rnd 9: (7 dc, inc) 6 times. (6 increases → 48 + 6 = 54 ✓)
Rnd 10: (8 dc, inc) 6 times. (6 increases → 54 + 6 = 60 ✓)
Rnds 11–20: 1 dc in each st around. (10 rounds at 60 sts ✓)
Rnd 21: (8 dc, dec) 6 times. (6 decreases → 60 − 6 = 54 ✓)
Rnd 22: (7 dc, dec) 6 times. (6 decreases → 54 − 6 = 48 ✓)
Rnd 23: (6 dc, dec) 6 times. (6 decreases → 48 − 6 = 42 ✓)
Rnd 24: (5 dc, dec) 6 times. (6 decreases → 42 − 6 = 36 ✓)
Rnd 25: (4 dc, dec) 6 times. (6 decreases → 36 − 6 = 30 ✓)
Rnd 26: (3 dc, dec) 6 times. (6 decreases → 30 − 6 = 24 ✓)
Stuff very firmly as you close — the body should feel solid, like a firm apple. Add extra stuffing just before the last two rounds.
Rnd 27: (2 dc, dec) 6 times. (6 decreases → 24 − 6 = 18 ✓)
Rnd 28: (1 dc, dec) 6 times. (6 decreases → 18 − 6 = 12 ✓)
Rnd 29: 6 dec. (6 decreases → 12 − 6 = 6 ✓)
FO. Close the remaining hole as for the head and weave in. Body is about 9 cm (3½ in) tall and 8.5 cm (3¼ in) wide.
Tail (A, teal)
Worked from the tip up. Stuff lightly as you go, leaving the last 3 cm (1¼ in) almost empty so the tail can coil.
Rnd 1: 6 dc in MR. (6)
Rnd 2: (1 dc, inc) 3 times. (3 increases → 6 + 3 = 9 ✓)
Rnds 3–5: 1 dc in each st around. (3 rounds at 9 sts ✓)
Rnd 6: (2 dc, inc) 3 times. (3 increases → 9 + 3 = 12 ✓)
Rnds 7–10: 1 dc in each st around. (4 rounds at 12 sts ✓)
Rnd 11: (3 dc, inc) 3 times. (3 increases → 12 + 3 = 15 ✓)
Rnds 12–16: 1 dc in each st around. (5 rounds at 15 sts ✓)
Rnd 17: (4 dc, inc) 3 times. (3 increases → 15 + 3 = 18 ✓)
Rnds 18–24: 1 dc in each st around. (7 rounds at 18 sts ✓)
FO, leaving a 40 cm (16 in) tail for sewing. Tail length is about 11 cm (4¼ in). Curve it in your hands so it wants to wrap around the fruit.
Stem (C, brown)
Worked from the base (fruit end) up. BLO gives a woody ridge.
Rnd 1: 6 dc in MR. (6)
Rnd 2: (1 dc, inc) 3 times. (3 increases → 6 + 3 = 9 ✓)
Rnds 3–8: 1 dc BLO in each st around. (6 rounds at 9 sts ✓)
FO, leaving a 25 cm (10 in) tail. Stuff lightly with the starting yarn tail and a pinch of stuffing. Stem is about 3.5 cm (1½ in) tall.
Leaves (D, green) — make 2
Worked in a round around a foundation chain.
Ch 10.
Rnd 1: Dc in 2nd ch from hook, htr in next ch, tr in next ch, dtr in next 2 ch, tr in next ch, htr in next ch, dc in next ch, (sl st, ch 2, sl st) in last ch (tip made). Working along the other side of the chain: dc in next ch, htr in next ch, tr in next ch, dtr in next 2 ch, tr in next ch, htr in next ch, dc in next ch, sl st in first dc to join. (8 sts each side + tip ✓)
FO, leaving a 20 cm (8 in) tail. Gently pinch the tip. Do not stuff.
Horns (B, dark teal) — make 2
Small cones. Stuff with the yarn tail only.
Rnd 1: 4 dc in MR. (4)
Rnd 2: (1 dc, inc) 2 times. (2 increases → 4 + 2 = 6 ✓)
Rnds 3–5: 1 dc in each st around. (3 rounds at 6 sts ✓)
FO, leaving a 20 cm (8 in) tail. Pinch the open end into an oval ready for sewing. Each horn is about 1.5 cm (⅝ in) tall.
Devil-fruit swirls (B, dark teal) — make 14
These raised discs are the fruit’s signature skin. Do not join the rounds — the visible spiral is part of the look. Close the magic ring firmly but not so tightly that the centre vanishes.
Rnd 1: 6 dc in MR. (6)
Rnd 2: 6 inc. (6 increases → 6 + 6 = 12 ✓)
Rnd 3: (1 dc, inc) 6 times. (6 increases → 12 + 6 = 18 ✓)
FO, leaving a 25 cm (10 in) tail for sewing. Weave the starting tail to the back. Each disc is about 2.5 cm (1 in) across.
Make all 14 before assembly. For a denser, more classic covering you may add 2 extra swirls (16 total) using the same three rounds.
Forked tongue (F, coral/red)
Ch 9.
Sl st in 2nd ch from hook, sl st in next 2 ch (first fork = 3 sl sts), ch 4, sl st in 2nd ch from hook, sl st in next 2 ch (second fork = 3 sl sts), sl st in each of the remaining 5 foundation chains (the stem).
FO, leaving a 15 cm (6 in) tail. The tongue is a small Y-shape, about 3 cm (1¼ in) long.
Throat patch (E, cream)
A small oval sewn under the jaw.
Ch 6.
Rnd 1: Dc in 2nd ch from hook, 1 dc in next 3 ch, 3 dc in last ch; rotate and work along the other side of the chain: 1 dc in next 3 ch, 2 dc in the same ch as the first dc. (12 ✓)
Rnd 2: Inc, 3 dc, 3 inc, 3 dc, 2 inc. (1 + 3 + 3 + 3 + 2 sts used = 12; 2 + 3 + 6 + 3 + 4 = 18 sts made ✓)
Sl st in first dc. FO, leaving a 20 cm (8 in) tail. Do not stuff; keep the patch flat.
Assembly
Pin every piece before sewing. Use whip stitch or mattress stitch with the matching yarn tail, taking small stitches so they disappear into the dc fabric.
1. Face details (head)
With G (black) and a yarn needle:
- Nostrils: two small vertical stitches, 2 sts apart, centred between the eyes and 2 rounds below them.
- Mouth: a shallow V or gentle curve, 2 rounds below the nostrils, about 5 sts wide. A tiny stitch at each corner reads as a smirk.
- Brows (optional): one short stitch above each eye, angling up and out.
Sew the throat patch to the underside of the head, from just below the mouth down toward the closing hole, covering the lower 4–5 rounds. Keep it centred.
Insert the tongue into the mouth: push the stem of the Y through a stitch in the mouth line so the forks sit outside, and fasten the tail securely on the inside of the head (if the head is already closed, catch the stem with a few stitches on the surface just inside the mouth).
Sew the horns to the top of the head, between Rnds 4 and 7, about 4 sts apart, angling them slightly outward and back. They should read as a pair of devil nubs, not as fruit-stem replacements.
Optional: a few satin stitches of pink on each cheek, or a dab of dry pastel blended with a fingertip.
2. Swirls on the fruit
This is the most important visual step. Pin all 14 swirls onto the body before sewing any of them, then adjust.
Leave these three clear zones with no swirls:
- Upper front — a circle about 4.5 cm (1¾ in) across, where the head will sit (roughly Rnds 8–16 of the body).
- Top centre — the magic-ring area plus about 1.5 cm (⅝ in) around it, for the stem.
- Lower back — a patch about 3 cm (1¼ in) across near Rnds 20–26, for the tail.
Scatter the 14 discs over the rest of the surface so they sit close together, with edges almost touching or overlapping by 2–3 mm. Rotate some discs so the spiral centres do not all point the same way. Sew each disc around its outer round, catching the body fabric underneath. A few extra tacking stitches through the centre of each swirl will stop it from lifting.
3. Head to body
Pin the head onto the upper-front clear zone, covering roughly Rnds 8–16 of the body, slightly above the body’s “equator” so the snake is looking forward and a little down. The throat patch should face down and slightly forward. Sew all the way around the join, adding a pinch of extra stuffing just before you close the last 2 cm if the neck looks hollow.
4. Tail to body
Pin the open (18-st) end of the tail to the lower-back clear zone. Sew it in place. Wrap the tail around the fruit’s right side (as you look at the face) so it hugs the swirls, and tack it down in two more spots — once at mid-length and once near the last third — so it holds a coil. The tip should sit free, curling forward.
5. Stem and leaves
Sew the stem over the top-centre of the body, covering Rnd 1 and a little of Rnd 2. Angle it about 10–15 degrees off vertical, as a real fruit stem would sit.
Sew one leaf to each side of the stem, about 1 cm (⅜ in) down from the stem tip, so the leaves flare out and slightly forward. A single stitch through the base of each leaf is enough; let them stand away from the fruit.
6. Final shaping
Roll the fruit body between your palms to round it. Bend the tail into a smoother coil. Steam is not recommended (acrylic can shine); instead, shape with your hands and leave the toy sitting overnight.
Weave in every remaining tail, burying them deep in the stuffing.
Finishing checklist
- [ ] Safety eyes locked (or eyes embroidered)
- [ ] Nostrils, mouth and optional brows stitched
- [ ] Tongue sitting in the mouth
- [ ] Horns paired on top of the head
- [ ] Throat patch centred under the jaw
- [ ] 14 swirls covering the fruit, with clear zones for head, stem and tail
- [ ] Head sewn on, looking forward
- [ ] Tail coiled and tacked
- [ ] Stem and two leaves on top
- [ ] All ends buried; stuffing not showing
Your Teal Snake Devil Fruit is ready — a firm little fruit with a devilish snake in residence.
Disclaimer: This pattern was generated by AI and should be reviewed for accuracy before use. While we strive for quality, AI-generated content may contain errors. Please verify measurements, stitch counts, charts, and instructions before beginning your project. Generated by purlJam.uk
Love this pattern?
Save this pattern to your free PurlJam libraryAccess your pattern anytime
Bookmark this page to access your pattern anytime