Type
Crochet
Difficulty
intermediate
Category
blanket
AI Thinking Process
Planning
Verification
Pattern
Textured Ripple Chevron Throw
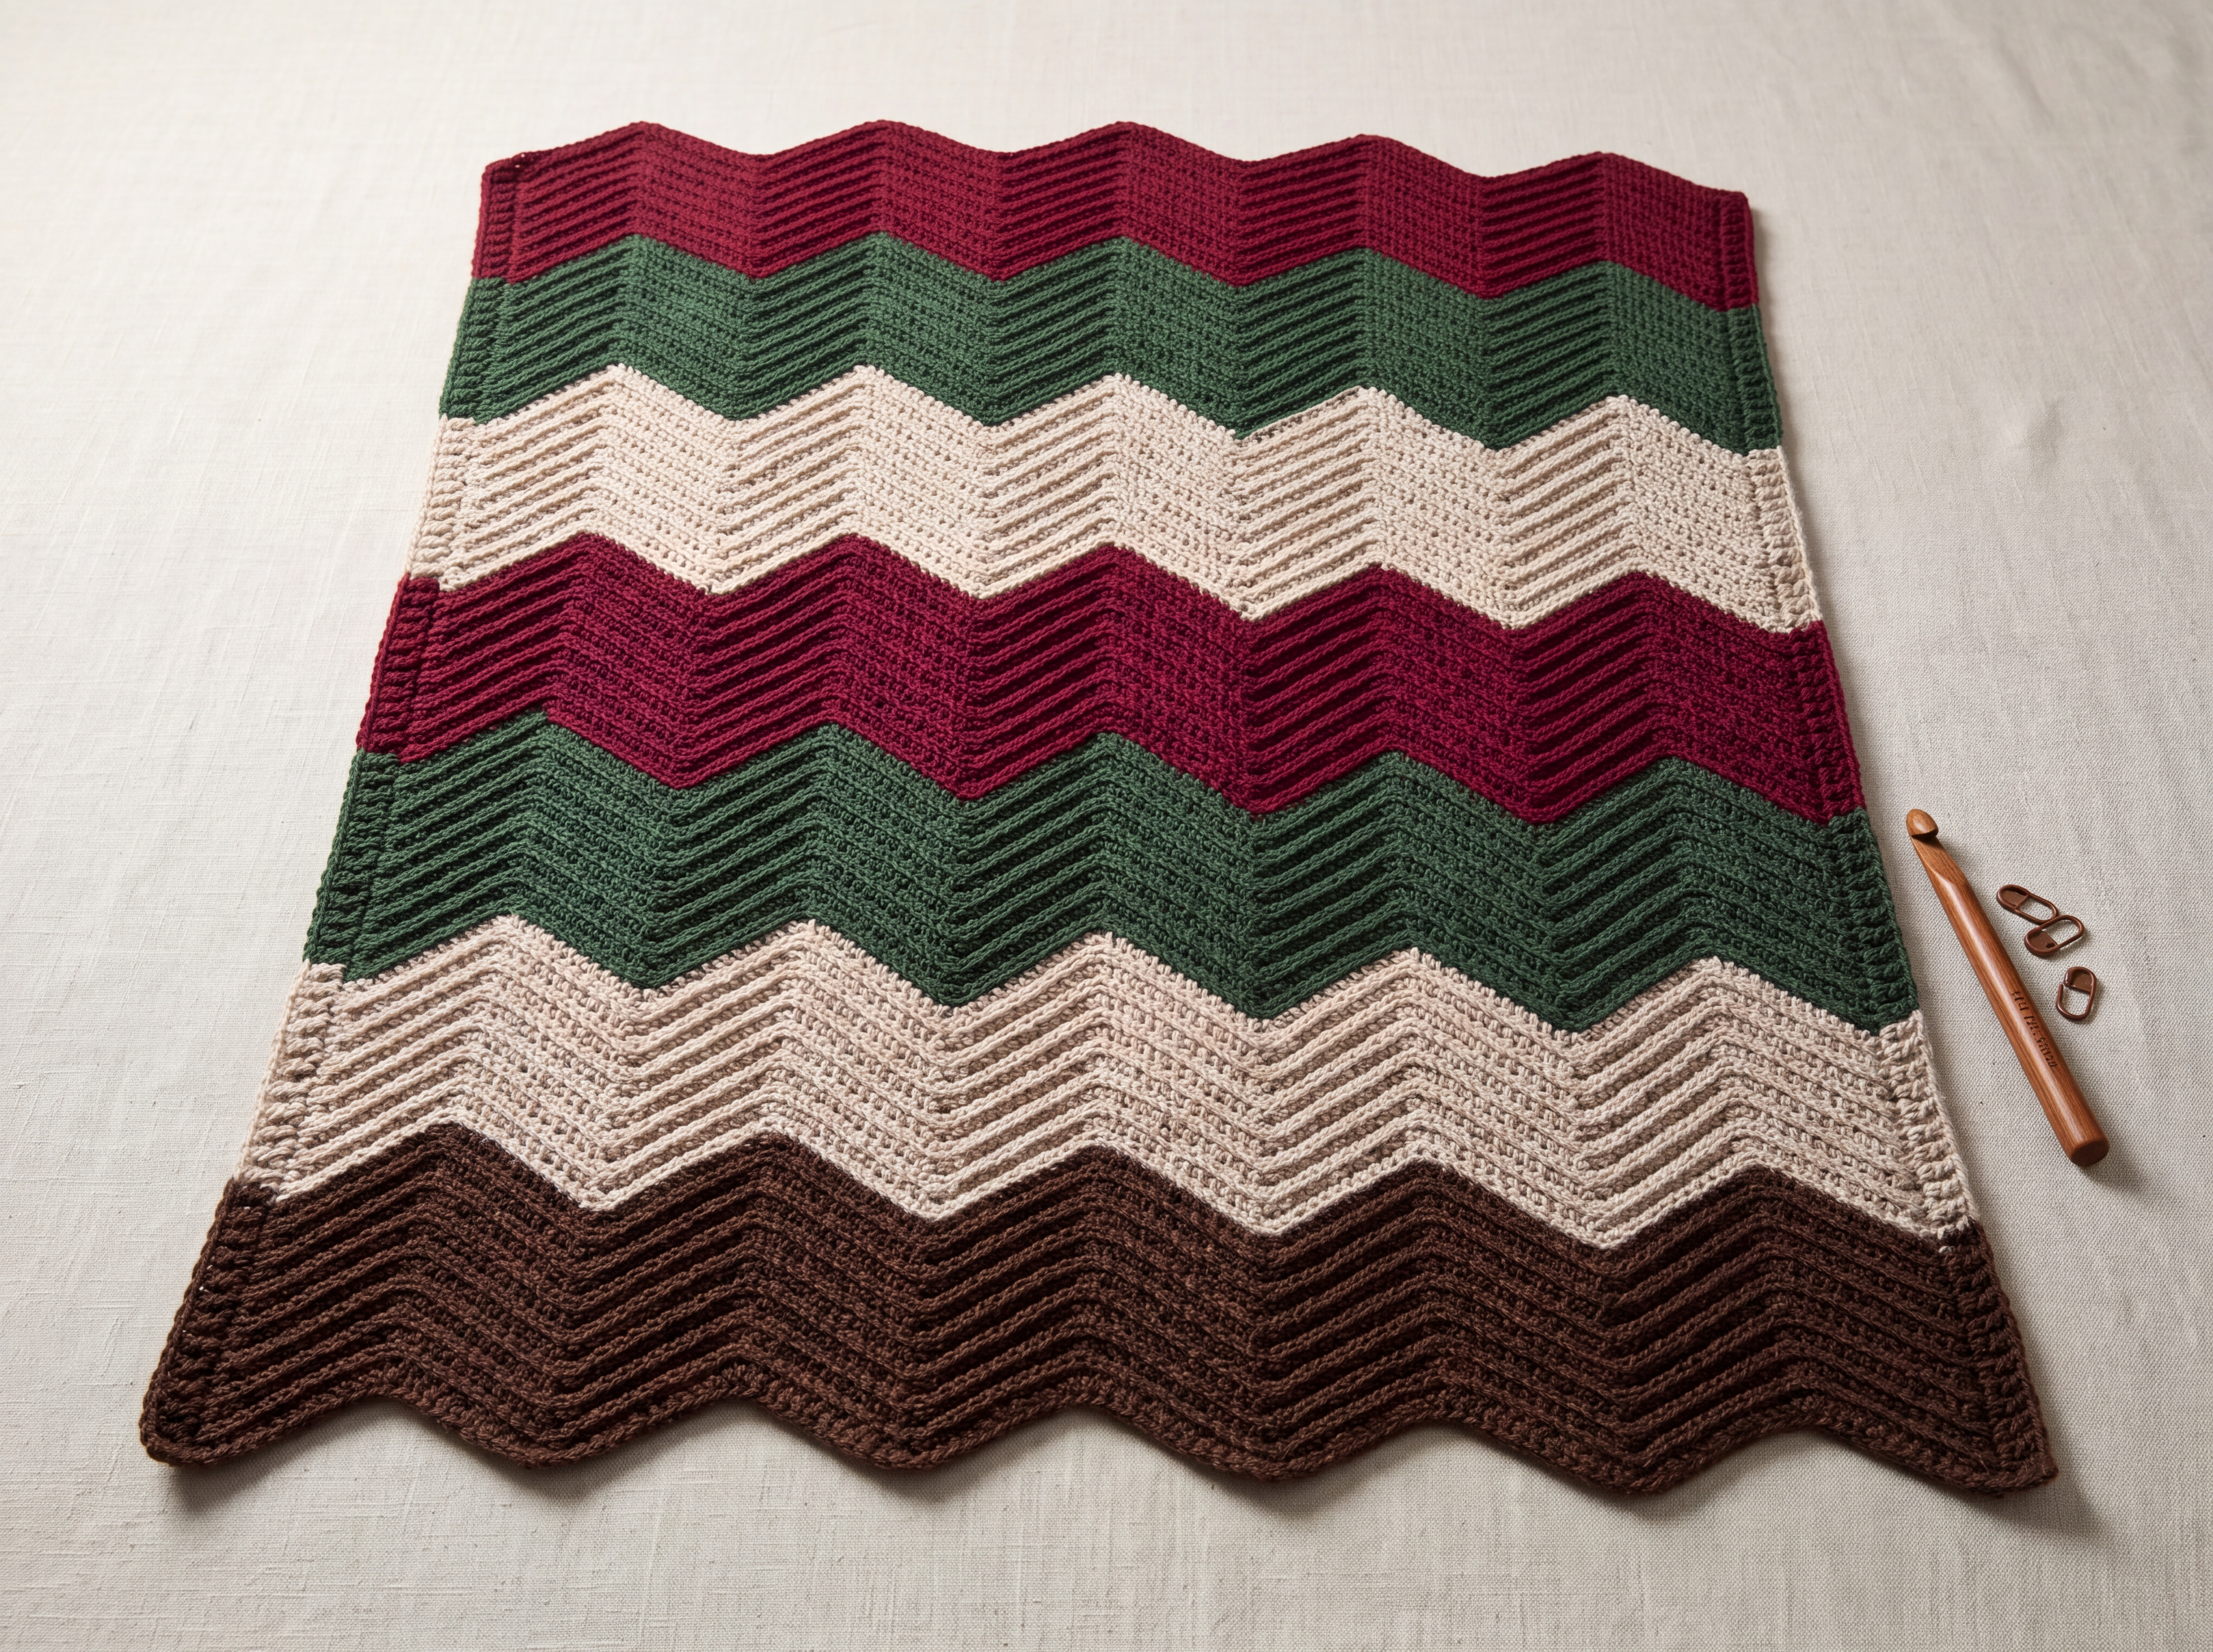
A modern ripple afghan worked flat in worsted-weight yarn. Stacked double-crochet waves form a rhythmic 14-stitch chevron: sharp 3-dc peaks, closed dc3tog valleys, and back-loop slope stitches that give the fabric a fine horizontal texture. Both long edges are straight. Color-block stripes of chocolate brown, oatmeal, forest green, and rich burgundy repeat down the length.
The fabric is reversible. Either face may be displayed.
Skill Level
Intermediate — you should be comfortable with double crochet, working decreases, keeping a long repeat, and changing colors.
Finished Size
50 inches wide × 60 inches long (127 × 152 cm), blocked.
12 waves across the width. Straight side edges. Chevron peaks and valleys along the top and bottom edges.
Materials
Yarn: Worsted weight (CYC #4), any fiber suitable for a throw.
| Color | Amount |
|---|---|
| Chocolate brown | 625 yards (572 m) |
| Oatmeal | 625 yards (572 m) |
| Forest green | 625 yards (572 m) |
| Rich burgundy | 625 yards (572 m) |
Total: about 2500 yards (2286 m).
Yardage is an estimate for the textured chevron at the gauge below. Buy enough of one dye lot for each color. Typical 100 g worsted skeins run 180–220 yards (165–200 m); plan on 3 skeins of each color, and a 4th skein of chocolate brown if your skeins are under 200 yards, because the foundation chain is chocolate.
Hook: US I/9 (5.5 mm), or the size needed to obtain gauge. Have a US H/8 (5 mm) and a US J/10 (6 mm) nearby in case you need to adjust.
Notions: Tapestry needle, scissors, locking stitch markers (optional, up to 12), blocking pins and a flat surface.
Gauge
27 stitches and 16 rows = 8 inches (20 cm) in the chevron pattern, blocked.
Equivalent: 13.5 stitches and 8 rows = 4 inches (10 cm).
Measure in the pattern stitch, not in plain double crochet. Back-loop stitches change the fabric density.
Swatch: Ch 45. Work Row 1 and Row 2 of the pattern (this chain gives 3 peaks and 43 stitches). Continue in pattern for 16 rows, changing nothing about the repeat. Block the swatch. In the center, 27 stitches should measure 8 inches (20 cm), and 16 rows should measure 8 inches (20 cm). If the swatch is too wide, use a smaller hook; if it is too narrow, use a larger hook. Re-swatch until both stitch and row gauge match. Row gauge sets the length; stitch gauge sets the width.
Abbreviations (US)
| Abbreviation | Meaning |
|---|---|
| blo | back loop only |
| ch | chain |
| dc | double crochet |
| dc-blo | double crochet in the back loop only |
| dc2tog | double crochet 2 stitches together |
| dc3tog | double crochet 3 stitches together |
| rep | repeat |
| RS | right side |
| st(s) | stitch(es) |
| WS | wrong side |
| yo | yarn over |
Special Stitches
dc2tog (edge decrease): Yo, insert hook in next st, yo, pull up a loop, yo, pull through 2 loops (2 loops remain on hook). Yo, insert hook in next st, yo, pull up a loop, yo, pull through 2 loops (3 loops remain). Yo, pull through all 3 loops. Counts as 1 stitch. Worked through both loops.
dc3tog (valley): [Yo, insert hook in next st, yo, pull up a loop, yo, pull through 2 loops] 3 times (4 loops remain). Yo, pull through all 4 loops. Counts as 1 stitch. Worked through both loops. This closes the valley with no eyelet.
3-dc peak: Work 3 dc into the same stitch, through both loops. The center (2nd) of these 3 dc is the peak stitch. On the following row the next peak is worked into that center stitch.
dc-blo (slope texture): Yo, insert hook under the back loop only of the next st, yo, pull up a loop, yo, pull through 2 loops, yo, pull through remaining 2 loops.
Back bump of a chain: The horizontal ridge on the reverse of the foundation chain. Working into it leaves a neat corded bottom edge.
Pattern Notes
- Throw is worked flat, in rows, in one piece. Do not join.
- Turning chain: At the start of Rows 2–120, ch 2. The ch-2 does not count as a stitch and is never worked into. Always begin the edge dc2tog in the first real stitch of the row.
- Stitch count is 169 every row. Count once after Row 1, then check the peak count (12) at the end of every row rather than counting every stitch.
- Texture placement is intentional. Slope stitches are dc-blo. Peaks, valleys, and both edge decreases are worked through both loops so the peaks and valleys stay crisp and the side edges stay firm.
- Row 1 is the RS. Odd rows are RS; even rows are WS.
- Each 10-row color block starts on a RS row. Change color at the end of the last (WS) row of the block, in the final pull-through of the last dc2tog: stop when 2 loops remain, drop the old color, yo with the new color, and pull through. Cut the old color, leaving a 6-inch (15 cm) tail. Do not carry yarn up the side — a carried strand will spoil the straight edge.
- Place a marker on the RS after Row 1 if you like, and one marker in the center dc of each peak. Move peak markers up each row. Markers are optional; the repeat stacks the waves without them if the count is kept.
Increase and Decrease Placement
Each row contains the same shaping, stacked so peaks sit on peaks and valleys sit on valleys.
| Place | Stitch | Effect | How many |
|---|---|---|---|
| Peak | 3 dc in one st | +2 | 12 |
| Interior valley | dc3tog | −2 | 11 |
| Each side edge | dc2tog | −1 each | 2 |
Net change: (12 × +2) + (11 × −2) + (2 × −1) = +24 − 22 − 2 = 0. The row stays at 169 stitches (14 × 12 + 1 = 169 ✓).
14-stitch wave, produced and consumed: 3 dc (peak) + 5 dc-blo + dc3tog + 5 dc-blo = 14 stitches (3 + 5 + 1 + 5 = 14 ✓). The two edge dc2tog stitches replace the outer valleys, which is what keeps the sides straight instead of zigzag.
Reading one row, left to right: edge dc2tog, 5 dc-blo up the slope, 3-dc peak, 5 dc-blo down the slope, dc3tog valley — then up, peak, down, valley — ending with 5 dc-blo down the last slope and an edge dc2tog. Both ends sit at valley level, so the side edges are vertical.
Straight Side Edges
- Every row begins with dc2tog over the first 2 stitches and ends with dc2tog over the last 2 stitches.
- Do not skip the first or last stitch. Do not work a plain dc at the edge “to straighten it” — the edge decrease is already the straight edge, and an extra stitch will make the side flare.
- Do not work into the turning chain.
- Work the edge dc2tog at the same tension as the rest of the row. A tight edge will cinch; a loose one will ripple. If the side pulls in, loosen the edge decreases only.
- After blocking, each side edge is a straight column of stacked dc2tog stitches. No side border is required.
Color Sequence
Work 10 rows of each color in this order. Repeat the 4-color sequence 3 times (12 blocks, 120 rows).
10 rows × 4 colors × 3 repeats = 120 rows ✓.
| Rows | Color | Side facing on first row of block |
|---|---|---|
| 1–10 | Chocolate brown | RS |
| 11–20 | Oatmeal | RS |
| 21–30 | Forest green | RS |
| 31–40 | Rich burgundy | RS |
| 41–50 | Chocolate brown | RS |
| 51–60 | Oatmeal | RS |
| 61–70 | Forest green | RS |
| 71–80 | Rich burgundy | RS |
| 81–90 | Chocolate brown | RS |
| 91–100 | Oatmeal | RS |
| 101–110 | Forest green | RS |
| 111–120 | Rich burgundy | RS |
Each block is 10 rows × 4 inches / 8 rows = 5 inches (12.5 cm) deep. Three repeats fill 60 inches (152 cm) ✓.
Change color at the end of rows 10, 20, 30, 40, 50, 60, 70, 80, 90, 100, and 110. Row 120 is the last row; fasten off in burgundy.
Color Stripe Options
The stitch pattern does not change. Only the row on which you change color changes. Yardage stays essentially the same if each color is still used for 30 rows total.
- As written — color-block stripes: 10-row blocks, sequence repeated 3 times. This is the pattern below.
- Bold panels: 30 rows chocolate, 30 rows oatmeal, 30 rows forest green, 30 rows burgundy. One pass of four large blocks, still 120 rows.
- Fine stripes: 2 rows of each color in the same order, repeated 15 times (2 × 4 × 15 = 120 ✓). Cut yarn at each change; do not carry it.
Instructions
Foundation
With chocolate brown, ch 171.
Checkpoint: 14 × 12 + 1 = 169 working chains, plus 2 chains skipped at the start for height, = 171 ✓. Recount before you begin Row 1. A wrong chain cannot be repaired later without ripping the row.
Row 1 (RS) — set the waves
Work every stitch of this row into the back bump of the chain.
Starting in the 3rd ch from the hook, dc2tog over the 3rd and 4th ch, dc in the next 5 ch, * 3 dc in the next ch, dc in the next 5 ch, dc3tog over the next 3 ch, dc in the next 5 ch; rep from * until 8 ch remain, 3 dc in the next ch, dc in the next 5 ch, dc2tog over the last 2 ch. Turn. (169 sts, 12 peaks)
What that used: opening dc2tog + 5 dc = 7 chains; the repeat uses 14 chains and is worked 11 times (154 chains); the ending 3 dc + 5 dc + dc2tog uses the last 8 chains. 7 + 154 + 8 = 169 ✓. Peaks: 11 inside the repeat + 1 in the ending = 12 ✓.
The 2 skipped chains at the start are not stitches. Leave them.
Optional: mark the center dc of each 3-dc peak (12 markers).
Row 2 (WS) — textured pattern row
Ch 2 (does not count as a st). Dc2tog over the first 2 sts, dc-blo in the next 5 sts, * 3 dc in the next st, dc-blo in the next 5 sts, dc3tog over the next 3 sts, dc-blo in the next 5 sts; rep from * until 8 sts remain, 3 dc in the next st, dc-blo in the next 5 sts, dc2tog over the last 2 sts. Turn. (169 sts, 12 peaks)
The first 3-dc peak falls on stitch 8 of the row below, which is the center of the first peak (edge dc2tog is st 1, five slope dc are sts 2–6, peak is sts 7–9, center is st 8 ✓). Every later peak and valley stacks the same way as long as this repeat is followed exactly.
Rows 3–120
Repeat Row 2, changing color at the end of each block as scheduled in the color table. Every one of these rows is the same stitch pattern.
- Rows 3–10: chocolate brown
- Then follow the table through Row 120 (rich burgundy)
There is no separate ending row. Row 120 is a WS row in burgundy and is the top edge of the throw.
Row checkpoints:
| After row | Color just completed | Peaks | Stitches |
|---|---|---|---|
| 10 | Chocolate brown | 12 | 169 |
| 40 | End of first 4-color sequence | 12 | 169 |
| 80 | End of second sequence | 12 | 169 |
| 120 | End of third sequence, burgundy | 12 | 169 |
If the peak count is not 12, or a valley has opened into a hole, you have shifted. Rip back to the last correct peak. Do not try to “ease” a missed decrease on the next row — the shift will travel.
Fasten off
At the end of Row 120, fasten off burgundy. Cut a 6-inch (15 cm) tail.
Finishing
- Weave in every end along the back of a slope, not across a peak or valley, so the waves stay smooth. Weave chocolate ends into chocolate, and so on, for about 2 inches (5 cm) in each direction. Trim.
- Block to 50 × 60 inches (127 × 152 cm). Pin the two side edges straight first, then ease the peaks and valleys so all 12 waves are even and the top and bottom ripples match. Steam gently or wet-block according to the yarn label. Let the throw dry completely before unpinning.
- The side edges are finished as worked. Do not add a border unless you want one for decoration; a border will add width and length beyond the stated size.
Numbers at a Glance
| Item | Figure | Check |
|---|---|---|
| Wave repeat | 14 sts | 3 + 5 + 1 + 5 = 14 ✓ |
| Peaks per row | 12 | set by design ✓ |
| Stitches per row | 169 | 14 × 12 + 1 = 169 ✓ |
| Shaping balance | 0 | +24 − 22 − 2 = 0 ✓ |
| Foundation chain | 171 | 169 + 2 = 171 ✓ |
| Width | 50 in (127 cm) | 169 sts at 27 sts = 8 in, blocked ✓ |
| Rows | 120 | 10 × 4 × 3 = 120 ✓ |
| Length | 60 in (152 cm) | 120 rows at 16 rows = 8 in ✓ |
| Each color | 30 rows | 10 rows × 3 repeats = 30 ✓ |
Care
Follow the yarn label. If the yarn allows, wash gently and dry flat, reshaping the side edges straight and the waves even while damp.
Disclaimer: This pattern was generated by AI and should be reviewed for accuracy before use. While we strive for quality, AI-generated content may contain errors. Please verify measurements, stitch counts, charts, and instructions before beginning your project. Generated by purlJam.uk
Love this pattern?
Save this pattern to your free PurlJam libraryAccess your pattern anytime
Bookmark this page to access your pattern anytime