Type
Crochet
Difficulty
intermediate
Category
toy
AI Thinking Process
Planning
Verification
Pattern
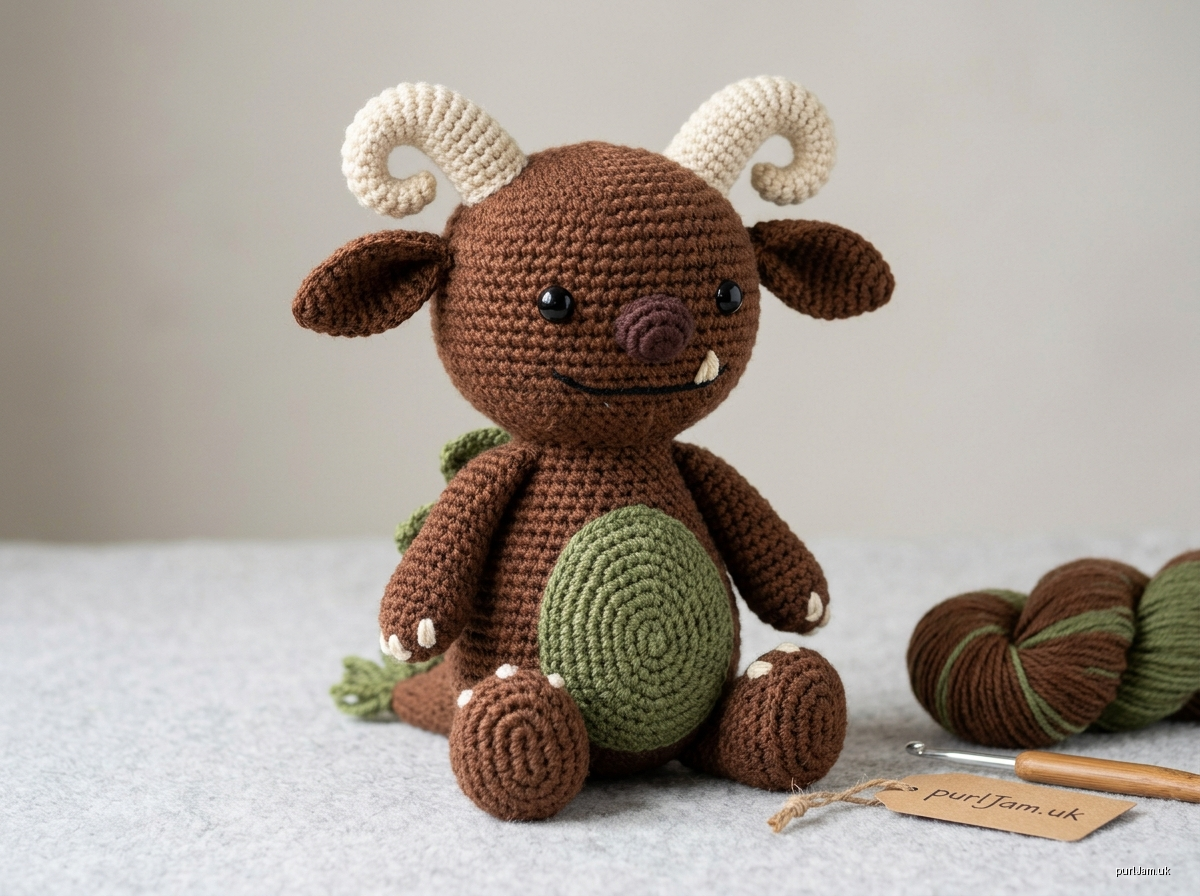
The Bramblebeast – Woodland Monster Amigurumi
An original deep-forest monster with curled horns, a mossy tummy and one proud fang.
Difficulty: Intermediate Finished size: approx. 25 cm (10 in) tall when seated upright on its feet.
Materials
- Worsted-weight yarn (acrylic or cotton blend):
- Brown (MC): 100 g
- Moss green (A): 15 g
- Cream (B): 10 g
- Dark brown (C): 5 g
- 3.5 mm (US E/4) crochet hook
- 2 × 12 mm safety eyes
- Approx. 80 g toy stuffing
- Stitch marker
- Tapestry needle
- Black embroidery thread for the mouth
Safety: For children under 3, replace the safety eyes with embroidered eyes.
Tension (gauge)
20 dc × 22 rnds = 10 cm (4 in) in dc spiral rounds on a 3.5 mm hook. Work tightly. The exact size is less critical than having no gaps.
Abbreviations (UK)
- MR – magic ring
- ch – chain
- ss – slip stitch
- dc – double crochet (US sc)
- htr – half treble (US hdc)
- inc – 2 dc in same st
- dc2tog – dc 2 sts together (invisible decrease recommended)
- BLO – back loop only
- rnd – round
- st(s) – stitch(es)
Working notes: All pieces are worked in continuous spirals. Move the marker up at the start of each rnd. Counts at the end of each rnd are shown in brackets.
Head (MC)
- Rnd 1: 6 dc in MR (6).
- Rnd 2: inc ×6 (12).
- Rnd 3: (dc 1, inc) ×6 (18).
- Rnd 4: (dc 2, inc) ×6 (24).
- Rnd 5: (dc 3, inc) ×6 (30).
- Rnd 6: (dc 4, inc) ×6 (36).
- Rnd 7: (dc 5, inc) ×6 (42).
- Rnd 8: (dc 6, inc) ×6 (48).
- Rnds 9–18: dc in each st (48). This is 10 rnds.
- Rnd 19: (dc 6, dc2tog) ×6 (42).
- Rnd 20: (dc 5, dc2tog) ×6 (36).
- Rnd 21: (dc 4, dc2tog) ×6 (30). Place a removable marker in this rnd; it is the neck join line.
- Insert the safety eyes between Rnds 12 and 13, 9 sts apart, centred on the front. Stuff the head firmly.
- Rnd 22: (dc 3, dc2tog) ×6 (24).
- Rnd 23: (dc 2, dc2tog) ×6 (18).
- Rnd 24: (dc 1, dc2tog) ×6 (12). Top up the stuffing.
- Rnd 25: dc2tog ×6 (6).
- Fasten off, close the hole and weave in the end.
Body (MC)
- Rnds 1–8: work as Head Rnds 1–8 (48).
- Rnd 9: (dc 7, inc) ×6 (54).
- Rnd 10: (dc 8, inc) ×6 (60).
- Rnds 11–14: dc in each st (60).
- Rnd 15: (dc 8, dc2tog) ×6 (54).
- Rnds 16–19: dc in each st (54).
- Rnd 20: (dc 7, dc2tog) ×6 (48).
- Rnds 21–24: dc in each st (48).
- Rnd 25: (dc 6, dc2tog) ×6 (42).
- Rnds 26–28: dc in each st (42).
- Rnd 29: (dc 5, dc2tog) ×6 (36).
- Rnd 30: (dc 4, dc2tog) ×6 (30).
- Ss to the next st and fasten off, leaving a 40 cm tail. Stuff firmly, keeping the base flat. Leave the top open (30 sts).
Belly patch (A)
- Ch 9.
- Rnd 1: 2 dc in 2nd ch from hook, dc 6, 4 dc in last ch. Turn to work along the underside of the chain: dc 6, 2 dc in the last ch (the same ch as the first) (2 + 6 + 4 + 6 + 2 = 20).
- Rnd 2: inc ×2, dc 6, inc ×4, dc 6, inc ×2 (4 + 6 + 8 + 6 + 4 = 28).
- Rnd 3: (dc 1, inc) ×2, dc 6, (dc 1, inc) ×4, dc 6, (dc 1, inc) ×2 (6 + 6 + 12 + 6 + 6 = 36).
- Ss into the next st and fasten off, leaving a 40 cm tail.
- The finished patch is approx. 8 × 5 cm.
Legs (make 2, MC)
- Rnd 1: 6 dc in MR (6).
- Rnd 2: inc ×6 (12).
- Rnd 3: (dc 1, inc) ×6 (18).
- Rnd 4: BLO dc in each st (18). This forms the sole edge.
- Rnds 5–6: dc in each st (18).
- Rnd 7: dc2tog ×3, dc 12 (15). These decreases shape the toe.
- Rnd 8: dc in each st (15).
- Rnd 9: (dc 3, dc2tog) ×3 (12).
- Rnds 10–15: dc in each st (12).
- Stuff the leg, stuffing lightly in the top 1 cm. Flatten the opening with the toe facing forward.
- Dc 6 through both layers to close (6). Fasten off, leaving a 30 cm tail.
Arms (make 2, MC)
- Rnd 1: 6 dc in MR (6).
- Rnd 2: inc ×6 (12).
- Rnds 3–4: dc in each st (12).
- Rnd 5: (dc 2, dc2tog) ×3 (9).
- Rnds 6–14: dc in each st (9).
- Rnd 15: dc 7, dc2tog (8).
- Stuff the hand firmly and the arm lightly. Flatten the opening.
- Dc 4 through both layers to close (4). Fasten off, leaving a 30 cm tail.
Claws (make 6, B)
- Ch 3.
- Ss in 2nd ch from hook, dc in next ch (2).
- Fasten off, leaving a tail.
- Sew 3 claws to each hand across Rnd 2, spaced 2 sts apart.
Horns (make 2, B)
- Rnd 1: 4 dc in MR (4).
- Rnd 2: dc in each st (4).
- Rnd 3: (dc 1, inc) ×2 (6).
- Rnd 4: dc in each st (6).
- Rnd 5: (dc 2, inc) ×2 (8).
- Rnds 6–9: htr 4, dc 4 (8). The taller htr side makes the horn curl.
- Rnd 10: (dc 3, inc) ×2 (10).
- Rnds 11–12: dc in each st (10).
- Stuff lightly and fasten off, leaving a 25 cm tail.
Ears (make 2, MC)
- Rnd 1: 5 dc in MR (5).
- Rnd 2: inc ×5 (10).
- Rnd 3: dc in each st (10).
- Do not stuff. Flatten and fasten off, leaving a tail.
Nose (C)
- Rnd 1: 6 dc in MR (6).
- Rnd 2: inc ×6 (12).
- Rnds 3–4: dc in each st (12).
- Stuff lightly and fasten off, leaving a tail.
Leaf ridge (make 5, A)
- Ch 6.
- Starting in 2nd ch from hook: ss, dc, htr, dc, ss (5 sts).
- Fasten off, leaving a tail.
Tail (MC)
- Rnd 1: 6 dc in MR (6).
- Rnds 2–8: dc in each st (6).
- Fasten off, leaving a tail. Do not stuff.
- Knot three 6 cm strands of A through Rnd 1 to make a mossy tuft.
Assembly
- Head to body: Pin the body's 30-st opening to the head's marked Rnd 21 (30 sts), on the underside of the head, with the eyes facing forward. Sew 1 body st to 1 head st, adding stuffing to the neck before closing (30 sts joined).
- Nose: Sew the nose centred between the eyes, covering head Rnds 14–17.
- Mouth: With black thread, embroider a 3 cm curved line across head Rnd 18.
- Fang: With B, work a 3-strand straight-stitch fang, 0.7 cm long, pointing upward from the mouth, 1 st left of centre.
- Ears: Sew one ear on each side of the head at Rnd 9, in line with the outer edge of each eye.
- Horns: Sew the horns over head Rnds 5–9, 12 sts apart, centred above the eyes. The htr side of each horn faces outward so the horns curl away from each other.
- Leaf ridge: Sew the 5 leaves upright in a line down the centre back. Start at head Rnd 4 and space them 2 rnds apart, ending at head Rnd 20.
- Belly patch: Centre the patch on the front of the body, from body Rnd 10 to Rnd 24. Whip-stitch it in place.
- Legs: Sew the flat tops of the legs to body Rnds 6–8, 8 sts apart, with the toes forward.
- Arms: Sew the flat tops of the arms to body Rnd 26, one on each side, at the side line directly below the ears.
- Tail: Sew the tail to the centre back at body Rnd 10.
- Finishing: Weave in all ends.
Finished size: approx. 25 cm tall × 11 cm wide at the body.
Disclaimer: This pattern was generated by AI and should be reviewed for accuracy before use. While we strive for quality, AI-generated content may contain errors. Please verify measurements, stitch counts, charts, and instructions before beginning your project. Generated by purlJam.uk
Love this pattern?
Save this pattern to your free PurlJam libraryAccess your pattern anytime
Bookmark this page to access your pattern anytime