Type
Crochet
Difficulty
intermediate
Category
amigurumi
AI Thinking Process
Planning
Verification
Pattern
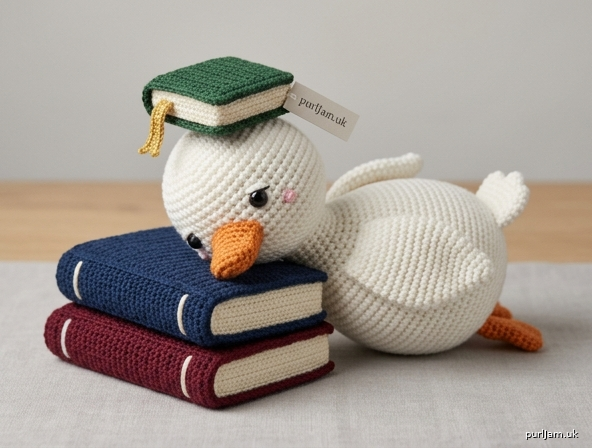
Sleepy Scholar Duck
White duck with his head on two books and a third book on his head
A plump Pekin-style duck who has clearly had enough studying. He lies on his belly with his cheek on a stack of two hardcovers, while a smaller book sits slightly askew on his head. Worked in US crochet terms as separate amigurumi pieces plus three 3D books.
Difficulty: Intermediate
Finished size: About 7" (18 cm) long from tail to beak and 4" (10 cm) tall including the book on his head, using worsted yarn at stated gauge.
Materials
Yarn — worsted weight (medium / category 4); exact amounts are generous estimates:
- White (MC): 90 yd (82 m) — head, body, wings, tail
- Orange: 15 yd (14 m) — beak and feet
- Cream / ivory: 40 yd (37 m) — book pages
- Cover A (navy or similar): 20 yd (18 m) — large book 1
- Cover B (burgundy or similar): 20 yd (18 m) — large book 2
- Cover C (forest green, mustard, or similar): 15 yd (14 m) — small head book
- Scrap pink: cheeks (optional)
- Scrap gold or red: bookmark ribbon (optional)
Hook: US E-4 / 3.5 mm, or size needed for a dense fabric with no stuffing show-through. Drop to 3.25 mm if your sc is loose.
Notions:
- 9 mm safety eyes (1 pair), or black embroidery floss if the toy is for a child under 3
- Polyester stuffing
- Stitch marker
- Yarn needle
- Pins
- Scissors
- Optional: pink pastel or fabric blush for cheeks
Gauge
5 sc and 6 rnds (or rows) = 1" (2.5 cm) in single crochet, worked tightly.
Gauge is a density check more than a fit check. If stuffing peeks through, go down a hook size. At this gauge the head is about 2¼" (5.5 cm) across and the body about 4" (10 cm) long.
Abbreviations (US)
- BLO — back loop only
- ch — chain
- dc — double crochet
- dec — single crochet 2 together (use the invisible decrease: insert hook in front loop of next 2 sts, yarn over, pull through both, yarn over, pull through 2)
- FO — fasten off
- hdc — half double crochet
- inc — 2 sc in same stitch
- MC — main color (white)
- MR — magic ring
- rnd(s) — round(s)
- sc — single crochet
- sl st — slip stitch
- st(s) — stitch(es)
Notes
- Head, body, wings, tail, beak, and feet are worked in continuous spirals unless a join is stated. Mark the first stitch of every round.
- Books are worked in turned rows. The ch-1 at the start of a row does not count as a stitch.
- Stuff as you go. The body should be firm but slightly flattened on the belly so the duck lies stably. Books should be plump, not ball-shaped.
- Invisible decreases keep the white fabric smooth.
- Safety eyes are a choking hazard. Embroider eyes if the duck will be given to a child under 3 years.
Head (white)
Worked from the crown down.
Rnd 1: MR, 6 sc. (6)
Rnd 2: inc around. (6 increases → 6 + 6 = 12 ✓)
Rnd 3: (sc, inc) 6 times. (6 increases → 12 + 6 = 18 ✓)
Rnd 4: (2 sc, inc) 6 times. (6 increases → 18 + 6 = 24 ✓)
Rnd 5: (3 sc, inc) 6 times. (6 increases → 24 + 6 = 30 ✓)
Rnd 6: (4 sc, inc) 6 times. (6 increases → 30 + 6 = 36 ✓)
Rnds 7–13: sc around. (36) — 7 rnds even
Safety eyes: Insert between Rnds 10 and 11, 8 sts apart, centered on the face. Do not snap the washers until the beak placement looks right.
Rnd 14: (4 sc, dec) 6 times. (6 decreases → 36 − 6 = 30 ✓)
Rnd 15: (3 sc, dec) 6 times. (6 decreases → 30 − 6 = 24 ✓)
Rnd 16: (2 sc, dec) 6 times. (6 decreases → 24 − 6 = 18 ✓)
Stuff the head firmly, rounding the crown.
Rnd 17: (sc, dec) 6 times. (6 decreases → 18 − 6 = 12 ✓)
Rnd 18: dec 6 times. (6 decreases → 12 − 6 = 6 ✓)
FO, leaving a 12" (30 cm) tail. Thread through the remaining 6 front loops and pull closed. Weave in. Head is a slightly tall oval, about 2¼" (5.5 cm) wide.
Body (white)
Worked as a fat sausage so the duck can lie on his belly. The magic-ring end is the tail end; the decrease end is the head end.
Rnd 1: MR, 6 sc. (6)
Rnd 2: inc around. (6 increases → 6 + 6 = 12 ✓)
Rnd 3: (sc, inc) 6 times. (6 increases → 12 + 6 = 18 ✓)
Rnd 4: (2 sc, inc) 6 times. (6 increases → 18 + 6 = 24 ✓)
Rnd 5: (3 sc, inc) 6 times. (6 increases → 24 + 6 = 30 ✓)
Rnd 6: (4 sc, inc) 6 times. (6 increases → 30 + 6 = 36 ✓)
Rnd 7: (5 sc, inc) 6 times. (6 increases → 36 + 6 = 42 ✓)
Rnds 8–17: sc around. (42) — 10 rnds even
Rnd 18: (5 sc, dec) 6 times. (6 decreases → 42 − 6 = 36 ✓)
Rnd 19: (4 sc, dec) 6 times. (6 decreases → 36 − 6 = 30 ✓)
Rnd 20: (3 sc, dec) 6 times. (6 decreases → 30 − 6 = 24 ✓)
Stuff firmly as you go. Press the underside flat against the table so the duck will lie without rolling.
Rnd 21: (2 sc, dec) 6 times. (6 decreases → 24 − 6 = 18 ✓)
Rnd 22: (sc, dec) 6 times. (6 decreases → 18 − 6 = 12 ✓)
Rnd 23: dec 6 times. (6 decreases → 12 − 6 = 6 ✓)
FO, close as for the head, and weave in. Body is about 4" (10 cm) long and 2½" (6.5 cm) across.
Wings (make 2, white)
Do not stuff. They should lie flat against the body.
Rnd 1: MR, 6 sc. (6)
Rnd 2: inc around. (6 increases → 6 + 6 = 12 ✓)
Rnd 3: (sc, inc) 6 times. (6 increases → 12 + 6 = 18 ✓)
Rnds 4–6: sc around. (18)
Rnd 7: (sc, dec) 6 times. (6 decreases → 18 − 6 = 12 ✓)
Flatten the opening so the starting tail sits at one side. Working through both layers, sc 6. FO, leaving a 10" (25 cm) tail for sewing.
Feet (make 2, orange)
Rnd 1: MR, 6 sc. (6)
Rnd 2: inc around. (6 increases → 6 + 6 = 12 ✓)
Rnd 3: (sc, inc) 6 times. (6 increases → 12 + 6 = 18 ✓)
Rnd 4: sc around. (18)
Do not stuff. Flatten (9 sts across).
Toes (worked through both layers along the 9-st edge):
(sc, hdc, dc) in next st, sl st in next st; repeat from * 3 times, sc in last 3 sts. (3 toes + 3 sc ✓)
FO, leaving a 10" (25 cm) tail. The three raised clusters are the webbing.
Beak (orange)
Worked as a small oval, then flattened into a duckbill. Do not stuff.
Rnd 1: Ch 5, sc in 2nd ch from hook, sc in next 2 ch, 3 sc in last ch; rotate and work along the opposite side of the chain: sc in next 2 ch, 2 sc in the same ch as the first sc. (3 + 3 + 2 + 2 = 10 ✓)
Rnds 2–3: sc around. (10)
FO, leaving a 10" (25 cm) tail. Flatten so the 3-sc end is the wide tip of the bill.
Tail (white)
Rnd 1: MR, 6 sc. (6)
Rnd 2: (sc, inc) 3 times. (3 increases → 6 + 3 = 9 ✓)
Rnd 3: (2 sc, inc) 3 times. (3 increases → 9 + 3 = 12 ✓)
Rnd 4: sc around. (12)
Flatten. FO, leaving an 8" (20 cm) tail. Do not stuff.
Books
Each book is a cream page block wrapped in a colored cover. The cover is worked as one long rectangle: front + spine + back. Spine rows are BLO so the book folds with a crisp hardcover edge.
Large books (make 2 — one in Cover A, one in Cover B)
These two stack under the duck’s head.
Page block (cream) — make 2 panels per book (4 panels total):
Row 1: Ch 12, sc in 2nd ch from hook and in each ch across. (11)
Rows 2–14: Ch 1, turn, sc in each st. (11) — 13 more rows; 14 rows total ✓
FO the first panel. On the second panel, do not FO.
Join: Hold the two panels together, matching stitches. Ch 1, sc around all four sides, working 2 sc in each corner. Stuff lightly before closing the last side so the block is a slim rectangle, not a pillow. Sl st to join. FO and weave in.
Page block measures about 2¼" × 2¼" × ⅜" (5.5 × 5.5 × 1 cm) at gauge (11 sc × 14 rows).
Cover (Cover A or B):
Row 1: Ch 14, sc in 2nd ch from hook and in each ch across. (13)
Rows 2–14: Ch 1, turn, sc in each st. (13) — front, 14 rows total ✓
Rows 15–17: Ch 1, turn, sc BLO in each st. (13) — spine, 3 rows = ½" (1.3 cm) ✓
Rows 18–31: Ch 1, turn, sc in each st (both loops). (13) — back, 14 rows (18 through 31 = 14 rows ✓)
FO, leaving a 24" (61 cm) tail.
Wrap the cover around the page block like a dust jacket: front on one face, BLO spine along the thickness, back on the other face. The 13-st cover height sits a little beyond the 11-st pages on both ends, as a hardcover should. Sew the cover snugly to the page block along the spine and tack the three overhanging edges. With cream, add 4–5 short vertical stitches along the open short edge for page lines.
Small book (make 1 in Cover C)
This one sits on the duck’s head.
Page block (cream) — make 2 panels:
Row 1: Ch 10, sc in 2nd ch from hook and in each ch across. (9)
Rows 2–12: Ch 1, turn, sc in each st. (9) — 12 rows total ✓
Join and stuff lightly as for the large books, with 2 sc in each corner.
Cover (Cover C):
Row 1: Ch 12, sc in 2nd ch from hook and in each ch across. (11)
Rows 2–12: Ch 1, turn, sc in each st. (11) — front, 12 rows total ✓
Rows 13–15: Ch 1, turn, sc BLO in each st. (11) — spine, 3 rows ✓
Rows 16–27: Ch 1, turn, sc in each st. (11) — back, 12 rows (16 through 27 = 12 rows ✓)
Wrap, sew, and add page-line stitches as before.
Optional bookmark: With gold or red, ch 12. FO. Tack one end between the small book’s pages so a 1" (2.5 cm) ribbon hangs out.
Assembly
Pin everything before sewing. Use matching yarn and small, hidden stitches. The pose is the whole design: the head must clearly rest on the stacked books, and the third book must sit on the head.
1. Beak
Pin the flattened beak on the head, centered between and just below the eyes, covering roughly Rnds 12–14. The wide (3-sc) end points forward. Sew around the sides and top, leaving the bill free.
2. Eyes
If the expression looks right, snap the safety-eye washers. For a sleepier scholar, embroider a short curved line over the top third of each eye in white (a tiny eyelid) before or after snapping.
3. Cheeks (optional)
With pink, embroider a small 3–4 wrap French knot or a tiny satin stitch on each side of the beak, just under the eyes. A light brush of pastel also works.
4. Head to body
The decrease end of the body is the neck. Pin the head onto that end so it sits slightly on top and forward, with the chin angled down toward the table — as if he has collapsed onto his books. About one-third of the head’s lower back should overlap the body. Sew all the way around, adding a pinch of stuffing in the neck if it dimples.
5. Wings
Pin one wing to each side of the body, top edge about 2 rnds behind the neck seam, angled slightly back and down. The flattened 6-sc edge is the sewn edge. Sew along that edge only so the wings can lift a little.
6. Tail
Sew the flattened tail to the magic-ring end of the body, pointing up and slightly back.
7. Feet
Turn the duck on his belly. Sew the feet to the underside, toward the tail, toes pointing out and a little back — as if he kicked his feet up while reading. Stitch through the un-toed 3-sc edge.
8. Book pillow (2 large books)
Stack the two large books. Offset them ¼" (6 mm) so they look like a casual pile, not a perfect cube. Tack the stack together at two hidden corners. Slide the stack under the duck’s head so the cheek and chin rest on the top cover. Sew the underside of the head to the top book (a 1" / 2.5 cm oval of stitches is enough). Tack the bottom book to the body or the table-facing belly with a couple of stitches so the pile cannot slide.
9. Book on the head (small book)
Pin the small book on top of the head, slightly off-center and tilted (about 15–20°). The spine can face either side; a bookmark hanging over one eye is charming. Sew around the cover where it touches the head, through the cover only so the pages stay crisp.
Finishing
- Weave in every remaining tail.
- Steam-block the book covers lightly from the wrong side if they curl; do not crush the stuffing.
- Check that the duck lies without rolling. If he lists, add a pinch of stuffing to the high side of the belly or take a hidden stitch from belly to book stack.
- Optional sleepy extras: a few loose cream “page” stitches peeking from the pillow books, or a second tiny bookmark in the lower stack.
Your scholar is done — leave him where he fell asleep.
Disclaimer: This pattern was generated by AI and should be reviewed for accuracy before use. While we strive for quality, AI-generated content may contain errors. Please verify measurements, stitch counts, charts, and instructions before beginning your project. Generated by purlJam.uk
Love this pattern?
Save this pattern to your free PurlJam libraryAccess your pattern anytime
Bookmark this page to access your pattern anytime