Type
Machine Knitting
Difficulty
advanced
Category
Pattern
Pattern
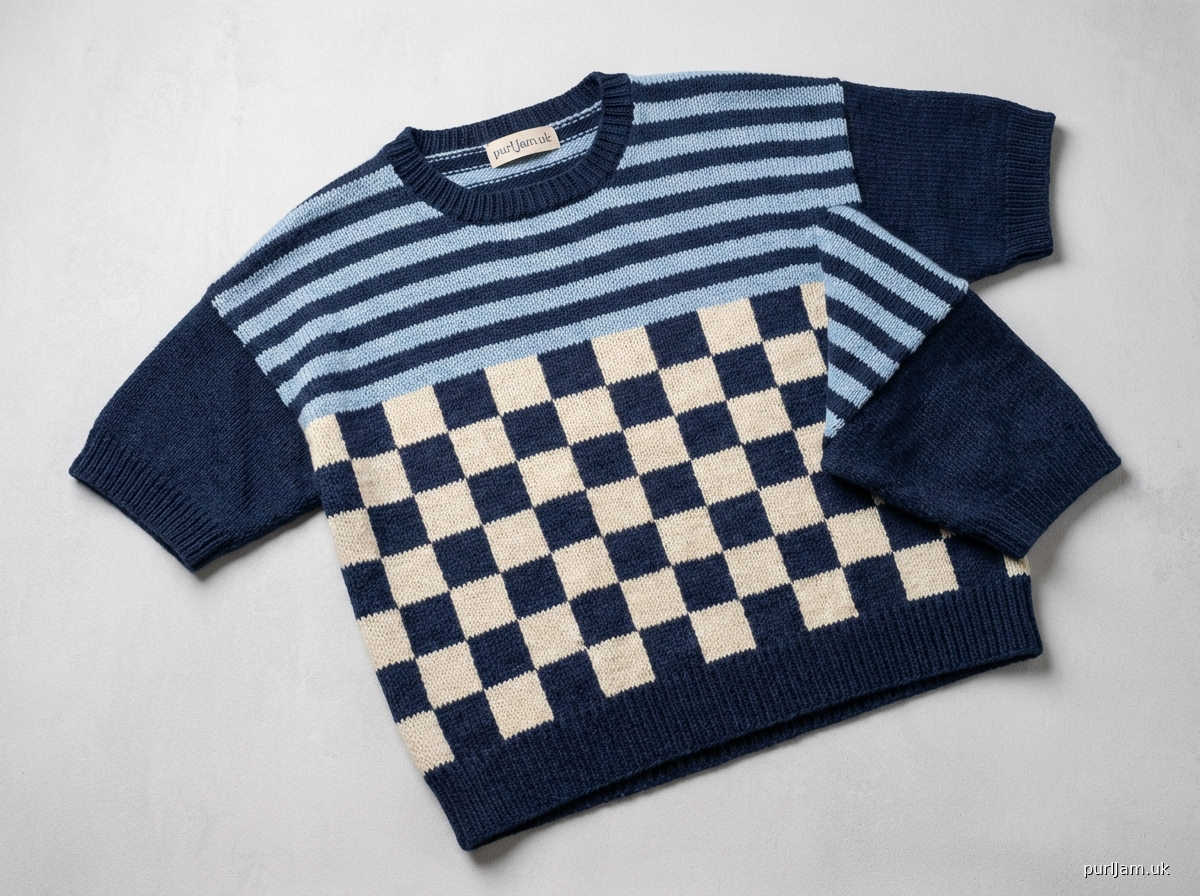
# The "Checkerboard & Stripes" Drop-Shoulder Tee

## TITLE
The "Checkerboard & Stripes" Drop-Shoulder Tee

## MACHINE_SETUP
This pattern is designed for a standard gauge machine with a ribber attachment (e.g., Brother KH series and KR series).

1.  **Machine Bed Configuration**: Set up main bed and ribber for 1x1 full needle rib. Ensure main bed needles are aligned with ribber needles.
2.  **Yarn & Tension Mates**:
    *   **Main Color (MC)** & **Contrast Color 1 (CC1)** & **Contrast Color 2 (CC2)**: Fingering weight yarn.
    *   **Main Bed Tension Dial (MTD)**:
        *   For Stockinette (body): MTD 6 (approx. 2.5-3.0 on some machines).
        *   For 1x1 Rib (hems/neckband): MTD 3 (approx. 1.0-1.5 on some machines).
    *   **Ribber Tension Dial (RTD)**:
        *   For 1x1 Rib (hems/neckband): RTD 3 (approx. 1.0-1.5 on some machines), matching MTD.
3.  **Carriage Settings**:
    *   **Main Carriage**: Set to slip for waste yarn, then knit for main fabric. Ensure proper yarn mast tension.
    *   **Ribber Carriage**: Set to knit in both directions for 1x1 rib.
    *   **Levers**: Adjust for full needle rib (FNR) on the ribber carriage for ribbing sections. For stockinette, move the ribber to a resting position or remove it if preferred (though not necessary if only main bed is knitting).
4.  **Cast-On**: Use waste yarn and ravel cord for all panel cast-ons. For ribbing, use full needle rib cast-on (e.g., zig-zag row, then circular rows) followed by ravel cord.
5.  **Weights**: Always use adequate claw weights or bar weights directly below the knitting to ensure even tension, especially with fine yarns and intricate patterns like intarsia. Distribute evenly.
6.  **Tools Required**: Transfer tools (1x2, 1x3, 1x1), latch tool, waste yarn, ravel cord, sewing machine or hand needle, yarn bobbins (minimum 18 for front panel intarsia), stitch markers.

## MATERIALS
*   **Main Color (MC)**: Fingering weight yarn (e.g., cotton, merino, blend).
    *   S: 800 yd (730 m) [M: 900 yd (823 m) / L: 1000 yd (914 m) / XL: 1100 yd (1006 m)]
*   **Contrast Color 1 (CC1)**: Fingering weight yarn (for checkerboard).
    *   S: 300 yd (274 m) [M: 350 yd (320 m) / L: 400 yd (366 m) / XL: 450 yd (411 m)]
*   **Contrast Color 2 (CC2)**: Fingering weight yarn (for stripes).
    *   S: 300 yd (274 m) [M: 350 yd (320 m) / L: 400 yd (366 m) / XL: 450 yd (411 m)]
*   Waste yarn
*   Ravel cord
*   Yarn bobbins (at least 18 for front intarsia)
*   Stitch markers
*   Tapestry needle for seaming
*   Sweater board and pins for blocking

## GAUGE_AND_TENSION
It is essential to knit and measure a swatch for accuracy.
1.  **Swatch**: Cast on at least 60 stitches on both main bed and ribber (for ribbing) and knit 30 rows in 1x1 rib at MTD 3 / RTD 3. Remove ribber and continue on main bed with MTD 6 for 60 rows in Stockinette. Finish with waste yarn.
2.  **Steaming**: Gently steam your swatch without touching the iron to the fabric. Lay flat and allow to dry completely.
3.  **Measurement**:
    *   **Main Fabric (Stockinette)**: 8.5 stitches and 11.5 rows = 1 inch (2.5 cm) using MTD 6.
    *   **1x1 Rib**: 10 stitches and 14 rows = 1 inch (2.5 cm) using MTD 3 / RTD 3.
    *   *Adjust tension dials as needed to achieve this gauge.*

## SCHEMATIC_AND_SIZES
Measurements are in inches (cm) and are for the finished garment.

| Size              | S (Small)          | M (Medium)         | L (Large)          | XL (Extra Large)   |
| :---------------- | :----------------- | :----------------- | :----------------- | :----------------- |
| **Finished Bust** | 34 (86.5)          | 38 (96.5)          | 42 (106.5)         | 46 (117)           |
| **Back/Front Width** | 17 (43)           | 19 (48.5)          | 21 (53.5)          | 23 (58.5)          |
| **Back/Front Length** | 23 (58.5)         | 24 (61)            | 25 (63.5)          | 26 (66)            |
| **Sleeve Length** | 8 (20.5)           | 9 (23)             | 10 (25.5)          | 11 (28)            |
| **Sleeve Cuff Circ.** | 9 (23)            | 10 (25.5)          | 10.5 (26.5)        | 11.5 (29)          |
| **Sleeve Underarm Circ.** | 15 (38)         | 17 (43)            | 19 (48.5)          | 20.5 (52)          |

**Stitch and Row Counts (based on gauge)**:

| Size              | S                  | M                  | L                  | XL                 |
| :---------------- | :----------------- | :----------------- | :----------------- | :----------------- |
| **Back/Front Stitches** | 144              | 162                | 179                | 196                |
| (17" * 8.5 st/in = 144.5) | (19" * 8.5 st/in = 161.5) | (21" * 8.5 st/in = 178.5) | (23" * 8.5 st/in = 195.5) |
| **Back/Front Rows** | 267              | 278                | 289                | 300                |
| (14 rib + 253 body) | (14 rib + 264 body) | (14 rib + 275 body) | (14 rib + 286 body) |
| **Sleeve Cuff Stitches** | 45               | 49                 | 53                 | 57                 |
| (4.5" * 10 st/in = 45) | (5" * 10 st/in = 50) | (5.3" * 10 st/in = 53) | (5.7" * 10 st/in = 57) |
| **Sleeve Body Stitches** | 64               | 72                 | 80                 | 88                 |
| (7.5" * 8.5 st/in = 63.75) | (8.5" * 8.5 st/in = 72.25) | (9.4" * 8.5 st/in = 79.9) | (10.3" * 8.5 st/in = 87.55) |
| **Sleeve Rows**   | 94               | 106                | 118                | 130                |
| (14 rib + 80 body) | (14 rib + 92 body) | (14 rib + 104 body) | (14 rib + 116 body) |

## BACK_PANEL

**Sizes**: S [M / L / XL]
**Stitches**: 144 [162 / 179 / 196] needles
**Total Rows**: 267 [278 / 289 / 300] rows

1.  **Cast On (Hem)**:
    *   **Needles**: Set up main bed and ribber for 1x1 full needle rib. Cast on 144 [162 / 179 / 196] needles (72 [81 / 90 / 98] on each side of 0).
    *   **Yarn**: Using waste yarn, knit 10 rows.
    *   **Ravel Cord**: Cut waste yarn, attach ravel cord (approx. 24" / 60 cm), knit 1 row COL.
    *   **Main Color (MC)**: Attach MC, set MTD 3 / RTD 3. Knit 2 circular rows (ribber to work, then main bed to work).
    *   **Ribbing**: RC000. Knit 1x1 rib for 14 rows total (including circular rows).
    *   **Transfer**: Transfer all ribber stitches to corresponding main bed needles using a 1x1 transfer tool. Ensure all stitches are caught.
    *   **Secure Weights**: Re-hang weights to main bed knitting only.
    *   **Ravel Cord**: Knit 1 row with ravel cord COL. Cut MC.
2.  **Body (Stockinette with Stripes)**:
    *   **Yarn**: Attach MC. Set MTD 6.
    *   **Stripe Pattern**: Use MC and CC2. Each stripe is 4 rows.
        *   **RC000**: Knit 1 row with MC, COR.
        *   **RC001-004**: Knit 3 more rows with MC. (4 rows total MC)
        *   **RC005-008**: Attach CC2. Knit 4 rows with CC2. (4 rows total CC2)
        *   **RC009-012**: Change to MC. Knit 4 rows with MC. (4 rows total MC)
        *   *Repeat this 8-row stripe sequence (4 rows MC, 4 rows CC2) until specified body length.*
    *   **Body Length**: Knit in stripe pattern until RC247 [258 / 269 / 280]. This is 233 [244 / 255 / 266] rows of stockinette body + 14 rows of rib hem = 247 [258 / 269 / 280] rows from the start of MC.
3.  **Shoulder Shaping**:
    *   **RC247 [258 / 269 / 280] (COR)**: With MC. Place stitch markers at center 24 [28 / 32 / 36] needles. These will be for the neck.
    *   **Neckline Bind-Off**:
        *   RC248 [259 / 270 / 281] (COL): Knit to first stitch marker. With latch tool, bind off center 24 [28 / 32 / 36] needles. Continue knitting to end of row COR. Work each side separately.
        *   Left Shoulder (starting COL):
            *   RC249 [260 / 271 / 282] (COL): Knit to end.
            *   RC250 [261 / 272 / 283] (COR): Bring out to hold 2 needles at neck edge (total 2 st held). Knit to end.
            *   RC251 [262 / 273 / 284] (COL): Bring out to hold 1 needle at neck edge (total 3 st held). Knit to end.
            *   RC252 [263 / 274 / 285] (COR): Knit to end.
            *   RC253 [264 / 275 / 286] (COL): Bring out to hold 1 needle at neck edge (total 4 st held). Knit to end.
            *   *Shoulder rows continue for a total of 20 rows. Continue bringing out 1 needle every other row at the neck edge until 12 needles are held.*
            *   RC267 [278 / 289 / 300] (COL): With latch tool, bind off remaining 58 [67 / 73 / 80] shoulder stitches.
        *   Right Shoulder (starting COR):
            *   RC249 [260 / 271 / 282] (COR): Knit to end.
            *   RC250 [261 / 272 / 283] (COL): Bring out to hold 2 needles at neck edge (total 2 st held). Knit to end.
            *   RC251 [262 / 273 / 284] (COR): Bring out to hold 1 needle at neck edge (total 3 st held). Knit to end.
            *   RC252 [263 / 274 / 285] (COL): Knit to end.
            *   RC253 [264 / 275 / 286] (COR): Bring out to hold 1 needle at neck edge (total 4 st held). Knit to end.
            *   *Shoulder rows continue for a total of 20 rows. Continue bringing out 1 needle every other row at the neck edge until 12 needles are held.*
            *   RC267 [278 / 289 / 300] (COR): With latch tool, bind off remaining 58 [67 / 73 / 80] shoulder stitches.

## FRONT_PANEL

**Sizes**: S [M / L / XL]
**Stitches**: 144 [162 / 179 / 196] needles
**Total Rows**: 267 [278 / 289 / 300] rows

1.  **Cast On (Hem)**:
    *   Follow BACK_PANEL instructions for 1x1 rib hem.
    *   **RC000**: Knit 1 row with MC, COR.
2.  **Body (Stockinette with Checkerboard Intarsia)**:
    *   **Yarn**: Attach MC. Set MTD 6.
    *   **Intarsia Checkerboard Pattern (8 stitches x 8 rows per square)**:
        *   **For Size S (144 needles)**: This means 18 columns of 8-stitch squares (144 / 8 = 18). You will need 9 bobbins of MC and 9 bobbins of CC1 for each intarsia row. Ensure bobbins are loaded and easily accessible.
        *   **General Intarsia Technique**: When changing colors, always twist the old and new yarns together on the wrong side of the fabric to avoid holes. Ensure even tension with each color section.
        *   **RC001-008 (Block 1, First Row of Checkers)**:
            *   RC001 (COL): Start with MC for the first 8 needles. Attach CC1 for the next 8 needles. Continue alternating MC (8 st) and CC1 (8 st) across the row. The last 8 stitches will be CC1 (since 18 columns means 9 MC and 9 CC1 sections starting with MC). Knit to COR.
            *   RC002 (COR): Knit back across. Maintain color sections.
            *   RC003-008: Repeat rows RC001-002 three more times. At RC008 (COR), you have completed the first 8-row checker block.
        *   **RC009-016 (Block 2, Second Row of Checkers)**:
            *   RC009 (COL): To offset the checkerboard, start with CC1 for the first 8 needles. Attach MC for the next 8 needles. Continue alternating CC1 (8 st) and MC (8 st) across the row. The last 8 stitches will be MC. Knit to COR.
            *   RC010 (COR): Knit back across. Maintain color sections.
            *   RC011-016: Repeat rows RC009-010 three more times. At RC016 (COR), you have completed the second 8-row checker block.
        *   **Repeat**: Continue alternating Block 1 and Block 2 pattern for a total of 6 checker blocks (48 rows of intarsia).
        *   **RC001-048**: Knit intarsia checkerboard pattern for 48 rows. (6 blocks * 8 rows/block = 48 rows).
    *   **Striped Body (Above Checkers)**:
        *   **RC049**: After completing the intarsia, cut CC1. Attach CC2. Knit 1 row with MC, COL. (All yarns from intarsia are trimmed and secured at the back.)
        *   **RC050-052**: Knit 3 more rows with MC. (4 rows total MC).
        *   **RC053-056**: Attach CC2. Knit 4 rows with CC2. (4 rows total CC2).
        *   **RC057-060**: Change to MC. Knit 4 rows with MC. (4 rows total MC).
        *   *Repeat this 8-row stripe sequence (4 rows MC, 4 rows CC2) until neck shaping begins.*
    *   **Body Length before Neck Shaping**: Knit in stripe pattern until RC227 [238 / 249 / 260]. This is 180 [191 / 202 / 213] rows of stockinette body (48 intarsia + 132 [143 / 154 / 165] stripes) + 14 rows of rib hem = 227 [238 / 249 / 260] rows from the start of MC.
4.  **Neckline Shaping**:
    *   **RC227 [238 / 249 / 260] (COR)**: With MC (or current stripe color). Place stitch markers at center 18 [22 / 26 / 30] needles. These will be for the neck.
    *   **Neckline Bind-Off**:
        *   RC228 [239 / 250 / 261] (COL): Knit to first stitch marker. With latch tool, bind off center 18 [22 / 26 / 30] needles. Continue knitting to end of row COR. Work each side separately.
        *   Left Shoulder (starting COL):
            *   RC229 [240 / 251 / 262] (COL): Bring out to hold 3 needles at neck edge. Knit to end.
            *   RC230 [241 / 252 / 263] (COR): Bring out to hold 2 needles at neck edge. Knit to end.
            *   RC231 [242 / 253 / 264] (COL): Bring out to hold 2 needles at neck edge. Knit to end.
            *   RC232 [243 / 254 / 265] (COR): Bring out to hold 1 needle at neck edge. Knit to end.
            *   *Continue bringing out 1 needle at neck edge every other row for 10 [11 / 12 / 13] more times. This creates a total of 18 [19 / 20 / 21] held needles.*
            *   RC267 [278 / 289 / 300] (COL): With latch tool, bind off remaining 58 [67 / 73 / 80] shoulder stitches.
        *   Right Shoulder (starting COR):
            *   RC229 [240 / 251 / 262] (COR): Bring out to hold 3 needles at neck edge. Knit to end.
            *   RC230 [241 / 252 / 263] (COL): Bring out to hold 2 needles at neck edge. Knit to end.
            *   RC231 [242 / 253 / 264] (COR): Bring out to hold 2 needles at neck edge. Knit to end.
            *   RC232 [243 / 254 / 265] (COL): Bring out to hold 1 needle at neck edge. Knit to end.
            *   *Continue bringing out 1 needle at neck edge every other row for 10 [11 / 12 / 13] more times. This creates a total of 18 [19 / 20 / 21] held needles.*
            *   RC267 [278 / 289 / 300] (COR): With latch tool, bind off remaining 58 [67 / 73 / 80] shoulder stitches.

## SLEEVES

**Sizes**: S [M / L / XL]
**Stitches (at cuff)**: 45 [49 / 53 / 57] needles
**Stitches (at underarm)**: 64 [72 / 80 / 88] needles
**Total Rows**: 94 [106 / 118 / 130] rows

Make 2 identical sleeves.

1.  **Cast On (Cuff)**:
    *   **Needles**: Set up main bed and ribber for 1x1 full needle rib. Cast on 45 [49 / 53 / 57] needles (22 [24 / 26 / 28] on left of 0, 23 [25 / 27 / 29] on right of 0, ensuring an odd number of needles for symmetry if desired, or simply adjust 0 position).
    *   **Yarn**: Using waste yarn, knit 10 rows.
    *   **Ravel Cord**: Cut waste yarn, attach ravel cord, knit 1 row COL.
    *   **Main Color (MC)**: Attach MC, set MTD 3 / RTD 3. Knit 2 circular rows.
    *   **Ribbing**: RC000. Knit 1x1 rib for 14 rows total (including circular rows).
    *   **Transfer**: Transfer all ribber stitches to corresponding main bed needles.
    *   **Secure Weights**: Re-hang weights to main bed knitting only.
    *   **Ravel Cord**: Knit 1 row with ravel cord COL. Cut MC.
2.  **Sleeve Body (Stockinette with Stripes and Increases)**:
    *   **Yarn**: Attach MC. Set MTD 6.
    *   **RC000**: Knit 1 row with MC, COR.
    *   **Stripe Pattern**: Use MC and CC2. Each stripe is 4 rows.
        *   RC001-004: Knit 3 more rows with MC. (4 rows total MC)
        *   RC005-008: Attach CC2. Knit 4 rows with CC2. (4 rows total CC2)
        *   RC009-012: Change to MC. Knit 4 rows with MC. (4 rows total MC)
        *   *Repeat this 8-row stripe sequence throughout the sleeve body.*
    *   **Increases**: Increase 1 stitch at each end of the row (total 2 stitches increased per increase row).
        *   Increase on RC000 and then every 8 [8 / 8 / 8] rows thereafter, 9 [11 / 13 / 15] times total.
        *   To Increase: When carriage is on the right (COR), push out the leftmost needle to working position (WP). When carriage is on the left (COL), push out the rightmost needle to WP. Place a small weight on the newly brought-into-work needle loop.
        *   **Total Stitches**: From 45 [49 / 53 / 57] stitches, increase by 2 * 9 [11 / 13 / 15] = 18 [22 / 26 / 30] stitches.
        *   Final stitch count after increases: 45+18 = 63 [49+22 = 71 / 53+26 = 79 / 57+30 = 87].
        *   These numbers are slightly different from the desired underarm stitches. Let's adjust the increases.
        *   Target end stitch count: 64 [72 / 80 / 88].
        *   Increases needed: 64-45 = 19 [72-49 = 23 / 80-53 = 27 / 88-57 = 31].
        *   Since we increase 2 stitches per increase row, we need 19/2 = 9.5 (round up to 10) [23/2 = 11.5 (round up to 12) / 27/2 = 13.5 (round up to 14) / 31/2 = 15.5 (round up to 16)] increase rows.
        *   Total rows for sleeve body = 80 [92 / 104 / 116].
        *   Increase every (80-4)/10 = 7.6 (approx every 8 rows) [ (92-4)/12 = 7.3 (approx every 7-8 rows) / (104-4)/14 = 7.1 (approx every 7 rows) / (116-4)/16 = 7 (approx every 7 rows)].
        *   Let's simplify: Increase 1 stitch at each edge every **8th row** for 10 [12 / 14 / 16] times.
        *   **Revised Increases**:
            *   S: Increase 10 times every 8th row (20 st total). (45+20=65 stitches. Close enough to 64, can decrease 1 st later or absorb in seaming).
            *   M: Increase 12 times every 8th row (24 st total). (49+24=73 stitches. Close to 72).
            *   L: Increase 14 times every 8th row (28 st total). (53+28=81 stitches. Close to 80).
            *   XL: Increase 16 times every 8th row (32 st total). (57+32=89 stitches. Close to 88).
            *   *Adjusting increase row to be 'every 8th row' for all sizes for simplicity.*
        *   **Final Stitch Counts (after increases)**: 65 [73 / 81 / 89] stitches.
    *   **End of Sleeve Body**: Knit until RC080 [092 / 104 / 116]. (This is 80 [92 / 104 / 116] rows of stockinette body).
    *   **Bind Off**:
        *   RC080 [092 / 104 / 116] (COR): Using a latch tool, bind off all 65 [73 / 81 / 89] stitches loosely.
        *   Cut MC, leaving a long tail for seaming (approx. 36" / 90 cm).

## NECKBAND

**Sizes**: S [M / L / XL]
**Total Stitches to Rehang**: Approx. 140 [156 / 170 / 184] stitches (based on 3.5 stitches per inch).
**Rows**: 14 rows

1.  **Prepare Neckline**: Carefully remove the ravel cord from the necklines of the Front and Back panels. Place all live stitches on stitch holders or waste yarn.
2.  **Rehang Stitches**:
    *   **Needles**: Set up main bed and ribber for 1x1 full needle rib.
    *   **Stitches**: Rehang the live stitches from the Front and Back necklines onto the main bed needles, right side facing you.
        *   **Front Neckline**: Rehang stitches from center outwards. The held needles from shoulder shaping (total 18 [22 / 26 / 30] per side) will be the outermost.
        *   **Back Neckline**: Rehang stitches from center outwards. The held needles from shoulder shaping (total 12 per side) will be the outermost.
        *   Aim for approximately 140 [156 / 170 / 184] stitches total, distributing evenly. You may need to pick up a few extra stitches between bound-off sections to avoid gaps, using a 1x1 transfer tool. Ensure an even number of stitches on both left and right sides of 0 for aesthetic balance.
    *   **Ribber**: Transfer every other main bed stitch to an opposing ribber needle to establish 1x1 rib.
    *   **Secure Weights**: Apply adequate weights.
3.  **Knit Ribbing**:
    *   **Yarn**: Attach MC. Set MTD 3 / RTD 3.
    *   **RC000**: Knit 2 circular rows.
    *   **RC001-014**: Knit 12 more rows in 1x1 rib. (14 rows total).
4.  **Bind Off**:
    *   **RC014 (COR)**: With latch tool, bind off all stitches loosely in 1x1 rib.
    *   Cut MC, leaving a long tail (approx. 24" / 60 cm) for seaming.

## FINISHING

1.  **Steaming**: Gently steam all panels (Front, Back, 2 Sleeves, Neckband). Lay flat and allow to dry completely, gently shaping to schematic dimensions. Use pins to block to shape if desired.
2.  **Shoulder Seams**: Join the shoulder seams using the mattress stitch or backstitch for a neat finish. Match rows precisely.
3.  **Sleeve Attachment**:
    *   Lay the body flat with the shoulder seams joined.
    *   Center the sleeves over the shoulder seams. The center of the sleeve should align with the shoulder seam.
    *   Pin the sleeves to the armholes, matching the bind-off edge of the sleeve to the body.
    *   Sew the sleeves to the body using mattress stitch or backstitch.
4.  **Side Seams and Sleeve Seams**:
    *   Fold the garment in half, right sides together.
    *   Starting from the cuff, sew the sleeve seams and then continue down the side seams to the bottom hem, using mattress stitch. Ensure stripe patterns align if present.
    *   Take extra care at the underarm to ensure a neat join without holes.
5.  **Neckband Seam**: Join the ends of the neckband to form a continuous circle using mattress stitch. Attach the finished neckband evenly around the neckline, matching the center back of the neckband to the center back of the garment.
6.  **Final Blocking**: For best results, use a sweater board. Gently wet the finished garment, squeeze out excess water, and lay it flat on a sweater board, pinning to achieve final dimensions. Allow to air dry completely.

## ABBREVIATIONS

*   **CC1**: Contrast Color 1
*   **CC2**: Contrast Color 2
*   **COL**: Carriage on Left
*   **COR**: Carriage on Right
*   **FNR**: Full Needle Rib
*   **MC**: Main Color
*   **MTD**: Main Bed Tension Dial
*   **RC**: Row Counter
*   **RTD**: Ribber Tension Dial
*   **St(s)**: Stitch(es)
*   **WP**: Working Position
*   **yd**: Yard
*   **m**: Meter
*   **cm**: Centimeter
*   **in**: Inch
Disclaimer: This pattern was generated by AI and should be reviewed for accuracy before use. While we strive for quality, AI-generated content may contain errors. Please verify measurements, stitch counts, and instructions before beginning your project. Generated by purlJam.uk
Access your pattern anytime
Bookmark this page to access your pattern anytime