Type
Crochet
Difficulty
intermediate
Category
amigurumi
AI Thinking Process
Planning
Verification
Pattern
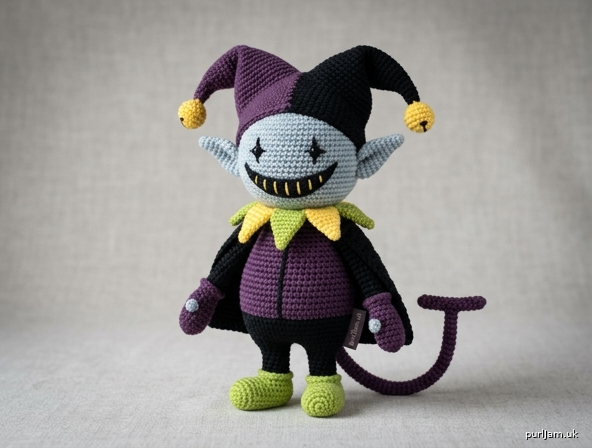
The Jester Sprite — Bobo da Corte Amigurumi
An Advanced Crochet Amigurumi Pattern
A whimsical bluish-gray sprite with pointed elf ears, a wide toothy grin, a two-tone jester hat with crocheted bells, a clown ruff collar, a flowing black cape, fingerless mitten hands, lime-green shoes, and a dramatic wire-shaped "J" tail.
FINISHED SIZE
Approximately 7 in (18 cm) tall including hat; body diameter approx 3.5 in (9 cm). Tail adds approx 5 in (13 cm) of length.
GAUGE
4 sc x 4.5 rounds = 1 in (2.5 cm) in single crochet worked in continuous rounds. Gauge is not critical for fit but affects finished size and stuffing density. Work tightly so stuffing does not show.
MATERIALS
- Worsted weight (#4) yarn:
- Light bluish-gray (Head) — approx 40 yd
- Dark purple (Body, hands, tail, one hat point) — approx 70 yd
- Black (Arms, legs, cape, one hat point) — approx 60 yd
- Lime green (Shoes, collar points) — approx 25 yd
- Yellow (Bells, collar points, teeth) — approx 20 yd
- Small amount of black for eye embroidery
- Hook: US E-4 (3.5 mm)
- Fiberfill polyester stuffing
- Yarn needle (tapestry needle)
- Stitch marker
- Craft/floral wire, ~18 gauge (for tail armature — optional, see Safety Note)
- Needle-nose pliers (to shape and cap wire ends)
- Optional: pins for assembly
ABBREVIATIONS (US TERMS)
- sc = single crochet
- inc = 2 sc in same stitch
- dec = invisible decrease (insert in FLO of next 2 sts, yo pull through both, yo pull through all)
- st(s) = stitch(es)
- MR = magic ring
- sl st = slip stitch
- ch = chain
- FLO = front loop only
- ( ) x N = repeat sequence N times
- [ ] = total stitch count at end of round
Note: Work in continuous spiral rounds (do not join) unless stated. Use a stitch marker to track the beginning of each round.
SAFETY NOTE (READ FIRST)
This pattern uses embroidered star/slit eyes instead of safety eyes, making it child-safe by default. The wire tail armature is optional and NOT child-safe — wire can poke through and is a hazard. For children under 3, omit the wire and stuff the tail firmly, or sew the J-curve into shape (instructions given in both versions).
HEAD
(Light bluish-gray)
- Rnd 1: 6 sc in MR [6]
- Rnd 2: inc in each st around [12] (6 inc → 6 + 6 = 12 ✓)
- Rnd 3: (sc, inc) x6 [18] (6 inc → 12 + 6 = 18 ✓)
- Rnd 4: (2 sc, inc) x6 [24] (6 inc → 18 + 6 = 24 ✓)
- Rnd 5: (3 sc, inc) x6 [30] (6 inc → 24 + 6 = 30 ✓)
- Rnds 6–13: sc in each st around [30] (8 even rounds for a round head)
- Rnd 14: (3 sc, dec) x6 [24] (6 dec → 30 − 6 = 24 ✓)
Begin stuffing firmly now and continue stuffing as you close.
- Rnd 15: (2 sc, dec) x6 [18] (18 ✓)
- Rnd 16: (sc, dec) x6 [12] (12 ✓)
- Rnd 17: dec x6 [6] (6 ✓)
Fasten off, leaving a tail. Weave through remaining 6 sts and cinch closed. The magic-ring end is the top of the head (where the hat sits); the closed end is the base (neck).
EARS (Make 2)
(Light bluish-gray — pointed elf/pixie style, worked flat)
- Ch 2.
- Row 1: 3 sc in 2nd ch from hook [3]
- Row 2: inc, sc, inc [5] (2 inc → 3 + 2 = 5 ✓)
- Row 3: sc in each st [5]
- Row 4: inc, 3 sc, inc [7] (2 inc → 5 + 2 = 7 ✓)
- Row 5: sc in each st [7]
Fasten off, leaving a long tail for sewing. The ch-2 tip is the pointed elf tip; the wide edge (Row 5) sews to the head. Do not stuff — pinch flat.
BODY
(Dark purple — chubby and round)
- Rnd 1: 6 sc in MR [6]
- Rnd 2: inc in each st around [12] (12 ✓)
- Rnd 3: (sc, inc) x6 [18] (18 ✓)
- Rnd 4: (2 sc, inc) x6 [24] (24 ✓)
- Rnd 5: (3 sc, inc) x6 [30] (30 ✓)
- Rnd 6: (4 sc, inc) x6 [36] (6 inc → 30 + 6 = 36 ✓)
- Rnds 7–15: sc in each st around [36] (9 even rounds for a plump belly)
- Rnd 16: (4 sc, dec) x6 [30] (6 dec → 36 − 6 = 30 ✓)
- Rnd 17: (3 sc, dec) x6 [24] (24 ✓)
Stuff very firmly.
- Rnd 18: (2 sc, dec) x6 [18] (18 ✓)
- Rnd 19: (sc, dec) x6 [12] (12 ✓)
Add more stuffing. The Rnd 19 opening [12] is the neck, sized to seat under the head base [approx 12–18 sts]. Do not close fully — leave this 12-st opening to sew the head on. Fasten off, leaving a long tail.
ARMS (Make 2)
(Black — thin)
- Rnd 1: 6 sc in MR [6]
- Rnd 2: sc in each st around [6]
- Rnds 3–10: sc in each st around [6] (long, thin arm — 9 even rounds total)
Change to dark purple for the hand:
- Rnd 11: (sc, inc) x3 [9] (3 inc → 6 + 3 = 9 ✓)
- Rnds 12–14: sc in each st around [9] (mitten cup)
- Rnd 15: (sc, dec) x3 [6] (3 dec → 9 − 3 = 6 ✓)
- Rnd 16: dec x3 [3] (3 ✓)
Fasten off, cinch closed. This gives a rounded fingerless mitten shape (no separate thumb — simple winter-mitten look). Stuff lightly. Leave arm top open to sew.
LEGS (Make 2)
(Black legs / lime-green rounded-toe shoes)
Start with lime green (the shoe):
- Rnd 1: 6 sc in MR [6]
- Rnd 2: inc in each st around [12] (12 ✓)
- Rnd 3: (sc, inc) x6 [18] (18 ✓)
- Rnds 4–6: sc in each st around [18] (rounded toe / foot base)
- Rnd 7: (sc, dec) x6 [12] (6 dec → 18 − 6 = 12 ✓)
- Rnd 8: (2 sc, dec) x3 [9] (3 dec → 12 − 3 = 9 ✓)
Change to black for the leg:
- Rnds 9–14: sc in each st around [9] (short leg — 6 even rounds)
Fasten off, leaving a tail. Stuff foot firmly and leg lightly. Leave top open to sew.
TAIL
(Dark purple — long, thin, "J"-shaped)
- Rnd 1: 6 sc in MR [6]
- Rnds 2–22: sc in each st around [6] (long thin tube, approx 5 in / 13 cm)
Fasten off, leaving a long sewing tail. Do not stuff densely — see shaping below.
Shaping the "J" (two options):
- Wired (decorative/adults): Cut craft wire slightly longer than the tail. Bend one end into a small closed loop with pliers (no sharp point). Insert wire the full length of the tube, capping both ends by folding. Add a wisp of stuffing around the wire. Bend the tube: keep the main length straight, then curve the last 1.5 in (4 cm) sharply upward to form the hook of the "J."
- Wireless (child-safe): Stuff firmly. Using the sewing tail, take a long stitch from the tip through the inside to about 1.5 in (4 cm) down, pull to bend the tube into the "J" hook, and secure. Tack the curve to hold shape.
HAT — Two-Point Jester Hat
Worked as a shaped cap starting at the crown edge, then splitting into two floppy points. The cap base fits over the head [30 sts].
Hat Band / Crown
Join dark purple and black — the hat is split front-to-back into a left dark purple half and a right black half. Work the band in rounds using both colors (carry the unused color inside; keep purple on the left half, black on the right half of each round: 15 purple sts, 15 black sts).
- Rnd 1: ch 30, sl st to join into a ring, sc in each ch [30] (15 purple + 15 black ✓)
- Rnds 2–4: sc in each st around, maintaining color halves [30]
- Rnd 5: (3 sc, inc) x6 [36] — split colors 18/18 (6 inc → 30 + 6 = 36 ✓)
Split for the two points. Fold flat so the purple half and black half each hold 18 sts. Work each point separately as a flat/tube tapering tube.
Point 1 — Dark Purple (worn on the LEFT)
Rejoin dark purple to the 18 purple sts, working in the round on those 18 sts:
- Rnd 1: sc in each st around [18]
- Rnd 2: (4 sc, dec) x3 [15] (3 dec → 18 − 3 = 15 ✓)
- Rnd 3: sc in each st [15]
- Rnd 4: (3 sc, dec) x3 [12] (12 ✓)
- Rnd 5: sc in each st [12]
- Rnd 6: (2 sc, dec) x3 [9] (9 ✓)
- Rnd 7: sc in each st [9]
- Rnd 8: (sc, dec) x3 [6] (6 ✓)
- Rnds 9–11: sc in each st [6] (long floppy droop)
- Rnd 12: dec x3 [3] (3 ✓) Fasten off, leaving a tail to attach a bell.
Point 2 — Black (worn on the RIGHT)
Repeat Point 1 exactly in black on the remaining 18 sts.
BELLS (Make 2)
(Yellow — mini bobbles)
- Rnd 1: 6 sc in MR [6]
- Rnd 2: inc in each st around [12] (12 ✓)
- Rnds 3–4: sc in each st around [12]
- Rnd 5: dec x6 [6] (6 dec → 12 − 6 = 6 ✓)
Stuff lightly. Fasten off, cinch closed, leaving a tail to sew one bell to each hat point tip.
COLLAR — Clown Ruff
(Alternating lime-green and yellow triangular points)
Worked as a base ring around the neck with triangular points added.
Base Ring
With lime green: ch 24, sl st to join into a ring (sized to sit around the neck under the head).
- Rnd 1: sc in each ch [24] (24 ✓)
Points (worked around the base ring)
You will make 8 triangular points (4 lime green + 4 yellow, alternating), each spanning 3 base sts. (8 points x 3 base sts = 24 sts ✓)
For each point, work back and forth over the next 3 base sts:
- Row 1: sc in next 3 base sts, ch 1, turn [3]
- Row 2: dec, sc, ... — work 2 sc: sc, dec across [2], ch 1, turn (1 dec → 3 − 1 = 2 ✓)
- Row 3: dec [1] (2 − 1 = 1 ✓, forms the point tip)
- Fasten off that point.
Alternate colors point by point: lime, yellow, lime, yellow, lime, yellow, lime, yellow. Rejoin the correct color at each new set of 3 base sts. When all 8 points are complete, weave in ends. The collar slips over the neck before the head is attached.
CAPE
(Black — simple, covers the back/shoulders)
Worked flat, top-down.
- Row 1: ch 15, sc in 2nd ch from hook and each ch across [14]
- Rows 2–9: sc in each st across, ch 1, turn [14] (rectangular back panel)
- Row 10: sc in each st across [14] Fasten off. Weave in ends. Leave a long strand at the top corners for tying/sewing around the shoulders.
Neck tie: Along the top edge (Row 1 edge), weave a length of black yarn to gather slightly and create shoulder straps for sewing to the back.
ASSEMBLY
Work on a flat surface and pin before sewing. Use matching yarn and a yarn needle; whip stitch or ladder stitch for invisible seams.
- Collar first: Slide the collar ring down over the body neck [12-st opening] so it rests at the shoulders.
- Attach head to body: Add extra stuffing through the neck. Center the head base over the body's 12-st opening and whip stitch all around firmly. The magic-ring top of the head faces up.
- Ears: Pin the pointed ears to the sides of the head at approximately head Rnd 8–10 level, tips angled slightly up and back (elf style). Sew the wide edge flat to the head.
- Arms: Flatten the open top of each arm and sew to the sides of the body at approximately Rnd 8, purple mitten hands pointing down/forward.
- Legs: Sew the open leg tops to the bottom-front of the body approximately 1 in (2.5 cm) apart so the sprite can sit/stand; lime-green rounded toes face forward.
- Tail: Sew the open tail base to the center back of the body at approximately Rnd 12, so the straight length projects out and back and the hook curves upward into the "J." Ensure any wire loop end is fully enclosed and not protruding.
- Cape: Drape the black cape over the shoulders/back, covering the tail base attachment point at the top. Sew the top edge across the shoulders and tack at the neck.
- Hat: Place the hat over the head so the dark purple point falls to the LEFT and the black point falls to the RIGHT. Sew the hat band edge to the head at approximately head Rnd 5–6. Let the two points droop naturally.
- Bells: Sew one yellow bell to each hat point tip.
EMBROIDERY — Face
Use the yarn needle and separate strands.
- Eyes: With black, embroider two small stars or narrow vertical slits about 1/2 in (1.3 cm) apart, centered at head Rnd 8–9. For star eyes, work three overlapping straight stitches crossing at a center point (6-point star). For slit eyes, work a single short vertical straight stitch each.
- Smile: With black, embroider a very wide grin from ear to ear (spanning approximately head Rnds 10–12), a shallow upward curve using long backstitches or split stitches.
- Teeth: With yellow, work several spaced vertical straight stitches across the black smile line, leaving gaps between each for the "spaced teeth" look (5–7 teeth).
FINISHING
- Weave in all remaining ends.
- Gently shape the J-tail, hat points, and collar.
- Fluff the cape and adjust the ear angle.
Your Jester Sprite is complete! For gift or child use, confirm all limbs are firmly attached and the wire (if used) is fully enclosed — or omit wire entirely per the Safety Note.
Disclaimer: This pattern was generated by AI and should be reviewed for accuracy before use. While we strive for quality, AI-generated content may contain errors. Please verify measurements, stitch counts, and instructions before beginning your project. Generated by purlJam.uk
Love this pattern?
Save this pattern to your free PurlJam libraryAccess your pattern anytime
Bookmark this page to access your pattern anytime