Type
Knitting
Difficulty
intermediate
Category
skirt
AI Thinking Process
Planning
Verification
Pattern
The Studio Skirt
A customizable waist-down knitted skirt — simple A-line, tiered, or ruffled
Skill Level: Intermediate
A seamless skirt worked from the waist down in worsted-weight yarn. One waistband and one increase grammar support three silhouettes, four lengths, and two waistband styles. Choose your options before you cast on; the pattern is written so every size, length, and variation is fully specified.
Sizes
XS (S, M, L, XL, 2XL, 3XL, 4XL, 5XL)
To fit waist: 24 (27, 30, 34, 38, 42, 46, 50, 54)" / 61 (68.5, 76, 86.5, 96.5, 106.5, 117, 127, 137) cm To fit hip: 34 (37, 40, 44, 48, 52, 56, 60, 64)" / 86.5 (94, 101.5, 112, 122, 132, 142, 152.5, 162.5) cm
Shown instructions use bold for the first size, with remaining sizes in parentheses. When only one number appears, it applies to all sizes. Circle your size throughout before you begin.
Finished Measurements
Waist (fabric circumference, unstretched): 25¾ (29¼, 32, 36½, 40, 43½, 48, 52½, 56)" / 65.5 (74.5, 81.5, 92.5, 101.5, 110.5, 122, 133.5, 142) cm Hip (at approx. 7" / 18 cm below waistband): 38¼ (41¾, 44½, 48¾, 52½, 56, 60½, 64¾, 68½)" / 97 (106, 113, 124, 133.5, 142, 153.5, 164.5, 174) cm
Ease: The fabric waist is written with about 1¾–2" (4.5–5 cm) of positive ease and is meant to be cinched by ribbing stretch or 1" (2.5 cm) elastic. Hip ease is about 4–4½" (10–11.5 cm) — enough to sit and walk. For a closer waist, use the ribbed waistband; for a custom cinch, use the folded casing and cut elastic to your waist minus 2" (5 cm). For a roomier hip, go up one size for the body only.
A-line hem circumference (blocked; produced by the increase rate below):
| Length | XS | S | M | L | XL | 2XL | 3XL | 4XL | 5XL |
|---|---|---|---|---|---|---|---|---|---|
| Mini | 43½" | 47¼" | 50" | 54½" | 58" | 61½" | 65¾" | 70¼" | 73¾" |
| Knee | 48¾" | 52½" | 55" | 59½" | 63" | 66¾" | 71" | 75½" | 79" |
| Midi | 54¼" | 58" | 60½" | 65" | 68½" | 72" | 76½" | 80¾" | 84½" |
| Maxi | 61¼" | 65" | 67½" | 72" | 75½" | 79" | 83½" | 88" | 91½" |
Tiered and ruffled hems are fuller than the A-line numbers; see each variation.
Finished length from top of waistband:
- Mini: 16" (40.5 cm) — 2" waistband + 14" body
- Knee: 22" (56 cm) — 2" waistband + 20" body
- Midi: 28" (71 cm) — 2" waistband + 26" body
- Maxi: 36" (91.5 cm) — 2" waistband + 34" body
Custom length: work the body until it measures [desired total length minus 2"] from the base of the waistband, then hem.
Yarn
Worsted weight (CYC 4), 18–20 sts = 4" on US 7–8. Choose a yarn with drape and recovery: wool, wool/nylon, wool/alpaca, or a wool/cotton blend. Avoid 100% cotton (it grows and never springs back) and harsh, inelastic acrylic.
Approximate yardage for the Simple A-line in Stockinette, including waistband. Add +35% for a 3-tier skirt at 1.5× fullness, +60% for 3-tier at 2× fullness, +25% for a single hem ruffle, +40% for two ruffles.
| Mini | Knee | Midi | Maxi | |
|---|---|---|---|---|
| XS | 800 yd / 730 m | 1150 yd / 1050 m | 1600 yd / 1465 m | 2200 yd / 2010 m |
| S | 900 yd / 825 m | 1300 yd / 1190 m | 1800 yd / 1645 m | 2500 yd / 2285 m |
| M | 1000 yd / 915 m | 1450 yd / 1325 m | 2000 yd / 1830 m | 2800 yd / 2560 m |
| L | 1150 yd / 1050 m | 1650 yd / 1510 m | 2250 yd / 2055 m | 3100 yd / 2835 m |
| XL | 1250 yd / 1145 m | 1800 yd / 1645 m | 2500 yd / 2285 m | 3450 yd / 3155 m |
| 2XL | 1350 yd / 1235 m | 1950 yd / 1785 m | 2700 yd / 2470 m | 3750 yd / 3430 m |
| 3XL | 1500 yd / 1370 m | 2150 yd / 1965 m | 3000 yd / 2745 m | 4150 yd / 3795 m |
| 4XL | 1650 yd / 1510 m | 2350 yd / 2150 m | 3250 yd / 2970 m | 4500 yd / 4115 m |
| 5XL | 1750 yd / 1600 m | 2500 yd / 2285 m | 3500 yd / 3200 m | 4800 yd / 4390 m |
Buy an extra skein if you plan a picot hem, seed stitch, or a very full ruffle. Yardage is estimated at 1.4 yd per square inch of Stockinette; your gauge and yarn will shift this.
Needles
- Ribbing / casing inner: US 7 / 4.5 mm, 24" (60 cm) circular
- Body: US 8 / 5 mm circulars in 24" (60 cm), 32" (80 cm), and 40" (100 cm) — switch to a longer needle as the circumference grows. A 47" (120 cm) circular is helpful for 4XL–5XL maxi, tiers, and ruffles.
- Spare US 8 / 5 mm circular for joining a folded waistband and for holding ruffle stitches.
Use the needle size you need to obtain gauge.
Notions
- 8 stitch markers (1 unique for beginning of round, 3 matching for quarters, 4 optional for increase tracking)
- Tapestry needle
- Waste yarn or spare circular (provisional cast-on, optional)
- 1" (2.5 cm) non-roll waist elastic: 22 (25, 28, 32, 36, 40, 44, 48, 52)" / 56 (63.5, 71, 81.5, 91.5, 101.5, 112, 122, 132) cm, plus 1" (2.5 cm) overlap — folded-casing waistband only
- Safety pin or bodkin for threading elastic
- Matching sewing thread and sharp needle (to close the casing and secure elastic)
- Blocking mats, wires or pins; a dress form is helpful but not required
Gauge
18 stitches and 24 rounds = 4" (10 cm) in Stockinette stitch in the round on US 8 / 5 mm needles, blocked.
- 4.5 sts = 1" (2.5 cm)
- 6 rounds = 1" (2.5 cm)
Swatch in the round (or knit a flat swatch and recast the stitch gauge from the fabric, not the edge). Block the swatch the same way you will block the skirt. If you have too many stitches per 4", go up a needle size; too few, go down. Row/round gauge matters here — the increase spacing is written in rounds. If your round gauge is not 6 rnds = 1", see Notes to convert.
Abbreviations (US)
BOR — beginning of round BO — bind off CO — cast on inc — increase k — knit k2tog — knit 2 together kfb — knit into front and back of the same stitch (1 st increased) M1L — make 1 left (lift the bar between stitches from front to back, knit through the back loop) M1R — make 1 right (lift the bar between stitches from back to front, knit through the front loop) p — purl pm — place marker rnd(s) — round(s) RS — right side sl — slip sl m — slip marker ssk — slip, slip, knit (left-leaning decrease) st(s) — stitch(es) St st — Stockinette stitch (knit every round in the round) WS — wrong side wyib — with yarn in back wyif — with yarn in front yo — yarn over
Notes
Construction. The skirt is worked in one piece in the round from the waist down. There is no side seam. Flare is produced only by increases; nothing is decreased.
Choosing a size. Match your waist for the ribbed waistband. Match your hip if you are between sizes or want a low-rise sit: start with the hip stitch count of the size that matches your hip and skip the seven hip-increase rounds, going straight to the post-hip rate (or to even knitting for a straight column).
Marker map. Four quarter-markers sit at center front, right side, center back, and left side. Increases are paired on either side of each marker (8 stitches per increase round), so the flare reads as four soft A-line “seams.”
Increase round (Inc Rnd). *Knit to marker, M1L, sl m, M1R; repeat from * to end of round. 8 stitches increased. The M1L / M1R pair leans away from the marker and makes a clean seam line. If you prefer a fully invisible increase, substitute kfb on the stitch before each marker and kfb on the stitch after it (still 8 sts).
Round-gauge conversion. Pattern spacing uses 6 rnds = 1". If you get a different round gauge, convert every inch instruction to your rounds (desired inches × your rnds per inch) and keep the same number of Inc Rnds.
Stitch-pattern substitution. The stitch counts assume Stockinette. Garter in the round (knit 1 rnd, purl 1 rnd) is shorter per round and wider per stitch — swatch and add extra length; do not trust the printed inch marks. Seed stitch in the round with an even count: Rnd 1 *k1, p1; rep from *; Rnd 2 *p1, k1; rep from *. A simple eyelet stripe that keeps the count: every 8th round *yo, k2tog; repeat from *. Work increases on plain Stockinette rounds, not on eyelet rounds.
Weight. A worsted maxi in 5XL is a heavy garment. If you are making midi or maxi in L and up, consider a wool-blend with nylon and block the skirt lying flat — never hang it wet.
Stretchy bind-off. Use Jeny’s Surprisingly Stretchy Bind-Off, a sewn bind-off, or bind off with a needle one or two sizes larger. A tight hem will cup and unseat the A-line.
Stitch Guide
Stockinette in the round: Knit every round.
2×2 rib in the round: *K2, p2; repeat from * to end. (Count is a multiple of 4.)
1×1 rib in the round: *K1, p1; repeat from * to end. (Count is a multiple of 2.)
Garter in the round: Rnd 1 knit; Rnd 2 purl. Repeat these 2 rounds.
Turning ridge: Purl 1 round. This is the fold line of the waistband and a pickup ridge for optional ruffles.
Before You Begin — Design Your Skirt
Circle one choice in each line:
- Silhouette: Simple A-line / Tiered / Ruffled
- Length: Mini (14" body) / Knee (20" body) / Midi (26" body) / Maxi (34" body) / Custom: ____"
- Waistband: Ribbed 2×2 (no elastic required) / Folded casing with elastic
- Tiers (tiered only): 2 tiers / 3 tiers; fullness 1.5× / 2×
- Ruffles (ruffled only): Hem ruffle only / Hem + one additional ruffle
- Hem: Standard stretchy BO / Garter edge / Picot / Rolled
- Fabric: Stockinette (as written) / Seed / Eyelet stripe
Then work Waistband → Body of your silhouette → Hem → Finishing.
Waistband
With US 7 / 4.5 mm, 24" (60 cm) circular, cast on 116 (132, 144, 164, 180, 196, 216, 236, 252) stitches. Use a long-tail cast-on for the ribbed band, or a long-tail / knitted cast-on for the casing. Place a unique marker for BOR and join to work in the round, taking care not to twist.
Check: 116 (132, 144, 164, 180, 196, 216, 236, 252) ÷ 4.5 sts per inch = 25¾ (29¼, 32, 36½, 40, 43½, 48, 52½, 56)" fabric waist ✓ Check: all counts ÷ 4 = 29 (33, 36, 41, 45, 49, 54, 59, 63) — valid 2×2 rib ✓
Option A — Ribbed Waistband
Work in 2×2 rib (*k2, p2; repeat from *) until the band measures 2" (5 cm) from the cast-on edge.
Change to US 8 / 5 mm. Knit 1 round.
Proceed to Place Quarter Markers.
(Optional drawstring: on the last rib round, work *k2, p2, k2, yo, p2tog; repeat from * around, then 1 more round of 2×2 rib. Thread i-cord or ribbon after finishing.)
Option B — Folded Waistband with Elastic Casing
Change to US 8 / 5 mm after the cast-on (or CO already on US 8).
- Knit every round until the piece measures 2½" (6.5 cm) from the cast-on. This is the inner layer (against the body).
- Turning ridge: Purl 1 round. This round is the top edge of the finished waistband.
- Knit every round until the outer layer measures 2½" (6.5 cm) from the turning ridge.
Join the casing (recommended): With a spare US 8 needle, pick up 116 (132, 144, 164, 180, 196, 216, 236, 252) stitches from the cast-on edge, one pickup per cast-on stitch, holding the spare needle behind the working needle. Fold the band so WS are together and the turning ridge is at the top. Knit 1 live stitch together with 1 picked-up stitch around, leaving a 2" (5 cm) gap unjoined at the BOR for inserting elastic later. You still have 116 (132, 144, 164, 180, 196, 216, 236, 252) stitches.
Join later (easier): Skip the pickup. Continue the skirt from here; in Finishing you will sew the cast-on edge to the WS, leaving a 2" (5 cm) gap.
Proceed to Place Quarter Markers. Elastic is inserted in Finishing.
Place Quarter Markers
On the next round, place 3 additional markers to divide the skirt into four equal quarters (the unique BOR marker is already one of the four):
K 29 (33, 36, 41, 45, 49, 54, 59, 63), pm, k 29 (33, 36, 41, 45, 49, 54, 59, 63), pm, k 29 (33, 36, 41, 45, 49, 54, 59, 63), pm, knit to BOR marker.
Check: 4 × 29 (33, 36, 41, 45, 49, 54, 59, 63) = 116 (132, 144, 164, 180, 196, 216, 236, 252) ✓
Read the four markers as: BOR = center back, next = left side, next = center front, next = right side. (Or rotate them if you prefer BOR at a side seam; the math does not change.)
Optional — Back-waist short rows (intermediate)
For a back that sits up instead of sliding down, add a short-row wedge at center back before any increases:
- Knit to 8 (8, 10, 10, 12, 12, 12, 14, 14) sts past the first quarter marker (left side), wrap & turn.
- Purl back past BOR to 8 (8, 10, 10, 12, 12, 12, 14, 14) sts past the last quarter marker (right side), wrap & turn.
- Knit to 4 sts before the previous wrap, wrap & turn; purl to 4 sts before the previous wrap, wrap & turn.
- Repeat step 3 once more.
- Knit to BOR, picking up wraps and knitting them with their stitches. On the next full round, pick up the remaining wraps.
You are still at 116 (132, 144, 164, 180, 196, 216, 236, 252) stitches. Proceed to your silhouette.
Skirt Body
Work in Stockinette (knit every round) unless you circled another fabric. Work all Inc Rnds as defined in Notes.
Inc Rnd: *Knit to marker, M1L, sl m, M1R; repeat from * 3 more times (4 markers, 8 sts increased).
Variation 1 — Simple A-Line Skirt
The A-line uses two speeds: a faster rate from waist to hip, then a slower rate to the hem so mini, knee, midi, and maxi all flare in proportion.
Hip shaping
Work 5 rounds even, then 1 Inc Rnd; repeat this 6-round sequence 7 times.
After 7 Inc Rnds: 172 (188, 200, 220, 236, 252, 272, 292, 308) sts.
Check: 116 + (7 × 8) = 172 ✓; 132 + 56 = 188 ✓; 144 + 56 = 200 ✓; 164 + 56 = 220 ✓; 180 + 56 = 236 ✓; 196 + 56 = 252 ✓; 216 + 56 = 272 ✓; 236 + 56 = 292 ✓; 252 + 56 = 308 ✓
These 42 rounds measure 7" (18 cm) at pattern gauge (42 ÷ 6 = 7" ✓). Hip circumference is now 38¼ (41¾, 44½, 48¾, 52½, 56, 60½, 64¾, 68½)" ✓.
Work even (no increases) until the body measures 8" (20.5 cm) from the base of the waistband.
Hem flare
Now work 11 rounds even, then 1 Inc Rnd; repeat this 12-round sequence until the body measures 1" (2.5 cm) less than your target body length (see table), ending with a completed Inc Rnd if one falls there, otherwise with even rounds.
Target body length from base of waistband, and expected extra Inc Rnds / stitch counts:
| Length | Body length | Work flare until | Extra Inc Rnds | Stitches at that point |
|---|---|---|---|---|
| Mini | 14" (35.5 cm) | 13" (33 cm) | 3 | 196 (212, 224, 244, 260, 276, 296, 316, 332) |
| Knee | 20" (51 cm) | 19" (48.5 cm) | 6 | 220 (236, 248, 268, 284, 300, 320, 340, 356) |
| Midi | 26" (66 cm) | 25" (63.5 cm) | 9 | 244 (260, 272, 292, 308, 324, 344, 364, 380) |
| Maxi | 34" (86.5 cm) | 33" (84 cm) | 13 | 276 (292, 304, 324, 340, 356, 376, 396, 412) |
Mini check: 172 + (3 × 8) = 196 ✓; 196 ÷ 4.5 = 43.6" ≈ 43½" hem ✓ Knee check: 172 + (6 × 8) = 220 ✓; 220 ÷ 4.5 = 48.9" ≈ 48¾" hem ✓ Midi check: 172 + (9 × 8) = 244 ✓; 244 ÷ 4.5 = 54.2" ≈ 54¼" hem ✓ Maxi check: 172 + (13 × 8) = 276 ✓; 276 ÷ 4.5 = 61.3" ≈ 61¼" hem ✓ (Same extra Inc Rnds apply to every size; add 24 / 48 / 72 / 104 sts to that size’s hip count.)
Work even until the body measures the full target length from the base of the waistband (14 / 20 / 26 / 34"), or your custom length.
Proceed to Hem.
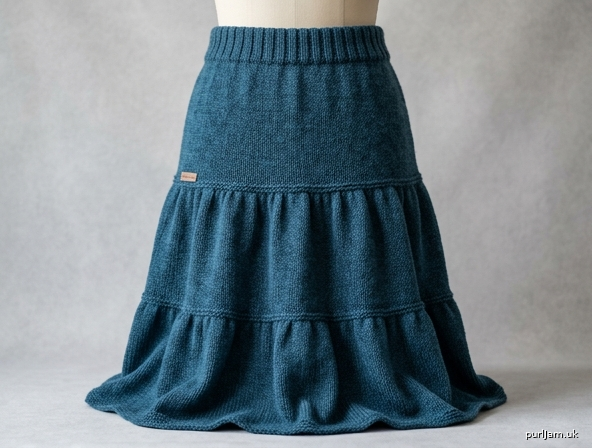
Variation 2 — Tiered Skirt
Each tier is bound off, then stitches are picked up along that edge and increased 1.5× (moderate swirl) or 2× (full dirndl) before the next tier is worked. Two-tier is clean on mini and knee; three-tier is the classic midi/maxi.
Suggested tier lengths (body only, excluding waistband):
| Tier 1 | Tier 2 | Tier 3 (3-tier only) | |
|---|---|---|---|
| Mini 14" | 6" (15 cm) | 8" (20.5 cm) | — or 5" / 5" / 4" |
| Knee 20" | 8" (20.5 cm) | 12" (30.5 cm) | — or 7" / 7" / 6" |
| Midi 26" | 8" (20.5 cm) | 9" (23 cm) | 9" (23 cm) |
| Maxi 34" | 10" (25.5 cm) | 12" (30.5 cm) | 12" (30.5 cm) |
Adjust any tier by an inch to taste; the stitch math does not depend on tier length.
Tier 1
Work Hip shaping exactly as in the A-line (7 Inc Rnds over 42 rounds, then even) until Tier 1 reaches its length from the base of the waistband.
If Tier 1 is shorter than 7" (mini 5" three-tier), stop when you hit that length — you will have worked fewer than 7 Inc Rnds. Count your stitches; that number is T1.
If Tier 1 is 7" or longer, you will be at the hip count:
T1 = 172 (188, 200, 220, 236, 252, 272, 292, 308) sts for a standard 7"+ first tier.
Knit 1 round. Bind off loosely purlwise (a purl bind-off makes a tidy pickup ridge). Fasten off.
Pickup and fullness for the next tier
With US 8 / 5 mm and RS facing, beginning at BOR (center back), pick up and knit 1 stitch per bind-off stitch along the bind-off edge. Pick up the same number you bound off. Place the four quarter markers again, dividing the new count as evenly as possible (1-stitch differences between quarters are fine).
Work one of the following increase rounds:
Moderate (1.5×): *Kfb, k1; repeat from * to end.
- Requires an even count (you have one).
- New count = T1 × 1.5.
- From hip T1: 258 (282, 300, 330, 354, 378, 408, 438, 462) sts.
- Check: 172 × 1.5 = 258 ✓; 188 × 1.5 = 282 ✓; 200 × 1.5 = 300 ✓; 220 × 1.5 = 330 ✓; 236 × 1.5 = 354 ✓; 252 × 1.5 = 378 ✓; 272 × 1.5 = 408 ✓; 292 × 1.5 = 438 ✓; 308 × 1.5 = 462 ✓
Full (2×): Kfb in every stitch.
- New count = T1 × 2.
- From hip T1: 344 (376, 400, 440, 472, 504, 544, 584, 616) sts.
- Check: 172 × 2 = 344 ✓; 308 × 2 = 616 ✓
If the count is large, switch to a 40" or 47" circular now.
Tier 2
Work even in Stockinette (or your chosen fabric) until Tier 2 measures its length from the pickup round. Do not work A-line increases inside a tier — the pickup increase is the flare.
Two-tier skirt: proceed to Hem and bind off loosely from these stitches.
Three-tier skirt: bind off loosely purlwise. Repeat Pickup and fullness using Tier 2’s bound-off count as the new T1, at the same 1.5× or 2× you chose. Then work Tier 3 even to length.
Expected 3-tier hem counts if you started from hip T1 and used the same multiplier twice:
- 1.5× then 1.5× (2.25× original T1): 387 (423, 450, 495, 531, 567, 612, 657, 693) — if a count is odd after the first 1.5×, kfb in the last stitch of the second increase round to keep it workable; 258 × 1.5 = 387 ✓.
- 2× then 2× (4× original T1): 688 (752, 800, 880, 944, 1008, 1088, 1168, 1232) sts. Check: 344 × 2 = 688 ✓. This is a very full skirt; use a long circular and a stretchy bind-off.
Proceed to Hem.
Variation 3 — Ruffled Skirt
The main body is the A-line (or a straight column if you skip post-hip increases). Ruffles are added from live stitches at the hem, and optionally picked up from a prepared ridge higher on the skirt.
Main body
Work Variation 1 — Simple A-Line until the body measures [ruffle depth] shorter than your target body length.
Default ruffle depth: 2½" (6.5 cm). Use 2" (5 cm) for a crisp trim, 3" (7.5 cm) for a softer flounce.
So for a 20" knee body with a 2½" ruffle, work the A-line until the body measures 17½" (44.5 cm), then begin the ruffle. You should be at (or within one Inc Rnd of) the A-line stitch count for that length.
Optional extra ruffle line. If you circled two ruffles, when the body measures 6" (15 cm) above the planned hem, work a turning ridge (purl 1 round), then continue in Stockinette. That purl ridge is the pickup track for the upper ruffle.
Hem ruffle (from live stitches)
Ruffle Inc Rnd (2×, default): Kfb in every stitch.
Stitches double. From the knee A-line counts, you would have: 440 (472, 496, 536, 568, 600, 640, 680, 712) sts if you doubled the knee table (220 × 2 = 440 ✓). From whatever count you actually hold, new count = current × 2.
Fuller ruffle (3×): *Kfb, kfb, k1; repeat from * (count must be a multiple of 3; knit any remainder as kfb). New count ≈ current × 2.
Work the ruffle in garter in the round (knit 1 rnd, purl 1 rnd) for a ruffle that stands out, or in Stockinette for a ruffle that drapes and rolls. Work until the ruffle measures 2½" (6.5 cm), or your chosen depth.
Proceed to Hem and bind off very loosely — a tight bind-off kills a ruffle. Jeny’s Surprisingly Stretchy Bind-Off is recommended.
Optional upper ruffle
With a spare US 8 / 5 mm circular and RS facing, pick up 1 stitch per stitch in the purl ridge you made (pick up in the purl bump so the ruffle sits on the RS). You will have approximately the stitch count that existed at that round.
Work the same Ruffle Inc Rnd (2×), then work 2" (5 cm) of garter in the round. Bind off very loosely. The upper ruffle is independent of the live hem ruffle.
Hem
Work the hem you circled. All hems begin with the stitches currently on the needle, at the target body length (A-line / tiered) or after the ruffle depth (ruffled).
1. Standard stretchy bind-off
Bind off loosely knitwise, using a needle one or two sizes larger or Jeny’s Surprisingly Stretchy Bind-Off: *k1, yo, k1, pass yo and first knit over the second knit; repeat from *, making a yo before every stitch including purls if you are on a ribbed edge. Fasten off.
2. Garter edge
Work 6 rounds of garter in the round (knit 1 rnd, purl 1 rnd, three times). Bind off loosely knitwise on a knit round. This edge will not roll.
3. Picot hem
- Knit 1 round.
- Picot round:
*yo, k2tog; repeat from *to end (even count required; you have one). - Knit every round for 1" (2.5 cm).
- Bind off loosely.
- Fold the hem to the WS along the picot round (the yos form the points) and loosely whipstitch the bind-off to the WS, matching stitch to stitch so the hem does not pull.
4. Rolled hem
Work 1 extra inch (2.5 cm) of Stockinette and bind off loosely. The Stockinette will roll to the RS on its own. Do not block the roll out if you want to keep it.
Ribbed hem (optional extra): Change to US 7 / 4.5 mm. Work 1" (2.5 cm) of 2×2 rib. If the current count is not a multiple of 4, decrease evenly on the first rib round until it is. Bind off in rib, loosely.
Finishing
1. Weave in ends. Weave each end along the same color/stitch column for at least 2" (5 cm) on the WS. At the waistband join and at tier pickups, weave in both directions. Do not weave through elastic.
2. Insert elastic (folded casing only). Cut 1" (2.5 cm) non-roll elastic to 22 (25, 28, 32, 36, 40, 44, 48, 52)" / 56 (63.5, 71, 81.5, 91.5, 101.5, 112, 122, 132) cm (body waist minus 2") plus 1" (2.5 cm) for overlap. Attach a safety pin to one end and thread it through the casing. Overlap the ends 1" (2.5 cm), sew a small rectangle with sewing thread, and ease the elastic into the casing so it is not twisted. Close the 2" (5 cm) gap with mattress stitch (if the casing was joined on the needle) or by sewing the remaining cast-on edge to the WS (if you deferred the join). The finished waist will cinch to about 23 (26, 29, 33, 37, 41, 45, 49, 53)" and stretch comfortably over the hips.
3. Close a sewn casing. If you did not knit the cast-on together with live stitches, fold the inner layer up so the cast-on sits just above the first body round. Whipstitch the cast-on to the WS, one stitch per stitch, leaving the 2" gap until the elastic is in.
4. Block. Soak in lukewarm water with a little wool wash for 15–20 minutes. Press (do not wring) in a towel. Lay the skirt flat, or on a dress form, and pin or wire the hem to the finished circumferences in the measurements table. Do not hang the skirt while wet — worsted Stockinette will grow irreversibly, especially in midi and maxi lengths. Let it dry completely. For a ruffled or tiered hem, block the ruffles/tiers out as separate flares so they do not sit in a lump.
5. Final press (optional). A light steam hover over the dry fabric (do not mash the iron onto it) evens Stockinette. Skip steam on acrylic.
6. Try-on pass. Put the skirt on. If the hem kicks at the sides, you have enough ease. If the waistband sits where you want and you can sit down without the hip fabric binding, the size is correct. If the hip binds, you needed more ease — a future skirt can skip fewer (or none) of the even rounds between hip Inc Rnds, which adds circumference without changing the waist.
Schematic (measurements)
                    <-- waist  25¾ (29¼, 32, 36½, 40, 43½, 48, 52½, 56)"
                   /  2" waistband
                  /
                 |    7–8" to hip
                 |    hip  38¼ (41¾, 44½, 48¾, 52½, 56, 60½, 64¾, 68½)"
                  \
                   \  A-line continues
                    \
                     <-- hem (see length table)

Total length including waistband:
Mini 16" | Knee 22" | Midi 28" | Maxi 36"
Tiered: each bind-off is a horizontal step; the next tier is 1.5× or 2× as wide. Ruffled: body follows the A-line outline; ruffles are additional 2–3" bands of 2× fabric at the hem (and optionally at a ridge 6" above the hem).
Stitch-Count Cheat Sheet (A-line, Stockinette)
| CO / waist | After 7 Inc Rnds (hip) | Mini +3 Inc | Knee +6 Inc | Midi +9 Inc | Maxi +13 Inc | |
|---|---|---|---|---|---|---|
| XS | 116 | 172 | 196 | 220 | 244 | 276 |
| S | 132 | 188 | 212 | 236 | 260 | 292 |
| M | 144 | 200 | 224 | 248 | 272 | 304 |
| L | 164 | 220 | 244 | 268 | 292 | 324 |
| XL | 180 | 236 | 260 | 284 | 308 | 340 |
| 2XL | 196 | 252 | 276 | 300 | 324 | 356 |
| 3XL | 216 | 272 | 296 | 320 | 344 | 376 |
| 4XL | 236 | 292 | 316 | 340 | 364 | 396 |
| 5XL | 252 | 308 | 332 | 356 | 380 | 412 |
Every step adds 8 stitches per Inc Rnd. If your count disagrees with this table, you missed or added an Inc Rnd — count markers (there should still be 4) and compare to the last checkpoint rather than ripping to the waist.
Customization Notes
- Low-rise: Cast on the hip count of your hip size, skip the 7 hip Inc Rnds, and go straight to the every-12-round flare (or work even for a column). Shorten the waistband-to-hem length by 2–3".
- Straighter skirt: After the 7 hip Inc Rnds, work even to the hem. Hip circumference becomes hem circumference.
- Fuller A-line: After hip, Inc Rnd every 8th round instead of every 12th. You will add 50% more flare stitches for the same length.
- Pockets: After hip shaping, work 5" (12.5 cm) even. On the next round, at each side marker, work to 2 sts before marker, place 24 sts on waste yarn (12 before and 12 after the marker, slipping the marker onto the waste yarn), then backwards-loop CO 24 sts and continue. On a spare needle, return the held sts, work a 6" (15 cm) St st pocket bag flat, and sew the bag to the WS. This is optional and not required for any size.
- Length on the body: Try on after the hip checkpoint by sliding stitches onto a long circular or waste yarn. The skirt will grow about ½–1" in blocking; stop ½" short if you are between lengths.
- Matching a stitch pattern into the increases: Always work Inc Rnds on a plain knit round. If an eyelet round and an Inc Rnd would collide, delay the eyelet round by 1 round.
Pattern math is locked to 18 sts / 24 rnds = 4" (10 cm) in Stockinette in the round, blocked. Recalculate from first principles if your gauge differs: desired inches × 4.5 = stitches; desired inches × 6 = rounds. Keep increase rounds in multiples of 8 stitches (4 markers × 2).
Disclaimer: This pattern was generated by AI and should be reviewed for accuracy before use. While we strive for quality, AI-generated content may contain errors. Please verify measurements, stitch counts, charts, and instructions before beginning your project. Generated by purlJam.uk
Love this pattern?
Save this pattern to your free PurlJam libraryAccess your pattern anytime
Bookmark this page to access your pattern anytime