Type
Knitting
Difficulty
intermediate
Category
cardigan
AI Thinking Process
Planning
Verification
Pattern
The Workshop Jacket
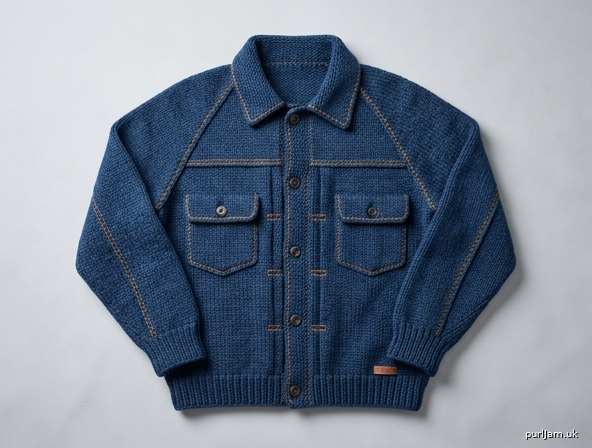
A seamless top-down raglan trucker jacket. Waist length, pointed collar, buttoned placket, flap chest pockets, and golden-orange topstitching over an indigo ground. It is a hand-knit reading of the 1940s Type I trucker silhouette, worked in one piece from the neck down.
The knitted fabric is entirely blue. The orange is stitching, applied after blocking, in the same places a denim jacket carries contrast thread: raglan seams, yoke line, side seams, placket, collar, and pocket edges.
Difficulty: Intermediate Construction: Top-down raglan cardigan, body worked flat, sleeves in the round
Sizes
To fit bust: 86–91 (97–102, 107–112, 117–122, 127–132) cm [34–36 (38–40, 42–44, 46–48, 50–52) in]
Instructions are given for size S, with M, L, XL, and 2XL in parentheses. Where only one figure is given, it applies to all sizes. Highlight your size before you begin.
Chunky cloth has bulk of its own. The ease below is enough to wear over a shirt. If you are between sizes and want a closer jacket, choose the smaller size. If you will wear it over a heavy layer, choose the larger.
| S | M | L | XL | 2XL | |
|---|---|---|---|---|---|
| Finished bust, buttoned | 98 cm (38½ in) | 107 cm (42 in) | 117 cm (46 in) | 128 cm (50½ in) | 138 cm (54¼ in) |
| Approximate ease | 7–12 cm | 5–10 cm | 5–10 cm | 6–11 cm | 6–11 cm |
| Centre-back length | 60 cm (23½ in) | 62 cm (24½ in) | 64 cm (25¼ in) | 66 cm (26 in) | 68 cm (26¾ in) |
| Yoke depth to underarm* | 18 cm | 19.5 cm | 22 cm | 23 cm | 24 cm |
| Sleeve, underarm to cuff end | 44 cm (17¼ in) | 45 cm (17¾ in) | 46 cm (18 in) | 46 cm (18 in) | 47 cm (18½ in) |
| Upper arm | 38 cm (15 in) | 42 cm (16½ in) | 48 cm (19 in) | 53 cm (21 in) | 57 cm (22½ in) |
| Neckline circumference | 42 cm | 43 cm | 47 cm | 48 cm | 52 cm |
*Yoke depth assumes row tension is matched. Stitch counts, not row counts, control the width. Finished length is measured from the cast-on, so a small row-tension difference will not change the hem.
Bust check, from the body stitch count at 12 sts = 10 cm: 118 (128, 140, 154, 166) ÷ 12 × 10 = 98 (107, 117, 128, 138) cm. ✓
Tension (gauge)
12 stitches and 17 rows = 10 cm (4 in) in stocking stitch on 8 mm needles, after blocking.
This is a dense, Cowichan-like cloth, not a loose worsted fabric. A single strand of worsted on 8 mm will not produce it.
Swatch. Cast on 20 sts. Work 26 rows in stocking stitch. Block as you will block the jacket, and let it dry fully. Count in the centre of the swatch.
- 12 sts should measure 10 cm. The full 20 sts should measure about 16.5 cm.
- 17 rows should measure 10 cm. The full 26 rows should measure about 15 cm.
If you have more than 12 sts in 10 cm, change to a larger needle. If you have fewer, change to a smaller needle. Stitch tension decides the fit. Row tension decides how deep the yoke is; the body and sleeve lengths are worked to centimetres so they can be corrected as you go.
Yarn and materials
Main colour (MC): indigo or a clear mid-blue, in one of these two forms.
- Chunky (bulky) wool or wool-blend, about 100–120 m per 100 g: 900 (1000, 1150, 1300, 1450) m
- Or two strands of worsted/aran held together throughout, on the same 8 mm needles: 1800 (2000, 2300, 2600, 2900) m of worsted in total
Choose a smooth wool that will block firm. A very hairy or very elastic yarn will not hold a jacket edge, and the topstitching will sink into it. Do not machine-felt the finished jacket.
Contrast (CC): smooth cotton or wool, worsted weight, in a warm golden orange (denim-thread colour, not neon): 100 m. Used single, for embroidery only. One ball is enough for every size.
Needles
- 8 mm (US 11) circular needle, 100 cm, for the yoke and body
- 8 mm circular needle, 40 cm, or double-pointed needles, or a long circular for magic loop, for the sleeves
- A spare 8 mm needle, or one size larger, for a loose cast-off only if your ordinary cast-off is tight
The needle size is a starting point. Match the tension.
Notions
- 4 stitch markers
- Waste yarn or stitch holders
- Tapestry needle
- 5 front buttons, 2 cm, copper or dark metal
- 2 pocket buttons, 1.5 cm, to match
- 1 further 2 cm button if you work the back cinch
Buttonholes are placed on the left front as worn, which is the men’s closure of the original jacket. Reverse the bands if you prefer a women’s closure.
Abbreviations
- CC contrast colour
- CO cast on
- k knit
- k2tog knit 2 stitches together
- m1L make 1 left: lift the strand between the needles from front to back and knit it through the back loop
- m1R make 1 right: lift the strand between the needles from back to front and knit it through the front loop
- MC main colour
- p purl
- pm place marker
- RS right side
- sl1 wyif slip 1 purlwise with yarn in front
- sm slip marker
- ssk slip, slip, knit: slip 2 stitches knitwise one at a time, return them to the left needle, and knit them together through the back loop
- st(s) stitch(es)
- WS wrong side
- yo yarn over
Selvedge. Slip the first stitch of every row purlwise with the yarn in front. This chain edge is what you will pick the bands up from. It is already written into the rows below.
Raglan seam stitches. The stitch on each side of every raglan marker is purled on RS rows and knitted on WS rows. The two purl stitches stay together and form a ditch. Increases are worked inside them, so the ditch does not wander. Orange chain stitch is worked in that ditch later.
Yoke
With MC and 8 mm needles, cast on loosely 50 (52, 56, 58, 62) sts.
Place markers, without working a row, as follows:
8 (8, 8, 8, 10) left front, pm, 6 (6, 8, 8, 8) left sleeve, pm, 22 (24, 24, 26, 26) back, pm, 6 (6, 8, 8, 8) right sleeve, pm, 8 (8, 8, 8, 10) right front.
Count: 8+6+22+6+8 = 50; 8+6+24+6+8 = 52; 8+8+24+8+8 = 56; 8+8+26+8+8 = 58; 10+8+26+8+10 = 62. ✓
Row 1 (RS, increase): Sl1 wyif, knit to 1 st before marker, m1L, p1, sm; p1, m1R, knit to 1 st before marker, m1L, p1, sm; p1, m1R, knit to 1 st before marker, m1L, p1, sm; p1, m1R, knit to 1 st before marker, m1L, p1, sm; p1, m1R, knit to end.
Eight stitches increased: 1 on the left front, 2 on the left sleeve, 2 on the back, 2 on the right sleeve, 1 on the right front. ✓
Row 2 (WS): Sl1 wyif, purl to 1 st before marker, k1, sm; k1, purl to 1 st before marker, k1, sm; k1, purl to 1 st before marker, k1, sm; k1, purl to 1 st before marker, k1, sm; k1, purl to end.
Repeat Rows 1 and 2 a further 14 (15, 17, 18, 19) times, so that Row 1 has been worked 15 (16, 18, 19, 20) times in total.
170 (180, 200, 210, 222) sts: cast-on 50 (52, 56, 58, 62) + 8 × 15 (16, 18, 19, 20) = 170 (180, 200, 210, 222). ✓
Stitches now sit as:
- Each front: 23 (24, 26, 27, 30)
- Each sleeve: 36 (38, 44, 46, 48)
- Back: 52 (56, 60, 64, 66)
You have just finished a WS row. The yoke should measure about 18 (19.5, 22, 23, 24) cm from the cast-on if your row tension matches. Do not omit an increase row to shorten it. The counts below depend on every increase.
Divide for body and sleeves
Divide row (RS): Sl1 wyif, k 22 (23, 25, 26, 29) — 23 (24, 26, 27, 30) front sts now sit on the right needle. Remove marker. Slip the next 36 (38, 44, 46, 48) sleeve sts to waste yarn. Remove marker.
Cast on 5 (6, 7, 9, 10) sts, pm, cast on 5 (6, 7, 9, 10) sts. This is the left underarm, 10 (12, 14, 18, 20) sts, with the marker between the centre pair.
Knit 52 (56, 60, 64, 66) back sts. Remove marker. Slip the next 36 (38, 44, 46, 48) sleeve sts to waste yarn. Remove marker.
Cast on 5 (6, 7, 9, 10) sts, pm, cast on 5 (6, 7, 9, 10) sts for the right underarm.
Knit to end.
118 (128, 140, 154, 166) body sts.
Check: yoke 170 (180, 200, 210, 222) − two sleeves 72 (76, 88, 92, 96) + two underarms 20 (24, 28, 36, 40) = 118 (128, 140, 154, 166). ✓
Next row (WS): Sl1 wyif, knit to end. This garter ridge is the yoke seam. You will chain-stitch along it later.
Body
RS: Sl1 wyif, knit to 1 st before the side marker, p1, sm, p1, knit to 1 st before the next side marker, p1, sm, p1, knit to end.
WS: Sl1 wyif, purl to 1 st before the side marker, k1, sm, k1, purl to 1 st before the next side marker, k1, sm, k1, purl to end.
The purl pair at each side marker is the side-seam ditch. Repeat these two rows until the piece measures 54 (56, 58, 60, 62) cm from the neck cast-on, measured at the centre back, ending with a RS row.
Remove the side markers on the last row.
Hem. Work in 1×1 rib for 6 cm, still slipping the first stitch of every row, as follows:
RS: Sl1 wyif, (k1, p1) to the last st, k1. WS: Sl1 wyif, (p1, k1) to the last st, p1.
Cast off loosely in rib. Centre-back length is now 60 (62, 64, 66, 68) cm. ✓
The 1×1 rib on the same needles draws in a little and stretches when buttoned. Do not change to a smaller needle for the hem; on this tension a smaller needle makes a waistband that will not meet.
Sleeves
Work both sleeves the same.
Return 36 (38, 44, 46, 48) held sts to 8 mm needles. With RS facing, and beginning at the centre of the underarm cast-on, pick up and knit 5 (6, 7, 9, 10) sts along one half of the underarm, knit the held sts, then pick up and knit 5 (6, 7, 9, 10) sts along the other half. Pick up 1 extra stitch at each corner of the underarm to close the gap.
Place a marker for the start of the round at the centre underarm. 48 (52, 60, 66, 70) sts, including the 2 extra corner stitches.
Knit 1 round, decreasing 1 stitch at each corner so the extras disappear: 46 (50, 58, 64, 68) sts. Held 36 (38, 44, 46, 48) + underarm 10 (12, 14, 18, 20) = 46 (50, 58, 64, 68). ✓
Knit until you can work the decreases below without passing the stocking-stitch length. Decrease round: k1, k2tog, knit to the last 3 sts, ssk, k1.
- S: decrease every 8th round, 7 times (14 sts decreased; 46 − 14 = 32)
- M: decrease every 6th round, 9 times (50 − 18 = 32)
- L: decrease every 6th round, 11 times (58 − 22 = 36)
- XL: decrease every 4th round, 14 times (64 − 28 = 36)
- 2XL: decrease every 4th round, 14 times (68 − 28 = 40)
Then knit even, if needed, until the sleeve measures 38 (39, 40, 40, 41) cm from the underarm. If you reach that length before the decreases are finished, work the remaining decreases every RS round so the cuff count is still correct.
32 (32, 36, 36, 40) sts.
Cuff. Work 1×1 rib in the round for 6 cm. Cast off loosely in rib. Sleeve length is 44 (45, 46, 46, 47) cm.
Button bands
Pick up with RS facing, from hem to neck, at a rate of about 3 stitches for every 4 rows. Space the stitches evenly. The counts below match the stated tension and are the counts the buttonholes are written for.
Right front band (as worn — this band has the buttons, no holes). Pick up and knit 78 (82, 84, 86, 88) sts from hem to neck.
Row 1 (RS): (K1, p1) to end. Row 2 (WS): (K1, p1) to end.
Work 7 further rows in rib as set. Cast off loosely in rib. Nine rib rows in total, about 5 cm wide.
Left front band (as worn — buttonholes). Pick up and knit 78 (82, 84, 86, 88) sts from hem to neck in the same way. Work 4 rows in 1×1 rib, ending with a WS row, so the next row is RS.
Buttonhole row (RS):
- S (78 sts): Work 6 sts in rib, (yo, k2tog, work 14 sts in rib) four times, yo, k2tog, work 6 sts in rib. 6 + 4 × 16 + 2 + 6 = 78, and there are 5 holes. ✓
- M (82 sts): Work 6 sts in rib, (yo, k2tog, work 15 sts in rib) four times, yo, k2tog, work 6 sts in rib. 6 + 4 × 17 + 2 + 6 = 82. ✓
- L (84 sts): Work 7 sts in rib, (yo, k2tog, work 15 sts in rib) four times, yo, k2tog, work 7 sts in rib. 7 + 4 × 17 + 2 + 7 = 84. ✓
- XL (86 sts): Work 6 sts in rib, (yo, k2tog, work 16 sts in rib) four times, yo, k2tog, work 6 sts in rib. 6 + 4 × 18 + 2 + 6 = 86. ✓
- 2XL (88 sts): Work 7 sts in rib, (yo, k2tog, work 16 sts in rib) four times, yo, k2tog, work 7 sts in rib. 7 + 4 × 18 + 2 + 7 = 88. ✓
On the following row, work each yo as a stitch so the rib columns continue (knit the knits, purl the purls). Work 3 further rows in rib. Cast off loosely in rib.
The lowest hole sits about 4.5 cm above the hem, the highest about 4.5 cm below the neck, with three holes evenly between them.
Collar
With RS facing and MC, starting at the outer top corner of the right front band, pick up and knit 7 sts across the top of the band, 50 (52, 56, 58, 62) sts along the neck cast-on (1 stitch for each cast-on stitch), and 7 sts across the top of the left front band.
64 (66, 70, 72, 76) sts. 7 + 50 (52, 56, 58, 62) + 7 = 64 (66, 70, 72, 76). ✓
Stand. Work 6 rows in 1×1 rib, about 3 cm.
Leaf. Change to stocking stitch and work 12 rows, increasing at each end of every RS row:
RS: K1, m1L, knit to the last st, m1R, k1. WS: Purl.
Six increase rows add 12 sts. 76 (78, 82, 84, 88) sts. The longer outer edge is what makes the front corners drop into points when the collar is folded. ✓
Cast off loosely. Fold the rib stand up against the neck so the stocking-stitch leaf falls over the shoulders. The points should sit on the fronts, just above the top button. Tack the stand at the two front corners if it rolls forward. Do not sew the leaf down.
Pockets and flaps
Make 2 pockets and 2 flaps in MC.
Pocket. Cast on 14 (14, 16, 16, 18) sts. Work 16 rows in stocking stitch (about 9.5 cm). Cast off.
Flap. Cast on 14 (14, 16, 16, 18) sts.
- Rows 1–2: stocking stitch, beginning with a RS knit row.
- Row 3 (RS, buttonhole): k 6 (6, 7, 7, 8), yo, k2tog, k 6 (6, 7, 7, 8). 6+2+6 = 14; 7+2+7 = 16; 8+2+8 = 18. ✓
- Rows 4–6: stocking stitch. Cast off.
Placement, after blocking. The pocket top sits 3 cm below the yoke ridge. Begin the pocket 4 (5, 5, 5, 6) sts in from the front opening edge (the edge under the band). On a front of 23 (24, 26, 27, 30) sts, that leaves 4 (5, 5, 6, 6) sts between the pocket and the raglan side, so the pocket is centred. ✓
Sew the pocket down the two sides and across the cast-on edge. Leave the top open. Sew the flap just above the opening so it overlaps the pocket by about 1 cm. Sew the pocket button to the pocket body, under the hole.
Back cinch (optional)
This is the waist strap of the wartime jacket, reduced to two short tabs and a button.
Cast on 6 sts. Work in garter stitch (knit every row, slipping the first stitch) until the strap measures 14 (15, 16, 17, 18) cm. Cast off. Make 2.
Sew one end of each strap to the back, at the top of the hem rib, 2 cm in from each side-seam ditch. The free ends meet at the centre back with about 2 cm of overlap. Sew the button through both ends, or make a small yo buttonhole in one strap on the last garter rows if you prefer no overlap bulk.
Orange topstitching
Block the jacket before you stitch, so every line is placed on the finished shape. Use CC and a tapestry needle. Work chain stitch:
- Bring the needle up at the start of the line.
- Put the needle back down through the same hole, and bring it up about 0.5 cm along the line.
- Loop the working yarn under the needle tip before you pull through. A chain link forms.
- Repeat. To finish, take the needle down through the last link and weave the end in on the wrong side.
Keep the stitches even and a little firm. They should sit on the surface like thread, not sink into the wool.
Work these lines:
- Raglan. One line in each purl ditch, from neck cast-on to underarm. Then a second line, one stitch to the side of the first, on each raglan.
- Yoke. One line along the garter ridge, from front edge to front edge, across both fronts and the back.
- Side seams. One line in each side-seam ditch, from the underarm down to the top of the hem rib. A short bar of three chain stitches across the underarm join is enough of a bartack.
- Placket. One line along the inner edge of each button band, where the band meets the front, from hem to collar.
- Collar. One line around the outer edge of the leaf, and a second line 1 cm inside it.
- Pockets. One line around each pocket, close to the edge. Two lines across each flap, one at the outer edge and one about 1 cm above it.
- Rivets. At each pocket corner, work a small cross in CC. Eight crosses.
Do not add a curved double-arc motif on the pockets or the back. Straight stitching is the jacket detail this pattern uses; that particular curve is a trademark, not a generic seam.
Steam the stitching lightly from the wrong side once it is in.
Finishing
Weave in every end before blocking, except the embroidery tails, which are finished as you stitch.
Block to the measurements in the table. Pin the bust width, the centre-back length, and the sleeve length, and let the jacket dry completely. Do not stretch the rib out flat; let it draw in.
Sew the five front buttons to the right front band, opposite the holes. Sew the pocket buttons. Sew on the cinch if you made it.
Fold the collar down. The top button should sit just below the collar points, not under them.
Schematic check
- Neck cast-on 50 (52, 56, 58, 62) sts = 42 (43, 47, 48, 52) cm at 12 sts per 10 cm. ✓
- After 15 (16, 18, 19, 20) increase rows, 8 sts each row, yoke = 170 (180, 200, 210, 222) sts. ✓
- Body after the divide = 118 (128, 140, 154, 166) sts = 98 (107, 117, 128, 138) cm. ✓
- Each sleeve = 46 (50, 58, 64, 68) sts = 38 (42, 48, 53, 57) cm. ✓
- Cuffs 32 (32, 36, 36, 40) sts, decreased in pairs. ✓
- Bands 78 (82, 84, 86, 88) sts, five 2-st buttonholes, equal margins. ✓
- Collar 64 (66, 70, 72, 76) sts picked up, 12 sts increased, 76 (78, 82, 84, 88) at the outer edge. ✓
Care
Hand-wash in cool water. Squeeze, do not wring. Dry flat, patting the jacket back to the schematic measurements, with the collar folded and the pockets smooth. A firm, even dry is what gives this cloth its weight. Store folded, not on a narrow hanger; chunky shoulders will peak if they hang.
Disclaimer: This pattern was generated by AI and should be reviewed for accuracy before use. While we strive for quality, AI-generated content may contain errors. Please verify measurements, stitch counts, charts, and instructions before beginning your project. Generated by purlJam.uk
Love this pattern?
Save this pattern to your free PurlJam libraryAccess your pattern anytime
Bookmark this page to access your pattern anytime