Type
Crochet
Difficulty
intermediate
Category
custom
AI Thinking Process
Planning
Verification
Pattern
Three-Tier Pastel Spiral Wind Spinner
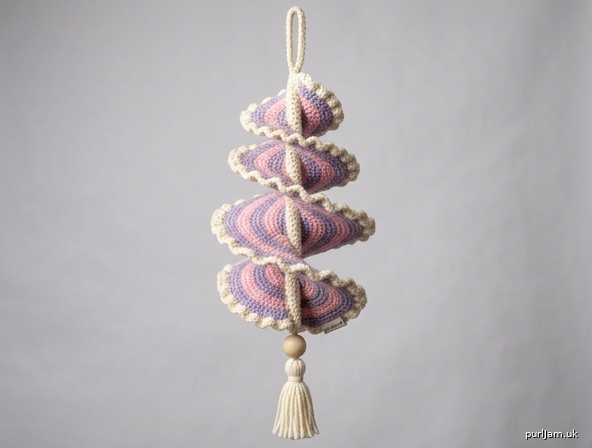
A long, elegant hanging wind spinner worked in tight single crochet. Three nested spiral vanes — 12", 18", and 24" — are striped in pastel pink and lavender, framed with a warm ivory outer edging, and sewn to a cream central twist. A sturdy hanging loop sits at the top; a small cream tassel with a wooden bead finishes the bottom. The ruffled cream outer edges draw each vane into a helix, so the layered spiral and color placement stay clear from the front.
Skill level: Easy
Skills used: Chain, single crochet, slip stitch, simple color change, whipstitch seaming
Materials
Yarn: Chunky / bulky weight (category 5); acrylic or cotton-blend recommended for a spinner that holds its shape
- Color A — pastel pink: 80 yd (73 m)
- Color B — lavender: 80 yd (73 m)
- Color C — warm ivory / cream: 120 yd (110 m)
Hook: US J/10 (6.0 mm), or size needed to obtain gauge (use a smaller hook than the yarn label suggests — tight stitches are required)
Notions:
- Yarn needle
- Scissors
- 2 stitch markers
- 1 wooden bead, about ¾" (20 mm), with a hole large enough for a doubled strand of chunky yarn
- Piece of cardboard 4½" (11.5 cm) wide for the tassel
- Optional: small hanging ring
Gauge
12 sc and 14 rows = 4" × 4" (10 × 10 cm) in single crochet with US J/10 (6.0 mm) hook, worked tightly.
Swatch: Ch 17. Row 1: Sc in 2nd ch from hook and in each ch across (16 sc). Rows 2–16: Ch 1, turn, sc in each sc. The center 12 sts and 14 rows should measure 4" × 4".
If your swatch is larger than 4", go down a hook size. Tight fabric is what keeps the spirals from sagging.
Finished Size
One size.
- Center twist: 26" long × 1¼" wide (66 × 3.2 cm), excluding loop and tassel
- Inner tier: 12" × 2¼" (30.5 × 5.5 cm) before edging
- Middle tier: 18" × 2¼" (46 × 5.5 cm) before edging
- Outer tier: 24" × 2¼" (61 × 5.5 cm) before edging
- Each vane is about 3" (7.5 cm) wide after cream edging
- Hanging loop: about 2¼" (5.5 cm) drop
- Tassel: 4" (10 cm)
- Total hanging length: about 34" (86 cm)
Abbreviations (US terms)
- ch — chain
- sc — single crochet
- sl st — slip stitch
- st(s) — stitch(es)
- rep — repeat
- RS — right side
- WS — wrong side
- yo — yarn over
Pattern Notes
- Turning ch-1 does not count as a stitch. Skip it at the start of the next row.
- Work in both loops of every stitch unless told otherwise.
- Work tightly throughout. Loose stitches will stretch and flatten the spiral.
- Color pattern on every vane is 2 rows Color A, 2 rows Color B, repeated. Change color in the last yo of the last sc of the row.
- All color changes fall at the top short edge of each vane (the hanging-loop end). Carry the unused color loosely up that short edge, or cut and weave in.
- Stitch counts are given in parentheses at the end of each row.
- The cream outer edging is ruffled (2 sc in every 3rd stitch) along one long edge only. That extra length is what twists each vane into a spiral. The inner long edge is worked even so it sews flat to the center twist.
- The three vanes are stacked and aligned at the top. From the front you should see a short inner spiral, a medium spiral, and a long outer spiral, all sharing the cream center.
Pattern
Center Twist and Hanging Loop (Color C)
The center is a tight 4-st strip. It becomes the cream central twist once the vanes are sewn on.
With Color C, ch 14. Sl st in the first ch to form a ring.
Loop round: Ch 1, work 14 sc into the ring (1 sc in each ch). Sl st in first sc to join. (14 sc)
Do not fasten off.
Ch 5.
Row 1 (RS): Sc in 2nd ch from hook and in each of the next 3 ch. (4 sc)
Rows 2–91: Ch 1, turn, sc in each of the 4 sc. (4 sc)
(91 rows × 4" ÷ 14 rows = 26" ✓)
Fasten off, leaving a 12" (30.5 cm) tail at the bottom for the bead.
The hanging loop sits at the top. The 4-sc strip measures 26" (66 cm) from the base of the loop to the last row.
Spiral Vanes
Make 3 vanes the same way; only the foundation length changes. Each vane is 8 rows of tight sc.
Color sequence (all vanes):
- Rows 1–2: Color A (pastel pink)
- Rows 3–4: Color B (lavender)
- Rows 5–6: Color A (pastel pink)
- Rows 7–8: Color B (lavender)
Mark the start of Row 1 with a stitch marker. That short edge is the top of the vane (hanging-loop end). The opposite short edge is the bottom.
Inner Tier (shortest)
With Color A, ch 37.
Row 1 (RS): Sc in 2nd ch from hook and in each ch across. (36 sc)
(36 sc × 4" ÷ 12 sc = 12" ✓)
Row 2 (WS): Ch 1, turn, sc in each sc across. (36 sc)
Change to Color B in the last yo of the last sc.
Row 3: Ch 1, turn, sc in each sc across. (36 sc)
Row 4: Ch 1, turn, sc in each sc across. (36 sc)
Change to Color A.
Row 5: Ch 1, turn, sc in each sc across. (36 sc)
Row 6: Ch 1, turn, sc in each sc across. (36 sc)
Change to Color B.
Row 7: Ch 1, turn, sc in each sc across. (36 sc)
Row 8: Ch 1, turn, sc in each sc across. (36 sc)
Fasten off. (8 rows × 4" ÷ 14 rows = 2¼" ✓)
Middle Tier
With Color A, ch 55.
Row 1 (RS): Sc in 2nd ch from hook and in each ch across. (54 sc)
(54 sc × 4" ÷ 12 sc = 18" ✓)
Rows 2–8: Work exactly as Inner Tier Rows 2–8, keeping 54 sc on every row and following the same 2-row color sequence. (54 sc)
Fasten off.
Outer Tier (longest)
With Color A, ch 73.
Row 1 (RS): Sc in 2nd ch from hook and in each ch across. (72 sc)
(72 sc × 4" ÷ 12 sc = 24" ✓)
Rows 2–8: Work exactly as Inner Tier Rows 2–8, keeping 72 sc on every row and following the same 2-row color sequence. (72 sc)
Fasten off.
Cream Edging (Color C)
Work around each vane with RS facing. The Row 8 long edge is the outer edge (ruffled). The foundation long edge is the inner edge (even, for sewing).
Ruffle repeat: (sc in next 2 sts, 2 sc in next st).
Join Color C with sl st in the first st of Row 8 (outer long edge, top corner).
Outer long edge (ruffle): Work the ruffle repeat across every stitch of Row 8, then work 3 sc in the corner.
- Inner tier: (sc in next 2, 2 sc in next) 12 times. (36 sts → 48 sc ✓)
- Middle tier: (sc in next 2, 2 sc in next) 18 times. (54 sts → 72 sc ✓)
- Outer tier: (sc in next 2, 2 sc in next) 24 times. (72 sts → 96 sc ✓)
Bottom short edge: Work 1 sc in each of the 8 row-ends, then 3 sc in the corner. (8 sc)
Inner long edge (even): Work 1 sc in each remaining loop of the foundation chain, then 3 sc in the corner.
- Inner tier: 36 sc
- Middle tier: 54 sc
- Outer tier: 72 sc
Top short edge: Work 1 sc in each of the 8 row-ends, then 2 more sc in the same st as the joining sl st (to complete the starting corner). (8 sc + corner)
Sl st in first sc to join. Fasten off.
Edging totals (including 3 sc in each of 4 corners = 12 corner sc):
- Inner: 48 + 8 + 36 + 8 + 12 = 112 sc ✓
- Middle: 72 + 8 + 54 + 8 + 12 = 154 sc ✓
- Outer: 96 + 8 + 72 + 8 + 12 = 196 sc ✓
Weave in all vane ends, leaving the carried strands at the top short edge to hide under the hanging loop later.
Finishing
Assemble the three-tier spiral
Lay the center twist flat, RS of the loop facing you, strip hanging down.
Stack the three vanes with all top short edges even at the base of the hanging loop, inner (even, non-ruffled) cream edges along the center strip:
- Inner tier on top of the stack (covers the upper 12")
- Middle tier next (covers the upper 18")
- Outer tier underneath (covers 24")
From the front you should see three nested lengths: 12", then 18", then 24".
Pin the inner cream edge of each vane to the center strip. At the top you will sew through all three vanes plus the center; below 12" you sew middle + outer + center; below 18" you sew only the outer vane to the center. Leave about 2" (5 cm) of center strip free at the bottom for the bead and tassel.
With Color C, whipstitch through the inner cream edging and the center strip. Keep the inner edges flat and the ruffled outer edges free. Do not sew the ruffles down — they must stand out to form the helix.
(Optional: instead of stacking all three on the same face, wrap them slightly around the center strip so each vane sits at a different angle. This makes a rounder spinner; the stacked method gives the clearest front-view layered look.)
Set the spiral
Hang the spinner from the loop. Gently wind each ruffled outer edge around the center in the same direction:
- Inner tier: 2 full turns (12" ÷ 6" per turn = 2 ✓)
- Middle tier: 3 full turns (18" ÷ 6" = 3 ✓)
- Outer tier: 4 full turns (24" ÷ 6" = 4 ✓)
This keeps the pitch even on all three tiers. Tack the bottom inner corner of each vane to the center strip with 2–3 hidden stitches so the helix holds. Do not flatten the ruffles.
Wooden bead
Thread the 12" tail at the bottom of the center strip through the wooden bead and slide the bead up against the last row of the center. Take a small stitch through the last row to lock the bead, or tie an overhand knot just above the bead if the hole is large. The bead sits at the bottom of the cream twist.
Cream tassel
- Wrap Color C around the 4½" cardboard 25 times.
- Slip a 10" (25 cm) strand of Color C under the wraps at one end and tie very tightly (this is the top of the tassel). Slide the wraps off the cardboard.
- Cut the loops at the opposite end.
- Wrap a 12" (30.5 cm) strand several times around the tassel, about ½" (1.3 cm) below the top tie, to form the neck. Tie off and bury the ends in the tassel.
- Trim the cut ends even so the tassel measures 4" (10 cm) from top tie to tips.
- Using the top-tie ends, sew or tie the tassel to the yarn just below the wooden bead so the bead sits on the tassel head and the tassel hangs at the very bottom.
Weave in any remaining ends.
Shape and hang
Steam the vanes lightly from the WS if needed — do not crush the ruffles. Re-set the 2 / 3 / 4 turns while the piece hangs and let it dry. The weight of the bead and tassel will keep the spinner straight so it can turn in a breeze.
Hang from a hook, hook-and-loop, or a small ring through the cream loop. Indoor use or a sheltered porch is best with chunky yarn.
Front-view checklist
When hung and twisted, you should see:
- Cream hanging loop at the top
- Cream central twist running straight down the middle
- Three layered spirals of equal pitch, shortest in front/inner, longest outer
- Alternating pastel pink and lavender bands on every vane
- Cream ruffled edging tracing the outside of each helix
- Wooden bead at the base of the center, with a small cream tassel below
Disclaimer: This pattern was generated by AI and should be reviewed for accuracy before use. While we strive for quality, AI-generated content may contain errors. Please verify measurements, stitch counts, charts, and instructions before beginning your project. Generated by purlJam.uk
Love this pattern?
Save this pattern to your free PurlJam libraryAccess your pattern anytime
Bookmark this page to access your pattern anytime