Type
Crochet
Difficulty
intermediate
Category
amigurumi
AI Thinking Process
Planning
Verification
Pattern
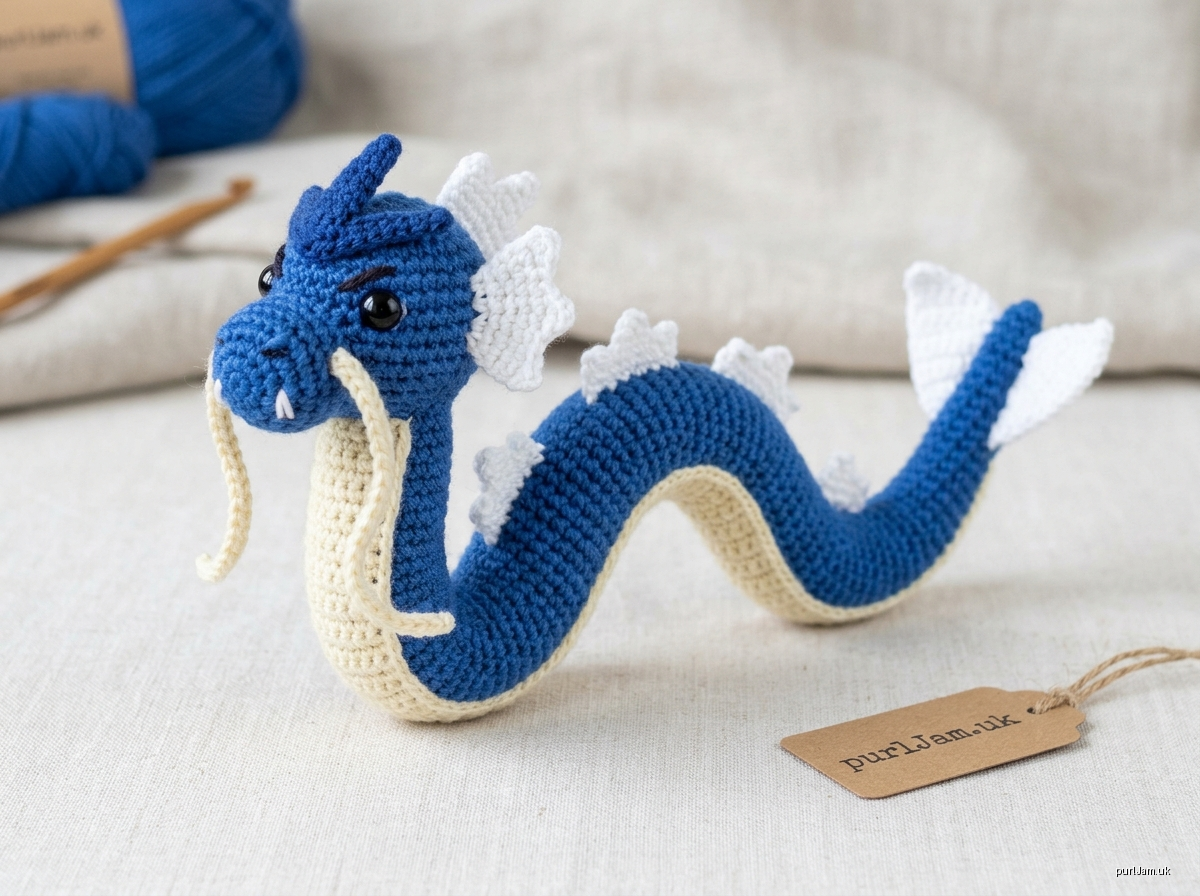
Tidal Fury Sea Serpent – Amigurumi Pattern
This is an original design for a fierce blue sea-serpent dragon, inspired by classic sea-monster lore.
Skill level: Intermediate Finished size: about 13 in (33 cm) long laid straight, and about 7 in (18 cm) when posed in an S-curve.
Materials
- Worsted weight yarn (#4):
- Color A, royal blue: about 120 yd (110 m)
- Color B, cream: about 30 yd (27 m)
- Color C, white: about 15 yd (14 m)
- Scraps of red or black yarn for the brows (optional)
- US G-6 (4.0 mm) crochet hook, or a 3.75 mm hook for tighter fabric
- One pair of 12 mm safety eyes
- Polyester fiberfill
- Stitch marker, yarn needle, pins, scissors
- Optional: one 14 in chenille stem or bendable craft wire, for posing (adult display only)
Gauge
5 sc × 5 rnds = 1 in (2.5 cm) in continuous rounds.
Gauge is not critical, but the fabric must be tight enough that stuffing doesn't show through.
Abbreviations (US)
- MR – magic ring
- ch – chain
- sc – single crochet
- hdc – half double crochet
- dc – double crochet
- tr – treble crochet
- sl st – slip stitch
- inc – 2 sc in the same st
- dec – invisible sc decrease (insert hook into the front loops of the next 2 sts, yo, pull through both loops, yo, pull through 2)
- sc2tog – standard sc decrease, used in rows
- st(s) – stitch(es)
- rnd(s) – round(s)
- ( ) x n – repeat the sequence n times
- [ ] – stitch count at the end of the round or row
Notes
- Unless stated otherwise, work in continuous spirals. Do not join rounds. Move the marker up each round.
- Stuff the body as you go, every 8–10 rnds.
- Child safety: For children under 3, embroider the eyes instead of using safety eyes, and omit the wire.
HEAD (Color A)
| Rnd | Instructions | Count |
|---|---|---|
| 1 | 6 sc in MR | [6] |
| 2 | inc x6 | [12] (6 + 6 = 12 ✓) |
| 3 | (sc, inc) x6 | [18] (12 + 6 = 18 ✓) |
| 4 | (2 sc, inc) x6 | [24] (18 + 6 = 24 ✓) |
| 5 | (3 sc, inc) x6 | [30] (24 + 6 = 30 ✓) |
| 6 | (4 sc, inc) x6 | [36] (30 + 6 = 36 ✓) |
| 7–14 | sc around (8 rnds) | [36] |
Place the eyes now. Insert the safety eyes between Rnds 9 and 10, with 10 sts between them. Center them on the side where the round starts, and attach the backs.
| Rnd | Instructions | Count |
|---|---|---|
| 15 | (4 sc, dec) x6 | [30] (36 − 6 = 30 ✓) |
| 16 | (3 sc, dec) x6 | [24] (30 − 6 = 24 ✓) |
Stuff the head firmly. Sl st, fasten off, and leave a 12 in tail. The 24-st opening forms the neck.
SNOUT (Color A)
| Rnd | Instructions | Count |
|---|---|---|
| 1 | 6 sc in MR | [6] |
| 2 | inc x6 | [12] ✓ |
| 3 | (sc, inc) x6 | [18] ✓ |
| 4–7 | sc around (4 rnds) | [18] |
Fasten off and leave a long tail. Stuff lightly.
Mouth line (optional): With Color C, embroider a wide V-shaped "grin" across Rnd 6. Add 2–4 short vertical straight stitches for fangs.
HEAD CREST (Color A, make 1)
| Rnd | Instructions | Count |
|---|---|---|
| 1 | 4 sc in MR | [4] |
| 2 | (sc, inc) x2 | [6] (4 + 2 = 6 ✓) |
| 3–5 | sc around (3 rnds) | [6] |
Fasten off and leave a tail. Do not stuff.
HEAD FINS (Color C, make 2)
Ch 7.
- Row 1: In the 2nd ch from the hook, work sc. Then work hdc, dc, dc, hdc, and sc in the remaining chains. [6] (7 − 1 = 6 ✓)
Fasten off and leave a tail.
WHISKERS (Color B, make 2)
Ch 16. Sl st in the 2nd ch from the hook and in each ch across. [15]
Fasten off and leave a tail.
BODY (Color A)
This piece is worked from the tail tip up to the neck.
| Rnd | Instructions | Count |
|---|---|---|
| 1 | 6 sc in MR | [6] |
| 2 | (sc, inc) x3 | [9] (6 + 3 = 9 ✓) |
| 3–5 | sc around | [9] |
| 6 | (2 sc, inc) x3 | [12] (9 + 3 = 12 ✓) |
| 7–10 | sc around | [12] |
| 11 | (3 sc, inc) x3 | [15] (12 + 3 = 15 ✓) |
| 12–15 | sc around | [15] |
| 16 | (4 sc, inc) x3 | [18] (15 + 3 = 18 ✓) |
| 17–21 | sc around | [18] |
| 22 | (5 sc, inc) x3 | [21] (18 + 3 = 21 ✓) |
| 23–27 | sc around | [21] |
| 28 | (6 sc, inc) x3 | [24] (21 + 3 = 24 ✓) |
| 29–50 | sc around (22 rnds) | [24] |
Total: 50 rnds, or about 10 in (25 cm) ✓.
Stuffing:
- Begin stuffing lightly at Rnd 10.
- Top up every 8–10 rnds.
- If you are using wire, fold both ends back ½ in and insert it down the center at about Rnd 25.
Finish firmly stuffed. Fasten off and leave a 12 in tail. The 24-st opening matches the head's neck opening ✓.
BELLY STRIPE (Color B)
Ch 46.
- Row 1: Sc in the 2nd ch from the hook and in each ch across. [45]
- Rows 2–3: Ch 1, turn, sc across. [45]
The finished stripe is about 9 in × 0.6 in. Fasten off and leave a long tail.
DORSAL FINS (Color C, make 4)
Ch 5.
- Row 1: In the 2nd ch from the hook, work sc. Then work hdc, dc, and tr in the remaining chains. [4] (5 − 1 = 4 ✓)
Fasten off and leave a tail.
TAIL FINS (Color C, make 2)
Ch 9.
| Row | Instructions | Count |
|---|---|---|
| 1 | sc in 2nd ch from hook and across | [8] |
| 2 | ch 1, turn, sc2tog, 4 sc, sc2tog | [6] (8 − 2 = 6 ✓) |
| 3 | ch 1, turn, sc2tog, 2 sc, sc2tog | [4] (6 − 2 = 4 ✓) |
| 4 | ch 1, turn, sc2tog x2 | [2] (4 − 2 = 2 ✓) |
| 5 | ch 1, turn, sc2tog | [1] |
Fasten off and leave a tail.
ASSEMBLY
- Snout: Pin the snout to the front of the head, centered below the eyes, covering Rnds 9–14. Whipstitch it in place, adding a little stuffing before you close it.
- Brows (optional): With red or black yarn, embroider angled straight stitches above each eye, slanting down toward the snout for a fierce expression.
- Head fins: Sew one fin to each side of the head at Rnds 7–10, behind the eyes. Point the tips backward.
- Crest: Sew the crest to the top center of the head at about Rnds 3–5, tilted slightly back.
- Whiskers: Attach one whisker to each side of the snout at its base, letting them drape down and back.
- Head to body: Align the 24-st neck of the head with the 24-st open end of the body. Use the 12 in tails to whipstitch through both edges, stitch by stitch (24 sts to 24 sts ✓). Add stuffing before you close the seam.
- Belly stripe: Starting just under the chin, pin the stripe along the underside of the body. Whipstitch both long edges in place. The stripe ends at about Rnd 5 of the body.
- Dorsal fins: Space the 4 fins evenly along the top of the body, about 2 in apart, starting 1 in behind the head. Sew each one by its Row 1 edge, with the tall (tr) end facing the head.
- Tail fins: Sew the two straight (Row 1) edges to the tail tip in a V shape to form a forked fin.
- Pose: Bend the body into an S-curve, or a rearing pose if you used wire. Weave in all ends.
Finishing Tips
- If you are not using wire, tack the curves in place with a few hidden stitches to hold a coiled pose.
- If you like, brush the white fins lightly with a pet brush for a soft, frothy "sea foam" texture.
Enjoy your Tidal Fury Sea Serpent! 🌊
Disclaimer: This pattern was generated by AI and should be reviewed for accuracy before use. While we strive for quality, AI-generated content may contain errors. Please verify measurements, stitch counts, charts, and instructions before beginning your project. Generated by purlJam.uk
Love this pattern?
Save this pattern to your free PurlJam libraryAccess your pattern anytime
Bookmark this page to access your pattern anytime