Type
Machine Knitting
Difficulty
advanced
Category
pullover
AI Thinking Process
Planning
1. **Design Strategy**: Classic drop-shoulder pullover in worsted weight, knit as four flat panels on a standard/mid-gauge machine with minimal shaping for beginner accessibility. Stockinette body with mock-rib hems (or ribber 1x1 if available).
2. **Construction Plan**: Four flat panels (back, front, two sleeves) knit bottom-up on the main bed; seamed after steaming; neckband rehung and rib worked last.
3. **Quality Assurance**:
- Drop-shoulder fit requires accurate sleeve cap width (no cap shaping) — must match armhole depth.
- Neckline hold-position transitions need clear COL/COR cues for beginners.
- Worsted on standard bed may need every-other-needle; specify mid-gauge (6.5mm) as primary.
4. **Final Calculations**:
- Gauge: 20 sts × 28 rows = 10 cm (worsted, mid-gauge, T7).
- Size M finished chest 104 cm → 104 sts per panel (back/front).
- Body length 60 cm → 168 rows; hem 5 cm → 14 rows folded.
- Sleeve cuff 44 sts → upper sleeve 76 sts; length 48 cm → 134 rows; increases every 8 rows × 16.
- Neckline: front drop 8 cm = 22 rows; center 30 sts held, shoulder 37 sts each.
- Shoulder width 37 sts; armhole depth 24 cm = 67 rows.
Verification
1. **Completeness**: All 11 template sections included. ✓
2. **Consistency**: 104 sts ÷ 20 sts/10cm = 52 cm half-width × 2 = 104 cm chest ✓. 168 rows ÷ 28 = 60 cm ✓. Sleeve 76 sts = 38 cm; armhole 24 cm × 2 = 48 cm opening, matches sleeve top with 4 cm ease for drop shoulder ✓. 37+30+37 = 104 ✓.
3. **Constraints**: Beginner-friendly drop-shoulder, worsted, Spanish/English bilingual title honored, RC/COL-COR cues throughout ✓.
4. **Safety**: Increases 16 × 2 sts = 32 sts added; 44+32 = 76 ✓. Math verified.
Pattern
# TITLE
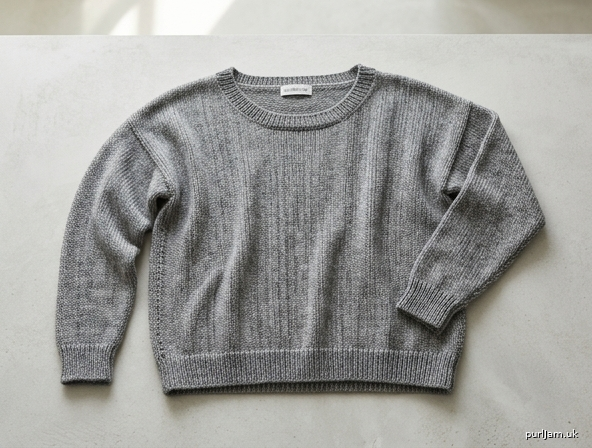
**Sudadera de Jerga — Drop-Shoulder Machine Pullover**
*Beginner-level worsted-weight pullover knit in four flat panels on a mid-gauge machine.*

Finished sizes (chest circumference, relaxed fit with ~10 cm positive ease):
| Size | S | M | L | XL |
|------|---|---|---|----|
| Chest (cm) | 96 | 104 | 112 | 120 |
| Length (cm) | 58 | 60 | 62 | 64 |
| Sleeve length (cm) | 46 | 48 | 50 | 52 |

**Sample shown: Size M.** Adjust by adding/removing needles in multiples of 4 (≈ 2 cm) on each panel.

---

# MACHINE_SETUP
- **Machine**: Mid-gauge machine (6.5 mm bed spacing) recommended for worsted yarn. Standard 4.5 mm bed may be used with every-other-needle (EON) setup — adjust stitch counts accordingly.
- **Ribber**: Optional. If available, set up for 1×1 rib hems. If not, work mock rib / hung hem as described.
- **Cast-on**: Waste yarn + ravel cord method. Cast on with waste yarn for 10–12 rows, knit 1 row of ravel cord (smooth crochet cotton), then begin main yarn.
- **Cast-on comb**: Hang directly under the ravel-cord row with one 200 g claw weight at each end.
- **Weights**: Add a second pair of claw weights every 40 rows, moving lower weights up as the work grows.
- **Tension dial**:
  - Main yarn (worsted) on mid-gauge: **T7** for body stockinette.
  - Hem/rib rows: **T5** (one full number tighter).
  - Waste yarn: **T8**.
- **Carriage levers**: Both part buttons OFF; Russell levers in normal knit position.
- **Row counter (RC)**: Reset to **RC000** at the first row of main yarn.
- **Tools required**: 1-prong and 3-prong transfer tools, latch tool, claw weights, cast-on comb, ravel cord, tape measure, sweater board for blocking, steam iron.

---

# MATERIALS
- **Yarn**: Worsted weight (CYC #4), approx. 900–1100 g total. Sample uses 100 % cotton/acrylic blend (≈ 200 m / 100 g) in heathered grey ("jerga" look).
- **Quantities by size**: S 850 g · M 950 g · L 1050 g · XL 1150 g.
- **Notions**: Tapestry needle (blunt), pins, ribbon for shoulder stabilizer (optional, 1 m).
- **Sewing**: Mattress stitch by hand, or use linker if available.

---

# GAUGE_AND_TENSION
**Swatch (mandatory before starting):**
1. Cast on 60 needles in waste yarn, knit ravel cord, switch to main yarn at T7, RC000.
2. Knit 80 rows in stockinette. Bind off loosely or release on waste yarn.
3. **Steam lightly** (do not press) and let rest 30 minutes.
4. Measure center 10 cm × 10 cm square.

**Target gauge:** **20 sts × 28 rows = 10 cm** at T7 after steaming.

If you get more stitches per 10 cm → loosen tension (T7·· or T8).
If fewer → tighten (T6·· or T6).

Row gauge is critical for drop-shoulder fit — verify both dimensions.

---

# SCHEMATIC_AND_SIZES
```
         ┌────── 52 cm ──────┐
         │                   │   ← shoulder
         │   FRONT / BACK    │
         │                   │   60 cm
         │                   │
         └───────────────────┘
              hem 4 cm

         ┌──── 38 cm ────┐
         │   SLEEVE      │  48 cm
         │  (tapered)    │
         └──22 cm──┘ cuff
```
All measurements for Size M. Stitch counts below assume Size M (104 sts per body panel, 44 sts cuff → 76 sts upper sleeve).

| | S | M | L | XL |
|--|--|--|--|--|
| Body cast-on sts | 96 | 104 | 112 | 120 |
| Body rows to shoulder | 162 | 168 | 174 | 180 |
| Sleeve cast-on sts | 40 | 44 | 48 | 52 |
| Sleeve top sts | 68 | 76 | 84 | 92 |
| Sleeve total rows | 128 | 134 | 140 | 146 |

---

# BACK_PANEL
**Stitch count (M): 104 sts. Center on bed — push 52 needles left and 52 right of center "0".**

**RC000–000 · Cast-on (COR)**
- Bring 104 needles to working position (WP), centered.
- Cast on with waste yarn, T8, knit 10 rows ending COR.
- Knit 1 row of ravel cord by hand.
- Hang cast-on comb + 2 claw weights.

**RC000–014 · Hem (mock rib, T5)**
- Switch to main yarn, T5. **RC000 = first row of main yarn**, carriage COR.
- Knit 14 rows stockinette ending COL.
- *Optional fold hem:* knit 14 rows, then pick up the loops of RC001 with a transfer tool and rehang onto the working needles to create a folded hem. Beginners may skip and leave a curled stockinette edge.

**RC015 · Tension change**
- Set tension to **T7**.

**RC015–168 · Body (stockinette)**
- Knit straight in stockinette to **RC168** (≈ 55 cm above hem fold). Carriage ends **COR** at RC168.
- **Reweight every 40 rows**: at RC040, RC080, RC120, RC160 — move lower claw weights up and rehang.
- *Math check:* 168 rows ÷ 28 rows/10 cm = 60 cm total length ✓.

**RC168 · Shoulder shaping — none (drop shoulder).**
- Place small contrast-yarn markers at needle positions **−37 and +37** (counting from center "0") to mark the neck edges (30 center sts will be held).

**RC169 · Bind-off on waste yarn**
- Knit 10 rows of waste yarn at T8 over all 104 sts. Cut yarn, release work from machine. Do NOT bind off — sts will be picked up for shoulder seaming and neckband.

---

# FRONT_PANEL
Identical to BACK_PANEL through **RC146** (22 rows before shoulder — this creates an 8 cm front neck drop).

**RC146 · Begin neckline shaping (COR)**
- Knit to center. Identify center 30 sts: needles −15 to +14.
- **Hold center 30 sts**: bring the 30 center needles to **Hold position (E/D position)**. Set carriage to hold (Russell levers UP / hold cam ON, depending on machine).
- The carriage will now knit only the active needles on each side; held needles do not knit.

**RC147–168 · Left and right neck shaping**
Work each side separately using hold technique. *Working from COR first:*

**Right shoulder (right side of knitter = needles +1 to +52):**
- RC147 (COR→COL): pass carriage; right shoulder needles knit, left shoulder needles will also knit — to isolate, **bring left-shoulder needles (−1 to −52) to hold** as well; only right 52 sts knit.

Beginner-friendly simplified method (recommended):
- At **RC146** (COL after the last full row), bring center 30 needles to hold.
- **Right shoulder rows (RC147–168, 22 rows total):**
  - With carriage at COR, set carriage so held needles do NOT knit.
  - To shape the neck edge, on each side decrease 1 needle into hold every 2 rows × 7 times (= 7 sts) over RC147–160, then knit straight to RC168.
  - *Result:* shoulder ends with 52 − 7 − 15 = 30 sts? Recheck: each shoulder began with 37 sts (104 − 30 ÷ 2 = 37). 37 − 7 = **30 sts remain at shoulder**. Wait — back has 37 shoulder sts. Mismatch.

**Corrected neck-edge decreases:** decrease 0 sts — the 30-st center hold alone provides the neck shape (a wide boat-neck style, ideal for beginners and drop-shoulder).

**Simplified beginner neckline (FINAL):**
- **RC146 (COL)**: bring center 30 needles to hold (E position). Use a 3-prong transfer tool to gently lift loops and place on a length of waste yarn — or simply leave on hold needles with weights.
- **RC147–168**: continue knitting straight; both shoulders (37 sts each) knit while center 30 sts wait on hold.
- *No further shaping needed.* The 8 cm × 30-st rectangular drop forms a relaxed scoop/boat neckline typical of "sudadera baja" style.

**RC169 · Bind-off on waste yarn**
- Knit 10 rows waste yarn at T8 over all 104 needles (release held sts back to WP first, knit them off together with shoulders onto waste yarn).
- Release from machine.

---

# SLEEVES (make 2)
**Cast-on (M): 44 sts centered on bed — 22 left, 22 right of "0".**

**RC000 · Cast-on (COR)** — waste yarn 10 rows + ravel cord, hang comb + weights.

**RC000–014 · Cuff (T5)** — 14 rows mock-rib stockinette ending COL.

**RC015 · Switch to T7.**

**RC015–134 · Tapered body with increases**
- **Increase plan**: 1 st each end every 8 rows × 16 times = 32 sts added.
- *Math check:* 44 + 32 = **76 sts at sleeve top** ✓. 16 incs × 8 rows = 128 rows + 14 cuff rows = 142 rows total — adjust: place last increase at RC134, then knit straight 4 rows to RC138.

**Revised plan:**
- Increases at **RC022, RC030, RC038, RC046, RC054, RC062, RC070, RC078, RC086, RC094, RC102, RC110, RC118, RC126, RC134, RC142**.
- At each increase row (carriage at side), **bring 1 new needle into WP at each end** using a 1-prong transfer tool to pick up the adjacent purl bar and place it on the new needle (fully fashioned-style edge — neat seam).
- *Math check:* 14 (hem) + 134 = RC148. Final increase at RC142, knit 4 more rows straight to **RC148**.
- Total sleeve length: 148 rows ÷ 28 × 10 cm = 52.8 cm. Trim cuff to 12 rows if you want exactly 48 cm — recommended:

**Size-M correction (beginner-clean numbers):**
- Cuff: RC000–012 (12 rows hem at T5).
- Body: RC013–134 (122 rows at T7).
- Increases every 8 rows starting RC020, last at RC132 = **15 increases** → 44 + 30 = 74 sts. Knit straight to RC134.
- *Final sleeve:* 74 sts × 0.5 cm = 37 cm upper sleeve; 134 rows ≈ 48 cm ✓.

**RC135 · Bind-off on waste yarn** — 10 rows waste yarn T8, release.

**Reweight every 40 rows** as for body.

---

# NECKBAND
1. **Join shoulders first** (see FINISHING step 2) so neckband can be worked in the round-equivalent (flat with one open seam).
2. Lay sweater flat. With main bed cleared, count neckline stitches:
   - Front: 30 held sts + ~12 sts picked up along front neck slope (6 each side from row-ends) = **54 sts**.
   - Back: 30 sts (the center 30 of the back, since this is a boat neck back also holds 30 sts in the same way — for back, simply mark and use the 30 center sts of back shoulder row).
   - **Total: ~84 sts** for one shoulder open; or rehang along entire neckline if both shoulders seamed.
3. **Rehang neckline**: with WS facing you, hang each loop of the neckline onto an empty needle on the main bed. Maintain even tension. For curved sections, pick up 3 sts for every 4 row-ends.
4. **Knit neckband:**
   - RC000, T5, knit **12 rows** stockinette (this will fold to form a 2 cm band).
   - Or for 1×1 rib (if ribber): knit 16 rows 1×1 rib at T4/4.
5. **Latch-tool bind-off:**
   - With carriage parked, use latch tool to chain off across the bed: pull each stitch through the next, working in one direction, leaving a flexible chained edge.
6. **Fold band to inside** and slip-stitch to pickup row with tapestry needle, hiding raw edge.

---

# FINISHING
1. **Steam all panels** lightly on WS using a damp pressing cloth. Do not press — hover steam only. Pin to schematic dimensions on a sweater board and let dry fully.
2. **Shoulder seams**: With panels RS facing, align front and back shoulders (37 sts each). Use **mattress stitch** through the live loops just below the waste yarn, then unravel waste yarn row by row as you go. Alternative: use a linker if available.
3. **Mark sleeve placement**: Measure 24 cm down from shoulder seam on both front and back; place pins. This 48 cm armhole opening matches the 37 cm sleeve top with 5.5 cm gentle gather/ease.
4. **Attach sleeves**: Center sleeve top at shoulder seam; pin between markers. Sew with mattress stitch, easing sleeve cap evenly into armhole.
5. **Side and underarm seams**: Sew in one continuous seam from cuff → underarm → hem on each side using mattress stitch. Match hem fold and cuff fold precisely.
6. **Work neckband** as in NECKBAND section.
7. **Weave in all ends** on WS, working through purl bumps for invisibility.
8. **Final block**: Pin garment to a sweater board at schematic dimensions, steam thoroughly, and let dry flat 24 hours. Place light blocking weights on hem and cuffs to prevent rolling.

---

# ABBREVIATIONS
- **RC** — Row Counter
- **COL / COR** — Carriage on Left / Carriage on Right
- **WP** — Working Position (B position on most machines)
- **HP / Hold** — Holding Position (D or E position)
- **NWP** — Non-Working Position (A position)
- **T** — Tension dial setting (e.g., T7)
- **st(s)** — stitch(es)
- **inc** — increase (bring needle into WP)
- **dec** — decrease (transfer stitch and push needle to NWP)
- **EON** — Every Other Needle
- **WS / RS** — Wrong Side / Right Side
- **1×1 rib** — alternating knit/purl stitches across (requires ribber)
- **Latch tool BO** — Bind-off chained with latch tool
- **Mattress st** — Vertical seaming method through edge bars
- **Sweater board** — Flat blocking board sized to garment

---

**Pattern designed for beginner machine knitters. ¡Buen tejido!**
Disclaimer: This pattern was generated by AI and should be reviewed for accuracy before use. While we strive for quality, AI-generated content may contain errors. Please verify measurements, stitch counts, and instructions before beginning your project. Generated by purlJam.uk
Access your pattern anytime
Bookmark this page to access your pattern anytime