Type
Crochet
Difficulty
beginner
Category
amigurumi
AI Thinking Process
Planning
Verification
Pattern
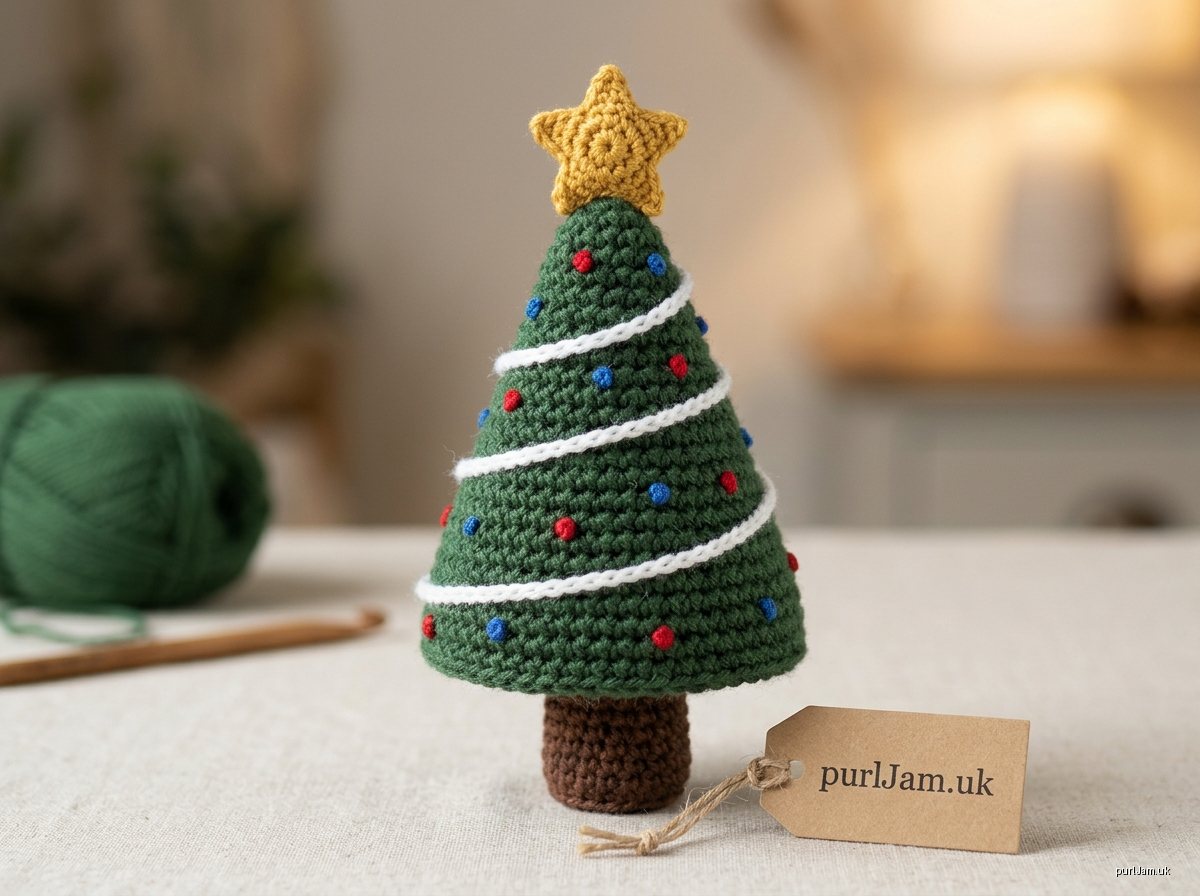
Twinkle Table-Top Christmas Tree
Skill level: Beginner Finished size: about 6" (15 cm) tall including the star and trunk; about 2.3" (5.8 cm) across at the widest point.
Materials
- Worsted (4) yarn, acrylic or cotton:
- Green (MC): about 60 yd (55 m)
- Brown (CC1): about 10 yd (9 m)
- Yellow or gold (CC2): about 8 yd (7 m)
- Small amounts of red, white and blue for ornaments and garland
- US G-6 (4.0 mm) hook, or one size smaller than the yarn label suggests
- Polyester fiberfill
- Optional: a small zip bag of poly pellets or clean pebbles for weight
- Yarn needle, stitch marker, scissors, pins
Gauge
5 sc × 6 rnds = 1" (2.5 cm) in tight single crochet worked in the round.
Gauge is not critical for this project. However, the fabric should be firm enough that stuffing does not show through. If it does, go down a hook size.
Abbreviations (US)
- ch – chain
- sc – single crochet
- sl st – slip stitch
- inc – 2 sc in the same stitch
- dec – invisible decrease (insert the hook in the front loops of the next 2 sts, yo, pull through both loops, yo, pull through 2)
- MR – magic ring
- st(s) – stitch(es)
- rnd – round
- [ ] – stitch count at the end of the round
Notes
- Work in continuous spirals. Do not join rounds.
- Place the marker in the first stitch of each round, and move it up every round.
- Stuff as you go once the piece is wide enough to reach inside.
Tree Body (Green, worked tip downward)
- Rnd 1: 4 sc in MR [4]
- Rnd 2: (sc, inc) twice [6] (4 + 2 = 6 ✓)
- Rnd 3: sc around [6]
- Rnd 4: (2 sc, inc) twice [8] (6 + 2 = 8 ✓)
- Rnd 5: (3 sc, inc) twice [10] (8 + 2 = 10 ✓)
- Rnd 6: sc around [10]
- Rnd 7: (4 sc, inc) twice [12] (10 + 2 = 12 ✓)
- Rnd 8: (3 sc, inc) 3 times [15] (12 + 3 = 15 ✓)
- Rnd 9: sc around [15]
- Rnd 10: (4 sc, inc) 3 times [18] (15 + 3 = 18 ✓)
- Rnd 11: sc around [18]
- Rnd 12: (5 sc, inc) 3 times [21] (18 + 3 = 21 ✓)
- Rnd 13: (6 sc, inc) 3 times [24] (21 + 3 = 24 ✓)
- Rnd 14: sc around [24]
- Rnd 15: (7 sc, inc) 3 times [27] (24 + 3 = 27 ✓)
- Rnd 16: (8 sc, inc) 3 times [30] (27 + 3 = 30 ✓)
- Rnd 17: sc around [30]
- Rnd 18: (9 sc, inc) 3 times [33] (30 + 3 = 33 ✓)
- Rnd 19: sc around [33]
- Rnd 20: (10 sc, inc) 3 times [36] (33 + 3 = 36 ✓)
- Rnds 21–22: sc around [36] (2 rnds)
Finishing the body:
- Sl st in the next st and fasten off, leaving a 16" (40 cm) tail for sewing.
- Stuff firmly, pushing the stuffing into the tip with the end of your hook.
- Total: 22 rnds ÷ 6 rnds per inch ≈ 3.7" tall ✓
Base (Green)
- Rnd 1: 6 sc in MR [6]
- Rnd 2: inc in each st [12] (6 × 2 = 12 ✓)
- Rnd 3: (sc, inc) around [18] (12 + 6 = 18 ✓)
- Rnd 4: (2 sc, inc) around [24] (18 + 6 = 24 ✓)
- Rnd 5: (3 sc, inc) around [30] (24 + 6 = 30 ✓)
- Rnd 6: (4 sc, inc) around [36] (30 + 6 = 36 ✓)
Sl st and fasten off. Weave in the end. The base has 36 sts, which matches the tree body's 36 sts ✓
Trunk (Brown)
- Rnd 1: 6 sc in MR [6]
- Rnd 2: inc in each st [12] (6 × 2 = 12 ✓)
- Rnd 3: working in back loops only, sc around [12] (this creates a flat bottom edge)
- Rnds 4–7: sc around [12] (4 rnds)
Sl st and fasten off, leaving a 12" (30 cm) tail. Stuff firmly.
Star (Yellow/Gold, flat; make 2)
- Rnd 1: 5 sc in MR. Join with a sl st to the first sc [5]. Pull the ring tight.
- Rnd 2 (points): Work the following in each st around [5 points]:
- Ch 3.
- Sl st in the 2nd ch from the hook.
- sc in the next ch.
- sl st in the same sc from Rnd 1.
- sl st into the next st.
Fasten off.
Joining the stars:
- Place the two stars together with their wrong sides facing.
- Whipstitch around the edges, adding a pinch of stuffing before closing.
- Leave one tail for sewing.
Assembly
- Weight (optional): Place the pellet bag in the bottom of the tree body, on top of the stuffing.
- Base:
- Pin the base to the open edge of the cone, matching stitch for stitch (36 to 36).
- Whipstitch it on with the body tail, topping up the stuffing before you finish.
- Trunk:
- Center the trunk on the base, with its open end against the base.
- Sew around it securely.
- The trunk's flat end is now the stand.
- Star: Sew the star to the tip of the tree, tacking it through the center so it stands upright.
Embellishments
- Garland:
- With white or gold yarn, work surface slip stitch in a spiral that winds down the tree.
- Start just below the star and make about 3 wraps, finishing at the base.
- Ornaments:
- Make French knots in red and blue, wrapping 3 times. Space them randomly, about 10–12 in total.
- Child-safe alternative: Use embroidery instead of beads or buttons.
- Optional extra: Crochet a few 4-sc magic rings in red and sew them on as larger baubles.
Size Adjustments
- Larger tree: Repeat the pattern of "3 increases spread evenly, then a plain round" until you reach 42 or 48 sts. Make the base to match by adding (5 sc, inc) or (6 sc, inc) rounds.
- Smaller ornament tree: Stop at Rnd 13 [24], then work 1 plain round. Make the base through Rnd 4 [24]. Skip the trunk, and add a hanging loop instead.
Finishing Tips
- Hide all tails by passing them through the stuffed body and trimming them close.
- Use the invisible decrease and work in tight tension for a smooth, professional look.
Merry making! 🎄
Disclaimer: This pattern was generated by AI and should be reviewed for accuracy before use. While we strive for quality, AI-generated content may contain errors. Please verify measurements, stitch counts, charts, and instructions before beginning your project. Generated by purlJam.uk
Love this pattern?
Save this pattern to your free PurlJam libraryAccess your pattern anytime
Bookmark this page to access your pattern anytime