Type
Crochet
Difficulty
advanced
Category
blanket
AI Thinking Process
Planning
Pattern
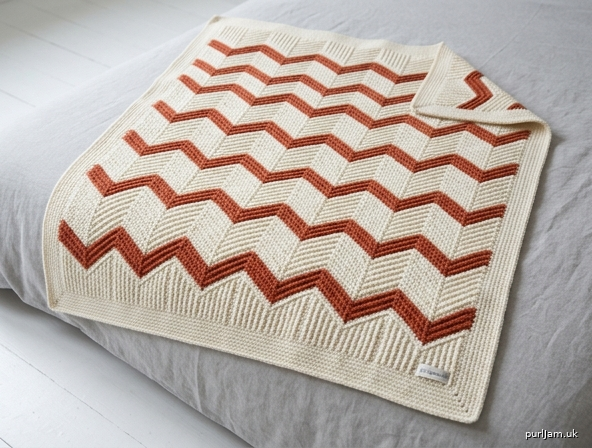
Two-Colour Textured Chevron Blanket
Advanced textured throw · allover raised V-ripple · cream + terracotta
Difficulty: Advanced
Construction: Worked flat in rows; border joined and worked in the round
Layout: Allover repeating chevron (V) with two-colour stripe sequence
Terminology: UK crochet terms throughout.
UK dc = US sc · UK htr = US hdc · UK tr = US dc · UK dtr = US tr · UK FPtr = US FPdc
Finished measurements
127 cm × 152 cm (50 in × 60 in) after blocking, including border.
- Body before border (blocked): 122 cm × 147 cm (48 in × 57¾ in)
- Border: 5 rounds UK dc, all edges
A schematic is given at the end of the pattern.
Materials
Yarn: Aran / worsted weight (10 ply); approx. 180 m / 197 yd per 100 g
Fibre: wool, wool-blend, or cotton-acrylic with good stitch definition (smooth, not fluffy).
| Colour | Role | Metres | Yards | 100 g balls (180 m) |
|---|---|---|---|---|
| MC Cream | Body + border | 1250 m | 1370 yd | 7 |
| CC Terracotta | Accent chevron stripes | 380 m | 415 yd | 3 |
Total: 1630 m (1785 yd). Allow 10 % extra if your tension is dense or you add rounds to the border.
Hook: 5.5 mm (US I/9) — or size needed to obtain tension
Notions:
- 14 stitch markers (one for each peak)
- Yarn needle
- Scissors
- Blocking mats and rust-proof pins
- Tape measure
Tension (gauge)
14 sts and 8 rows = 10 cm × 10 cm (4 in × 4 in) over Textured Chevron Pattern with 5.5 mm hook, after blocking.
Work a swatch of 2 full chevron repeats: Chain 42, work Rows 1–8 of the body 2 times (16 rows). Block, then measure the inner 14 sts × 8 rows.
- Too few sts to 10 cm → smaller hook
- Too many sts to 10 cm → larger hook
Post-stitch fabric is denser than plain treble. Match this tension or the finished blanket will not hit 127 × 152 cm.
Abbreviations (UK)
| Abbr. | Meaning |
|---|---|
| BLO | back loop only |
| CC | contrast colour (terracotta) |
| ch | chain |
| dc | double crochet (US sc) |
| FPtr | front post treble (US FPdc) |
| MC | main colour (cream) |
| pm | place marker |
| rem | remaining |
| rep | repeat |
| RS | right side |
| sk | skip |
| sl st | slip stitch |
| st(s) | stitch(es) |
| tr | treble (US dc) |
| WS | wrong side |
| yrh | yarn round hook |
| … | work instructions between asterisks as directed |
| [ ] | work instructions in brackets the number of times stated |
Special stitches
FPtr (front post treble): Yrh, insert hook from front to back to front around the post of the indicated stitch (not under the top 2 loops), yrh, pull up a loop (3 loops on hook), (yrh, pull through 2 loops) twice.
On texture rows the FPtr is worked around the next stitch of the previous row, standing on the current row. Do not also work into the top of that same stitch.
3-tr peak: 3 tr in the centre stitch of the 3-tr group of the previous row (the 2nd of the 3). This is the peak point.
Edge peak: 2 tr in the first (or last) stitch, keeping the side edges straight.
Valley: Skip 2 stitches — always the 2 stitches that sit at the base of the V (the last stitch of one arm and the first stitch of the next arm). Valleys must stack vertically.
Notes
- Turning chain: Row 1 — the 2 skipped ch do not count as a stitch. From Row 2 onwards, 3 ch at the start of a row counts as 1 tr. Work the last stitch of every subsequent row into the top of the beginning 3-ch.
- Stitch count is 170 sts at the end of every body row (turning ch included as 1 st from Row 2). Count after Row 1 and then after every colour-change row.
- Markers: Place a marker in the centre stitch of every 3-tr peak and in each edge-peak stitch. Move markers up every RS row. The next 3-tr group is always worked into the marked stitch.
- Colour changes: Change colour in the last yrh of the last stitch of the row. Do not strand CC across MC rows. Cut CC at the end of each 2-row stripe, leaving a 15 cm tail. MC may be carried loosely up the edge for the 2 CC rows only (the border will encase it).
- This is stripe colourwork, not stranded Fair Isle. Each row is a single colour. The V/chevron is created by the stitch shaping, not by intra-row colour changes. There are no floats inside the row.
- RS is the post-ridge side. Peaks and valleys run across the width; colour bands form horizontal zigzags.
- Keep tension even on FPtr so ridges sit up without pulling the arms inward. If the fabric cups, go up a hook size for FPtr rows only.
Charts
How to read the charts
- RS rows (odd numbers): read right to left
- WS rows (even numbers): read left to right
- Charts are numbered from the bottom up
- Chart A shows colour by row for one 8-row repeat (every cell in a row is the same colour)
- Chart B shows one interior chevron repeat (13 worked sts; the skip-2 valley is drawn as two empty columns)
- Chart C shows how colour bands sit on the finished throw
- Repeat Chart B 12 times across each row, between the two written edge peaks
- Stitch counts per Chart B repeat: 13 worked sts (5 + 5 + 3); skip 2 is not counted as sts
Colour key
□ = MC Cream
■ = CC Terracotta
Stitch key (Chart B)
T = tr
B = tr BLO
F = FPtr
▲ = 3 tr in same st (peak)
·· = skip 2 sts (valley)
E = edge handling — not on Chart B; see written edge instructions
CHART A — Colour repeat (8 rows × 14-st visual module)
One module = 14 columns. Repeat the module across the row. Whole row is one colour.
 8: ■■■■■■■■■■■■■■   CC  WS  tr BLO chevron
 7: ■■■■■■■■■■■■■■   CC  RS  FPtr chevron
 6: □□□□□□□□□□□□□□   MC  WS  tr BLO chevron
 5: □□□□□□□□□□□□□□   MC  RS  tr chevron
 4: □□□□□□□□□□□□□□   MC  WS  tr BLO chevron
 3: □□□□□□□□□□□□□□   MC  RS  FPtr chevron
 2: □□□□□□□□□□□□□□   MC  WS  tr BLO chevron
 1: □□□□□□□□□□□□□□   MC  RS  tr chevron
Work Chart A 14 times (112 rows), then work Chart A Rows 1–6 once more in MC only (6 rows).
Total body rows: 112 + 6 = 118 ✓
CHART B — Stitch repeat, one interior V (13 worked sts)
Read with the written edges. Interior repeat is worked 12 times per row.
Columns left → right on WS (Row 2, 4, 6, 8); right → left on RS (Row 1, 3, 5, 7).
Peak (▲) is the centre of the V; ·· is the valley.
 8:  B B B B B ·· B B B B B ▲     CC  WS  BLO
 7:  F F F F F ·· F F F F F ▲     CC  RS  FPtr
 6:  B B B B B ·· B B B B B ▲     MC  WS  BLO
 5:  T T T T T ·· T T T T T ▲     MC  RS  tr
 4:  B B B B B ·· B B B B B ▲     MC  WS  BLO
 3:  F F F F F ·· F F F F F ▲     MC  RS  FPtr
 2:  B B B B B ·· B B B B B ▲     MC  WS  BLO
 1:  T T T T T ·· T T T T T ▲     MC  RS  tr
Alignment: Each ▲ sits in the column of the ▲ below it. Each ·· sits in the column of the ·· below it.
Edge stitches (every row, not charted):
- Begin RS/WS: 2 sts in the first st (see written pattern: 2 tr, or 3 ch + 1 tr).
- Then 5 arm sts, skip 2, 5 arm sts, then start Chart B repeats at the first ▲.
- End: after the last 5 arm sts, 2 sts in the last st.
Worked-st check per row: 2 (start) + 5 + 5 + (3 + 5 + 5) × 12 + 2 (end)
= 12 + 13 × 12 + 2 = 12 + 156 + 2 = 170 ✓
CHART C — Colour-band schematic (throw layout)
Zigzag lines are the chevron peaks/valleys. Not to scale.
        ←  127 cm (50 in)  →
    ┌─────────────────────────┐  ↑
    │ MC cream dc border      │
    │ □□□□□□ 6 rows MC        │
    │ ■■■■■■ 2 rows CC        │  14 CC
    │ □□□□□□ 6 rows MC        │  stripes
    │ ■■■■■■ 2 rows CC        │
    │          · · ·          │  152 cm
    │ □□□□□□ 6 rows MC        │  (60 in)
    │ ■■■■■■ 2 rows CC        │
    │ □□□□□□ 6 rows MC        │
    │ MC cream dc border      │  ↓
    └─────────────────────────┘
         chevron V-bands
         run across width
Pattern — Body
With MC and 5.5 mm hook, loosely ch 172.
(12 interior repeats: 12 × 13 + 16 = 172 ✓)
Mark the 3rd ch from the hook (first worked st) and the last ch.
Setup / Repeat Row 1 (RS, MC) — tr chevron
2 tr in 3rd ch from hook (skipped 2 ch do not count as a st), tr in each of next 5 ch, sk 2 ch, tr in each of next 5 ch,
*3 tr in next ch, tr in each of next 5 ch, sk 2 ch, tr in each of next 5 ch;
rep from * to last ch, 2 tr in last ch. Turn.
170 sts ✓
Pm in the 2nd tr of each 3-tr group and in the first and last sts of the row (14 peak markers: 12 interior + 2 edges ✓).
Repeat Row 2 (WS, MC) — BLO chevron
3 ch (counts as 1 tr here and throughout), 1 tr in first st (edge peak = 2 tr),
tr BLO in each of next 5 sts, sk 2 sts, tr BLO in each of next 5 sts,
*3 tr BLO in marked peak st, tr BLO in each of next 5 sts, sk 2 sts, tr BLO in each of next 5 sts;
rep from * to last st, 2 tr in last st (top of turning ch of previous row, or last tr on Row 1). Turn.
170 sts ✓
Move markers up into the centre st of each 3-tr peak.
Repeat Row 3 (RS, MC) — FPtr textured chevron
3 ch, 1 tr in first st,
FPtr around each of next 5 sts, sk 2 sts, FPtr around each of next 5 sts,
*3 tr in marked peak st, FPtr around each of next 5 sts, sk 2 sts, FPtr around each of next 5 sts;
rep from * to last st, 2 tr in last st. Turn.
170 sts ✓
The FPtr ridges follow the arms of each V. Do not work FPtr in the 3-tr peaks or the 2-tr edges.
Repeat Row 4 (WS, MC) — BLO chevron
As Row 2.
Repeat Row 5 (RS, MC) — tr chevron
3 ch, 1 tr in first st,
tr in each of next 5 sts, sk 2 sts, tr in each of next 5 sts,
*3 tr in marked peak st, tr in each of next 5 sts, sk 2 sts, tr in each of next 5 sts;
rep from * to last st, 2 tr in last st. Turn.
170 sts ✓
Repeat Row 6 (WS, MC) — BLO chevron
As Row 2.
Change to CC in the last yrh of the last st. Cut MC only if you prefer not to carry; otherwise carry MC loosely up the RS edge for the next 2 rows.
Repeat Row 7 (RS, CC) — FPtr textured chevron
As Row 3, in terracotta.
The terracotta post-ridges are the accent Vs.
Repeat Row 8 (WS, CC) — BLO chevron
As Row 2, in terracotta.
Change to MC in the last yrh of the last st. Cut CC, leaving a 15 cm tail.
Repeat the 8-row sequence
Work Rows 1–8 a further 13 times (14 full repeats in total).
Row count check: 14 × 8 = 112 rows ✓
Colour check: 14 terracotta stripes, each 2 rows, separated by 6-row cream bands ✓
On every later Row 1, work into stitches (not the foundation chain):
3 ch, 1 tr in first st, then continue as Row 5 (plain tr chevron in MC).
(Row 1 of repeats 2–14 = same stitch path as Row 5; only the first Row 1 is worked into the chain.)
Balancing cream band
With MC, work Rows 1–6 once more (plain tr / BLO / FPtr / BLO / tr / BLO).
Do not change to CC.
Row count: 112 + 6 = 118 rows ✓
The body now begins and ends with 6 rows of cream, so the cream border sits on cream at both short edges.
Fasten off MC. Piece should measure approx. 121–123 cm wide × 145–148 cm long before blocking.
Border (MC, cream)
Block the body lightly to 122 × 147 cm before edging if the side edges are very wavy; otherwise work the border first and block the finished blanket. Do not flatten the post ridges (see Finishing).
Join MC with sl st in the first st of the last row, at the top-right corner as the RS faces you. Work with RS facing throughout. 1 ch at the start of a round does not count as a st. Join each round with sl st to first dc.
Round 1 (set-up)
Top edge: 1 ch, 3 dc in first st (corner), dc in each st to last st of the top edge, 3 dc in last st (corner).
(170 body sts: 3 + 168 + 3 = 174 dc along the top, including 2 extra at each corner ✓)
Left side: Working into row-ends, work 2 dc in each row-end down the long edge.
(118 rows × 2 = 236 dc ✓)
Foundation edge: 3 dc in the first remaining loop of the starting chain (corner), dc in each ch across the foundation (skip the same 2-ch valleys you skipped on Row 1 so the border follows the chevron without flaring — 170 dc positions matching the body), 3 dc in the last ch (corner).
174 dc along the bottom, including corner extras ✓
Right side: 2 dc in each row-end to the start of the round (236 dc ✓).
Join to first dc.
Corner check: 4 corners × 3 dc.
Rounds 2–5
1 ch, dc in each dc around, working 3 dc in the centre dc of each 3-dc corner.
Join.
Keep corner increases stacked. After Round 5 the border is a smooth cream frame, approx. 2.5–3 cm deep.
If the long sides ripple, on Round 2 only work dc2tog once near the centre of each long side (2 decreases total); restore 3 dc in corners as usual. Do not decrease on Rounds 3–5.
Fasten off.
Finishing
- Weave in all ends on the WS. Weave CC tails along the terracotta rows (into the BLO ridge) so they do not show on the RS. Weave MC tails into cream rows or into the reverse of the border.
- Block. Textured chevron must be blocked so the Vs lie flat and the measurements match.
- Preferred — wet block: Soak in lukewarm water with a drop of wool wash for 15 minutes. Press out water (do not wring). Lay flat on mats. Pin the four corners to 127 × 152 cm, then pin each peak and each valley along both short edges so the chevron amplitude is even. Pin the long sides straight. Let dry fully.
- Steam (acrylic or if you must not wet the piece): Hover a steam iron 2–3 cm above the fabric. Do not rest the iron on the posts — that will crush the ridges. Pin to size first, steam, dry.
- Remove pins. Trim any remaining tails.
Schematic
                    127 cm (50 in)
        |←———————— body 122 cm + border →|
        ┌────────────────────────────────┐
        │ ░ 5 rnds dc (MC)               │  ↑
        │    6 rows MC                   │
        │ /\/\/\/\/\/\/\/\/\/\/\  CC     │
        │ /\/\/\/\/\/\/\/\/\/\/\  MC     │  152 cm
        │ /\/\/\/\/\/\/\/\/\/\/\  CC     │  (60 in)
        │         (14 CC bands)          │
        │    6 rows MC                   │
        │ ░ 5 rnds dc (MC)               │  ↓
        └────────────────────────────────┘
         peaks point along the length;
         colour bands zigzag across the width
Size adjustment (optional)
- Width: Add or subtract 13 ch in the foundation for each extra/fewer interior V. Each repeat ≈ 9.3 cm (3¾ in) of blocked width. Recalculate: sts per row = 170 ± 13 per repeat.
- Length: Add or subtract full 8-row colour repeats (10 cm / 4 in each). Keep the final 6 MC rows so the border still sits on cream.
- Recalculate yarn at approx. 85 m of MC and 25 m of CC per 8-row repeat, plus 180 m MC for the 5-round border.
Inline maths summary
| Item | Calculation | Result |
|---|---|---|
| Foundation | 12 × 13 + 16 | 172 ch ✓ |
| Sts per row | 2 + 5 + 5 + 12 × 13 + 2 | 170 ✓ |
| Interior peaks | 12 | 12 ✓ |
| Total peak markers | 12 + 2 edges | 14 ✓ |
| Colour repeats | 14 × 8 rows | 112 ✓ |
| Balancing MC rows | Rows 1–6 | +6 ✓ |
| Body rows | 112 + 6 | 118 ✓ |
| CC stripes | 14 × 2 rows | 28 CC rows ✓ |
| Side border Rnd 1 | 118 × 2 dc | 236 ✓ |
| Tension | 14 sts / 8 rows = 10 cm | blocked |
| Finished size | body 122 × 147 cm + 5-rnd dc | 127 × 152 cm ✓ |
Disclaimer: This pattern was generated by AI and should be reviewed for accuracy before use. While we strive for quality, AI-generated content may contain errors. Please verify measurements, stitch counts, charts, and instructions before beginning your project. Generated by purlJam.uk
Love this pattern?
Save this pattern to your free PurlJam libraryAccess your pattern anytime
Bookmark this page to access your pattern anytime