Type
Knitting
Difficulty
intermediate
Category
cardigan
AI Thinking Process
Planning
Verification
Pattern
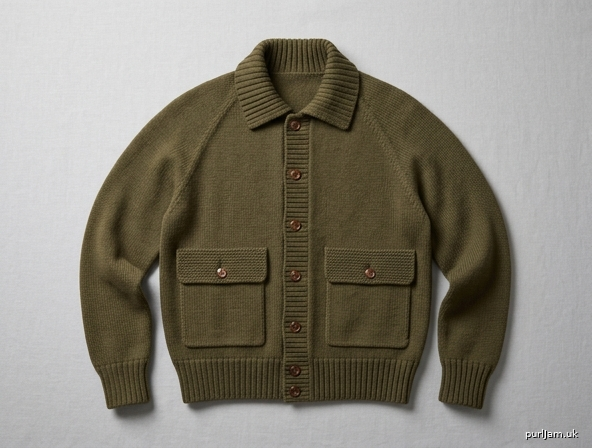
Type A-1 Wool Flight Jacket
A top-down raglan cardigan in sport-weight wool, knitted as an all-wool interpretation of the US Army Air Corps Type A-1 flying jacket (specified 1927, the button-front predecessor of the wartime A-2). The original was a leather shell with wool-knit collar, cuffs and waistband. This version keeps the readable A-1 silhouette: a hip-length blouson, buttons rather than a zip, a ribbed stand collar, deep ribbed cuffs and waistband, and two flapped patch pockets. It is worked in one piece from the neck down. There are no sleeve seams and no shoulder seams.
The jacket is unisex and sized by chest. Buttonholes are placed on the wearer’s right front (traditional men’s and military overlap: right front over left). To reverse the overlap, work the buttonholes on the other band.
Figures are given for sizes S (M, L, XL, 2XL). Where only one figure is given, it applies to all sizes.
Sizes
| S | M | L | XL | 2XL | |
|---|---|---|---|---|---|
| To fit chest | 86–91 cm (34–36 in) | 97–102 cm (38–40 in) | 107–112 cm (42–44 in) | 117–122 cm (46–48 in) | 127–132 cm (50–52 in) |
Designed with approximately 5–11 cm (2–4½ in) of positive ease, so it can be worn over a shirt. If you are at the top of a size range and want a closer fit, compare your chest with the finished chest below and choose the size that gives you 5–10 cm of ease.
Finished measurements
Measured after blocking, jacket buttoned, bands overlapped (do not add band width to the chest).
| S | M | L | XL | 2XL | |
|---|---|---|---|---|---|
| Chest | 97 cm (38¼ in) | 108 cm (42½ in) | 117 cm (46 in) | 128 cm (50¼ in) | 138.5 cm (54½ in) |
| Back width between underarms | 50 cm (19¾ in) | 55.5 cm (21¾ in) | 60 cm (23½ in) | 66 cm (26 in) | 71.5 cm (28 in) |
| Length, back neck to hem | 58.5 cm (23 in) | 60.5 cm (23¾ in) | 62.5 cm (24½ in) | 65 cm (25½ in) | 67 cm (26¼ in) |
| Yoke depth, back neck to underarm | 20.5 cm (8 in) | 22.5 cm (8¾ in) | 24.5 cm (9¾ in) | 27 cm (10½ in) | 29 cm (11½ in) |
| Sleeve, underarm to end of cuff | 49 cm (19¼ in) | 49 cm (19¼ in) | 50 cm (19¾ in) | 51 cm (20 in) | 52 cm (20½ in) |
| Upper arm | 39 cm (15¼ in) | 43 cm (17 in) | 46 cm (18 in) | 51.5 cm (20¼ in) | 55.5 cm (21¾ in) |
| Waistband depth | 8 cm (3¼ in) | 8 cm | 8 cm | 8 cm | 8 cm |
| Cuff length | 6 cm (2¼ in) | 6 cm | 6 cm | 6 cm | 6 cm |
| Collar height | 7 cm (2¾ in) | 7 cm | 7 cm | 7 cm | 7 cm |
| Button band width | 3 cm (1¼ in) | 3 cm | 3 cm | 3 cm | 3 cm |
The 2×2 rib waistband draws in when relaxed, so the hem sits closer than the chest and the body blouses slightly over it. That is the flight-jacket line; do not block the rib out flat.
Yarn
Sport weight wool or wool-blend (UK: about 5-ply — heavier than 4-ply, lighter than DK). A springy wool is worth using: the cuffs, waistband and collar need to recover. Cotton will bag.
A firm solid is the most convincing: olive drab, seal brown, khaki or navy. One colour throughout.
Quantity, including pockets, flaps, bands and collar:
- 500 (550, 625, 700, 800) g
- 1375 (1515, 1720, 1925, 2200) m / 1505 (1655, 1880, 2105, 2405) yards
Based on a ball of about 275 m per 100 g. Buy one extra ball. Rib uses more yarn than stocking stitch, and a short knit is a poor moment to change dye lots.
Needles and notions
- 3.0 mm circular needle, 80 cm (32 in) or longer, for the body
- 3.0 mm circular needle, 40 cm (16 in), or double-pointed needles, for the sleeves
- Optional: 2.75 mm needles in the same lengths, for a firmer waistband, cuffs and collar only
- 4 stitch markers
- Waste yarn or stitch holders
- Tapestry needle
- 6 buttons, 15–18 mm, for the front
- Optional: 2 buttons, 12–15 mm, for the pocket flaps
- Optional: 2 buttons, 12–15 mm, for the epaulettes
Needle size is a guide. Use whatever 3 mm-area needle gives you the tension below. The user-requested 3.0 mm needle is the size this tension is written for; change it if your knitting does not match.
Tension
26 stitches and 36 rows = 10 cm (4 in) over stocking stitch on 3.0 mm needles, after blocking.
This is a gauge. It is also the fit. A jacket with 24 stitches to 10 cm will be about 8 cm too large in the chest on the smallest size, and the button spacing will be wrong. Knit the swatch, wash it as you will wash the jacket, and measure it pinned, not stretched.
If you have more than 26 stitches to 10 cm, go up a needle size. If you have fewer, go down.
Tension swatch
Using 3.0 mm needles, cast on 33 stitches.
Work in stocking stitch (knit on the right side, purl on the wrong side) for 44 rows.
Cast off. Block and dry the swatch completely. Count stitches and rows over the centre 10 cm.
You need 26 stitches and 36 rows. If either is off, change needle size and knit another swatch. Do not start the jacket until both numbers match. Row tension matters here as well as stitch tension: yoke depth, body length and sleeve shaping are all planned on 36 rows to 10 cm.
Abbreviations and techniques
k knit; p purl; st(s) stitch(es); RS right side; WS wrong side; pm place marker; sl m slip marker; rep repeat; cont continue; st st stocking stitch; dec decrease; approx approximately; cm centimetres; mm millimetres.
M1R (make 1 right): with the left needle, lift the bar between the stitches from back to front and knit into the front of it. Right-leaning increase.
M1L (make 1 left): with the left needle, lift the bar between the stitches from front to back and knit into the back of it. Left-leaning increase.
k2tog knit 2 stitches together. Right-leaning decrease.
ssk slip 2 stitches knitwise one at a time, return them to the left needle, and knit them together through the back loops. Left-leaning decrease.
yo yarn over.
One-row buttonhole (over the next 2 stitches; stitch count unchanged):
- Bring the yarn to the front, slip the next stitch purlwise, take the yarn to the back.
- Slip the next stitch purlwise and pass the first slipped stitch over it and off the needle. Do this once more. Two stitches have been cast off. Slip the remaining stitch on the right needle back to the left needle.
- Turn the work. Using the cable cast-on, cast on 3 stitches. Turn the work.
- Slip 1 stitch from the left needle to the right needle, then pass the last cast-on stitch over it and off the needle. This closes the hole.
- Continue in rib. The net change is zero (2 cast off, 3 cast on, 1 passed over: 2 − 3 + 1 = 0 ✓).
On the following row, work in rib as the stitches present themselves (knit the knits, purl the purls). The rib settles back into line once the band is blocked.
Pattern notes
- The neck cast-on is the base of the collar. It is not cast off. The collar is picked up along it later.
- Raglan increases are worked every right-side row: one stitch each side of each of the four markers, 8 stitches per increase row.
- The body is worked flat. Do not join it in the round.
- Sleeves are worked in the round from the held stitches.
- Chest ease is in the stocking stitch. The waistband is meant to be tighter.
- Length is easy to change: work the body longer or shorter before the waistband, and the sleeve longer or shorter after the decreases and before the cuff. If you change the body length, still pick up band stitches at 3 stitches for every 4 rows, and space the six buttonholes evenly using the same method (equal gaps, equal margins at hem and neck).
- Original A-1 sleeves were set in. This jacket uses a raglan because that is the construction. The collar, rib trims, buttons and pockets carry the A-1 look.
Instructions
Yoke
With 3.0 mm needles, cast on 96 (104, 112, 120, 128) stitches using the long-tail cast-on. Do not join.
Set-up row (WS): P16 (18, 20, 20, 22), pm, p12 (12, 12, 14, 14), pm, p40 (44, 48, 52, 56), pm, p12 (12, 12, 14, 14), pm, p16 (18, 20, 20, 22).
Marker check, size S: 16 + 12 + 40 + 12 + 16 = 96 ✓. The same five sections sum to the cast-on for every size (M: 18+12+44+12+18 = 104 ✓; L: 20+12+48+12+20 = 112 ✓; XL: 20+14+52+14+20 = 120 ✓; 2XL: 22+14+56+14+22 = 128 ✓).
Sections are: Right Front, Right Sleeve, Back, Left Sleeve, Left Front. “Right” means the wearer’s right, which is the start of right-side rows.
Row 1 (RS, increase): *Knit to marker, M1R, sl m, M1L; rep from * three times more, knit to end. 8 stitches increased.
Row 2 (WS): Purl.
Repeat Rows 1–2 a further 35 (39, 43, 47, 51) times.
Increase rows worked: 1 + 35 (39, 43, 47, 51) = 36 (40, 44, 48, 52) ✓. Stitches increased: 36 × 8 = 288 (40 × 8 = 320, 44 × 8 = 352, 48 × 8 = 384, 52 × 8 = 416). 384 (424, 464, 504, 544) stitches: cast-on 96 + 288 = 384 ✓ (104+320 = 424 ✓; 112+352 = 464 ✓; 120+384 = 504 ✓; 128+416 = 544 ✓).
You now have:
- 52 (58, 64, 68, 74) stitches each Front (16+36 = 52 ✓; 18+40 = 58 ✓; 20+44 = 64 ✓; 20+48 = 68 ✓; 22+52 = 74 ✓)
- 84 (92, 100, 110, 118) stitches each Sleeve (12+72 = 84 ✓; 12+80 = 92 ✓; 12+88 = 100 ✓; 14+96 = 110 ✓; 14+104 = 118 ✓)
- 112 (124, 136, 148, 160) stitches for the Back (40+72 = 112 ✓; 44+80 = 124 ✓; 48+88 = 136 ✓; 52+96 = 148 ✓; 56+104 = 160 ✓)
Section sum, size S: 52+84+112+84+52 = 384 ✓. Check the other sizes the same way before you divide.
Yoke depth, including the set-up row: 73 (81, 89, 97, 105) rows, approximately 20.5 (22.5, 24.5, 27, 29) cm. If your row tension is correct and the depth is more than 1 cm off, you have missed or added an increase row — count stitches before going on.
Divide for body and sleeves
Separation row (RS): Knit 52 (58, 64, 68, 74) Front stitches, remove marker, slip the next 84 (92, 100, 110, 118) Sleeve stitches onto waste yarn, remove marker, turn and cable-cast on 18 (20, 20, 24, 26) underarm stitches, turn, knit 112 (124, 136, 148, 160) Back stitches, remove marker, slip the next 84 (92, 100, 110, 118) Sleeve stitches onto waste yarn, remove marker, turn and cable-cast on 18 (20, 20, 24, 26) underarm stitches, turn, knit the remaining 52 (58, 64, 68, 74) Front stitches.
Body stitches: 52+18+112+18+52 = 252 ✓ (58+20+124+20+58 = 280 ✓; 64+20+136+20+64 = 304 ✓; 68+24+148+24+68 = 332 ✓; 74+26+160+26+74 = 360 ✓).
All four markers have been removed. Leave the sleeve stitches on their waste yarn.
Body
Continue in stocking stitch, beginning with a wrong-side purl row, until the body measures 30 cm (11¾ in) from the separation row, ending with a wrong-side row. At 36 rows to 10 cm this is about 108 rows; the measurement is the authority, not the row count.
The piece should now measure about 50.5 (52.5, 54.5, 57, 59) cm from the back neck cast-on.
Waistband
Change to 2.75 mm needles here if you want a firmer, more elastic band. Stitch count does not change.
Next row (RS): *K2, p2; rep from * to end.
252 ÷ 4 = 63 ✓ (280 ÷ 4 = 70 ✓; 304 ÷ 4 = 76 ✓; 332 ÷ 4 = 83 ✓; 360 ÷ 4 = 90 ✓), so the rib repeat fits exactly and the row ends with p2.
Continue in 2×2 rib as set until the waistband measures 8 cm (3¼ in).
Cast off in rib: knit the knit stitches and purl the purl stitches as you cast them off. Do not cast off tightly; the hem must stretch over a layer of clothing.
Sleeves
Work both sleeves the same.
Return 84 (92, 100, 110, 118) held sleeve stitches to a 3.0 mm needle, ready to work a right-side round.
With the right side facing, and starting at the centre of the underarm cast-on, pick up and knit 9 (10, 10, 12, 13) stitches along the first half of the underarm cast-on (1 stitch in each cast-on stitch), knit across the 84 (92, 100, 110, 118) held stitches, then pick up and knit 9 (10, 10, 12, 13) stitches along the remaining half of the underarm. Place a marker for the start of the round.
102 (112, 120, 134, 144) stitches (9+84+9 = 102 ✓; 10+92+10 = 112 ✓; 10+100+10 = 120 ✓; 12+110+12 = 134 ✓; 13+118+13 = 144 ✓).
If a hole shows at either end of the held stitches, pick up one extra stitch in that corner and, on the next round, knit it together with the neighbouring stitch so the count stays the same.
Shape the sleeve
The decrease sits at the underarm.
Decrease round: K1, k2tog, knit to the last 3 stitches, ssk, k1. 2 stitches decreased.
Knit 5 (4, 4, 3, 3) rounds even.
These 6 (5, 5, 4, 4) rounds are one cycle. Work the cycle once, then repeat it a further 24 (27, 29, 34, 37) times.
Decrease rounds worked: 1 + 24 (27, 29, 34, 37) = 25 (28, 30, 35, 38) ✓. Stitches decreased: 50 (56, 60, 70, 76). 52 (56, 60, 64, 68) stitches remain (102 − 50 = 52 ✓; 112 − 56 = 56 ✓; 120 − 60 = 60 ✓; 134 − 70 = 64 ✓; 144 − 76 = 68 ✓).
Rounds used by the shaping: 25 × 6 = 150 (28 × 5 = 140 ✓; 30 × 5 = 150 ✓; 35 × 4 = 140 ✓; 38 × 4 = 152 ✓), which is about 41.5 (39, 41.5, 39, 42) cm. You should still be short of the length below. If you are already at the cuff length, your row tension is tighter than 36 rows to 10 cm — work the remaining decreases every 3rd round so they are finished before the cuff, then go straight to the rib.
Knit even until the sleeve measures 43 (43, 44, 45, 46) cm from the underarm pick-up.
Cuff
Change to 2.75 mm needles if you used them for the waistband.
Next round: *K2, p2; rep from * to end.
52 ÷ 4 = 13 ✓ (56 ÷ 4 = 14 ✓; 60 ÷ 4 = 15 ✓; 64 ÷ 4 = 16 ✓; 68 ÷ 4 = 17 ✓).
Continue in 2×2 rib until the cuff measures 6 cm (2¼ in).
Cast off in rib, loosely enough to pull the cuff on over the hand, firmly enough that it recovers.
Sleeve from underarm to end of cuff: 43+6 = 49 (43+6 = 49, 44+6 = 50, 45+6 = 51, 46+6 = 52) cm ✓.
Button bands
The buttonhole band is the wearer’s right front (the front at the beginning of right-side rows). The plain band is the wearer’s left front. When the jacket is buttoned, the right front lies on top. For a women’s overlap, swap the two bands.
Pick up with the right side facing, at a rate of about 3 stitches for every 4 rows (about 27 stitches per 10 cm of edge). The target counts already match a front edge of 58.5–67 cm at that rate; space them evenly rather than picking up into every row.
Buttonhole band (wearer’s right)
Starting at the hem, pick up and knit 156 (162, 168, 174, 180) stitches evenly up the wearer’s right front to the neck.
Row 1 (WS): *P1, k1; rep from * to end. Row 2 (RS): *K1, p1; rep from * to end.
Rows 1–2 set 1×1 rib. The pick-up count is even, so both rows end cleanly (156 ÷ 2 = 78 ✓; 162 ÷ 2 = 81 ✓; 168 ÷ 2 = 84 ✓; 174 ÷ 2 = 87 ✓; 180 ÷ 2 = 90 ✓).
Work a further 3 rows in rib as set. You have completed 5 rows, and the last of them was a wrong-side row.
Row 6 (RS, buttonhole): Work 12 (15, 18, 21, 24) stitches in rib, *work a one-row buttonhole over the next 2 stitches, work 24 stitches in rib; rep from * 4 times more, work a one-row buttonhole over the next 2 stitches, work in rib to end.
Spacing check: 12 + 5 × (2 + 24) + 2 + 12 = 12 + 130 + 2 + 12 = 156 ✓. The same gaps fit the other sizes because each size’s two margins absorb the extra stitches: margins 15+15 give 162 ✓, 18+18 give 168 ✓, 21+21 give 174 ✓, 24+24 give 180 ✓. Six buttonholes, five gaps of 24 stitches (about 9 cm), equal margins at hem and neck.
Work 5 further rows in rib. 11 rows in all, buttonhole on the centre row. The band is about 3 cm wide.
Cast off in rib.
Plain band (wearer’s left)
Starting at the neck, pick up and knit 156 (162, 168, 174, 180) stitches evenly down the wearer’s left front to the hem.
Work 11 rows in 1×1 rib as for the buttonhole band, with no buttonholes. Cast off in rib.
Starting at the neck on this band, and at the hem on the other, makes both bands’ first row a wrong-side row and keeps the rib facing the same way. Sew nothing yet.
Collar
The collar is a straight 2×2 stand, 7 cm high. Worn up it frames the neck; folded once it sits like the soft knit collar of the original jacket.
With 3.0 mm needles (or 2.75 mm if you firmed the other rib) and the right side facing, starting at the top corner of the wearer’s right band, pick up and knit 10 stitches across the top of that band, 96 (104, 112, 120, 128) stitches along the neck cast-on, and 10 stitches across the top of the wearer’s left band.
116 (124, 132, 140, 148) stitches (10 + 96 + 10 = 116 ✓; 10+104+10 = 124 ✓; 10+112+10 = 128 ✓; 10+120+10 = 140 ✓; 10+128+10 = 148 ✓). All are divisible by 4 (116 ÷ 4 = 29 ✓; 124 ÷ 4 = 31 ✓; 128 ÷ 4 = 32 ✓; 140 ÷ 4 = 35 ✓; 148 ÷ 4 = 37 ✓).
Row 1 (WS): *K2, p2; rep from * to end. Row 2 (RS): *K2, p2; rep from * to end.
Continue in 2×2 rib until the collar measures 7 cm (2¾ in).
Cast off in rib, not tightly. A tight cast-off will stop the collar from standing or folding.
Optional collar closure: on row 4 of the collar, work a one-row buttonhole over the 2 centre stitches of the wearer’s right end of the collar, and sew a seventh button opposite it. The six front buttons already close the jacket; this one only pins the collar.
Pockets (make 2)
With 3.0 mm needles, cast on 30 (32, 34, 36, 38) stitches.
Work in stocking stitch for 11 (12, 12, 13, 13) cm, ending with a wrong-side row.
Work 4 rows in 1×1 rib (*k1, p1; rep from * to end on the right side; on the wrong side, knit the knits and purl the purls). All pocket widths are even, so the rib fits (30 ÷ 2 = 15 ✓, and the same for the larger sizes).
Cast off in rib.
Finished pocket about 11.5 (12.5, 13, 14, 14.5) cm wide (30 ÷ 2.6 = 11.5 ✓; 32 ÷ 2.6 = 12.3 ✓; 34 ÷ 2.6 = 13.1 ✓; 36 ÷ 2.6 = 13.8 ✓; 38 ÷ 2.6 = 14.6 ✓) and about 12 (13, 13, 14, 14) cm deep including the rib.
Pocket flaps (make 2)
Cast on 30 (32, 34, 36, 38) stitches.
Work in garter stitch (knit every row) for 3 cm, ending with a wrong-side row.
Buttonhole row (RS): K14 (15, 16, 17, 18), yo, k2tog, knit to end.
Centre check: 14 + 2 + 14 = 30 ✓ (15+2+15 = 32 ✓; 16+2+16 = 34 ✓; 17+2+17 = 36 ✓; 18+2+18 = 38 ✓). The eyelet sits on the two centre stitches. Omit this row, and knit it plain, if you do not want flap buttons.
Continue in garter stitch until the flap measures 4.5 cm. Cast off knitwise.
Optional epaulettes (make 2)
Not on every original A-1, and not required for the silhouette. Skip them if you would rather the raglan line stay clean.
Cast on 8 stitches. Work in garter stitch until the strap measures 9 (10, 10, 11, 11) cm. Cast off.
Later, sew one end to the neck edge at the centre of each sleeve’s cast-on stitches, and sew the strap down along the centre of the sleeve for its full length. Sew a small button on the outer end, through the strap and the sleeve fabric.
Finishing
Weave in ends on the wrong side. Wet-block or steam-block the jacket, pockets and flaps to the measurements in the table. Pin the chest and the length; do not stretch the ribbed waistband, cuffs or collar — pat them into shape and let them draw in. Dry flat, fully.
Pockets. On each front, place the lower edge of the pocket 1 cm above the waistband. Place the edge nearest the buttons 5 (5.5, 6, 6.5, 7) cm out from the front selvedge (the edge the band was picked up from), so the overlapping band does not cover the pocket. The pocket then sits slightly toward the side seam rather than dead centre; that is intentional. Sew the side and lower edges with small stitches on the wrong side, leaving the ribbed top open. Do not sew through to the public side in a heavy seam.
Flaps. Sew the cast-on edge of each flap to the front, directly above the pocket, about 0.5 cm above the pocket’s rib, so the flap overlaps the pocket mouth. Sew a button on the pocket to meet the eyelet, or leave the flap unbuttoned.
Front buttons. Overlap the bands and mark the button positions through the six buttonholes. Sew the buttons on the wearer’s left band. Check that the hem and the neck corners meet before you sew the top and bottom buttons.
Epaulettes, if you made them: sew as above.
Weave in any remaining ends. Fold the collar once, or leave it standing. The lowest button should close the waistband; the top button sits just below the collar.
Fit notes for the technical check
Use these if a measurement looks wrong before you sew the buttons. All of them follow from 26 stitches and 36 rows to 10 cm.
- Finished chest is the body stitch count divided by 2.6: 252 ÷ 2.6 = 96.9 cm, published as 97 cm ✓. The other sizes: 280 ÷ 2.6 = 107.7 cm (108) ✓; 304 ÷ 2.6 = 116.9 cm (117) ✓; 332 ÷ 2.6 = 127.7 cm (128) ✓; 360 ÷ 2.6 = 138.5 cm ✓.
- Back width is the back stitches plus one underarm, divided by 2.6: (112+18) ÷ 2.6 = 50 cm ✓; (124+20) ÷ 2.6 = 55.4 cm ✓; (136+20) ÷ 2.6 = 60 cm ✓; (148+24) ÷ 2.6 = 66.2 cm ✓; (160+26) ÷ 2.6 = 71.5 cm ✓.
- Upper arm: 102 ÷ 2.6 = 39.2 cm ✓; 112 ÷ 2.6 = 43.1 cm ✓; 120 ÷ 2.6 = 46.2 cm ✓; 134 ÷ 2.6 = 51.5 cm ✓; 144 ÷ 2.6 = 55.4 cm ✓.
- If the chest is right and the length is short, the row tension was tight. The stitch count is still correct; add length in the stocking-stitch body before the waistband on the next size you knit, or block the body longer if the fabric will bear it.
- If the button bands ripple, you picked up too many stitches. If they draw the front in, you picked up too few. The given counts are the ones the buttonhole maths belongs to — unpick and re-pick rather than forcing the spacing onto a different number.
Disclaimer: This pattern was generated by AI and should be reviewed for accuracy before use. While we strive for quality, AI-generated content may contain errors. Please verify measurements, stitch counts, charts, and instructions before beginning your project. Generated by purlJam.uk
Love this pattern?
Save this pattern to your free PurlJam libraryAccess your pattern anytime
Bookmark this page to access your pattern anytime