Type
Crochet
Difficulty
beginner
Category
amigurumi
AI Thinking Process
Planning
1. **Design Strategy**: Creating a Valentine's-themed gnome using simple amigurumi shapes. The gnome will feature:
- Sphere-based body (simplified, no legs)
- Cone-shaped heart-colored hat
- Simple sphere for nose
- Flat beard (can be textured or simple)
- Valentine's color scheme: pink, red, white, cream for beard
- Minimal embellishments suitable for beginners
2. **Construction Plan**:
- Bottom-up construction starting with body (sphere/oval shape)
- Hat worked separately as elongated cone, then attached
- Nose as small sphere sewn on
- Beard either crocheted flat piece or yarn loops attached directly
- All pieces worked in continuous rounds (amigurumi style)
- Simple assembly with minimal sewing required
3. **Quality Assurance**:
- Clear stitch counts in every round to prevent confusion
- Stuffing reminders at appropriate points
- Color change instructions clearly marked
- Assembly order specified to avoid mistakes
- Invisible decrease technique emphasized for smooth finish
- Stitch marker placement noted
4. **Final Calculations**:
- Worsted weight yarn with 3.5mm (E) hook
- Body: increase to 24 sts for approximately 3" width
- Hat: 7-8" long cone
- Nose: tiny sphere with 12 st maximum
- Final gnome height: approximately 5-6 inches
- Gauge: Not critical for toys, but approximately 5 sc = 1"
Verification
[PRE-FLIGHT CHECKS]
1. **Completeness**:
- ✓ Materials list with yarn colors specified
- ✓ Abbreviations section
- ✓ Pattern notes for beginners
- ✓ Individual component instructions (body, hat, nose, beard)
- ✓ Assembly instructions
- ✓ Optional embellishments
2. **Consistency**:
- ✓ Body sphere: 6→12→18→24, then even rounds, then decrease mirror
- ✓ Hat cone: gradual increases with even rounds between
- ✓ Nose sphere: 6→12 maximum for proportion
- ✓ All stitch counts verified in brackets
3. **Constraints**:
- ✓ Beginner-friendly: only sc, inc, dec stitches
- ✓ Valentine's theme: pink/red hat, heart embellishments
- ✓ Worsted weight specified
- ✓ US terminology throughout
4. **Safety**:
- ✓ All increase/decrease math verified
- ✓ Stuffing reminders placed appropriately
- ✓ Warning about safety eyes if making for children
- ✓ Clear fastening off instructions
Pattern
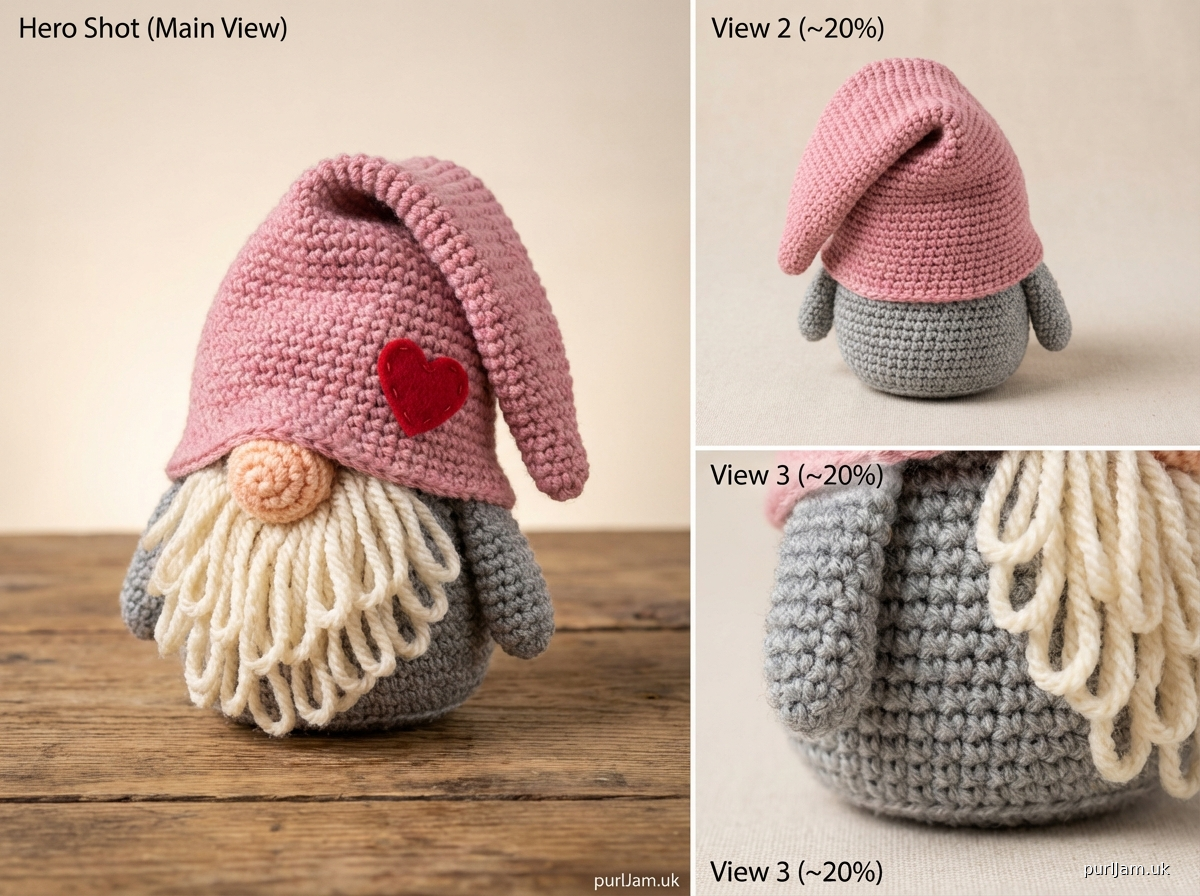
# Valentine's Gnome Crochet Pattern

**Designed for beginner crocheters | Finished size: Approximately 5-6 inches tall**

## MATERIALS

**Yarn:** Worsted weight (4) acrylic or cotton blend
- Color A (Pink or Red): 50-60 yards for hat
- Color B (Gray or Tan): 30-40 yards for body
- Color C (Cream or White): 15-20 yards for beard
- Small amount of Peach or Pink for nose

**Suggested yarns:** Red Heart Super Saver, Lion Brand Vanna's Choice, Caron Simply Soft

**Hook:** US E-4 (3.5mm) or size needed for tight fabric

**Other supplies:**
- Fiberfill stuffing (polyester)
- Yarn needle for weaving and assembly
- Stitch marker
- Small piece of white or pink felt for heart (optional)
- Fabric glue or needle and thread for felt (optional)
- Scissors

**Gauge:** Not critical for this project, but approximately 5 sc and 5 rows = 1 inch. The most important thing is to crochet tightly enough that stuffing doesn't show through.

## ABBREVIATIONS
- ch = chain
- sc = single crochet
- inc = increase (2 sc in same stitch)
- dec = invisible decrease (insert hook in front loops of next 2 sts, yarn over, pull through both loops, yarn over, pull through 2 loops on hook)
- st(s) = stitch(es)
- rnd(s) = round(s)
- [ ] = stitch count at end of round

## PATTERN NOTES

- This pattern is worked in continuous rounds (spiral). Use a stitch marker to track the beginning of each round.
- Do not join or turn unless instructed.
- Crochet tightly to prevent stuffing from showing through.
- The invisible decrease creates a smoother finish than a standard sc2tog.
- Stuff pieces firmly but not overstuffed—you want them plump but not lumpy.
- All pieces are worked separately, then assembled.

## INSTRUCTIONS

### BODY

Using Color B (gray or tan):

**Rnd 1:** 6 sc in magic ring [6]

**Rnd 2:** inc in each st around [12]
*Stitch count check: 6 increases = 12 sts*

**Rnd 3:** (sc, inc) around [18]
*Stitch count check: 6 inc + 6 sc = 18 sts*

**Rnd 4:** (2 sc, inc) around [24]
*Stitch count check: 8 repeats of 3 sts = 24 sts*

**Rnds 5-10:** sc in each st around [24]
*Work 6 rounds even*

**Rnd 11:** (2 sc, dec) around [18]
*Stitch count check: 8 decreases, 24 - 6 = 18 sts*

Begin stuffing the body firmly with fiberfill.

**Rnd 12:** (sc, dec) around [12]
*Stitch count check: 6 decreases, 18 - 6 = 12 sts*

Continue stuffing, adding more fiberfill as needed.

**Rnd 13:** dec around [6]
*Stitch count check: 6 decreases, 12 - 6 = 6 sts*

Fasten off, leaving a long tail. Thread yarn needle with tail and weave through remaining 6 sts. Pull tight to close hole. Weave in end securely.

---

### HAT

Using Color A (pink or red):

**Rnd 1:** 4 sc in magic ring [4]

**Rnd 2:** (sc, inc) around [6]
*Stitch count check: 2 inc + 2 sc = 6 sts*

**Rnd 3:** sc in each st around [6]

**Rnd 4:** (2 sc, inc) around [8]
*Stitch count check: 2 inc + 4 sc = 8 sts*

**Rnd 5:** sc in each st around [8]

**Rnd 6:** (3 sc, inc) around [10]
*Stitch count check: 2 inc + 6 sc = 10 sts*

**Rnd 7:** sc in each st around [10]

**Rnd 8:** (4 sc, inc) around [12]
*Stitch count check: 2 inc + 8 sc = 12 sts*

**Rnd 9:** sc in each st around [12]

**Rnd 10:** (5 sc, inc) around [14]
*Stitch count check: 2 inc + 10 sc = 14 sts*

**Rnd 11:** sc in each st around [14]

**Rnd 12:** (6 sc, inc) around [16]
*Stitch count check: 2 inc + 12 sc = 16 sts*

**Rnds 13-14:** sc in each st around [16]
*Work 2 rounds even*

**Rnd 15:** (7 sc, inc) around [18]
*Stitch count check: 2 inc + 14 sc = 18 sts*

**Rnds 16-18:** sc in each st around [18]
*Work 3 rounds even*

Fasten off, leaving a long tail for sewing. Lightly stuff the tip of the hat with a small amount of fiberfill—just enough to give it shape without making it stiff. The hat should flop over naturally.

---

### NOSE

Using Peach or Pink yarn:

**Rnd 1:** 6 sc in magic ring [6]

**Rnd 2:** inc in each st around [12]
*Stitch count check: 6 increases = 12 sts*

**Rnd 3:** sc in each st around [12]

Fasten off, leaving a long tail. Stuff very lightly with a tiny amount of fiberfill (you want a small, round button nose). The opening will close naturally when you sew it onto the body.

---

### BEARD

**Option 1: Simple Yarn Loop Beard (Easiest for beginners)**

Cut approximately 15-20 strands of Color C (cream or white) yarn, each about 3-4 inches long. You'll attach these directly to the body during assembly to create a fluffy beard.

**Option 2: Crocheted Flat Beard**

Using Color C (cream or white):

**Row 1:** Ch 10, sc in 2nd ch from hook and in each ch across [9 sc], turn

**Row 2:** Ch 1, sc in each st across [9], turn

**Row 3:** Ch 1, sc in each st across [9]

Fasten off, leaving a long tail for sewing.

---

## ASSEMBLY

**Step 1: Attach Hat to Body**
- Position the hat opening on top of the body, slightly toward the back.
- Using the long tail from the hat and your yarn needle, whip stitch around the edge of the hat opening to secure it to the body.
- The hat should flop forward naturally.

**Step 2: Attach Nose**
- Position the nose on the front of the body, about 1/3 down from where the hat sits.
- Using the long tail from the nose, sew around the edges to secure it to the body.
- Make sure the stuffing stays inside as you sew.

**Step 3: Attach Beard**

*For Yarn Loop Beard:*
- Using your crochet hook, pull loops of yarn through stitches below the nose.
- Space them evenly across the lower front of the body.
- Pull each strand through, fold in half, and pull the ends through the loop to secure (like fringe).
- Trim to desired length—about 1-2 inches works well.
- You can make the beard fuller by adding more strands.

*For Crocheted Flat Beard:*
- Position the crocheted rectangle below the nose, centered on the body.
- Using the long tail, sew the top edge of the beard to the body.
- The beard should cover the lower portion of the front body.

**Step 4: Optional Heart Embellishment**
- Cut a small heart shape from white or pink felt (about 1 inch tall).
- Glue or sew the heart to the front of the hat.
- Alternatively, you can embroider a small heart using pink or red yarn and a yarn needle.

**Step 5: Finishing**
- Weave in all remaining yarn ends securely.
- Gently shape the hat so it flops to one side.
- Fluff the beard if using the yarn loop method.

---

## CUSTOMIZATION IDEAS

**Color Variations:**
- Classic Valentine's: Red hat with white beard
- Pink Love: Light pink hat with cream beard
- Romantic: Dark red hat with gray body and white beard

**Embellishments:**
- Add small ribbon bow to hat
- Sew on tiny buttons down the body
- Create multiple small felt hearts for hat decoration
- Use metallic yarn for sparkly hat
- Add "LOVE" or "XOXO" embroidered on body

**Size Adjustments:**
- **Smaller gnome (3-4 inches):** Stop body increases at Round 3 (18 sts), work fewer even rounds
- **Larger gnome (7-8 inches):** Add one more increase round to body (30 sts), work more even rounds, and add length to hat

---

## CARE INSTRUCTIONS

Hand wash in cool water with mild soap. Lay flat to dry, reshaping as needed. Do not machine wash or dry. Keep away from heat sources.

---

## TROUBLESHOOTING

**Problem:** Stuffing shows through stitches
- **Solution:** Use a smaller hook or crochet more tightly. You can also line the inside with fabric or use yarn that matches your stuffing color.

**Problem:** Hat won't stay upright/floppy
- **Solution:** This is normal! Gnome hats are meant to flop over. If you want it to stand up, insert a pipe cleaner through the center of the hat for structure.

**Problem:** Body is lumpy
- **Solution:** Stuff more gradually, adding small amounts of fiberfill at a time. Smooth the stuffing as you work.

**Problem:** Stitch count is off
- **Solution:** Go back to the last round where your count was correct. Use the stitch count checks provided to verify your work.

---

## SKILL LEVEL
**Beginner** - Requires knowledge of: magic ring, single crochet, increases, and decreases. Perfect for learning basic amigurumi techniques!

---

**Pattern Notes:**
- This pattern is designed for personal use and gift-giving.
- You may sell finished items made from this pattern in small quantities.
- Please credit the pattern designer.
- Do not reproduce, share, or sell this pattern itself.

**Questions?** Common beginner tips:
- Keep your tension consistent throughout
- Count your stitches at the end of each round
- Don't be afraid to pull out a round if something doesn't look right
- Your first amigurumi might not be perfect, and that's okay—each one gets better!

Happy crocheting! Your Valentine's gnome will bring smiles all February long! ❤️
Disclaimer: This pattern was generated by AI and should be reviewed for accuracy before use. While we strive for quality, AI-generated content may contain errors. Please verify measurements, stitch counts, and instructions before beginning your project. Generated by purlJam.uk
Access your pattern anytime
Bookmark this page to access your pattern anytime