Type
Knitting
Difficulty
beginner
Category
socks
AI Thinking Process
Planning
Verification
Pattern
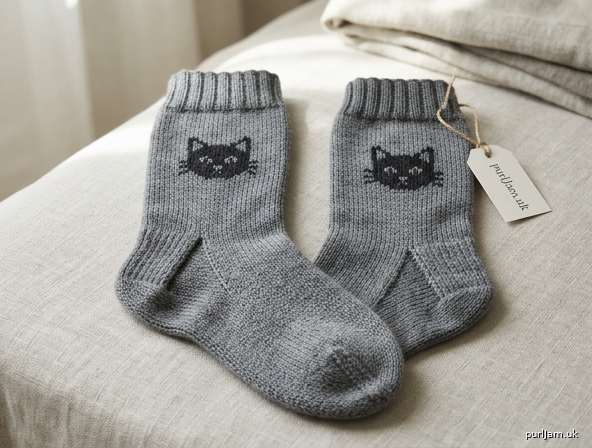
Vanilla Socks with Cat
Easy Cuff-Down Worsted Socks
A pair of cozy, beginner-friendly vanilla socks knit cuff-down with a traditional heel flap, plus a sweet little cat face worked in simple stranded colorwork on the leg. Perfect first colorwork project—only knits, two colors, and a tiny chart!
Make 2 identical socks.
Sizes
Small (Medium, Large) To fit foot circumference: 7–7.5 (8–8.5, 9–9.5)" / 18–19 (20.5–21.5, 23–24) cm Finished circumference (unstretched): 7.25 (8.75, 10)" / 18.5 (22, 25.5) cm (Negative ease is built in; socks stretch to fit.)
Yarn
Worsted weight yarn (approx. 200–220 yds / 183–201 m per 100 g)
- MC (main color): 180 (200, 220) yds / 165 (183, 201) m
- CC (cat color): 15 yds / 14 m contrasting color Sample uses solid MC + darker CC for the cat.
Needles
US 5 / 3.75 mm — DPNs (set of 5), or long circular for magic loop, or two circulars (or size needed to obtain gauge)
Gauge
22 sts and 30 rnds = 4" / 10 cm in stockinette stitch in the round, blocked Critical: Firm gauge prevents sagging and makes the cat crisp. Too loose = floppy socks that wear out fast.
Notions
Stitch markers, tapestry needle, scissors, optional row counter
Abbreviations (US)
CO = cast on
k = knit
p = purl
st(s) = stitch(es)
rnd(s) = round(s)
sl = slip purlwise with yarn in back
k2tog = knit 2 together
ssk = slip, slip, knit (left-leaning dec)
p2tog = purl 2 together
N1, N2, etc. = needle 1, needle 2
MC = main color
CC = contrasting color
RS = right side
WS = wrong side
St st = stockinette stitch
Notes for Beginners
- These socks are worked cuff-down. You can try them on as you go!
- DPN method: Distribute sts over 4 needles; 5th needle works. N1 & N2 = instep (top of foot); N3 & N4 = sole/heel.
- Magic loop: Divide sts in half (instep | sole).
- Cat motif uses stranded colorwork: carry the unused color loosely across the back. Keep floats under 1" and snug enough that sts don’t gape.
- Slip-stitch heel flap adds durability.
- All stitch counts given as Small (Medium, Large).
Cuff
With MC, CO 40 (48, 56) sts using a stretchy cast-on (long-tail or alternate cable).
Join to work in the rnd, being careful not to twist. Place marker for beginning of rnd.
Work k2, p2 ribbing for 2" / 5 cm. (40 (48, 56) sts remain ✓)
Leg
Knit all rnds (St st) for 1" / 2.5 cm.
Place Cat Chart (worked over center 16 sts of instep):
- On next rnd, k 2 (4, 6) MC, place marker, work 16-st Cat Chart with MC & CC, place marker, k to end of rnd in MC.
- Continue in St st, working Cat Chart between markers on every rnd until chart is complete (16 rnds).
- After chart, break CC. Continue with MC only in St st until leg measures 6" / 15 cm from CO edge (or desired length to ankle).
(Cat Chart is 16 sts wide × 16 rnds tall — see chart below. Center it on the front/instep half.)
Cat Chart (16 sts)
Read bottom to top, right to left on every rnd.
□ = MC
■ = CC
Rnd 16: □ □ □ □ □ ■ ■ ■ ■ □ □ □ □ □ □ □
Rnd 15: □ □ □ □ ■ ■ ■ ■ ■ ■ □ □ □ □ □ □
Rnd 14: □ □ □ ■ ■ □ □ □ □ ■ ■ □ □ □ □ □
Rnd 13: □ □ ■ ■ □ □ □ □ □ □ ■ ■ □ □ □ □
Rnd 12: □ □ ■ □ □ ■ □ □ ■ □ □ ■ □ □ □ □
Rnd 11: □ ■ ■ □ □ ■ □ □ ■ □ □ ■ ■ □ □ □
Rnd 10: □ ■ □ □ □ □ □ □ □ □ □ □ ■ □ □ □
Rnd  9: ■ ■ □ □ □ □ □ □ □ □ □ □ ■ ■ □ □
Rnd  8: ■ □ □ □ □ □ □ □ □ □ □ □ □ ■ □ □
Rnd  7: ■ □ □ □ □ □ □ □ □ □ □ □ □ ■ □ □
Rnd  6: ■ ■ □ □ □ □ ■ ■ □ □ □ □ ■ ■ □ □
Rnd  5: □ ■ ■ □ □ ■ ■ ■ ■ □ □ ■ ■ □ □ □
Rnd  4: □ □ ■ ■ ■ ■ □ □ ■ ■ ■ ■ □ □ □ □
Rnd  3: □ □ □ ■ ■ □ □ □ □ ■ ■ □ □ □ □ □
Rnd  2: □ □ □ □ □ □ □ □ □ □ □ □ □ □ □ □
Rnd  1: □ □ □ □ □ □ □ □ □ □ □ □ □ □ □ □
(Eyes are the two single ■ on Rnd 12; ears form on Rnds 14–16. Simple face—no mouth needed for beginner clarity.)
Heel Flap
Heel is worked back and forth on half the sts: 20 (24, 28) sts. Place remaining 20 (24, 28) sts (instep, including finished cat) on hold.
Row 1 (RS): *Sl 1, k1; rep from * to end.
Row 2 (WS): Sl 1, p to end.
Rep Rows 1–2 until heel flap measures approx. 2.25 (2.5, 2.75)" / 5.5 (6.5, 7) cm, ending after a WS row — about 20 (24, 28) rows total.
(20 (24, 28) heel sts ✓)
Heel Turn
Row 1 (RS): Sl 1, k11 (13, 15), ssk, k1, turn.
Row 2 (WS): Sl 1, p5, p2tog, p1, turn.
Row 3: Sl 1, k to 1 st before gap, ssk, k1, turn.
Row 4: Sl 1, p to 1 st before gap, p2tog, p1, turn.
Rep Rows 3–4 until all heel sts have been worked.
End with a RS row if needed so you are ready to pick up.
12 (14, 16) heel sts remain. ✓
Gusset
With RS facing and MC, pick up and knit 10 (12, 14) sts along left side of heel flap (1 st per slipped edge st).
Knit across held instep sts (20 (24, 28) sts).
Pick up and knit 10 (12, 14) sts along right side of heel flap.
Knit across remaining heel sts.
Total sts now: 52 (62, 72) sts.
Redistribute:
- Instep: 20 (24, 28) sts
- Sole: 32 (38, 44) sts
Place marker at start of sole if helpful. Beginning of rnd is now start of sole (or keep original BOR and adjust).
Gusset Decrease Rnds
Rnd 1: Knit.
Rnd 2: Sole: k1, ssk, k to 3 sts before end of sole, k2tog, k1; Instep: k all.
Rep Rnds 1–2 until 40 (48, 56) sts remain (20 (24, 28) sole + 20 (24, 28) instep). ✓
Foot
Work even in St st (knit every rnd) until foot measures 1.75 (2, 2.25)" / 4.5 (5, 5.5) cm less than desired total foot length.
(Try on the sock! Standard women’s Medium finished foot ≈ 9–9.5".)
Toe
Redistribute evenly if needed: 20 (24, 28) sts each on instep and sole.
Rnd 1 (dec):
Instep: k1, ssk, k to last 3 sts, k2tog, k1;
Sole: k1, ssk, k to last 3 sts, k2tog, k1.
(4 sts decreased)
Rnd 2: Knit.
Rep Rnds 1–2 until 20 (24, 28) sts remain.
Then rep Rnd 1 only until 16 (20, 24) sts remain. ✓
Finishing
Arrange sts so 8 (10, 12) instep sts face 8 (10, 12) sole sts.
Graft toe closed with Kitchener stitch:
- Setup: Insert tapestry needle purlwise into first front st, leave on. Insert knitwise into first back st, leave on.
- Front st: go knitwise, slip off; purlwise into next front, leave on.
- Back st: go purlwise, slip off; knitwise into next back, leave on.
- Rep 2–3 until all sts grafted. Weave in ends.
Weave in all ends securely on WS. Block lightly if desired (sock blockers or wet-block flat).
Make second sock to match.
Tips for Success
- Cat floats: Catch every 3–4 sts if a float feels long; keep tension even so fabric doesn’t pucker.
- If colorwork feels tight, go up half a needle size just for the chart section.
- Reinforce heel and toe later with duplicate stitch if you want extra durability.
- These make a great gift pair—add a tiny embroidered whisker with CC if you like!
Enjoy your cozy vanilla cat socks!
Disclaimer: This pattern was generated by AI and should be reviewed for accuracy before use. While we strive for quality, AI-generated content may contain errors. Please verify measurements, stitch counts, and instructions before beginning your project. Generated by purlJam.uk
Love this pattern?
Save this pattern to your free PurlJam libraryAccess your pattern anytime
Bookmark this page to access your pattern anytime