Type
Crochet
Difficulty
beginner
Category
amigurumi
AI Thinking Process
Planning
Verification
Pattern
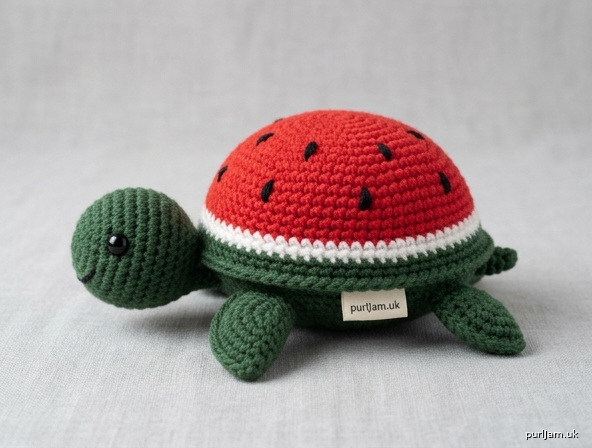
Watermelon Turtle Plushie
A squat little turtle whose shell is a slice of watermelon — red flesh, a thin white band, green rind, and embroidered seeds. Head, legs, and tail are classic turtle green. Worked from basic amigurumi shapes (dome, oval, sphere, tubes, and a tiny cone) with only single crochet, increases, and decreases. Perfect as a desk buddy or handmade gift.
Skill level: Beginner
Techniques used: Magic ring, single crochet in the round, increase, decrease, color change, stuffing, whip-stitch assembly, simple embroidery.
Finished Size
With worsted weight yarn and the stated gauge:
- Length (nose to tail): about 4½ inches (11.5 cm)
- Shell diameter: about 3 inches (7.5 cm)
- Height: about 2½ inches (6.5 cm)
Size will change if you use a different hook, yarn, or stuffing firmness.
Materials
Yarn — worsted weight (category 4), acrylic or cotton:
| Color | Role | Approx. amount |
|---|---|---|
| A Red or watermelon pink | Shell flesh | 25 yd (23 m) |
| B White | Rind inner band | 5 yd (5 m) |
| C Dark green | Shell rind, head, legs, tail | 40 yd (37 m) |
| D Light / mint green | Belly | 15 yd (14 m) |
| E Black | Seeds and face | 3 yd (3 m) |
A leftover of pink (Color A or a scrap) is optional for cheek blush.
Hook: US E-4 (3.5 mm). If your fabric is loose and stuffing shows, drop to US D-3 (3.25 mm).
Notions:
- Polyester fiberfill stuffing
- Yarn needle
- Stitch marker
- Scissors
- 6 mm safety eyes (1 pair) — or extra black yarn to embroider eyes
- Straight pins for assembly
Safety note: Safety eyes are a choking hazard. If this plushie is for a child under 3 years, embroider the eyes instead and stitch all parts on very firmly.
Gauge
5 sc and 5 rnds = 1 inch (2.5 cm) in single crochet, worked tightly in the round.
Gauge is not critical for a stuffed toy, but the fabric must be dense enough that stuffing cannot peek through. If you see gaps, go down a hook size.
Abbreviations (US terms)
- ch — chain
- sc — single crochet
- inc — increase (2 sc in the same stitch)
- dec — decrease (invisible sc2tog: insert hook through front loops of next 2 sts, yarn over, pull through both loops, yarn over, pull through 2)
- sl st — slip stitch
- st(s) — stitch(es)
- rnd(s) — round(s)
- MR — magic ring
- FO — fasten off
- RS — right side
- ( ) around — repeat the instructions in parentheses for the whole round
- [ ] — stitch count at the end of the round
Pattern Notes
- Use US crochet terms throughout.
- All pieces are worked in a continuous spiral (do not join or chain at the end of a round). Mark the first stitch of every round and move the marker up as you go.
- Work tightly. Amigurumi looks clean only when the stitches sit close together.
- Stuff as instructed. It is much harder to stuff later.
- Invisible decrease gives a smoother surface; a regular sc2tog is fine if you prefer it.
- Magic ring alternative: ch 2, work the Rnd 1 stitches into the 2nd ch from the hook, then pull the tail to close the hole.
- Color change: On the last yarn-over of the last stitch of the old color, pull through the new color. Drop the old color and continue. Weave in the cut tail on the wrong side.
- Pin every piece before sewing. A few extra minutes of pinning saves a lopsided turtle.
Shell
Worked as a dome, left open at the bottom.
With A (red):
Rnd 1: 6 sc in MR. [6]
Rnd 2: inc in each st around. [12] (6 increases → 6 + 6 = 12 ✓)
Rnd 3: (sc, inc) around. [18] (6 increases → 12 + 6 = 18 ✓)
Rnd 4: (2 sc, inc) around. [24] (6 increases → 18 + 6 = 24 ✓)
Rnd 5: (3 sc, inc) around. [30] (6 increases → 24 + 6 = 30 ✓)
Rnd 6: (4 sc, inc) around. [36] (6 increases → 30 + 6 = 36 ✓)
Rnd 7: (5 sc, inc) around. [42] (6 increases → 36 + 6 = 42 ✓)
Rnd 8: (6 sc, inc) around. [48] (6 increases → 42 + 6 = 48 ✓)
Rnd 9: sc around. [48]
Change to B (white).
Rnd 10: sc around. [48]
Change to C (dark green).
Rnds 11–14: sc around. [48] (4 rounds even ✓)
FO, leaving a 24 inch (61 cm) tail for sewing.
The red dome is the watermelon flesh, the white round is the inner rind, and the green rounds are the outer rind hanging down as the shell sides.
Belly
Worked as a flat oval. The right side is the underside of the turtle (what you see when you flip it over).
With D (light green):
Ch 7.
Rnd 1: 2 sc in 2nd ch from hook, sc in next 4 ch, 3 sc in last ch; rotate and work along the opposite side of the chain: sc in next 4 ch, sc in the same ch as the beginning 2-sc. [14] (2 + 4 + 3 + 4 + 1 = 14 ✓)
Rnd 2: inc in next 2 sts, sc in next 4 sts, inc in next 3 sts, sc in next 4 sts, inc in last st. [20] (6 increases → 14 + 6 = 20 ✓)
Rnd 3: (sc, inc) twice, sc in next 4 sts, (sc, inc) 3 times, sc in next 4 sts, sc, inc. [26] (6 increases → 20 + 6 = 26 ✓)
Rnd 4: (2 sc, inc) twice, sc in next 4 sts, (2 sc, inc) 3 times, sc in next 4 sts, 2 sc, inc. [32] (6 increases → 26 + 6 = 32 ✓)
Rnd 5: (3 sc, inc) twice, sc in next 4 sts, (3 sc, inc) 3 times, sc in next 4 sts, 3 sc, inc. [38] (6 increases → 32 + 6 = 38 ✓)
Rnd 6: (4 sc, inc) twice, sc in next 4 sts, (4 sc, inc) 3 times, sc in next 4 sts, 4 sc, inc. [44] (6 increases → 38 + 6 = 44 ✓)
FO, leaving a 6 inch (15 cm) tail to weave in (the shell tail will do the joining).
The belly (44 sts) is slightly smaller than the shell opening (48 sts) so the shell sits over it like a real turtle’s carapace.
Head
With C (dark green):
Rnd 1: 6 sc in MR. [6]
Rnd 2: inc in each st around. [12] (6 increases → 6 + 6 = 12 ✓)
Rnd 3: (sc, inc) around. [18] (6 increases → 12 + 6 = 18 ✓)
Rnd 4: (2 sc, inc) around. [24] (6 increases → 18 + 6 = 24 ✓)
Rnds 5–7: sc around. [24] (3 rounds even ✓)
Place eyes now. Insert 6 mm safety eyes between Rnds 5 and 6, 4 stitches apart, centered on what will be the face. If you are embroidering eyes instead, skip this and wait until after stuffing.
Rnd 8: (2 sc, dec) around. [18] (6 decreases → 24 − 6 = 18 ✓)
Stuff the head firmly, filling the cheeks so the face is round.
Rnd 9: (sc, dec) around. [12] (6 decreases → 18 − 6 = 12 ✓)
Add a little more stuffing.
Rnd 10: dec around. [6] (6 decreases → 12 − 6 = 6 ✓)
FO. Thread the tail through the front loops of the remaining 6 sts and pull closed. Weave in.
Legs (make 4)
With C (dark green):
Rnd 1: 6 sc in MR. [6]
Rnd 2: inc in each st around. [12] (6 increases → 6 + 6 = 12 ✓)
Rnds 3–6: sc around. [12] (4 rounds even ✓)
FO, leaving a 10 inch (25 cm) tail for sewing. Stuff each leg lightly — firm at the closed end (the foot), softer at the open end so it flattens against the body.
Tail
With C (dark green):
Rnd 1: 4 sc in MR. [4]
Rnd 2: (sc, inc) around. [6] (2 increases → 4 + 2 = 6 ✓)
Rnd 3: sc around. [6]
Rnd 4: (2 sc, inc) around. [8] (2 increases → 6 + 2 = 8 ✓)
Rnd 5: sc around. [8]
FO, leaving an 8 inch (20 cm) tail for sewing. Stuff lightly.
Details
Do these before you sew the shell on — embroidery is easier on an unattached piece.
Watermelon seeds (shell).
With E (black) and a yarn needle, embroider 8 to 10 small seeds on the red dome. Scatter them so they are not in a grid: a few near the center, more toward the white band, none on the green rind. Each seed is a short teardrop — two or three satin stitches (or one small V) about ¼ inch (6 mm) long, pointing toward the center of the shell. Weave in ends on the wrong side.
Face (head).
- If you did not use safety eyes, embroider two small oval eyes with E (black) between Rnds 5 and 6, 4 stitches apart.
- Smile: one shallow curved backstitch in black, 2 rnds below the eyes and about 3 sts wide.
- Optional blush: two tiny straight stitches in leftover red or pink, just below and outside each eye.
Optional rind stripes.
With D (light green), surface-slip-stitch 4 or 5 gentle curves down the dark green sides of the shell (Rnds 11–14), like the stripes on a watermelon rind. Skip this if you are new to surface crochet — the turtle reads as a watermelon without it.
Assembly
Use whip stitch and matching yarn unless noted. Pin everything first, then sew. The turtle sits on its belly; the shell is the “lid.”
1. Arrange the belly.
Place the Belly with the right side facing down (this side will show on the underside of the finished turtle). The oval has two narrow ends: one is the front (head), one is the back (tail).
2. Sew on the head.
Set the Head on the front narrow end so about half of it sits on the belly and half hangs off the front. The face looks forward, eyes level. Sew the underside of the head to the belly with dark green, taking stitches only through the back of the head so they do not show on the face. The top of the head will be covered later by the shell brim.
3. Sew on the tail.
Sew the open end of the Tail to the back narrow end of the belly, centered, so it points straight back.
4. Sew on the legs.
- Front legs: one on each long side, just behind the head, angled slightly forward.
- Back legs: one on each long side, just in front of the tail, angled slightly back.
Flatten each open leg end into an oval as you sew so the feet look like little turtle paddles, not tubes. Stitch the open edges securely to the belly, about ¼ inch (6 mm) in from the belly edge. Leave a small gap between front and back legs on each side.
5. Attach the shell.
Turn the turtle right way up. Set the Shell over the belly, red dome on top, green brim down. The shell should overlap the belly all around and cover the tops of the head, legs, and tail joins — the limbs peek out from under the brim.
Pin at 4 points (front, back, left, right), then add more pins. The shell has 48 sts and the belly has 44 sts: ease the extra 4 shell stitches evenly around the oval (one eased stitch roughly every quarter of the way around). (48 − 44 = 4 eased stitches ✓)
With the long green tail from the shell, whip stitch the green brim to the edge of the belly all the way around, catching the bases of the head, legs, and tail in the seam as you pass them so they cannot pull out.
Stop 2 inches (5 cm) before the end of the seam. Stuff the body firmly through the gap — more in the center, a little less toward the brim so the shell keeps a gentle dome. Do not overstuff or the white band will stretch. Close the remaining seam. Weave in the end.
6. Shape.
Roll the shell in your hands so the dome is even. Tug the head, legs, and tail into place. The turtle should sit flat on its four feet and belly.
Finishing
Weave in every remaining tail. If a stitch of red or white peeks at a color-change round, tug it to the wrong side with the needle.
Give the seeds a last look — add one more if a patch of red looks empty.
Your watermelon turtle is ready. It is a decorative plush; if it will be loved by a small child, skip safety eyes, embroider every feature, and check that all sewn parts are rock-solid.
Stitch-count summary (for checking as you go)
| Piece | Start | Widest | End |
|---|---|---|---|
| Shell | 6 | 48 | 48 (open) |
| Belly | 14 | 44 | 44 (open) |
| Head | 6 | 24 | 6 (closed) |
| Each leg | 6 | 12 | 12 (open) |
| Tail | 4 | 8 | 8 (open) |
Disclaimer: This pattern was generated by AI and should be reviewed for accuracy before use. While we strive for quality, AI-generated content may contain errors. Please verify measurements, stitch counts, charts, and instructions before beginning your project. Generated by purlJam.uk
Love this pattern?
Save this pattern to your free PurlJam libraryAccess your pattern anytime
Bookmark this page to access your pattern anytime