Type
Crochet
Difficulty
intermediate
Category
amigurumi
AI Thinking Process
Planning
Verification
Pattern
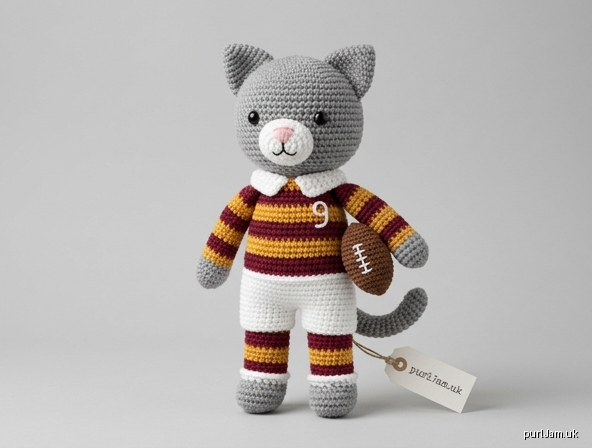
"Westie" the Rugby Cat – Amigurumi Crochet Pattern
Skill level: Intermediate Finished size: approx. 22 cm (8¾ in) tall when standing
Materials
Yarn: Worsted / aran-weight cotton or acrylic (approx. 4 mm yarn).
| Colour | Use | Approx. amount |
|---|---|---|
| MC – Grey (or your choice of cat colour) | Head, ears, paws, tail | 40 g |
| A – Maroon | Shirt hoops, sock hoops | 20 g |
| B – Old gold | Shirt hoops, sock hoops | 15 g |
| C – White | Shorts, muzzle, collar, sock tops | 15 g |
| D – Brown (optional) | Rugby ball | 5 g |
| Scraps of pink and black | Nose and mouth | – |
Kit colours: Westcliff RFC (Westcliff-on-Sea) kit is shown here in maroon and old gold hoops with white shorts. Kits change between seasons, so check the club's current strip and swap colours A, B and C as needed.
Other materials:
- 4 mm crochet hook (US G/6). Use 3.5 mm if your stitches show gaps.
- One pair of 10 mm safety eyes
- Toy stuffing
- Stitch marker
- Tapestry needle
Tension
10 dc × 11 rnds = 5 cm (2 in) square, worked in the round with a 4 mm hook. Tension is not critical, but your fabric should be tight enough that stuffing does not show through.
Abbreviations (UK terms)
| Abbreviation | Meaning |
|---|---|
| MR | Magic ring |
| ch | Chain |
| dc | Double crochet (US single crochet) |
| inc | 2 dc in the same stitch |
| dec | Invisible dc2tog: insert hook in the front loops only of the next 2 sts, yo, pull through both loops, yo, pull through 2 |
| sl st | Slip stitch |
| BLO | Back loop only |
| st(s) | Stitch(es) |
| rnd(s) | Round(s) |
| ( ) × n | Repeat the sequence in brackets n times |
| [n] | Stitch count at the end of the round |
Notes
- Work in continuous spirals. Do not join rounds. Move the stitch marker up at the start of each round.
- Colour changes: Work the last stitch of the old colour until 2 loops remain on the hook. Pull the new colour through to complete the stitch. Carry unused colours loosely inside the piece, or cut and tie off.
- Safety: For children under 3, embroider the eyes with black yarn instead of using safety eyes.
Head (MC)
| Rnd | Instructions | Count |
|---|---|---|
| 1 | 6 dc in MR | [6] |
| 2 | inc ×6 (6 + 6 = 12 ✓) | [12] |
| 3 | (dc, inc) ×6 | [18] |
| 4 | (2 dc, inc) ×6 | [24] |
| 5 | (3 dc, inc) ×6 | [30] |
| 6 | (4 dc, inc) ×6 | [36] |
| 7 | (5 dc, inc) ×6 (36 + 6 = 42 ✓) | [42] |
| 8–16 | dc in each st (9 rnds) | [42] |
| 17 | (5 dc, dec) ×6 | [36] |
| 18 | (4 dc, dec) ×6 | [30] |
Eyes: Insert the safety eyes between Rnds 12 and 13, with 7 sts between them. Fasten the backs securely.
Muzzle: Make the muzzle now (see below) so you can check its placement before you close the head.
| Rnd | Instructions | Count |
|---|---|---|
| 19 | (3 dc, dec) ×6 | [24] |
| 20 | (2 dc, dec) ×6 | [18] |
Stuff the head firmly.
| Rnd | Instructions | Count |
|---|---|---|
| 21 | (dc, dec) ×6 | [12] |
| 22 | dec ×6 | [6] |
Fasten off. Weave the tail through the front loops of the last round, pull tight to close, and weave in the end. This closed end is the base of the head.
Muzzle (C)
| Rnd | Instructions | Count |
|---|---|---|
| 1 | 6 dc in MR | [6] |
| 2 | inc ×6 | [12] |
| 3 | (dc, inc) ×6 | [18] |
| 4 | dc in each st | [18] |
Fasten off, leaving a long tail for sewing. Sew the muzzle centred below the eyes, covering Rnds 13–18. Stuff it lightly before closing the seam.
Embroider a pink triangle nose at the top of the muzzle. Add a black "Y"-shaped mouth below it.
Ears (make 2, MC)
| Rnd | Instructions | Count |
|---|---|---|
| 1 | 4 dc in MR | [4] |
| 2 | (inc, dc) ×2 | [6] |
| 3 | (dc, inc) ×3 | [9] |
| 4 | (2 dc, inc) ×3 | [12] |
| 5 | dc in each st | [12] |
Fasten off, leaving a long tail. Flatten the ear; do not stuff it.
Body (starts in C – shorts)
| Rnd | Colour | Instructions | Count |
|---|---|---|---|
| 1 | C | 6 dc in MR | [6] |
| 2 | C | inc ×6 | [12] |
| 3 | C | (dc, inc) ×6 | [18] |
| 4 | C | (2 dc, inc) ×6 | [24] |
| 5 | C | (3 dc, inc) ×6 | [30] |
| 6 | C | (4 dc, inc) ×6 | [36] |
| 7–10 | C | dc in each st (4 rnds) | [36] |
| 11–12 | A | dc in each st | [36] |
| 13–14 | B | dc in each st | [36] |
| 15–16 | A | dc in each st | [36] |
| 17 | B | (4 dc, dec) ×6 (36 − 6 = 30 ✓) | [30] |
| 18 | B | dc in each st | [30] |
| 19 | A | dc in each st | [30] |
| 20 | A | (3 dc, dec) ×6 | [24] |
| 21–22 | B | dc in each st | [24] |
| 23 | A | (2 dc, dec) ×6 | [18] |
| 24 | A | dc in each st | [18] |
| 25 | C | BLO: dc in each st (forms the collar base) | [18] |
Sl st to the next st and fasten off, leaving a long tail. Stuff the body firmly, packing the neck tightly.
Collar: Join C to a front loop left over from Rnd 25 at the centre front. Work (ch 3, sl st in the next front loop) all round. This makes a folded rugby collar. Fasten off.
Legs (make 2)
| Rnd | Colour | Instructions | Count |
|---|---|---|---|
| 1 | MC | 6 dc in MR | [6] |
| 2 | MC | inc ×6 | [12] |
| 3–4 | MC | dc in each st (paw) | [12] |
| 5–6 | A | dc in each st | [12] |
| 7–8 | B | dc in each st | [12] |
| 9 | C | dc in each st (sock turnover) | [12] |
| 10–12 | C | dc in each st (shorts leg) | [12] |
Stuff firmly. Flatten the opening and work 6 dc through both layers to close (12 ÷ 2 = 6 ✓). Fasten off, leaving a tail for sewing.
Arms (make 2)
| Rnd | Colour | Instructions | Count |
|---|---|---|---|
| 1 | MC | 6 dc in MR | [6] |
| 2 | MC | inc ×4, dc ×2 (8 + 2 = 10 ✓) | [10] |
| 3–5 | MC | dc in each st (paw) | [10] |
| 6–7 | A | dc in each st | [10] |
| 8–9 | B | dc in each st | [10] |
| 10–11 | A | dc in each st | [10] |
| 12–13 | B | dc in each st | [10] |
| 14 | A | dc in each st | [10] |
Stuff the paw end only, lightly. Flatten the opening and close with 5 dc through both layers. Fasten off, leaving a tail.
Tail (MC)
| Rnd | Instructions | Count |
|---|---|---|
| 1 | 6 dc in MR | [6] |
| 2–20 | dc in each st (19 rnds) | [6] |
Do not stuff. Fasten off, leaving a tail.
Rugby Ball (optional, D)
| Rnd | Instructions | Count |
|---|---|---|
| 1 | 6 dc in MR | [6] |
| 2 | inc ×6 | [12] |
| 3 | (dc, inc) ×6 | [18] |
| 4–7 | dc in each st (4 rnds) | [18] |
| 8 | (dc, dec) ×6 | [12] |
Stuff firmly.
| Rnd | Instructions | Count |
|---|---|---|
| 9 | dec ×6 | [6] |
Close the opening as for the head. Embroider white laces along one side.
Assembly
- Ears: Sew the ears to the top of the head between Rnds 5 and 9, about 8 sts apart.
- Head: Place the closed base of the head centrally over the body's neck opening (Rnd 25). Whip-stitch all 18 sts to the head, adding stuffing before you close the seam.
- Arms: Sew the flat tops of the arms to the sides of the body at Rnd 22, just below the collar.
- Legs: Sew the flat tops of the legs to the underside of the body at Rnds 3–5, about 2 sts apart. Check that the cat stands evenly.
- Tail: Sew the tail to the centre back of the shorts at Rnd 8. Curve it up and tack it in place with a stitch.
- Shirt number (optional): Use C to backstitch a number (e.g. "9") on the back of the shirt across Rnds 13–19.
- Ball (optional): Tack the ball under one arm.
- Finish: Weave in all ends securely.
Enjoy your Westcliff rugby cat – ready for match day!
Disclaimer: This pattern was generated by AI and should be reviewed for accuracy before use. While we strive for quality, AI-generated content may contain errors. Please verify measurements, stitch counts, charts, and instructions before beginning your project. Generated by purlJam.uk
Love this pattern?
Save this pattern to your free PurlJam libraryAccess your pattern anytime
Bookmark this page to access your pattern anytime