Type
Knitting
Difficulty
intermediate
Category
amigurumi
AI Thinking Process
Planning
Verification
Pattern
Willow
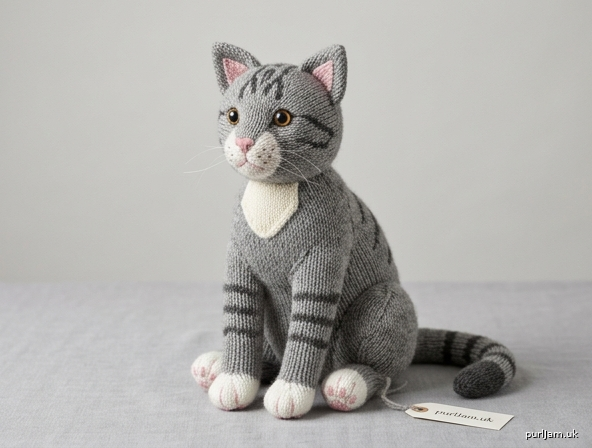
A Realistic Sitting Cat
Skill level: Intermediate
Construction: Knitted amigurumi in the round (DPNs or Magic Loop), stockinette throughout. Pieces are stuffed as you go and seamed with mattress stitch.
A small sitting cat with a tapered muzzle, pointed ears, folded hindquarters, and a long curving tail. Finished toy sits about 8½" (21.5 cm) tall and about 4" (10 cm) wide at the haunches, with an 8½" (21.5 cm) tail.
Materials
Yarn (worsted weight; wool or wool-blend recommended for a light halo after brushing)
- MC (body, head, legs, tail, outer ears): 180 yd / 165 m (about 90 g). One 100 g skein is sufficient.
- CC1 Pink (inner ears, nose, paw pads): 20 yd / 18 m
- CC2 White or cream (optional muzzle, chest bib, paws): 40 yd / 37 m
Suggested realistic colorways
- Gray tabby: heathered gray MC, charcoal embroidery for forehead “M” and tail rings, CC1 pink.
- Ginger: heathered orange MC, cream CC2 muzzle/bib, CC1 pink.
- Tuxedo: black MC, white CC2 muzzle, bib, and paws, CC1 pink.
- Siamese: cream MC; dark brown for ears, muzzle, lower legs, and tail.
Needles
- US 5 / 3.75 mm DPNs (set of 5) or a 32" (80 cm) circular needle for Magic Loop
- Use a needle 1–2 sizes smaller than the yarn label if your fabric is not dense enough to hide stuffing.
Notions
- Stitch marker
- Polyester fiberfill: about 3½ oz (100 g)
- 10 mm safety eyes in amber, green, or yellow or black embroidery floss for embroidered almond eyes
- Embroidery floss: pink, black or dark brown
- Tapestry needle
- Scissors
- Optional: clear nylon fishing line or waxed cotton for whiskers (six 3" / 7.5 cm lengths)
- Optional: pet slicker brush (wool yarns only)
Gauge
22 sts and 30 rnds = 4" (10 cm) in stockinette stitch in the round, unblocked.
Tight, even fabric matters more than matching this number exactly. If you can see gaps between stitches, go down a needle size. A slightly larger or smaller cat is fine; a loose fabric that shows stuffing is not.
Abbreviations (US)
BO — bind off
CC — contrast color
CO — cast on
DPNs — double-pointed needles
k — knit
k2tog — knit 2 together (right-leaning decrease)
kfb — knit into front and back of the same stitch (1 stitch increased)
MC — main color
p — purl
rnd(s) — round(s)
ssk — slip, slip, knit (left-leaning decrease)
st(s) — stitch(es)
St st — stockinette stitch (knit every round in the round; knit RS / purl WS when flat)
Pattern Notes
- All pieces except the optional bib are worked in the round in stockinette (knit every round).
- Join to work in the round being careful not to twist. Place a marker for the beginning of the round.
- Closed starts (head, body): CO 6 sts using a knitted cast-on, join, and pull the tail snug after Round 2 to close the hole. An Emily Ocker circular cast-on also works.
- Stuff in small pinches as you go. Pack the muzzle, cheeks, and haunches firmly; keep the tail and lower legs only lightly stuffed so they stay flexible.
- Safety eyes go in before the head opening is too small to reach. If you prefer embroidered eyes (more almond-shaped, more realistic), stuff the head fully, close the neck, then embroider.
- Do not weave ends along the outside. Dive them into the stuffing and trim.
Head
Worked from muzzle to neck. With CC2 (white muzzle) or MC if working a solid cat, CO 6 sts. Join to work in the round.
Rnd 1: Knit. (6 sts)
Rnd 2: [kfb] 6 times. (6 increases → 6 + 6 = 12 sts ✓)
Rnd 3: [k1, kfb] 6 times. (6 increases → 12 + 6 = 18 sts ✓)
Rnds 4–6: Knit. (18 sts)
If you started with CC2, switch to MC here.
Rnd 7: [k2, kfb] 6 times. (6 increases → 18 + 6 = 24 sts ✓)
Rnd 8: Knit. (24 sts)
Rnd 9: [k3, kfb] 6 times. (6 increases → 24 + 6 = 30 sts ✓)
Rnd 10: Knit. (30 sts)
Rnd 11: [k4, kfb] 6 times. (6 increases → 30 + 6 = 36 sts ✓)
Rnd 12: Knit. (36 sts)
Rnd 13: [k5, kfb] 6 times. (6 increases → 36 + 6 = 42 sts ✓)
Rnds 14–23: Knit. (42 sts; 10 rounds even)
Eye placement: Insert 10 mm safety eyes now, between Rounds 11 and 13, 6 sts apart, sitting on the sides of the muzzle rather than on top of the head. For a cat expression, angle them very slightly inward (inner corners a touch lower than outer corners). Do not fasten the washers until you are happy with the stare.
Rnd 24: [k5, k2tog] 6 times. (6 decreases → 42 − 6 = 36 sts ✓)
Rnd 25: Knit. (36 sts)
Rnd 26: [k4, k2tog] 6 times. (6 decreases → 36 − 6 = 30 sts ✓)
Rnd 27: Knit. (30 sts)
Stuff the muzzle and cheeks firmly, then fill the skull. Add a pinch extra in each cheek so the face is wedge-shaped, not round.
Rnd 28: [k3, k2tog] 6 times. (6 decreases → 30 − 6 = 24 sts ✓)
Rnds 29–31: Knit. (24 sts)
Bind off. Leave an 18" (45 cm) tail for seaming to the body. Finish stuffing through the neck so the head is firm and the muzzle stays pointed.
Ears (make 2)
With MC, CO 16 sts. Join to work in the round.
Rnds 1–3: Knit. (16 sts)
Rnd 4: [k6, k2tog] 2 times. (2 decreases → 16 − 2 = 14 sts ✓)
Rnd 5: Knit. (14 sts)
Rnd 6: [k5, k2tog] 2 times. (2 decreases → 14 − 2 = 12 sts ✓)
Rnd 7: Knit. (12 sts)
Rnd 8: [k4, k2tog] 2 times. (2 decreases → 12 − 2 = 10 sts ✓)
Rnd 9: Knit. (10 sts)
Rnd 10: [k3, k2tog] 2 times. (2 decreases → 10 − 2 = 8 sts ✓)
Rnd 11: Knit. (8 sts)
Rnd 12: [k2, k2tog] 2 times. (2 decreases → 8 − 2 = 6 sts ✓)
Rnd 13: [k1, k2tog] 2 times. (2 decreases → 6 − 2 = 4 sts ✓)
Rnd 14: [k2tog] 2 times. (2 decreases → 4 − 2 = 2 sts ✓)
Break yarn, thread through remaining 2 sts, and pull closed. Do not stuff — empty ears fold into a realistic point. Flatten each ear so the decrease lines run along the two side edges.
With CC1, satin-stitch a triangle on the inner face of each ear, leaving a MC border of about 1 st all around.
Body
Worked from the closed base up to the neck. With MC, CO 6 sts. Join to work in the round.
Rnd 1: Knit. (6 sts)
Rnd 2: [kfb] 6 times. (6 increases → 6 + 6 = 12 sts ✓)
Rnd 3: [k1, kfb] 6 times. (6 increases → 12 + 6 = 18 sts ✓)
Rnd 4: [k2, kfb] 6 times. (6 increases → 18 + 6 = 24 sts ✓)
Rnd 5: [k3, kfb] 6 times. (6 increases → 24 + 6 = 30 sts ✓)
Rnd 6: [k4, kfb] 6 times. (6 increases → 30 + 6 = 36 sts ✓)
Rnd 7: [k5, kfb] 6 times. (6 increases → 36 + 6 = 42 sts ✓)
Rnd 8: [k6, kfb] 6 times. (6 increases → 42 + 6 = 48 sts ✓)
Rnd 9: [k7, kfb] 6 times. (6 increases → 48 + 6 = 54 sts ✓)
Rnd 10: [k8, kfb] 6 times. (6 increases → 54 + 6 = 60 sts ✓)
Rnds 11–22: Knit. (60 sts; 12 rounds even)
Begin tapering toward the chest. Keep the beginning-of-round marker at center back.
Rnd 23: [k8, k2tog] 6 times. (6 decreases → 60 − 6 = 54 sts ✓)
Rnds 24–26: Knit. (54 sts)
Rnd 27: [k7, k2tog] 6 times. (6 decreases → 54 − 6 = 48 sts ✓)
Rnds 28–32: Knit. (48 sts)
Rnd 33: [k6, k2tog] 6 times. (6 decreases → 48 − 6 = 42 sts ✓)
Rnds 34–37: Knit. (42 sts)
Rnd 38: [k5, k2tog] 6 times. (6 decreases → 42 − 6 = 36 sts ✓)
Rnds 39–41: Knit. (36 sts)
Rnd 42: [k4, k2tog] 6 times. (6 decreases → 36 − 6 = 30 sts ✓)
Rnds 43–44: Knit. (30 sts)
Rnd 45: [k3, k2tog] 6 times. (6 decreases → 30 − 6 = 24 sts ✓)
Rnds 46–48: Knit. (24 sts)
Bind off. Leave an 18" (45 cm) tail. Stuff as you finish: pack the base and back haunches very firmly so the cat sits upright, and use slightly less stuffing in the belly so the chest does not balloon forward. The neck opening is 24 sts to match the head.
Front Legs (make 2)
Start at the paw. With CC2 (white paw) or MC, CO 8 sts. Join to work in the round.
Rnd 1: Knit. (8 sts)
Rnd 2: [kfb] 8 times. (8 increases → 8 + 8 = 16 sts ✓)
Rnds 3–6: Knit. (16 sts)
If you started with CC2, switch to MC here.
Rnd 7: [k2, k2tog] 4 times. (4 decreases → 16 − 4 = 12 sts ✓)
Rnds 8–23: Knit. (12 sts; 16 rounds even)
Stuff the paw firmly and the leg only moderately — a slightly under-stuffed leg looks more like a real cat’s foreleg. Bind off, leaving a 12" (30 cm) tail for seaming.
Hind Legs (make 2)
Worked from open thigh (sewn to the body) down to a closed paw. With MC, CO 18 sts. Join to work in the round. The cast-on edge remains open.
Rnds 1–9: Knit. (18 sts)
Rnd 10: [k7, k2tog] 2 times. (2 decreases → 18 − 2 = 16 sts ✓)
Rnd 11: Knit. (16 sts)
Rnd 12: [k6, k2tog] 2 times. (2 decreases → 16 − 2 = 14 sts ✓)
Rnd 13: Knit. (14 sts)
Rnd 14: [k5, k2tog] 2 times. (2 decreases → 14 − 2 = 12 sts ✓)
Rnds 15–20: Knit. (12 sts)
If working white paws, switch to CC2 here.
Rnd 21: [k1, kfb] 6 times. (6 increases → 12 + 6 = 18 sts ✓)
Rnds 22–24: Knit. (18 sts)
Rnd 25: [k1, k2tog] 6 times. (6 decreases → 18 − 6 = 12 sts ✓)
Rnd 26: [k2tog] 6 times. (6 decreases → 12 − 6 = 6 sts ✓)
Break yarn, thread through remaining 6 sts, and pull closed. Stuff the thigh firmly and the lower leg and paw lightly. The open cast-on edge is the top of the thigh.
Tail
With MC, CO 14 sts. Join to work in the round. The cast-on edge remains open for seaming to the body.
Rnds 1–16: Knit. (14 sts)
Rnd 17: k5, k2tog, k5, k2tog. (2 decreases → 14 − 2 = 12 sts ✓)
Rnds 18–30: Knit. (12 sts)
Rnd 31: k4, k2tog, k4, k2tog. (2 decreases → 12 − 2 = 10 sts ✓)
Rnds 32–44: Knit. (10 sts)
Rnd 45: k3, k2tog, k3, k2tog. (2 decreases → 10 − 2 = 8 sts ✓)
Rnds 46–54: Knit. (8 sts)
Rnd 55: k2, k2tog, k2, k2tog. (2 decreases → 8 − 2 = 6 sts ✓)
Rnds 56–60: Knit. (6 sts)
Rnd 61: k1, k2tog, k1, k2tog. (2 decreases → 6 − 2 = 4 sts ✓)
Rnd 62: Knit. (4 sts)
Rnd 63: [k2tog] 2 times. (2 decreases → 4 − 2 = 2 sts ✓)
Break yarn, thread through remaining 2 sts, and pull closed. Stuff lightly as you go — a floppy, stuffable tail can wrap around the haunches the way a real cat’s does. Leave a 12" (30 cm) tail of yarn at the cast-on edge for seaming.
Optional Chest Bib
Worked flat in stockinette for tuxedo, ginger, and tabby-with-white-chest versions. With CC2, CO 5 sts.
Row 1 (RS): kfb, k3, kfb. (2 increases → 5 + 2 = 7 sts ✓)
Row 2 (WS): Purl. (7 sts)
Row 3: kfb, k5, kfb. (2 increases → 7 + 2 = 9 sts ✓)
Row 4: Purl. (9 sts)
Row 5: kfb, k7, kfb. (2 increases → 9 + 2 = 11 sts ✓)
Rows 6–12: Work in St st, starting with a WS purl row. (11 sts; 7 rows)
Row 13 (RS): ssk, k7, k2tog. (2 decreases → 11 − 2 = 9 sts ✓)
Row 14: Purl. (9 sts)
Row 15: ssk, k5, k2tog. (2 decreases → 9 − 2 = 7 sts ✓)
Row 16: Purl. (7 sts)
Row 17: ssk, k3, k2tog. (2 decreases → 7 − 2 = 5 sts ✓)
Bind off knitwise. Leave a 12" (30 cm) tail. The bib is a small pointed oval, about 2¼" (5.5 cm) tall.
Face
Work all embroidery with a single strand of floss unless noted.
Nose. With pink floss (or CC1 yarn), satin-stitch a small inverted triangle on the muzzle tip, covering Rounds 3–5 and about 3 sts wide. A tiny horizontal stitch at the bottom of the triangle makes the nostrils.
Mouth. With dark brown or black, stitch a short vertical line down from the nose, then a shallow inverted-Y or two small curves for the lips.
Eyes, embroidered option. If you did not use safety eyes, satin-stitch almond shapes 6 sts apart at the same depth as Rounds 11–13. Use amber, green, or yellow for the iris, a vertical black pupil, and a tiny white highlight in the upper inner corner. A single dark stitch at each inner and outer corner lengthens the eye into a cat’s almond.
Eye sockets (both options). With MC, take a short stitch from the inner corner of one eye, through the head, and out the inner corner of the other eye. Cinch gently until the muzzle stands forward and the eyes sink slightly. Tie off inside the neck.
Whisker dots. Three tiny dark French knots (or small satin stitches) on each side of the muzzle.
Whiskers. Thread three 3" (7.5 cm) lengths of fishing line or waxed cotton through each side of the muzzle, just behind the whisker dots. Knot inside the stuffing. Trim to 2½–3" (6.5–7.5 cm), slightly longer at the bottom.
Tabby forehead (optional). With a darker shade, duplicate-stitch a small “M” above the eyes — the classic tabby mark.
Assembly
Use mattress stitch for every join. Work with the long tails already attached; bury finished tails inside the stuffing.
- Ears to head. Pin ears on top of the head, inner edges about ¾" (2 cm) apart, bases sitting over Rounds 18–22, angled slightly outward and a little to the back (cat ears are not on the sides of the skull). Sew the open cast-on edge of each ear to the head with mattress stitch, catching both layers of the flattened ear. A couple of extra stitches along the front of the base will tilt the ears forward.
- Head to body. Align center front of the head (muzzle) with center front of the body. Both openings are 24 sts. Mattress-stitch the bound-off edges together, adding a last pinch of stuffing at the neck before closing so the head does not wobble. The head should look slightly large for the body — that is correct for a sitting cat.
- Front legs. Sew bound-off edges to the upper chest, about ½" (1.25 cm) below the neck seam and about 1" (2.5 cm) apart, so the legs hang vertically with paws on the “ground.” Check symmetry from the front before fastening off.
- Hind legs. Pin the open thigh edge along the side of the lower body, top of the thigh near Round 23 of the body, paw pointing forward and sitting level with the front paws. The bulk of the thigh should read as the haunch. Sew all around the open edge. Repeat on the other side, matching placement exactly.
- Tail. Sew the open cast-on edge to center back, just above the stuffed base (around body Rounds 14–18). Curve the tail around one haunch and tack it in one or two places with hidden stitches if you want a wrapped-tail pose.
- Chest bib (if using). Center on the chest, point toward the belly, top edge just under the neck seam. Whipstitch with CC2, catching the surface of the body stitches only.
- Paw pads. With CC1, satin-stitch a small oval pad and three tiny toe pads on the underside of each paw.
Set the cat on a table. If it tips, add stuffing through a small opening in the base (open a few mattress stitches, push stuffing into the rear haunches, and re-close).
Finishing
Weave every remaining end into the stuffing and trim. Do not leave knots on the surface.
If you used wool, a few light passes with a slicker brush over the body and tail will raise a short halo and soften the stitch definition — the fastest route to a more realistic coat. Do not brush the face or the inner ears.
For tabby markings after assembly, duplicate-stitch broken stripes down the spine, rings around the tail, and two or three short stripes on each leg, using a darker shade of MC.
Finished Measurements (at pattern gauge)
- Sitting height, paws to ear tips: 8½" (21.5 cm)
- Body width at haunches: 4" (10 cm)
- Head diameter at widest: about 2½" (6.5 cm)
- Tail length: 8½" (21.5 cm)
A different gauge changes size but not the construction. Keep the fabric tight enough that stuffing never shows.
Disclaimer: This pattern was generated by AI and should be reviewed for accuracy before use. While we strive for quality, AI-generated content may contain errors. Please verify measurements, stitch counts, charts, and instructions before beginning your project. Generated by purlJam.uk
Love this pattern?
Save this pattern to your free PurlJam libraryAccess your pattern anytime
Bookmark this page to access your pattern anytime