Type
Crochet
Difficulty
intermediate
Category
amigurumi
AI Thinking Process
Planning
Verification
Pattern
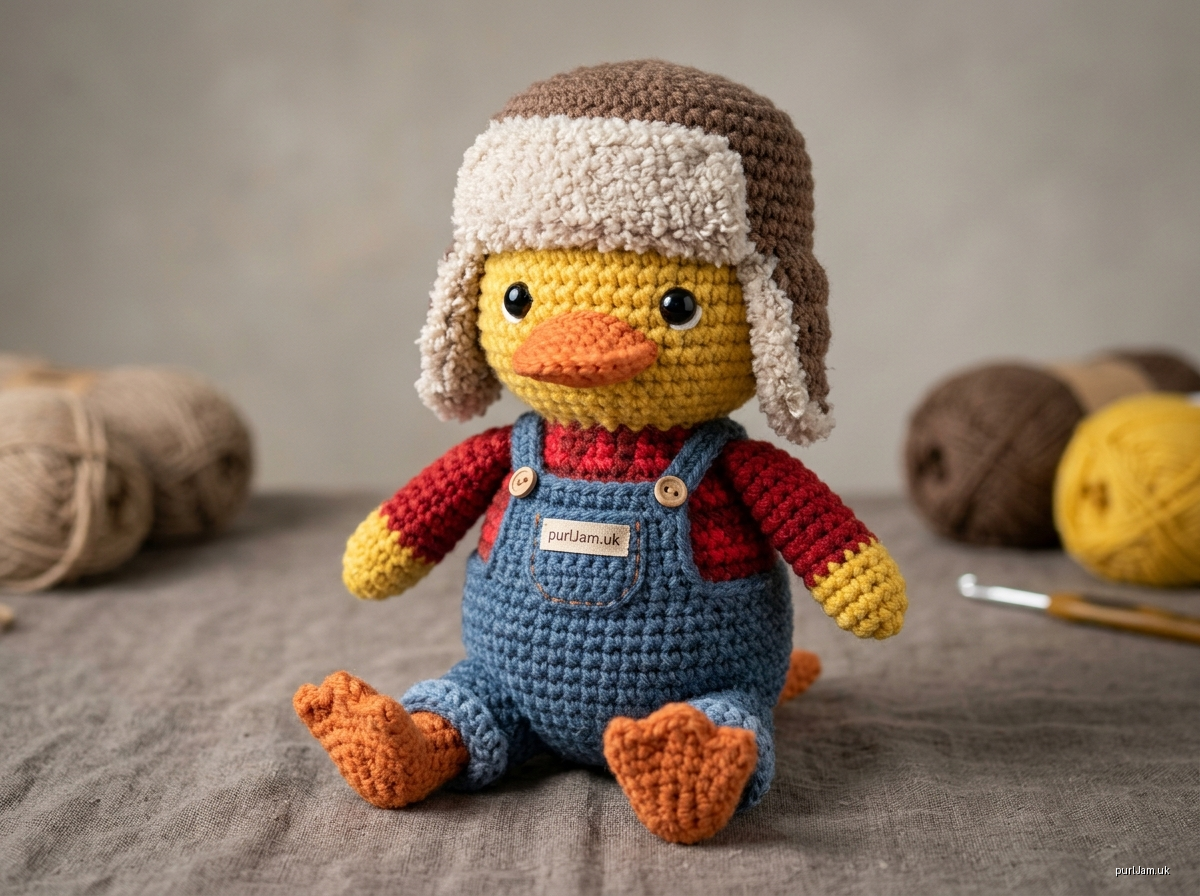
Winter Waddles – Cosy Duck Amigurumi with Ushanka, Shirt & Overalls
Skill level: Intermediate | Finished size: approx. 25 cm (10") tall seated, including hat
Materials
Yarn: chunky (weight 5) acrylic or cotton blend, in these colours:
- A – Yellow: 80 g (head, arms, tail)
- B – Orange: 25 g (bill, legs, feet)
- C – Red check or red: 40 g (shirt)
- D – Denim blue: 50 g (overalls)
- E – Brown: 30 g (hat)
- F – Cream: 20 g (hat fur trim; a faux-fur or bouclé chunky is ideal)
Other materials:
- Hook: 5 mm (US H-8), one size below the yarn label
- Safety eyes: 12 mm ×2
- Stuffing: polyester fibrefill, approx. 120 g
- Notions: stitch marker, yarn needle, pins, 2 small buttons (optional; omit for under-3s and embroider instead)
Tension (gauge)
12 dc × 13 rnds = 10 cm (4") worked in the round. The tension must be tight enough that no stuffing shows through the fabric.
Abbreviations (UK)
| Abbreviation | Meaning |
|---|---|
| ch | chain |
| ss | slip stitch |
| dc | double crochet (US sc) |
| htr | half treble (US hdc) |
| tr | treble (US dc) |
| inc | 2 dc in the same st |
| dec | invisible decrease: insert hook in FLO of the next 2 sts, yo, pull through both loops, yo, pull through all 3 loops on hook |
| BLO / FLO | back / front loop only |
| MR | magic ring |
| [ ] | stitch count at the end of the round |
Work in a continuous spiral unless told otherwise, and move the marker up each round.
HEAD (A)
- Rnd 1: 6 dc in MR [6]
- Rnd 2: inc ×6 [12]
- Rnd 3: (dc, inc) ×6 [18]
- Rnd 4: (2 dc, inc) ×6 [24]
- Rnd 5: (3 dc, inc) ×6 [30]
- Rnd 6: (4 dc, inc) ×6 [36] (30 + 6 = 36 ✓)
- Rnds 7–14: dc around (8 rnds) [36]
- Insert the safety eyes between Rnds 10 and 11, 6 sts apart.
- Rnd 15: (4 dc, dec) ×6 [30]
- Rnd 16: (3 dc, dec) ×6 [24]
- Stuff the head firmly.
- Rnd 17: (2 dc, dec) ×6 [18]
- Rnd 18: (dc, dec) ×6 [12]
- Finish stuffing, then work the closing round.
- Rnd 19: dec ×6 [6]
- Fasten off. Weave the tail through the front loops of the remaining sts, pull closed and weave in.
BILL (B)
- Rnd 1: 6 dc in MR [6]
- Rnd 2: (dc, inc) ×3 [9]
- Rnd 3: (2 dc, inc) ×3 [12]
- Rnd 4: (3 dc, inc) ×3 [15]
- Rnds 5–6: dc around [15]
- Do not stuff. Flatten the bill, then dc 7 through both layers to close [7].
- Fasten off, leaving a long tail for sewing.
BODY (D, then C)
Work in D (overalls/trousers):
- Rnd 1: 6 dc in MR [6]
- Rnd 2: inc ×6 [12]
- Rnd 3: (dc, inc) ×6 [18]
- Rnd 4: (2 dc, inc) ×6 [24]
- Rnd 5: (3 dc, inc) ×6 [30]
- Rnd 6: (4 dc, inc) ×6 [36]
- Rnd 7: (5 dc, inc) ×6 [42] (36 + 6 = 42 ✓)
- Rnd 8: BLO dc around [42]. This creates the flat seated base.
- Rnds 9–14: dc around [42]
- Rnd 15: in BLO, (5 dc, dec) ×6 [36]. Leave the FLO free; it becomes the overall waistband.
Change to C (shirt):
- Rnds 16–19: dc around [36]
- Rnd 20: (4 dc, dec) ×6 [30]
- Rnds 21–22: dc around [30]
- Rnd 23: (3 dc, dec) ×6 [24]
- Stuff very firmly.
- Rnd 24: (2 dc, dec) ×6 [18]
- Rnd 25: (dc, dec) ×6 [12]
- Fasten off, leaving a long tail. Leave the neck open so you can add extra stuffing before attaching the head.
Waistband: Join D to the front loops left free in Rnd 15. Ss around [42] and fasten off.
Shirt collar:
- Join C in Rnd 24 at the centre front.
- Row 1: ch 1, dc 14 across the front, leaving 4 sts at the back unworked, turn [14].
- Row 2: ch 1, (htr, tr) in first st, htr 12, (tr, htr) in last st [16].
- Fasten off. Fold the collar down.
ARMS / SLEEVES ×2 (A, then C)
These are long sleeves with yellow wing-tips.
In A:
- Rnd 1: 6 dc in MR [6]
- Rnd 2: (dc, inc) ×3 [9]
- Rnds 3–4: dc around [9]
Change to C:
- Rnd 5: BLO dc around [9]. The free front loops form the cuff ridge.
- Rnds 6–11: dc around [9]
- Stuff the arm lightly.
- Flatten the top and dc 4 through both layers.
- Fasten off, leaving a long tail.
LEGS ×2 (B, then D)
In B:
- Rnd 1: 6 dc in MR [6]
- Rnd 2: inc ×6 [12]
- Rnds 3–4: dc around [12]
Change to D for the trouser legs:
- Rnd 5: BLO dc around [12]
- Rnds 6–8: dc around [12]
- Stuff lightly.
- Flatten the top and dc 6 through both layers.
- Fasten off, leaving a long tail.
Turn-up cuff: Join D in the free FLO of Rnd 5 and dc around [12].
WEBBED FEET ×2 (B)
- Rnd 1: 6 dc in MR [6]
- Rnd 2: inc ×6 [12]
- Toes: (ch 3, ss in 2nd ch from hook, dc in next ch, skip 1 st, ss in next 3 sts) ×3. This makes 3 toe points.
- Fasten off, leaving a tail.
- Sew each foot flat under a leg, with the toes pointing forward.
TAIL (A)
- Rnd 1: 4 dc in MR [4]
- Rnd 2: inc ×4 [8]
- Rnd 3: (dc, inc) ×4 [12]
- Flatten the tail, then dc 6 through both layers.
- Fasten off.
USHANKA HAT
Crown (E):
- Rnd 1: 6 dc in MR [6]
- Rnd 2: inc ×6 [12]
- Rnd 3: (dc, inc) ×6 [18]
- Rnd 4: (2 dc, inc) ×6 [24]
- Rnd 5: (3 dc, inc) ×6 [30]
- Rnd 6: (4 dc, inc) ×6 [36]
- Rnd 7: (5 dc, inc) ×6 [42] (42 sts over the 36-st head gives an easy fit ✓)
- Rnds 8–12: dc around [42]
- ss to join. Do not fasten off.
Ear flaps (E), worked in rows: Place the join at the centre back. The first flap is worked from the 6th to 13th sts from the join.
First flap:
- Row 1: join over 8 sts, ch 1, dc 8, turn [8]
- Rows 2–3: ch 1, dc 8, turn [8]
- Row 4: ch 1, dec, dc 4, dec, turn [6]
- Row 5: ch 1, dec, dc 2, dec [4]
- Fasten off.
Second flap: Count 13 sts from the far edge of the first flap. Work the same 8 sts on the other side so the flaps mirror each other (8 + 13 + 8 + 13 = 42 ✓).
Brim trim (F):
- Join F at the centre back.
- dc evenly around the whole lower edge, down and around both flaps.
- ss to join. Fasten off.
Front turn-up (F):
- Join F to the 13 front sts of Rnd 12.
- Rows 1–3: ch 1, dc 13, turn [13]
- Fasten off.
- Fold the turn-up upwards and tack its ends to the crown.
Ties (optional; omit for under-3s): ch 15 in E from each flap tip.
OVERALL BIB & STRAPS (D)
Bib:
- Row 1: ch 9, dc in 2nd ch from hook and in each ch across, turn [8]
- Rows 2–6: ch 1, dc 8, turn [8]
- Fasten off.
Straps ×2:
- ch 26, dc in 2nd ch and across [25]
- Fasten off.
ASSEMBLY
- Add extra stuffing through the neck. Pin the head on and whip stitch it to Rnd 25 of the body.
- Sew the bill centrally between the eyes, just below Rnd 12 of the head.
- Sew the arms at Rnd 23, one on each side.
- Sew the legs to the front of the body at Rnd 9, angled forward for sitting.
- Sew the tail at the back, at Rnd 12.
- Sew the bib to the front waistband, centred.
- Attach the straps from the bib corners, crossing them at the back and sewing them down to the waistband. Sew on the buttons or embroider them in a contrasting yarn.
- Embroider a small pocket outline on the bib, and white highlights in the eyes if desired.
- Put the hat on and tack it to the head at 4 points so it cannot be pulled off. Leave it unsewn if you want it removable for an older child.
SAFETY
- Use safety eyes, never buttons, for children under 3.
- Omit buttons and ties for children under 3.
- Tug-test every limb before gifting.
- Embroider all small details rather than gluing them.
SIZE NOTES
- This pattern (chunky yarn, 5 mm hook): about 25 cm
- Worsted yarn, 4 mm hook: about 18 cm
- DK yarn, 3.5 mm hook: about 14 cm, using 9 mm eyes
Disclaimer: This pattern was generated by AI and should be reviewed for accuracy before use. While we strive for quality, AI-generated content may contain errors. Please verify measurements, stitch counts, charts, and instructions before beginning your project. Generated by purlJam.uk
Love this pattern?
Save this pattern to your free PurlJam libraryAccess your pattern anytime
Bookmark this page to access your pattern anytime