Type
Crochet
Difficulty
beginner
Category
amigurumi
AI Thinking Process
Planning
Verification
Pattern
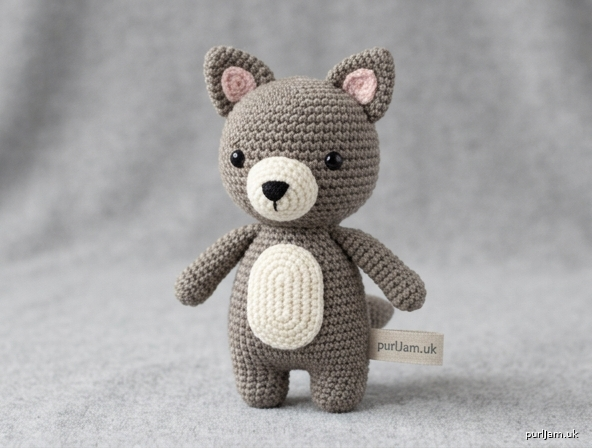
Wolf Chan Crochet Plush
Beginner · Simple shapes amigurumi · Worsted weight
A cute mini wolf character (“wolf chan”) made from basic spheres, ovals, cones, and tubes. Approx. finished size: 4–5 inches (10–13 cm) tall when made as written.
Materials
- Yarn (worsted weight / category 4):
- Color A (main): Gray or gray-brown — approx. 50 yd (46 m)
- Color B (muzzle/belly): White or cream — approx. 20 yd (18 m)
- Color C (details): Black or dark gray — small amount for nose/embroidery
- Optional Color D: Light pink — scrap for inner ears
- Hook: US E-4 (3.5 mm) or US F-5 (3.75 mm) — use a hook 1–2 sizes smaller than yarn label for tight fabric
- Fiberfill stuffing
- Yarn needle
- Stitch marker
- Optional: 6–8 mm safety eyes (pair) or black embroidery for eyes
- Scissors
- Straight pins (for assembly)
Gauge
Worked tightly in single crochet (sc) in the round:
- 5 sc = 1 inch (2.5 cm)
- 5 rounds = 1 inch (2.5 cm)
Gauge is not critical for a toy, but fabric should be dense enough that stuffing does not show. If holes appear, go down a hook size.
Abbreviations (US terms)
- ch — chain
- sc — single crochet
- inc — increase (2 sc in same stitch)
- dec — invisible decrease (sc2tog through front loops)
- sl st — slip stitch
- st(s) — stitch(es)
- rnd(s) — round(s)
- [ ] — total stitch count at end of round
- ( ) — work instructions in parentheses as a set
- FO — fasten off
- MR — magic ring (adjustable ring)
Work in continuous spirals unless noted. Do not join rounds. Move stitch marker up each round.
Notes
- Stuff as you go; final stuffing is hard to add later.
- Use invisible decreases for a smoother look.
- Pin all pieces before sewing.
- “Wolf chan” look = round head, small snout, pointed ears, simple limbs, optional blush.
- Safety: If giving to a baby or pet, embroider eyes and nose instead of using safety eyes or hard parts.
Pattern Pieces
Head (Color A — sphere)
Rnd 1: 6 sc in MR. [6] Rnd 2: inc in each st around. [12] (6 inc → 6 + 6 = 12 ✓) Rnd 3: (sc, inc) around. [18] (6 inc → 12 + 6 = 18 ✓) Rnd 4: (2 sc, inc) around. [24] (6 inc → 18 + 6 = 24 ✓) Rnds 5–9: sc in each st around. [24] (5 even rounds) Rnd 10: (2 sc, dec) around. [18] (6 dec → 24 − 6 = 18 ✓) Insert safety eyes between Rnds 6 and 7, about 5–6 sts apart, if using. Stuff head firmly. Rnd 11: (sc, dec) around. [12] (6 dec → 18 − 6 = 12 ✓) Rnd 12: dec around. [6] (6 dec → 12 − 6 = 6 ✓) FO, leaving a long tail. Thread tail through front loops of remaining 6 sts and pull closed. Weave in end.
Snout (Color B — small half-sphere / dome)
Rnd 1: 6 sc in MR. [6] Rnd 2: inc in each st around. [12] Rnds 3–4: sc in each st around. [12] FO, leaving a long tail for sewing. Lightly stuff. Embroider a small triangle or oval nose with Color C on the front of the snout (centered on Rnds 2–3). Optional: two tiny vertical stitches under nose for mouth.
Ears (make 2 — Color A; optional pink inner)
Outer ear (Color A): Rnd 1: 4 sc in MR. [4] Rnd 2: (sc, inc) around. [6] (2 inc → 4 + 2 = 6 ✓) Rnd 3: (2 sc, inc) around. [8] (2 inc → 6 + 2 = 8 ✓) Rnd 4: sc in each st around. [8] FO, leaving a long tail. Do not stuff (flatten into a triangle/cone).
Optional inner ear (Color D or B): Ch 4. Work 3 sc in 2nd ch from hook, sc in next ch, 3 sc in last ch; rotate and sc in remaining loop of starting ch. [8] FO. Sew centered on outer ear before attaching ears to head.
Body (Color A — oval / rounded cylinder)
Rnd 1: 6 sc in MR. [6] Rnd 2: inc in each st around. [12] Rnd 3: (sc, inc) around. [18] Rnd 4: (2 sc, inc) around. [24] Rnd 5: (3 sc, inc) around. [30] (6 inc → 24 + 6 = 30 ✓) Rnds 6–11: sc in each st around. [30] (6 even rounds) Rnd 12: (3 sc, dec) around. [24] (6 dec → 30 − 6 = 24 ✓) Rnd 13: (2 sc, dec) around. [18] Stuff body firmly, shaping slightly taller than wide. Rnd 14: (sc, dec) around. [12] Rnd 15: dec around. [6] FO, close hole as for head, or leave a short tail if you prefer to sew head over the closed top. Weave in.
Belly Patch (Color B — flat oval)
Ch 6. Rnd 1: sc in 2nd ch from hook, sc in next 3 ch, 3 sc in last ch; rotate to work opposite side of chain: sc in next 3 ch, 2 sc in last ch (same as first ch). [12] Rnd 2: inc, sc in next 3, inc in next 3, sc in next 3, inc in next 2. [18] FO, leaving long tail. Do not stuff. Sew centered on front of body.
Legs (make 4 — Color A — short tubes)
Rnd 1: 6 sc in MR. [6] Rnd 2: inc in each st around. [12] Rnds 3–5: sc in each st around. [12] Stuff lightly. Rnd 6: (sc, dec) around. [8] FO, leaving long tail. Flatten opening slightly and sew closed or sew directly to body with opening against body.
(For a sitting wolf chan, make back legs the same and attach angled forward under the body.)
Arms (make 2 — Color A — smaller tubes)
Rnd 1: 6 sc in MR. [6] Rnd 2: (sc, inc) around. [9] Rnds 3–5: sc in each st around. [9] Stuff lightly. FO, leaving long tail. Sew openings closed flat or attach open edge to body sides.
Tail (Color A — small cone)
Rnd 1: 4 sc in MR. [4] Rnd 2: (sc, inc) around. [6] Rnd 3: sc around. [6] Rnd 4: (2 sc, inc) around. [8] Rnds 5–6: sc around. [8] Stuff lightly. FO, leaving long tail for sewing. Optional: add a tiny Color B tip by working last 2 rnds in white.
Face Finishing
- Sew snout to lower front of head, centered between/under the eyes (bottom of snout near head Rnds 8–10).
- If not using safety eyes, embroider simple oval or dot eyes with Color C above snout.
- Optional “chan” blush: tiny pink straight stitches or French knots on cheeks beside snout.
- Optional eyebrows: two short angled stitches above eyes.
Assembly
Use pins. Sew with matching yarn tails and whip stitch or mattress stitch.
- Head to body: Center head on top of body (closed ends together). Sew securely all around.
- Ears: Flatten and sew to top of head, slightly angled outward, about 3–4 sts apart at inner edges, spanning roughly head Rnds 3–5.
- Arms: Attach to upper sides of body, just below head seam, angled slightly forward.
- Legs:
- Standing: sew two legs to bottom front and two slightly back.
- Sitting: sew both pairs under body so wolf sits stably.
- Belly patch: Already noted — sew flat to center front of body before or after limbs.
- Tail: Sew to lower back of body, angled up or out.
- Weave in all ends. Shape by rolling between hands.
Finishing Checklist
- [ ] Fabric dense; stuffing not visible
- [ ] Head closed neatly; eyes secure
- [ ] Snout and ears symmetric
- [ ] Body stuffed firmly enough to stand or sit
- [ ] All ends woven in
Customization (optional)
- Larger wolf: Add one more increase round on head/body (e.g. head to 30 sts) and 2 extra even rounds.
- Keychain size: Stop head increases at 18 sts; shorten even rounds; use DK yarn and 2.75–3.25 mm hook.
- Colorways: Classic gray, arctic white (A = white, B = light gray), black wolf, or pastel “chan” colors.
- Stress-toy firmness: Stuff very firmly and use tight gauge.
Quick Reference Counts
| Piece | Max sts | Key shaping |
|---|---|---|
| Head | 24 | Sphere, 5 even rnds |
| Body | 30 | 6 even rnds |
| Snout | 12 | Short dome |
| Ear | 8 | Flattened cone |
| Leg | 12 → 8 | Short tube |
| Arm | 9 | Short tube |
| Tail | 8 | Small cone |
Enjoy your wolf chan! With only sc, inc, and dec, this is ideal first character plush practice.
Disclaimer: This pattern was generated by AI and should be reviewed for accuracy before use. While we strive for quality, AI-generated content may contain errors. Please verify measurements, stitch counts, charts, and instructions before beginning your project. Generated by purlJam.uk
Love this pattern?
Save this pattern to your free PurlJam libraryAccess your pattern anytime
Bookmark this page to access your pattern anytime