Type
Crochet
Difficulty
intermediate
Category
amigurumi
AI Thinking Process
Planning
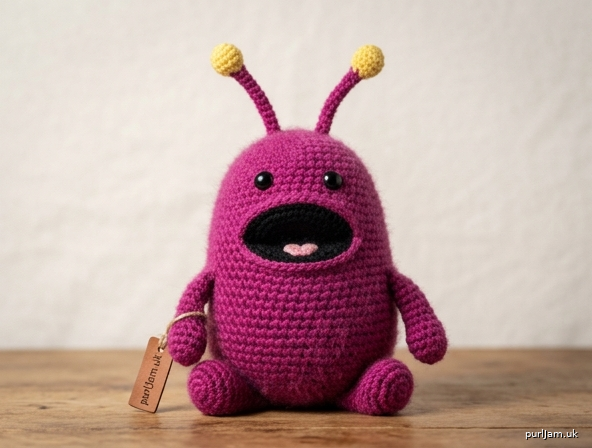
1. **Design Strategy**: Create a Yip Yip Martian from Sesame Street — a fuzzy, oval-shaped creature with two antennae, a huge gaping mouth, and tiny arms. Use worsted yarn in magenta or maroon (classic Yip Yip color). The signature feature is the wide open oval mouth, which I'll create as a separate flat piece sewn onto the face.
2. **Construction Plan**: Worked bottom-up in continuous rounds as one egg-shaped body/head combo, with mouth, antennae, arms, and eyes added after.
3. **Quality Assurance**:
- Mouth must be distinctive oval shape — use contrasting dark color
- Antennae need pipe cleaner or stiff stitching to stand up
- Eyes placed high and close together above the huge mouth
4. **Final Calculations**: Gauge 4 sc x 4.5 rows per inch. Body widest at 36 sts (~9"/circumference ~8"). Finished height ~7" tall.
Verification
1. **Completeness**: Body, mouth, arms, antennae, eyes, assembly — all present.
2. **Consistency**: Increase pattern 6→12→18→24→30→36 sts verified. Decrease mirrors increases.
3. **Constraints**: Intermediate amigurumi in worsted weight, US terms, Sesame Street Yip Yip character captured via oval body, huge mouth, antennae.
4. **Safety**: Safety eyes secured before stuffing; all stitch counts verified in brackets.
Pattern
# Yip Yip Martian Amigurumi
*"Yip yip yip yip — uh huh, uh huh!"*

An intermediate amigurumi pattern inspired by the beloved Sesame Street Martians. This fuzzy, egg-shaped alien features the signature gaping oval mouth, two wiggly antennae, and tiny stubby arms.

---

## Finished Size
Approximately **7 inches tall × 4.5 inches wide** (18 cm × 11.5 cm)

## Materials

**Yarn** (worsted weight / #4):
- **MC (Main Color)**: ~100 yds in magenta, maroon, or orange (classic Yip Yip colors are magenta, maroon, orange, or blue)
- **CC1 (Mouth)**: ~15 yds in black or very dark brown
- **CC2 (Tongue/Mouth interior accent, optional)**: ~5 yds in pink
- **CC3 (Antennae tips)**: ~5 yds in white or yellow

**Hook**: US size E-4 (3.5 mm) for tight gauge

**Notions**:
- Two 9 mm black safety eyes
- Polyester fiberfill stuffing
- Yarn needle
- Stitch marker
- 2 pipe cleaners (for antennae structure), optional but recommended
- Scissors

## Gauge
4 sc × 4.5 rows = 1 inch (2.5 cm) in single crochet, worked in continuous rounds. Gauge is not critical but affects finished size; tight stitches prevent stuffing from showing.

## Abbreviations (US terms)
- **MR** – magic ring
- **sc** – single crochet
- **inc** – 2 sc in same stitch (increase)
- **dec** – invisible decrease (insert hook in FLO of next 2 sts, yo, pull through both loops, yo, pull through all)
- **st(s)** – stitch(es)
- **rnd** – round
- **sl st** – slip stitch
- **ch** – chain
- **FLO** – front loop only
- **[ ]** – total stitch count at end of round
- **( ) x N** – repeat instructions in parentheses N times

## Notes
- Work in continuous spiral rounds. Do **not** join unless specified.
- Use a stitch marker in the first stitch of each round; move it up as you go.
- Stuff **firmly** as you work, especially before the final decreases.
- The Yip Yip is one continuous piece (head and body combined) for that classic egg/potato shape.

---

## BODY (make 1, in MC)

Yip Yips have a rounded egg-shape with no distinct neck — we'll work bottom-up.

**Rnd 1:** 6 sc in MR. **[6]**
**Rnd 2:** inc in each st around. **[12]** *(6 inc = +6; 6+6=12 ✓)*
**Rnd 3:** (sc, inc) x 6. **[18]** *(+6; 12+6=18 ✓)*
**Rnd 4:** (2 sc, inc) x 6. **[24]** *(+6; 18+6=24 ✓)*
**Rnd 5:** (3 sc, inc) x 6. **[30]** *(+6; 24+6=30 ✓)*
**Rnd 6:** (4 sc, inc) x 6. **[36]** *(+6; 30+6=36 ✓)*

**Rnds 7–20:** sc in each st around (14 even rnds). **[36]**

*This long straight section creates the Yip Yip's signature tall, bulbous body shape.*

**Insert safety eyes** between Rnds 17 and 18, approximately **6 stitches apart**, centered on what will be the "face" side. Place them HIGH — the mouth will sit just below.

Begin stuffing firmly now and continue stuffing as you decrease.

**Rnd 21:** (4 sc, dec) x 6. **[30]** *(−6; 36−6=30 ✓)*
**Rnd 22:** sc in each st around. **[30]**
**Rnd 23:** (3 sc, dec) x 6. **[24]** *(−6; 30−6=24 ✓)*
**Rnd 24:** (2 sc, dec) x 6. **[18]** *(−6; 24−6=18 ✓)*
**Rnd 25:** (sc, dec) x 6. **[12]** *(−6; 18−6=12 ✓)*

Add final stuffing — make it **very firm**.

**Rnd 26:** dec x 6. **[6]** *(−6; 12−6=6 ✓)*

Fasten off, leaving a 6-inch tail. Weave tail through front loops of remaining 6 sts and pull tight to close. Weave in end.

**Total rounds: 26. Body count verified: 6→36 (20 rnds wide) → 6 (close). ✓**

---

## MOUTH (make 1, in CC1)

The signature gaping Yip Yip mouth — a large oval worked flat.

Ch 9.

**Rnd 1:** Starting in 2nd ch from hook: 7 sc across, 3 sc in last ch (turn to work along opposite side of foundation ch), 6 sc along bottom, 2 sc in last st, sl st to first sc to join. **[18]** *(7+3+6+2 = 18 ✓)*

**Rnd 2:** ch 1, 2 sc in first st, sc in next 6, 2 sc in each of next 3, sc in next 6, 2 sc in each of next 2, sl st to first sc. **[24]** *(1+6+3+6+2 increases added 6 sts; 18+6=24 ✓)*

Fasten off, leaving a long 18-inch tail for sewing.

**Optional pink tongue detail:** With CC2, embroider 3–4 straight stitches across the lower interior of the mouth oval.

---

## ARMS (make 2, in MC)

Tiny stubby arms that hang at the sides.

**Rnd 1:** 6 sc in MR. **[6]**
**Rnd 2:** inc in each st around. **[12]** *(+6; 6+6=12 ✓)*
**Rnds 3–5:** sc in each st around (3 rnds). **[12]**
**Rnd 6:** (2 sc, dec) x 3. **[9]** *(−3; 12−3=9 ✓)*
**Rnds 7–8:** sc in each st around. **[9]**

Stuff lightly (arms should be somewhat floppy).

Flatten the opening and sc 4 across through both layers to close. Fasten off, leaving a 10-inch tail for sewing.

---

## ANTENNAE (make 2)

### Stalk (in MC)
**Rnd 1:** 6 sc in MR. **[6]**
**Rnds 2–8:** sc in each st around (7 rnds). **[6]**

*Do not stuff.* Insert a folded pipe cleaner inside the tube for shape and bend-ability (fold ends to prevent poking through).

### Tip ball (continue on top of stalk, switch to CC3)
**Rnd 9:** change to CC3; inc in each st around. **[12]** *(+6; 6+6=12 ✓)*
**Rnd 10:** sc in each st around. **[12]**
**Rnd 11:** dec x 6. **[6]** *(−6; 12−6=6 ✓)*

Add a tiny bit of stuffing in the tip ball. Fasten off, weave tail through remaining 6 sts, pull closed.

Leave a 10-inch tail at the bottom (stalk starting tail) for sewing to head.

---

## ASSEMBLY

1. **Attach mouth**: Position the oval mouth on the front of the body, centered, with the top edge approximately **1 stitch below the safety eyes**. The mouth should span roughly Rnds 13–18 horizontally. Pin in place, then whip stitch all the way around using the long CC1 tail. Leave a small opening at the bottom and add a tiny wisp of stuffing behind the mouth to give it a slight 3D pucker, then close.

2. **Attach antennae**: Position the two antennae on the very top of the head, about **3–4 sts apart**, directly above the eyes. Whip stitch the base of each stalk securely to the top of the body using the long tails. Bend the pipe cleaners so the antennae lean slightly outward in a "V."

3. **Attach arms**: Pin the arms to the sides of the body at approximately **Rnd 14**, roughly in line with the bottom edge of the mouth. Whip stitch securely using the long tails. The arms should dangle slightly forward.

4. **Final shaping**: Give the body a gentle squeeze to settle the stuffing. Bend antennae into position. If desired, brush the MC yarn lightly with a pet slicker brush to create the fuzzy, fluffy Yip Yip texture.

---

## Finishing Touches

- **Optional fuzzy texture**: For the authentic Yip Yip look, lightly brush the entire body (except mouth and eyes area) with a pet slicker brush or wire brush to raise the yarn fibers. Work gently in small sections.
- Weave in all remaining ends securely.
- Give your Yip Yip a name and have it communicate exclusively in "yip yip yip" and "nope nope nope."

---

## Customization Ideas

- **Color variations**: Classic Yip Yips come in **magenta, maroon, orange, and blue** — make a whole family!
- **Size up**: Use bulky yarn and a size H-8 (5 mm) hook for a ~10" tall Yip Yip.
- **Telephone accessory**: Crochet a tiny rotary phone as a prop — the Yip Yips were famously confused by one.

Enjoy your new Martian friend! Yip yip yip — uh huh, uh huh!
Disclaimer: This pattern was generated by AI and should be reviewed for accuracy before use. While we strive for quality, AI-generated content may contain errors. Please verify measurements, stitch counts, and instructions before beginning your project. Generated by purlJam.uk
Access your pattern anytime
Bookmark this page to access your pattern anytime