Type
Crochet
Difficulty
intermediate
Category
amigurumi
Pattern
Zapdos Amigurumi
Unofficial fan-made pattern for personal use. Not affiliated with Nintendo, The Pokémon Company, or their licensees.
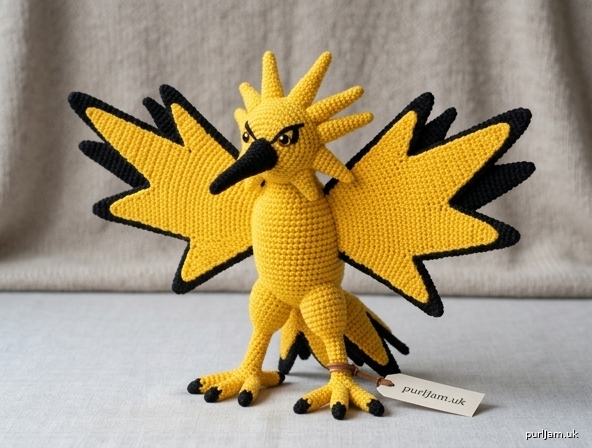
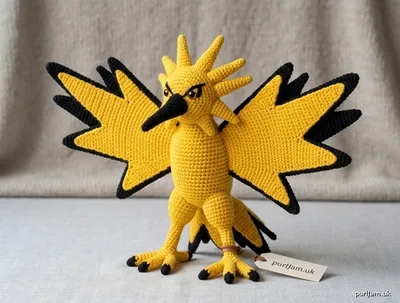
A perched thunderbird worked in continuous rounds: swept-back crest, long dark beak, black-tipped jagged wings, fanned tail, and talons. The finished bird stands on its feet with the tail angled down as a brace and the wings raised.
Skill level: Intermediate
Construction: Separate pieces, sewn. Head, body, neck, beak, crest, tail, and legs are worked in a continuous spiral. Wings and wing spikes are worked flat in turned rows.
Finished Size
At the gauge below, about 7 inches (18 cm) tall including the crest, and about 12 inches (30 cm) from wing tip to wing tip with the wings raised.
- Head width: about 2.25 inches (5.5 cm)
- Body width: about 2.5 inches (6.5 cm)
- Each wing, base to spike tip: about 6 inches (15 cm)
Materials
- Worsted weight yarn (weight 4):
- Bright yellow (MC): 150 yards (137 m)
- Black (CC): 60 yards (55 m)
- Hook: US E-4 (3.5 mm), or the size that gives a tight fabric with no gaps
- 10 mm safety eyes, amber or orange preferred (black will work)
- Polyester fiberfill, about 3 oz (85 g)
- Yarn needle, locking stitch marker, scissors, straight pins
Gauge
6 sc and 6 rows = 1 inch (2.5 cm) in single crochet, worked tightly.
Gauge sets the finished size. A gap-free fabric matters more than the exact inch measurement: if stuffing shows between stitches, use a smaller hook. Size estimates in this pattern assume the gauge above.
Abbreviations (US)
| Abbreviation | Meaning |
|---|---|
| CC | contrast color (black) |
| ch | chain |
| dec | invisible decrease (see Notes) |
| FO | fasten off |
| inc | increase (2 sc in the same stitch) |
| MC | main color (bright yellow) |
| MR | magic ring (adjustable ring) |
| rnd | round |
| sc | single crochet |
| sl st | slip stitch |
| st(s) | stitch(es) |
| ( ) | work the instructions in parentheses the number of times stated |
| [ ] | stitch count for that round or row — check it before continuing |
Notes
- Work spiral pieces in continuous rounds. Do not join and do not turn unless the instructions say to.
- Place a stitch marker in the first stitch of each round and move it up as you go.
- Ch 1 at the start of a flat row does not count as a stitch.
- Inc: 2 sc in the same stitch.
- Dec (invisible decrease): Insert the hook under the front loop only of the next 2 sts, yarn over, pull through both front loops, yarn over, pull through both loops on the hook.
- Magic ring: If you prefer not to use one, ch 2 and work Round 1 into the second chain from the hook. A magic ring closes the center more tightly.
- Color change: On the last yarn-over of the stitch before the change, drop the old color and pull the new color through to finish the stitch. Carry nothing inside flat wings; cut the old color and weave it in later.
- Stuff the head and body firmly. Stuff the beak, crest, tail, and legs lightly to moderately. Do not stuff the wings, wing spikes, or toes.
- The number in brackets is the count you should have. If it does not match, correct that round or row before going on.
- Safety eyes, pins, and small toes are not suitable for children under 3. Sew every piece on firmly.
Head (MC)
The magic ring is the top of the head (crest end). The open end is the neck.
Rnd 1: 6 sc in MR. [6]
Rnd 2: Inc in each st around. [12] (6 + 6 = 12 ✓)
Rnd 3: (Sc, inc) 6 times. [18] (12 + 6 = 18 ✓)
Rnd 4: (2 sc, inc) 6 times. [24] (18 + 6 = 24 ✓)
Rnd 5: (3 sc, inc) 6 times. [30] (24 + 6 = 30 ✓)
Rnd 6: (4 sc, inc) 6 times. [36] (30 + 6 = 36 ✓)
Rnd 7: (5 sc, inc) 6 times. [42] (36 + 6 = 42 ✓)
Rnds 8–14: Sc in each st around. [42]
Eyes: After Rnd 12, insert the safety eyes between Rnds 11 and 12, with 8 stitches between them. The front center of the face is the midpoint of those 8 stitches. Do not close the washers until you are happy with the placement. Center the pair on the front of the head, slightly below the middle of the even section, so there is room for the crest above and the beak below.
Rnd 15: (5 sc, dec) 6 times. [36] (42 − 6 = 36 ✓)
Rnd 16: (4 sc, dec) 6 times. [30] (36 − 6 = 30 ✓)
Rnd 17: (3 sc, dec) 6 times. [24] (30 − 6 = 24 ✓)
Stuff the head firmly. Shape it into a smooth sphere.
Rnd 18: (2 sc, dec) 6 times. [18] (24 − 6 = 18 ✓)
FO, leaving an 18-inch (46 cm) tail for sewing. Do not close. The 18-stitch opening joins to the neck. Add a little more stuffing if the lower head looks soft, but keep the opening round.
Beak (CC)
Rnd 1: 4 sc in MR. [4]
Rnd 2: Sc in each st around. [4]
Rnd 3: (Sc, inc) 2 times. [6] (4 + 2 = 6 ✓)
Rnd 4: Sc in each st around. [6]
Rnd 5: (2 sc, inc) 2 times. [8] (6 + 2 = 8 ✓)
Rnd 6: Sc in each st around. [8]
Rnd 7: (3 sc, inc) 2 times. [10] (8 + 2 = 10 ✓)
Rnds 8–10: Sc in each st around. [10]
FO, leaving a 12-inch (30 cm) tail. Stuff lightly. Pinch the magic-ring end into a firm point. The open 10-stitch end is sewn to the face.
Crest (MC)
Make five stuffed spikes. Pull each magic ring tight so the tip stays pointed. Use a marker; these rounds are short and easy to lose.
Long spike — make 1 (center)
Rnd 1: 4 sc in MR. [4]
Rnd 2: Sc in each st around. [4]
Rnd 3: (Sc, inc) 2 times. [6] (4 + 2 = 6 ✓)
Rnd 4: Sc in each st around. [6]
Rnd 5: (2 sc, inc) 2 times. [8] (6 + 2 = 8 ✓)
Rnds 6–9: Sc in each st around. [8]
FO, leaving a 10-inch (25 cm) tail. Stuff lightly, less toward the tip.
Medium spike — make 2
Rnd 1: 4 sc in MR. [4]
Rnd 2: Sc in each st around. [4]
Rnd 3: (Sc, inc) 2 times. [6] (4 + 2 = 6 ✓)
Rnds 4–7: Sc in each st around. [6]
FO, leaving a 10-inch (25 cm) tail. Stuff very lightly.
Short spike — make 2
Rnd 1: 4 sc in MR. [4]
Rnds 2–5: Sc in each st around. [4]
FO, leaving an 8-inch (20 cm) tail. Do not stuff, or stuff only the open end.
Body (MC)
The magic ring is the base. The open end is the top (neck edge). This lets you flatten the base for a steadier perch.
Rnd 1: 6 sc in MR. [6]
Rnd 2: Inc in each st around. [12] (6 + 6 = 12 ✓)
Rnd 3: (Sc, inc) 6 times. [18] (12 + 6 = 18 ✓)
Rnd 4: (2 sc, inc) 6 times. [24] (18 + 6 = 24 ✓)
Rnd 5: (3 sc, inc) 6 times. [30] (24 + 6 = 30 ✓)
Rnd 6: (4 sc, inc) 6 times. [36] (30 + 6 = 36 ✓)
Rnd 7: (5 sc, inc) 6 times. [42] (36 + 6 = 42 ✓)
Rnd 8: (6 sc, inc) 6 times. [48] (42 + 6 = 48 ✓)
Rnds 9–13: Sc in each st around. [48]
Rnd 14: (6 sc, dec) 6 times. [42] (48 − 6 = 42 ✓)
Rnd 15: (5 sc, dec) 6 times. [36] (42 − 6 = 36 ✓)
Rnd 16: (4 sc, dec) 6 times. [30] (36 − 6 = 30 ✓)
Rnd 17: (3 sc, dec) 6 times. [24] (30 − 6 = 24 ✓)
Stuff firmly. Press the magic-ring base slightly flatter than the top so the body wants to sit rather than roll. Do not leave the base concave.
Rnd 18: (2 sc, dec) 6 times. [18] (24 − 6 = 18 ✓)
FO, leaving an 18-inch (46 cm) tail. Do not close. The 18-stitch opening is the neck edge. Mark the front center stitch of this opening with a scrap of yarn.
Neck (MC)
Setup: Ch 18. Sl st in the first ch to form a ring, without twisting the chain. This join is setup only.
Rnd 1: Ch 1 (does not count), sc in each ch around. Do not join. Place a marker in the first sc. [18]
Rnds 2–5: Sc in each st around. [18]
FO, leaving an 8-inch (20 cm) tail to weave in. Do not stuff yet. The tube is about 0.8 inch (2 cm) long before seaming; the visible neck will be shorter once it is sewn.
Wings
Make 4 identical panels (2 per wing). Panels are unstuffed. A double layer keeps the raised wing from flopping.
The first 7 rows are the black tip. The rest of the panel is yellow. Shaping adds 2 stitches on each increase row, always in the first and last stitch.
Wing panel — make 4
With CC:
Row 1: Ch 2, 2 sc in the 2nd ch from the hook. [2]
Row 2: Ch 1, turn, sc in each st across. [2]
Row 3: Ch 1, turn, inc in each st. [4] (2 + 2 = 4 ✓)
Row 4: Ch 1, turn, sc in each st across. [4]
Row 5: Ch 1, turn, inc, sc in next 2 sts, inc. [6] (4 + 2 = 6 ✓)
Row 6: Ch 1, turn, sc in each st across. [6]
Row 7: Ch 1, turn, inc, sc in next 4 sts, inc. [8] (6 + 2 = 8 ✓)
Change to MC on the last yarn-over of Row 7. Cut CC, leaving a 6-inch (15 cm) tail to weave in later.
With MC:
Rows 8–9: Ch 1, turn, sc in each st across. [8]
Row 10: Ch 1, turn, inc, sc in next 6 sts, inc. [10] (8 + 2 = 10 ✓)
Rows 11–12: Ch 1, turn, sc in each st across. [10]
Row 13: Ch 1, turn, inc, sc in next 8 sts, inc. [12] (10 + 2 = 12 ✓)
Rows 14–15: Ch 1, turn, sc in each st across. [12]
Row 16: Ch 1, turn, inc, sc in next 10 sts, inc. [14] (12 + 2 = 14 ✓)
Rows 17–18: Ch 1, turn, sc in each st across. [14]
Row 19: Ch 1, turn, inc, sc in next 12 sts, inc. [16] (14 + 2 = 16 ✓)
Rows 20–21: Ch 1, turn, sc in each st across. [16]
Row 22: Ch 1, turn, inc, sc in next 14 sts, inc. [18] (16 + 2 = 18 ✓)
Rows 23–24: Ch 1, turn, sc in each st across. [18]
Row 25: Ch 1, turn, inc, sc in next 16 sts, inc. [20] (18 + 2 = 20 ✓)
Rows 26–32: Ch 1, turn, sc in each st across. [20]
FO. On one panel of each pair, leave an 18-inch (46 cm) MC tail for seaming and sewing the wing to the body. On the other panel, leave a 6-inch (15 cm) tail to weave in.
Row 32 (20 sts) is the body edge. The opposite end is the tip. Each panel is 32 rows, about 5.3 inches (13.5 cm) from tip to base before the spikes are added.
Join each wing
Hold two panels together, edges even. With the long MC tail and a yarn needle, whip stitch the Row 32 edges together through both layers (20 sts to 20 sts). Do not cut the remaining tail; it will sew the wing to the body.
Black border
The black border runs along the lower edge of each posed wing, around the tip, and a short way up the upper edge. Make the second wing a mirror of the first: put its black border on the opposite long edge, so both borders face down when the wings are raised.
Join CC through both layers at the lower corner of the seamed base. Ch 1 (does not count).
- Sc in each row-end along the lower edge to the tip. [32] (1 sc in each of 32 rows ✓)
- 2 sc in the tip point. [2]
- Sc in the next 7 row-ends up the upper edge. [7]
FO and weave in the CC end. Keep this edging relaxed. If it cups the wing, you worked it too tightly — pull back and redo that edge at an easier tension. The unworked remainder of the upper edge stays yellow.
Wing Spikes (CC)
Make one large, one medium, and one small spike per wing (6 spikes total). Worked flat. Do not stuff.
Large — make 2
Row 1: Ch 2, 2 sc in the 2nd ch from the hook. [2]
Row 2: Ch 1, turn, inc in each st. [4] (2 + 2 = 4 ✓)
Row 3: Ch 1, turn, inc, sc in next 2 sts, inc. [6] (4 + 2 = 6 ✓)
Row 4: Ch 1, turn, sc in each st across. [6]
Row 5: Ch 1, turn, inc, sc in next 4 sts, inc. [8] (6 + 2 = 8 ✓)
FO, leaving a 10-inch (25 cm) tail.
Medium — make 2
Row 1: Ch 2, 2 sc in the 2nd ch from the hook. [2]
Row 2: Ch 1, turn, inc in each st. [4] (2 + 2 = 4 ✓)
Row 3: Ch 1, turn, inc, sc in next 2 sts, inc. [6] (4 + 2 = 6 ✓)
Row 4: Ch 1, turn, sc in each st across. [6]
FO, leaving an 8-inch (20 cm) tail.
Small — make 2
Row 1: Ch 2, 2 sc in the 2nd ch from the hook. [2]
Row 2: Ch 1, turn, inc in each st. [4] (2 + 2 = 4 ✓)
Row 3: Ch 1, turn, sc in each st across. [4]
FO, leaving an 8-inch (20 cm) tail.
Sew the three spikes to the front face of each wing tip (the face that will point forward when the wing is raised). Overlap them about 0.5 inch (1.3 cm) onto the black tip. Place the large spike on the wing’s long axis, the medium spike angled slightly down, and the small spike angled slightly up. This is the jagged lightning tip. Whip stitch around each spike base so the points stand slightly off the wing.
Tail Feathers
Five stuffed feathers, black at the tip and yellow on the shaft. Pull each magic ring tight.
Center feather — make 1 (longest)
With CC:
Rnd 1: 4 sc in MR. [4]
Rnd 2: Sc in each st around. [4]
Rnd 3: (Sc, inc) 2 times. [6] (4 + 2 = 6 ✓)
Rnd 4: Sc in each st around. [6]
Change to MC on the last stitch of Rnd 4.
With MC:
Rnd 5: Sc in each st around. [6]
Rnd 6: (2 sc, inc) 2 times. [8] (6 + 2 = 8 ✓)
Rnds 7–18: Sc in each st around. [8]
FO, leaving a 12-inch (30 cm) tail. Stuff lightly, a little more at the open end than at the tip. Leave the tip pointed.
Inner feathers — make 2
Work the same as the center feather through Rnd 6. [8]
Rnds 7–14: Sc in each st around. [8]
FO, leaving a 10-inch (25 cm) tail. Stuff lightly.
Outer feathers — make 2
With CC:
Rnd 1: 4 sc in MR. [4]
Rnd 2: Sc in each st around. [4]
Rnd 3: (Sc, inc) 2 times. [6] (4 + 2 = 6 ✓)
Change to MC.
With MC:
Rnds 4–10: Sc in each st around. [6]
FO, leaving a 10-inch (25 cm) tail. Stuff very lightly.
Legs (MC) — make 2
The magic ring is the bottom of the foot. Round 3 is a front-loop rim that helps the toes splay.
Rnd 1: 6 sc in MR. [6]
Rnd 2: Inc in each st around. [12] (6 + 6 = 12 ✓)
Rnd 3: Working in the back loop only, sc in each st around. [12]
Rnds 4–8: Working in both loops, sc in each st around. [12]
FO, leaving a 12-inch (30 cm) tail. Stuff moderately. Keep the foot end flat.
Toes (CC) — make 6
Rnd 1: 4 sc in MR. [4]
Rnds 2–4: Sc in each st around. [4]
FO, leaving an 8-inch (20 cm) tail. Do not stuff. Flatten each toe.
Sew 3 toes to each foot, attaching them to the Round 3 rim and the base, not only to the magic ring. Point one toe forward and one to each side, and sew them flat so they lie on the table. The splayed toes are the standing base. Check that a gentle tug does not pull a toe off.
Assembly
Pin every piece before you sew. Use a yarn needle and matching yarn. Whip stitch through both layers. Ladder stitch is fine for any seam you want less visible, especially the neck.
Goal pose: Body upright on a slightly flat base. Head facing forward, beak level or tipped a little down. Crest swept back. Wings raised about 45 degrees from horizontal and swept slightly back. Tail fanned on the lower back, with the center feather angled down to touch the surface behind the feet. Feet just in front of center, toes flat. Contact points are the two feet and the center tail tip.
1. Face
Sew the beak to the front of the head, centered under the eyes, with the open edge covering about Rnds 13–16. Angle it slightly downward. The point should project about 1.5 inches (4 cm) from the face.
With CC, embroider a short brow over each eye. Bring the needle out above the inner corner of the eye and stitch a diagonal line about 0.5 inch (1.3 cm) long that rises toward the outer side of the head. Repeat on the other side so the brows angle down toward the beak.
2. Crest
Sew the spikes to the crown, over about Rnds 2–6, in this order from the bird’s left to right: short, medium, long, medium, short. Tilt all five backward. The long center spike leans toward the back of the head, not straight up. Overlap the bases slightly so they read as one swept crest.
3. Neck
Mark the front center of the head opening: the stitch directly below the beak.
Whip stitch one end of the neck to the head opening, 18 stitches to 18 stitches, using the head’s tail. Keep the marked front stitches aligned.
Fit the other end of the neck onto the body opening, front mark to front mark. Before you close the last third of this seam, stuff the neck lightly and add any extra fiberfill the head or shoulders need. Then finish the seam with the body’s tail. The head should not twist, and the beak should point forward.
4. Wings
Sew the spikes on before attaching the wings to the body, if you have not already.
On each wing, sew only the center 10 stitches of the Row 32 edge to the side of the body. Center that seam on the widest part of the body (Rnds 9–13). Ten stitches are about 1.7 inches (4 cm). Leave 5 stitches unsewn on each end of Row 32 so the wing root can flare. (20 − 10 = 10 unsewn, 5 per side ✓)
Do not try to sew the full 20-stitch edge to the body. That edge is wider than the body side and will pucker.
Angle each wing up about 45 degrees, tip swept slightly back, black border along the lower edge. Tack the lower flare of the wing root to the body with 2 or 3 stitches so the wing holds the angle. Leave the upper flare free.
5. Tail
Arrange the feathers in a fan on the lower back, over about Rnds 4–7 (near the base, not up by the neck): outer, inner, center, inner, outer. Overlap the open ends slightly and whip stitch them to the body.
Angle the center feather down so its tip can rest on the surface behind the feet. Angle the inner feathers a little less steeply, and set the outer feathers closer to horizontal. This fan is both the tail and the rear brace.
6. Legs
Sew the open top of each leg to the front underside of the body, over about Rnds 3–5, about 0.75 inch (2 cm) apart. Toes point forward and lie flat. The body’s flat base should still touch, or nearly touch, the surface between and just behind the feet.
7. Stability check
Set the bird on a table.
- If it tips forward, move the legs back a little, or lower the center tail.
- If it tips backward, move the legs forward, or check that the tail tip actually reaches the table.
- If it rolls sideways, spread the toes more and confirm the base is stuffed flat rather than round.
The three contact points — left foot, right foot, center tail tip — should form a triangle.
Weave in every remaining end. Tug each crest spike, wing, tail feather, and toe once. If anything shifts, add a few more whip stitches.
Finishing
- Crest: five yellow spikes, shortest on the outside, longest in the center, all swept back.
- Beak: long, black, centered under the eyes, tip firm.
- Eyes: amber or orange, 8 stitches apart, with black brows slanting down toward the beak.
- Wings: yellow, black along the lower edge and tip, three black spikes fanned at each tip.
- Tail: five feathers, black tips, center one longest and lowest.
- Feet: yellow legs, three black toes each, sewn flat.
No separate belly panel is used. The color break that reads as Zapdos is the black wing border, the jagged tips, the beak, and the talons against the yellow body.
Safety
- Use safety eyes, not buttons, if the toy might be handled by a young child. Even then, this piece has small toes and spikes and is best kept as a display toy for ages 3 and up.
- Sew limbs, crest, beak, wings, and tail on firmly and test each one.
- Stuff firmly enough that the fabric does not stretch open between stitches. A smaller hook is safer than a looser tension.
Care
Spot clean. If the yarn allows, a gentle machine wash in a mesh bag on cold, then reshape and dry flat. Do not wring. Re-pose the wings and tail while the piece is still damp so they dry at the raised angle.
Disclaimer: This pattern was generated by AI and should be reviewed for accuracy before use. While we strive for quality, AI-generated content may contain errors. Please verify measurements, stitch counts, charts, and instructions before beginning your project. Generated by purlJam.uk
Love this pattern?
Save this pattern to your free PurlJam libraryAccess your pattern anytime
Bookmark this page to access your pattern anytime