Type
Crochet
Difficulty
beginner
Category
amigurumi
AI Thinking Process
Planning
Verification
Pattern
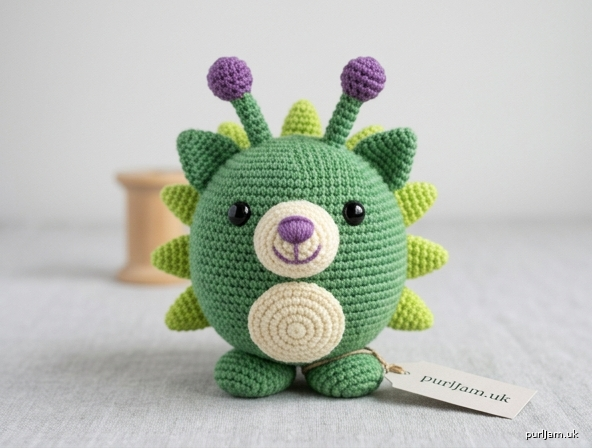
Zog the Alien Hedgehog
A beginner amigurumi made from simple rounds and one small triangle. Zog’s head and body are a single sphere. Lime spikes and little ears make the hedgehog; purple antennae, wide eyes, and bright green yarn make the alien. If you can single crochet, increase, and decrease, you can make this toy.
Skill Level
Beginner
Finished Size
About 3.5 inches (9 cm) wide and 3.5 inches (9 cm) tall for the body. About 5 inches (13 cm) tall including antennae, and about 4.5 inches (11.5 cm) wide including spikes. Size varies with tension and stuffing.
Materials
- Worsted weight (4) acrylic yarn:
- Color A (medium green): 50 yards (46 m) — body, ears, feet, antenna stalks
- Color B (lime): 20 yards (18 m) — spikes
- Color C (purple): 8 yards (7 m) — antenna tips and face embroidery
- Color D (cream): 12 yards (11 m) — belly and snout
- Hook: US F-5 / 3.75 mm
- Polyester fiberfill
- Yarn needle
- Locking stitch marker
- Straight pins
- Scissors
- One pair of 12 mm black safety eyes
Or embroider the eyes (required if the toy is for a child under 3 years)
Optional: a scrap of pink yarn for cheeks.
Safety eyes are a choking hazard. For a child under 3 years, embroider the eyes and sew every part on very firmly.
Gauge
5 sc = 1 inch (2.5 cm), worked in the round. Gauge is not critical. A tight fabric is more important than an exact size, so stuffing does not show. If you crochet loosely, use a US E-4 / 3.5 mm hook.
Abbreviations (US)
- ch — chain
- dec — invisible decrease (see Notes)
- inc — increase (2 sc in the same stitch)
- MR — magic ring
- rnd — round
- sc — single crochet
- sl st — slip stitch
- st(s) — stitch(es)
- ( ) — work the stitches inside the parentheses the number of times stated
- [ ] — stitch count at the end of the round or row
Notes
- Work in a continuous spiral. Do not join rounds unless the pattern tells you to slip stitch.
- Place a stitch marker in the first stitch of every round and move it up as you go.
- The number in brackets is your checkpoint. If your count does not match, undo to the marker and rework that round before continuing.
- Magic ring: Wrap the yarn around two fingers, insert the hook, pull up a loop, ch 1, and work the stated sc into the ring. Pull the tail to close. Easy start: ch 2 and work all of Round 1 into the 2nd ch from hook.
- Inc: work 2 sc in the next stitch.
- Dec (invisible decrease): Insert the hook under the front loop only of the next stitch, then under the front loop only of the following stitch. Yarn over, pull through both front loops, yarn over, and pull through the two loops on the hook. A normal single-crochet decrease through both loops is also fine.
- The right side faces out. After Round 3, check that the smooth side is outside and the yarn tail is inside.
- A finishing sl st is not counted in the stitch count.
- Leave the sewing tails as long as stated. Short tails are hard to bury.
Parts Checklist
- Body (Color A) — 1
- Snout (Color D) — 1
- Belly (Color D) — 1
- Spikes (Color B) — 7
- Ears (Color A) — 2
- Antennae (Color A and Color C) — 2
- Feet (Color A) — 2
Body (Color A)
Rnd 1: 6 sc in MR. [6]
Rnd 2: Inc in each st around. [12]
(6 increases → 6 + 6 = 12 ✓)
Rnd 3: (Sc, inc) 6 times. [18]
(6 increases → 12 + 6 = 18 ✓)
Rnd 4: (2 sc, inc) 6 times. [24]
(6 increases → 18 + 6 = 24 ✓)
Rnd 5: (3 sc, inc) 6 times. [30]
(6 increases → 24 + 6 = 30 ✓)
Rnds 6–8: Sc in each st around. [30]
Pause here for safety eyes. On the front of the body, insert the eyes between Rnd 7 and Rnd 8, with 6 stitches between the inner edges. This wide spacing is the alien look. Secure the washers inside. If you will embroider the eyes, skip this step and embroider them after the body is closed.
Rnd 9: (3 sc, dec) 6 times. [24]
(Each repeat uses 5 sts and makes 4; 6 × 4 = 24. Also 30 − 6 = 24 ✓)
Rnd 10: (2 sc, dec) 6 times. [18]
(Each repeat uses 4 sts and makes 3; 6 × 3 = 18. Also 24 − 6 = 18 ✓)
Begin stuffing. Pack the fiberfill firmly, and press a small flat spot into the bottom so Zog can sit.
Rnd 11: (Sc, dec) 6 times. [12]
(Each repeat uses 3 sts and makes 2; 6 × 2 = 12. Also 18 − 6 = 12 ✓)
Finish stuffing. Do not leave empty corners.
Rnd 12: Dec 6 times. [6]
(6 decreases → 12 − 6 = 6 ✓)
Fasten off, leaving a 6 inch (15 cm) tail. Thread the tail through the front loops of the remaining 6 stitches, pull tight to close, knot, and bury the tail inside the body.
Snout (Color D)
Rnd 1: 6 sc in MR. [6]
Rnd 2: (Sc, inc) 3 times. [9]
(Each repeat uses 2 sts and makes 3; 3 × 3 = 9. Also 6 + 3 = 9 ✓)
Rnd 3: Sc in each st around. [9]
Sl st in the next st. Fasten off, leaving an 8 inch (20 cm) tail. Stuff lightly.
Belly (Color D)
Worked in a flat spiral. Do not stuff.
Rnd 1: 6 sc in MR. [6]
Rnd 2: Inc in each st around. [12]
(6 increases → 6 + 6 = 12 ✓)
Rnd 3: (Sc, inc) 6 times. [18]
(6 increases → 12 + 6 = 18 ✓)
Sl st in the next st. Fasten off, leaving a 12 inch (30 cm) tail.
Spike (Color B) — make 7
Pull each magic ring tight so the tip is sharp. Do not stuff.
Rnd 1: 4 sc in MR. [4]
Rnd 2: Inc in each st around. [8]
(4 increases → 4 + 4 = 8 ✓)
Rnd 3: Sc in each st around. [8]
Rnd 4: Sc in each st around. [8]
Sl st in the next st. Fasten off, leaving an 8 inch (20 cm) tail.
Ear (Color A) — make 2
Worked in rows. The ch-1 at the end of a row is not a stitch.
Ch 5.
Row 1: Sc in the 2nd ch from the hook and in each ch across. Ch 1, turn. [4]
Row 2: Dec, sc in the next 2 sts. Ch 1, turn. [3]
(One decrease → 4 − 1 = 3 ✓)
Row 3: Dec, sc in the next st. Ch 1, turn. [2]
(One decrease → 3 − 1 = 2 ✓)
Row 4: Dec. [1]
(One decrease → 2 − 1 = 1 ✓)
Fasten off, leaving a 6 inch (15 cm) tail. Do not stuff.
Antenna (Color A and Color C) — make 2
Stalk (Color A): Ch 9. Sc in the 2nd ch from the hook and in each ch across. [8]
(Ch 9, skip 1, work 8 ✓)
Fasten off, leaving an 8 inch (20 cm) tail at the bottom end for sewing to the head.
Ball tip (Color C):
Rnd 1: 6 sc in MR. [6]
Rnd 2: Sc in each st around. [6]
Rnd 3: Dec 3 times. [3]
(3 decreases → 6 − 3 = 3 ✓)
Fasten off, leaving an 8 inch (20 cm) tail. Thread the tail through the front loops of the 3 stitches and pull tight. Use the same tail to sew the ball firmly over one end of the stalk. Weave in the short tail at that end of the stalk.
Foot (Color A) — make 2
Rnd 1: 6 sc in MR. [6]
Rnd 2: (Sc, inc) 3 times. [9]
(3 increases → 6 + 3 = 9 ✓)
Rnd 3: Sc in each st around. [9]
Rnd 4: (Sc, dec) 3 times. [6]
(Each repeat uses 3 sts and makes 2; 3 × 2 = 6. Also 9 − 3 = 6 ✓)
Sl st in the next st. Fasten off, leaving an 8 inch (20 cm) tail. Stuff lightly. Do not close the opening; sewing it to the body will close it.
Assembly
Pin every piece in place before you sew. Use the long tail and a yarn needle. Whip stitch: pass the needle through one stitch on the body and one stitch on the piece, repeat around, pull snug, knot, and bury the tail inside the body.
Front and back are set by the eyes. The eye side is the front. Keep the entire front half free of spikes.
- Snout: Sew it to the front, centered under the eyes, with the top of the snout just below the eye line. It should sit over about Rnds 8–10.
- Belly: Sew the flat circle on the lower front, with its top edge touching or slightly overlapping the bottom of the snout. The smooth side faces out.
- Feet: Sew the two feet side by side on the flattened bottom, slightly toward the front, openings against the body. They should touch each other so Zog sits level.
- Ears: Sew one ear on each side of the upper body, about level with the top of the eyes, in front of where the spikes will go. The pointed end (Row 4) faces up. Catch the side edges of the triangle so the ear stands up a little.
- Antennae: Sew the plain ends of the stalks to the top center, about 3 stitches apart, just behind the eye line. The balls point up. Stitch through the end of each stalk several times so they do not pull out.
- Spikes: Sew all 7 on the back half only, open bases against the body, tips pointing out.
- Upper row: 2 spikes, centered just below the antennae, about 2 stitches apart.
- Middle row: 3 spikes, about 1 round below the upper row, spread across the back.
- Lower row: 2 spikes, about 1 round below the middle row, sitting in the gaps between the middle spikes.
Stop above the midline so the spikes do not crowd the feet.
Face
Use Color C and the yarn needle.
- Nose: On the center of the snout, sew 3 or 4 short straight stitches stacked into a small oval, about 2 stitches wide.
- Mouth: Just under the snout, sew a shallow upward curve about 4 stitches wide. Two short stitches in a small V also work.
- Embroidered eyes (only if you did not use safety eyes): Between Rnd 7 and Rnd 8, with 6 stitches between them, fill a small oval about 3 stitches tall with straight stitches. Add one short Color D stitch at the upper inner corner of each eye for a highlight.
- Cheeks (optional): One short horizontal stitch on each side of the snout in pink or Color C.
- Star mark (optional): On the belly, sew a small X with two crossing Color C stitches.
Weave in every remaining end. Tug each sewn part gently. If anything shifts, add a few more stitches.
Tips for Success
- Count every round. Most beginner mistakes are a missed increase, not a hard stitch.
- Stuff the body as the opening shrinks. A firm sphere keeps its shape; loose stuffing looks lumpy.
- Do not stuff the spikes. A tight magic ring makes the point.
- Pin the face, belly, and spike outline before sewing. Move anything that crosses the side “seam” between front and back.
- Work at a firm tension. If stuffing shows between stitches, switch to a US E-4 / 3.5 mm hook and start that piece again.
- Same stitch counts in a lighter yarn make a smaller toy. Same stitch counts in a heavier yarn make a larger one. Do not change the numbers unless you want to redesign the decreases.
Color Ideas
The written pattern is Galaxy Green: medium green, lime spikes, purple details, cream belly.
You can swap colors without changing any stitch counts. A purple body with teal spikes and yellow embroidery reads just as alien. Spikes may also be worked in Color A if you only have one green skein; the cone shape still reads as quills.
Care
Spot clean with a damp cloth and air dry. Do not machine wash if safety eyes are installed. If the toy is for a young child, check seams now and then and restitch anything loose.
Disclaimer: This pattern was generated by AI and should be reviewed for accuracy before use. While we strive for quality, AI-generated content may contain errors. Please verify measurements, stitch counts, charts, and instructions before beginning your project. Generated by purlJam.uk
Love this pattern?
Save this pattern to your free PurlJam libraryAccess your pattern anytime
Bookmark this page to access your pattern anytime