Type
Crochet
Difficulty
intermediate
Category
amigurumi
AI Thinking Process
Planning
Verification
Pattern
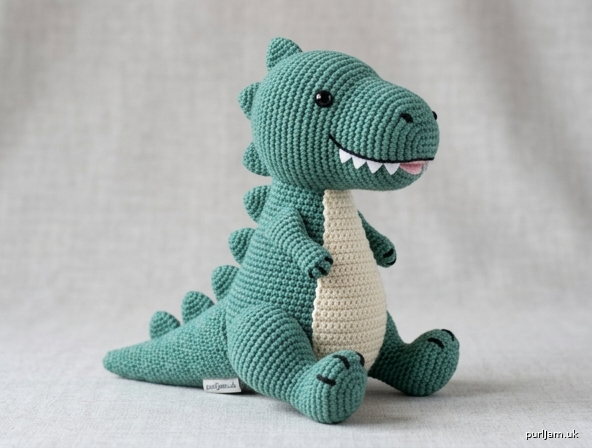
Advanced Crochet Dinosaur Amigurumi (T-Rex Style)
Skill Level: Advanced
Finished Size: Approximately 9 inches (23 cm) tall when seated, 11 inches (28 cm) nose-to-tail
Yarn Weight: Worsted (4)
Materials
- Worsted weight yarn:
- Main Color (MC): 150 yd (137 m) – green, teal, or purple
- Contrast Color (CC): 40 yd (37 m) – cream or light yellow (belly)
- Small amount black or dark brown for nostrils/claws (embroidery)
- US E-4 / 3.5 mm crochet hook (or size needed for tight gauge)
- 10–12 mm safety eyes (1 pair)
- Polyester fiberfill stuffing
- Yarn needle
- Stitch marker
- Scissors
- Optional: small piece of white felt + fabric glue or sewing thread for teeth; pink felt for mouth interior
Gauge
5.5 sc and 5.5 rounds = 1 inch (2.5 cm) in continuous sc, worked tightly.
Gauge is critical for a firm fabric that holds stuffing without gaps. Adjust hook size if necessary.
Abbreviations (US Terms)
- MR: magic ring (adjustable ring)
- sc: single crochet
- inc: 2 sc in same stitch
- invdec: invisible decrease (insert hook in front loops only of next 2 sts, yo, pull through both, yo, pull through 2 loops)
- ch: chain
- sl st: slip stitch
- st(s): stitch(es)
- rnd(s): round(s)
- BLO: back loop only
- FLO: front loop only
- MC: main color
- CC: contrast color
- [...] : stitch count at end of round
- ( ) × n : work instructions in parentheses n times
Notes
- Work in continuous spirals unless stated. Do not join rounds. Use a stitch marker in the first stitch of each round and move it up.
- Keep tension tight and even.
- Stuff firmly as you go, especially the head and body, before openings become too small.
- Invisible decrease (invdec) is used for all decreases to minimize holes.
- Color changes: work the last yarn-over of the previous stitch in the new color.
- Safety first: Use safety eyes (not buttons) if the toy is for a child under 3. Sew all parts securely.
HEAD (make 1 – MC)
Rnd 1: 6 sc in MR. [6]
Rnd 2: inc in each st around. [12]
Rnd 3: (sc, inc) around. [18]
Rnd 4: (2 sc, inc) around. [24]
Rnd 5: (3 sc, inc) around. [30]
Rnd 6: (4 sc, inc) around. [36]
Rnds 7–12: sc in each st around. [36] (6 rounds)
Place safety eyes between Rnds 9 and 10, approximately 8–9 stitches apart, centered on the face.
Rnd 13: (4 sc, invdec) around. [30]
Rnd 14: (3 sc, invdec) around. [24]
Begin snout shaping (work even on front, slight decrease on sides):
Rnd 15: 8 sc, invdec, 4 sc, invdec, 8 sc. [22]
Rnd 16: sc in each st around. [22]
Rnd 17: 7 sc, invdec, 4 sc, invdec, 7 sc. [20]
Rnd 18: sc in each st around. [20]
Stuff head firmly, pushing stuffing into snout.
Rnd 19: (3 sc, invdec) around. [16]
Rnd 20: (2 sc, invdec) around. [12]
Rnd 21: (sc, invdec) around. [8]
Rnd 22: invdec around. [4]
Fasten off, leaving a 12-inch (30 cm) tail. Thread tail through remaining front loops and pull tight to close. Weave in end.
Optional open mouth (advanced): Before closing, embroider or sew a small pink felt oval inside the lower snout area and add tiny white felt triangles for teeth along the upper and lower jaw edges.
BODY (make 1 – start with MC, add CC belly)
Rnd 1: With MC, 6 sc in MR. [6]
Rnd 2: inc in each st around. [12]
Rnd 3: (sc, inc) around. [18]
Rnd 4: (2 sc, inc) around. [24]
Rnd 5: (3 sc, inc) around. [30]
Rnd 6: (4 sc, inc) around. [36]
Rnd 7: (5 sc, inc) around. [42]
Belly color change begins (work CC on center front only):
Rnd 8: 15 sc MC, 12 sc CC, 15 sc MC. [42]
Rnd 9: 14 sc MC, 14 sc CC, 14 sc MC. [42]
Rnds 10–16: 13 sc MC, 16 sc CC, 13 sc MC. [42] (7 rounds)
Rnd 17: 14 sc MC, 14 sc CC, 14 sc MC. [42]
Rnd 18: 15 sc MC, 12 sc CC, 15 sc MC. [42]
Continue in MC only:
Rnd 19: (5 sc, invdec) around. [36]
Rnd 20: sc in each st around. [36]
Rnd 21: (4 sc, invdec) around. [30]
Rnd 22: sc in each st around. [30]
Rnd 23: (3 sc, invdec) around. [24]
Stuff body very firmly, shaping a slight oval.
Rnd 24: (2 sc, invdec) around. [18]
Rnd 25: (sc, invdec) around. [12]
Rnd 26: invdec around. [6]
Fasten off, leave long tail for sewing. Close remaining hole if desired, or leave slightly open for neck attachment. Weave in short ends only.
LEGS (make 2 – MC)
Rnd 1: 6 sc in MR. [6]
Rnd 2: inc in each st around. [12]
Rnd 3: (sc, inc) around. [18]
Rnd 4: BLO sc in each st around. [18] (creates foot ridge)
Rnds 5–6: sc in each st around. [18]
Rnd 7: (sc, invdec) around. [12]
Rnds 8–12: sc in each st around. [12] (5 rounds)
Stuff foot firmly and leg moderately (leave top ½ inch / 1 cm unstuffed for easier sewing).
Flatten top opening and sc across both layers (6 sc) to close, or leave open and sew later. Fasten off, leaving 10-inch (25 cm) tail for sewing.
ARMS (make 2 – MC)
Rnd 1: 6 sc in MR. [6]
Rnd 2: (sc, inc) around. [9]
Rnds 3–7: sc in each st around. [9] (5 rounds)
Lightly stuff. Flatten opening and sc across both layers (4–5 sc) to close. Fasten off, leaving long tail for sewing.
Optional: Embroider 2–3 small claw lines at the tip with black yarn.
TAIL (make 1 – MC)
Rnd 1: 6 sc in MR. [6]
Rnd 2: (sc, inc) around. [9]
Rnds 3–4: sc in each st around. [9]
Rnd 5: (2 sc, inc) around. [12]
Rnds 6–8: sc in each st around. [12]
Rnd 9: (3 sc, inc) around. [15]
Rnds 10–12: sc in each st around. [15]
Rnd 13: (4 sc, inc) around. [18]
Rnds 14–18: sc in each st around. [18] (5 rounds)
Stuff firmly at the base, tapering to lightly stuffed tip. Do not close. Fasten off, leaving 12-inch (30 cm) tail for sewing. The wide end attaches to the body.
BACK SPINES (make 5–7 – MC)
Small triangle spines (worked flat):
Row 1: Ch 2, 2 sc in 2nd ch from hook. Turn. [2]
Row 2: Ch 1, inc in each st. Turn. [4]
Row 3: Ch 1, sc, inc, inc, sc. Turn. [6]
Row 4: Ch 1, sc across. [6]
Fasten off, leaving 8-inch (20 cm) tail for sewing.
Make 5–7 spines in graduating sizes if desired (stop after Row 2 or 3 for smaller ones). Weave in starting ends.
ASSEMBLY
- Pin first. Position all parts with locking stitch markers or pins before sewing.
- Head to body: Sew head to the open top of the body, adding extra stuffing through the neck if needed for a firm join. Align snout forward. Use whip stitch or ladder stitch with MC.
- Legs: For a stable sitting pose, sew legs to the lower sides of the body so the dinosaur sits upright. Attach at approximately Rnds 20–24 of the body, angled slightly forward. Legs should splay just enough to create a flat base.
- Arms: Sew short arms to the upper sides of the body, just below the neck join (around Rnds 8–10 of body), angled slightly forward and down.
- Tail: Sew the wide open end of the tail to the lower back of the body (centered, opposite the belly), roughly at Rnds 18–22. Curve the tail slightly to one side for character if desired. Add any final stuffing before closing the seam completely.
- Spines: Arrange 5–7 spines in a straight or gently curved line along the center back from the base of the head to the base of the tail. Sew each spine securely through both layers of the triangle base using the long tails. Space them evenly (about ½–¾ inch / 1.5–2 cm apart).
- Facial details:
- Embroider two small nostrils on the snout with black yarn (French knots or tiny straight stitches).
- Optional smile: a gentle curved stitch under the snout.
- Optional claws: 2–3 short straight stitches on each foot and hand in black or dark brown.
- Final shaping: Massage the stuffing so the belly is rounded, the snout is distinct, and the dinosaur sits level. Weave in all remaining ends securely.
Finishing & Care
- Check that every seam is tight and no stuffing shows.
- Spot clean only; do not machine wash.
- For children under 3 years: omit felt teeth, ensure safety eyes are locked, and double-sew all limbs.
Stitch-Count Validation Summary
- Head peak: 36 sts → closed cleanly via (4 sc, invdec) etc.
- Body peak: 42 sts → decreases (5 sc, invdec) → 36 → 30 → 24 → 18 → 12 → 6.
- Legs: 18 → 12; Arms: 9; Tail: progressive 6 → 9 → 12 → 15 → 18.
All rounds balance (increases/decreases divisible into starting count).
Your advanced dinosaur is ready to roar! Enjoy.
Disclaimer: This pattern was generated by AI and should be reviewed for accuracy before use. While we strive for quality, AI-generated content may contain errors. Please verify measurements, stitch counts, charts, and instructions before beginning your project. Generated by purlJam.uk
Love this pattern?
Save this pattern to your free PurlJam libraryAccess your pattern anytime
Bookmark this page to access your pattern anytime