Type
Crochet
Difficulty
intermediate
Category
amigurumi
AI Thinking Process
Planning
Verification
Pattern
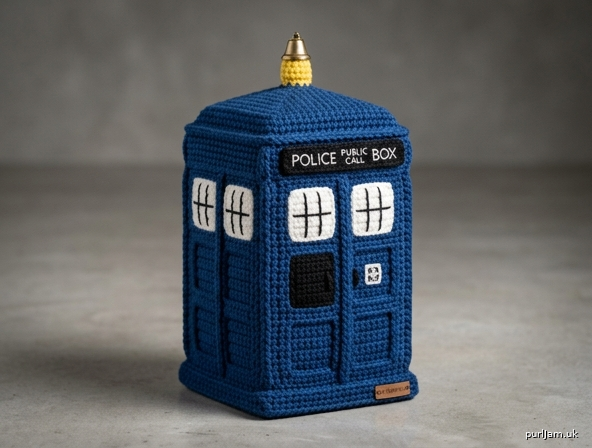
Amigurumi TARDIS
Intermediate Crochet Pattern (Bulky Weight)
A classic blue police-box amigurumi inspired by the TARDIS. Worked in dense single crochet for a firm, free-standing figure approximately 9 inches (23 cm) tall and 4.5 inches (11.5 cm) wide.
Materials
- Bulky weight yarn (category 5):
- Main Blue: 180 yd (165 m)
- White: 40 yd (37 m)
- Black: 30 yd (27 m)
- Yellow or Gold: 15 yd (14 m)
- US G-6 (4.0 mm) crochet hook (or size needed to obtain firm gauge; go down from yarn-label recommendation)
- Polyester fiberfill stuffing
- Yarn needle
- Stitch marker
- Optional but recommended: thin cardboard or plastic canvas pieces cut to 4" × 4" (10 × 10 cm) for base and mid-body support
- Optional: black embroidery floss, small yellow bead or bell for lamp top, fabric glue
- Scissors
Gauge
14 sc and 14 rnds = 4" (10 cm) in single crochet, worked tightly.
Adjust hook size to obtain gauge; fabric must be dense so stuffing does not show.
Finished Size
Approximately 9" (23 cm) tall × 4.5" (11.5 cm) wide × 4.5" (11.5 cm) deep.
Abbreviations (US Terms)
- ch: chain
- sc: single crochet
- inc: 2 sc in same stitch
- dec: invisible decrease (insert hook in FLO of next 2 sts, yo, pull through both, yo, pull through 2 loops)
- BLO: back loop only
- FLO: front loop only
- sl st: slip stitch
- st(s): stitch(es)
- rnd(s): round(s)
- MR: magic ring (adjustable ring)
- FO: fasten off
- [ ]: stitch count at end of round/row
Work in continuous spirals unless noted. Do not join rounds. Move stitch marker up each round.
BODY (Main Blue)
Worked from the base up as a square tube.
Base (worked flat)
With Main Blue, ch 13.
Row 1: Sc in 2nd ch from hook and in each ch across. [12]
Rows 2–12: Ch 1, turn, sc in each st across. [12]
You now have a 12-sc × 12-row square.
Begin working in the round (sides)
Do not turn. Rotate work to crochet around the perimeter of the square.
Rnd 1 (setup): Work 12 sc evenly across the first side (1 sc in each row end), 12 sc across the next side (1 sc in each foundation ch), 12 sc across the next side (1 sc in each row end), 12 sc across the last side (1 sc in each st of Row 12). [48]
Place marker in first st to mark beginning of rnd.
Rnds 2–22: Sc in each st around. [48]
(Work approximately 22 rnds or until body measures 6.25" / 16 cm tall from base.)
Optional structure: Insert 4" × 4" cardboard square into base now. Add a second square halfway up if desired for extra rigidity.
Stuff body very firmly as you go, keeping corners sharp and sides straight.
Rnd 23 (BLO ridge for roof seat): Sc BLO in each st around. [48]
Rnd 24: Sc in each st around. [48]
FO, leaving a 24" (60 cm) tail for sewing. Finish stuffing so top is level and firm. Set aside.
ROOF (Main Blue)
Rnd 1: 6 sc in MR. [6]
Rnd 2: Inc in each st around. [12]
Rnd 3: (sc, inc) around. [18]
Rnd 4: (2 sc, inc) around. [24]
Rnd 5: (3 sc, inc) around. [30]
Rnd 6: (4 sc, inc) around. [36]
Rnd 7: (5 sc, inc) around. [42]
Rnd 8: (6 sc, inc) around. [48]
Rnds 9–10: Sc in each st around. [48]
Rnd 11 (overhang): (7 sc, inc) around. [54]
Rnd 12: Sc in each st around. [54]
FO, leaving long tail for sewing. Lightly stuff the roof so it keeps a shallow pyramidal/dome shape with a flat underside that will sit on the body. Do not overstuff.
LAMP / LIGHT (Yellow)
Rnd 1: 6 sc in MR. [6]
Rnd 2: Inc in each st around. [12]
Rnds 3–5: Sc in each st around. [12]
Rnd 6: (sc, dec) around. [8]
Stuff lightly.
Rnd 7: Dec around. [4]
FO, thread tail through remaining 4 sts, pull tight to close, and weave in.
Optional: sew a small yellow bead or bell to the very top for a “lantern” look.
WINDOWS (make 8 – White)
(Four large side windows + simplified door windows; each is a small square panel.)
Ch 7.
Row 1: Sc in 2nd ch from hook and each ch across. [6]
Rows 2–6: Ch 1, turn, sc in each st across. [6]
FO, leaving 12" (30 cm) tail for sewing.
Window panes (surface detail): With Black, embroider or surface-sl-st a plus-sign (+) grid on each white square: one vertical line down the center and one horizontal line across the center, dividing the window into four panes. Weave in ends.
DOOR PANEL DETAIL (optional – Black or White)
Ch 9.
Row 1: Sc in 2nd ch from hook and each ch across. [8]
Rows 2–14: Ch 1, turn, sc in each st across. [8]
FO, leaving long tail. This becomes the recessed door suggestion on the front face.
POLICE BOX SIGN (Black with White or Yellow lettering)
Ch 21.
Row 1: Sc in 2nd ch from hook and each ch across. [20]
Rows 2–4: Ch 1, turn, sc in each st across. [20]
FO, leaving long tail.
With White (or Yellow) yarn/embroidery floss, stitch the words “POLICE” on the top line and “PUBLIC CALL BOX” (or simply “POLICE BOX”) centered on the band using backstitch or chain stitch. Keep letters small and neat.
ASSEMBLY
- Attach Roof: Pin roof centered on top of body so the Rnd 23 BLO ridge sits just inside the roof overhang. Using the body tail (or matching blue), whipstitch through the BLO ridge and corresponding roof stitches. Add a little extra stuffing at the neck joint if needed before closing completely.
- Attach Lamp: Sew lamp firmly to the exact center of the roof top. Reinforce with several passes so it cannot be pulled off.
- Windows: Pin four white window squares evenly spaced on each of the four body sides (two upper, two lower per side is classic; or one large per side for a simpler look). Sew in place with matching white tails using whipstitch.
- Door & Sign: Sew the optional door panel to the front face, slightly off-center or centered under the sign area. Sew the POLICE BOX sign horizontally across the top of the front face, just below the roof line.
- Final embroidery (Black yarn or floss):
- Small door handle (French knot or tiny vertical bar) on the door.
- Optional thin vertical lines suggesting paneling between windows.
- Optional “St. John Ambulance” or notice-board rectangle on the door with a few straight stitches.
- Weave in all remaining ends securely. Shape the TARDIS by rolling the sides gently between your hands so corners stay crisp.
Finishing & Care
- Spot clean only; do not machine wash.
- If using cardboard inserts, keep the piece dry.
- For display, the firm stuffing and square base allow the TARDIS to stand alone.
Safety Note
This pattern uses no safety eyes. If giving to children under 3 years, omit any bead/bell on the lamp, embroider all details instead of using small appliqués that could loosen, and ensure every piece is sewn extremely securely. Supervise play.
Pattern Notes & Math Validation
- Base perimeter: 12 + 12 + 12 + 12 = 48 sts ✓
- Body remains 48 sts for 22 even rounds ✓
- Roof increases: 6 → 12 → 18 → 24 → 30 → 36 → 42 → 48 (6 inc each rnd) → 54 (6 inc) ✓
- Lamp: 6 → 12, even, then (sc, dec) × 4 = 8, then dec × 4 = 4 ✓
- Window panels: 6 sc × 6 rows each ✓
- Sign: 20 sc × 4 rows ✓
Enjoy your amigurumi TARDIS — it’s bigger on the inside (with fiberfill)!
Disclaimer: This pattern was generated by AI and should be reviewed for accuracy before use. While we strive for quality, AI-generated content may contain errors. Please verify measurements, stitch counts, charts, and instructions before beginning your project. Generated by purlJam.uk
Love this pattern?
Save this pattern to your free PurlJam libraryAccess your pattern anytime
Bookmark this page to access your pattern anytime