Type
Crochet
Difficulty
intermediate
Category
amigurumi
AI Thinking Process
Planning
Verification
Pattern
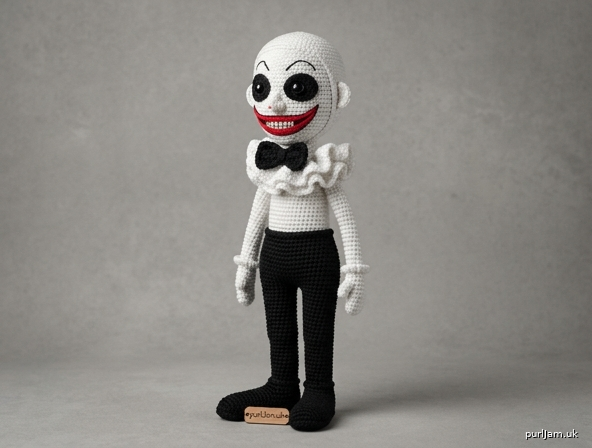
Art the Clown
12-Inch Advanced Amigurumi Doll
A gaunt, bald clown doll worked in separate amigurumi pieces and sewn together. Inspired by the horror-film character Art the Clown. Decorative collectible only — not a toy.
Finished size: Approximately 12 in (30.5 cm) tall when made at gauge.
Skill level: Advanced
Materials
- Worsted weight yarn (category 4)
- Color A (pale white): skin, shirt, collar, nose, ears — 160 yd (146 m)
- Color B (black): trousers, shoes, eye patches, bow tie — 130 yd (119 m)
- Color C (bright red): smile — 10 yd (9 m)
- Small amount of off-white or cream for teeth (Color A may be used)
- Crochet hook: US E-4 / 3.5 mm (or size needed to obtain gauge)
- 12 mm black safety eyes (1 pair)
- Polyester fiberfill
- Yarn needle, tapestry needle
- Stitch marker
- Pins
- Optional: small piece of black felt to back the eye patches; white felt scraps for teeth
- Optional: black embroidery floss for extra-crisp mouth outline
Gauge
5 sc and 5.5 rnds = 1 in (2.5 cm) in single crochet worked in the round, unstuffed, fabric tight enough that stuffing will not show.
Work a small spiral: Rnds 1–8 of the Head. The Rnd 8 circle should measure about 3 in (7.5 cm) across (48 sts ÷ 5 sc per inch ≈ 9.6 in / 24.5 cm circumference; 9.6 ÷ 3.14 ≈ 3.1 in / 7.9 cm diameter ✓).
If your swatch is larger, go down a hook size. If smaller, go up a hook size. Height is written for this gauge; a looser fabric will grow past 12 in (30.5 cm).
Abbreviations (US)
- BLO — back loop only
- ch — chain
- dc — double crochet
- dec — invisible single-crochet decrease (insert hook FLO of next 2 sts, yo, pull through both, yo, pull through 2)
- FLO — front loop only
- FO — fasten off
- hdc — half double crochet
- inc — 2 sc in same stitch
- MR — magic ring
- rnd(s) — round(s)
- sc — single crochet
- sl st — slip stitch
- st(s) — stitch(es)
- yo — yarn over
- ( ) × n — work the stitches in parentheses n times
Pattern Notes
- Pieces are worked in continuous spirals unless a row is specified. Do not join or chain at the start of rnds. Mark the first st of every rnd and move the marker up.
- Use invisible decreases. Work tightly. Amigurumi fabric should be firm.
- Stuff as directed, a little at a time. Firm stuffing in the head and feet; moderate stuffing in limbs so they stay thin and gaunt.
- When changing color, work the last yarn-over of the previous st in the new color.
- Parenthetical stitch counts are the number of stitches you should have at the end of that rnd.
- Safety eyes are a choking hazard. This doll is a collectible for adults and is not suitable for children under 3 years.
Head
With A. Worked from the crown down.
Rnd 1: 6 sc in MR. (6)
Rnd 2: inc × 6. (6 increases → 6 + 6 = 12 ✓)
Rnd 3: (sc, inc) × 6. (6 increases → 12 + 6 = 18 ✓)
Rnd 4: (2 sc, inc) × 6. (6 increases → 18 + 6 = 24 ✓)
Rnd 5: (3 sc, inc) × 6. (6 increases → 24 + 6 = 30 ✓)
Rnd 6: (4 sc, inc) × 6. (6 increases → 30 + 6 = 36 ✓)
Rnd 7: (5 sc, inc) × 6. (6 increases → 36 + 6 = 42 ✓)
Rnd 8: (6 sc, inc) × 6. (6 increases → 42 + 6 = 48 ✓)
Rnds 9–17: sc in each st around. (48) — 9 rnds even
Safety eyes: Insert 12 mm safety eyes between Rnds 11 and 12, 9 sts apart (measure 9 sts from post to post at the inner edges). Do not fasten the washers until the Eye Patches are seated (see Eye Patches). The eye line sits slightly below the horizontal center of the head.
Rnd 18: (6 sc, dec) × 6. (6 decreases → 48 − 6 = 42 ✓)
Rnd 19: (5 sc, dec) × 6. (6 decreases → 42 − 6 = 36 ✓)
Rnd 20: (4 sc, dec) × 6. (6 decreases → 36 − 6 = 30 ✓)
Rnd 21: (3 sc, dec) × 6. (6 decreases → 30 − 6 = 24 ✓)
Stuff the head firmly, shaping a slightly egg-like skull (fuller at the back). Leave Rnd 21 accessible — the body neck is sewn to this round.
Rnd 22: (2 sc, dec) × 6. (6 decreases → 24 − 6 = 18 ✓)
Rnd 23: (sc, dec) × 6. (6 decreases → 18 − 6 = 12 ✓)
Add final stuffing. Rnd 24: dec × 6. (6 decreases → 12 − 6 = 6 ✓)
FO, leaving a 12 in (30.5 cm) tail. Thread through the front loops of the remaining 6 sts and pull closed. Weave in the end, burying it inside the head.
Eye Patches (make 2)
With B. These form Art’s sunken black sockets. Worked as small ovals.
Ch 6.
Rnd 1: 2 sc in 2nd ch from hook, sc in next 3 ch, 3 sc in last ch; rotate to work along the unused loops of the foundation, sc in next 3, sc in same ch as the starting 2 sc. (2 + 3 + 3 + 3 + 1 = 12 ✓)
Rnd 2: inc × 2, sc in next 3, inc × 3, sc in next 3, inc. (2 + 3 + 3 + 3 + 1 = 12 sts used; 6 increases → 12 + 6 = 18 ✓)
Sl st in first sc. FO, leaving a 14 in (35.5 cm) tail for sewing.
Cut a tiny slit at the center of each patch (or ease the safety-eye post between stitches). Seat each patch on the head so the eye post passes through the patch, then through the head, then the washer. The patch should sit as a horizontal oval, covering Rnds 10–13, with a slight outer-corner droop. Only then snap the washers on.
Indent the sockets (advanced sculpting): With a 18 in (45.5 cm) length of A, enter at the neck opening (or through a nearby stitch), come out just beside the left eye post, go back in beside the right eye post, and exit at the neck. Pull gently until both eyes sink. Tie off inside the head. Repeat once if needed. Do not over-pull or the face will pucker.
Ears (make 2)
With A.
Rnd 1: 6 sc in MR. (6)
Rnd 2: (sc, inc) × 3. (3 increases → 6 + 3 = 9 ✓)
Rnd 3: sc in each st around. (9)
FO, leaving a 10 in (25.5 cm) tail. Do not stuff. Flatten into a small half-circle.
Nose
With A.
Rnd 1: 6 sc in MR. (6)
Rnd 2: sc in each st around. (6)
FO, leaving an 8 in (20.5 cm) tail. Stuff with a few fiberfill wisps. The nose is a tiny bump only — Art does not have a round circus nose.
Legs and Body
The legs begin as oval shoes, become 18-st pant tubes, and are joined with a 4-st crotch chain. The body is then worked up in one piece: black through the hips, pale white for the shirt, decreasing to a 24-st neck.
Foot and Leg (make 2)
With B.
Ch 8.
Rnd 1: sc in 2nd ch from hook, sc in next 5 ch, 3 sc in last ch; rotate to work along the unused loops, sc in next 5, 2 sc in the remaining end ch. (6 + 3 + 5 + 2 = 16 ✓)
Rnd 2: inc in first st, sc in next 5, inc in next 3 sts, sc in next 5, inc in next 2 sts. (1 + 3 + 2 = 6 increases → 16 + 6 = 22 ✓)
Rnd 3: sc in first st, inc, sc in next 5, (sc, inc) × 3, sc in next 5, (sc, inc) × 2. (1 + 3 + 2 = 6 increases → 22 + 6 = 28 ✓)
Rnd 4: sc BLO in each st around (this ridge is the sole edge). (28)
Rnd 5: sc in each st around. (28)
Rnd 6: sc in next 8, dec × 6, sc in next 8. (6 decreases at the toe → 28 − 6 = 22 ✓; 8 + 12 + 8 = 28 sts used ✓)
Rnd 7: sc in next 7, dec × 4, sc in next 7. (4 decreases → 22 − 4 = 18 ✓; 7 + 8 + 7 = 22 sts used ✓)
Rnds 8–25: sc in each st around. (18) — 18 rnds even
Stuff the shoe firmly, pushing fill into the toe so the oval sole stays flat. Stuff the leg only moderately so it stays thin. FO the first leg only. Do not FO the second leg.
Join Legs and Work Body
Keep the second leg live. Confirm both toes point the same way (forward). From the inner side of the second leg (the side that will face the other leg), ch 4.
Body Rnd 1 (join): sc in any st of the first leg, sc in next 17 sts of the first leg, sc in each of the 4 ch, sc in each of the 18 sts of the second leg, sc in each unused loop of the 4 ch. (18 + 4 + 18 + 4 = 44 ✓)
Place the marker on the first sc of this rnd. The 4-st chains are the crotch gusset; the toes must still point forward.
Body Rnd 2: (10 sc, inc) × 4. (4 increases → 44 + 4 = 48 ✓; 11 sts per repeat × 4 = 44 used ✓)
Body Rnds 3–7: sc in each st around. (48) — still Color B (trouser rise)
Change to A on the last yo of Rnd 7.
Body Rnds 8–20: sc in each st around. (48) — 13 rnds of shirt
Stuff the hips and torso as you go, keeping the waist slightly narrower by not overfilling. Art should look lean, not round.
Body Rnd 21: (6 sc, dec) × 6. (6 decreases → 48 − 6 = 42 ✓; 8 sts per repeat × 6 = 48 used ✓)
Body Rnd 22: (5 sc, dec) × 6. (6 decreases → 42 − 6 = 36 ✓)
Body Rnd 23: (4 sc, dec) × 6. (6 decreases → 36 − 6 = 30 ✓)
Body Rnd 24: (3 sc, dec) × 6. (6 decreases → 30 − 6 = 24 ✓)
FO, leaving an 18 in (45.5 cm) tail for sewing the neck to the head. Finish stuffing. The neck opening is 24 sts and will be matched to Head Rnd 21 (also 24 sts ✓).
Arms (make 2)
With A. Hands and sleeves are the same pale white. A BLO ridge at Rnd 9 reads as a shirt cuff.
Rnd 1: 6 sc in MR. (6)
Rnd 2: inc × 6. (6 increases → 6 + 6 = 12 ✓)
Rnd 3: (3 sc, inc) × 3. (3 increases → 12 + 3 = 15 ✓; 4 sts per repeat × 3 = 12 used ✓)
Rnds 4–6: sc in each st around. (15) — palm
Rnd 7: (3 sc, dec) × 3. (3 decreases → 15 − 3 = 12 ✓)
Rnd 8: sc in each st around. (12)
Rnd 9: sc BLO in each st around. (12) — cuff ridge
Rnds 10–19: sc in each st around. (12) — 10 rnds of sleeve
Rnd 20: (2 sc, dec) × 3. (3 decreases → 12 − 3 = 9 ✓)
Stuff the hand firmly and the arm lightly (gaunt). FO, leaving a 12 in (30.5 cm) tail.
Thumbs (make 2)
With A.
Rnd 1: 4 sc in MR. (4)
Rnd 2: sc in each st around. (4)
FO, leaving a 6 in (15 cm) tail. Do not stuff. Sew each thumb to the side of the hand over Rnds 4–5, angled slightly forward. Weave ends inside the hand.
Ruffled Collar
With A. Worked flat, then wrapped around the neck.
Ch 28.
Row 1: 3 dc in 4th ch from hook (skipped 3 ch count as 1 dc, so this base ch has 4 dc), 3 dc in each remaining ch across. (26 remaining ch + 1 starting group = 27 groups × 3 dc = 81 dc ✓)
FO, leaving a 16 in (40.5 cm) tail. The strip will curl into a dense ruffle.
Bow Tie
With B.
Ch 12.
Row 1: hdc in 3rd ch from hook, hdc in each ch across. (10)
Rows 2–4: ch 2 (does not count as a st), hdc in each st across. (10)
FO, leaving a 14 in (35.5 cm) tail. Pinch the rectangle tightly at the center. Wrap the tail around the pinch 8–10 times to form the knot, then stitch through the wraps to lock. Do not cut the remaining tail — it is used to sew the bow on.
Neck band (optional, for a cleaner bow sit): With B, ch 26, sl st in 2nd ch from hook and in each ch across. (25) Wrap once around the neck and stitch the ends together at the back.
Assembly
Pin every piece and check symmetry from the front before sewing. Use mattress stitch or whipstitch with matching yarn. Hide all knots inside.
1. Face — patches already on; now place features.
- Nose: Centered on the midline, spanning Rnds 13–14, directly below the gap between the eyes. Sew with tiny stitches; keep it almost flat.
- Ears: Flattened, sewn over Rnds 12–15, aligned with the outer corners of the eye patches, slightly toward the back of the head so they are visible in three-quarter view.
2. Embroider the face (do this before attaching the head).
- Smile (C): Art’s grin is a wide, sharp red slash — not a friendly curve. Using satin stitch or doubled yarn, embroider a mouth that starts under the outer third of the left eye patch, drops to about Rnd 16 at center, and rises under the right patch. Keep the line 1/8–1/4 in (3–6 mm) tall at center. Add a second, slightly longer pass along the lower edge so the mouth reads as a painted gash.
- Teeth (cream or A): Five or six short vertical stitches crossing the red mouth, uneven in height, leaving small gaps. Optional: cut tiny white felt rectangles and stitch them on top of the red for a sharper grimace.
- Mouth outline (optional, black floss): One thin backstitch just outside the red, especially at the corners, to sharpen the paint-line look.
- Do not add a red circus nose, eyebrows, or blush. The face should stay stark: white, black sockets, red gash.
3. Head to body.
- Pin Head Rnd 21 (24 sts) to Body Rnd 24 (24 sts). The face looks forward, in line with the toes.
- Sew all the way around with the body tail. Add a last pinch of stuffing at the neck just before closing so the head does not wobble, but do not balloon the neck.
4. Arms.
- Sew the 9-st tops of the arms over Body Rnds 20–22, on either side of the torso, 4 sts back from the side “seam” so they hang slightly forward. Thumbs point up and in. Stitch around twice for a strong shoulder.
5. Collar and bow tie.
- Wrap the ruffled collar around the neck seam, ruffle facing out, ends meeting at center back. Stitch the foundation-chain edge only to the neck so the ruffle stands.
- Sew the bow tie at center front, on top of the collar (or on the neck band if you made one), sitting just below the chin.
6. Balance check.
- Stand the doll. If it tips, add a pinch more stuffing in the toes or flatten the soles with a few stitches through the shoe (entry at the ankle, out through the sole, back in, snug — do not cinch so hard the oval collapses).
Finishing
- Weave in every remaining end.
- Steam is not recommended on acrylic stuffing; shape with your hands only.
- Optional aging (advanced, decorative): with a dry brush and a tiny amount of gray or taupe yarn fuzz, tap very lightly at the shoe soles and under the eyes. Do not soak the fabric.
- Photograph and store as a collectible. Keep away from small children and pets (safety eyes and small sewn parts).
Stitch-Count Recap (for checking as you go)
| Piece | Start | Max | End | Notes |
|---|---|---|---|---|
| Head | 6 | 48 | 6 | Eyes between Rnds 11–12, 9 sts apart |
| Eye patch | 12 | 18 | 18 | Oval; slit for eye post |
| Ear | 6 | 9 | 9 | Flattened, unstuffed |
| Nose | 6 | 6 | 6 | Barely stuffed |
| Foot/leg | 16 | 28 | 18 | BLO sole at Rnd 4; 18-st tube Rnds 8–25 |
| Body | 44 | 48 | 24 | Join 18+4+18+4; B for Rnds 1–7, A for Rnds 8–24 |
| Arm | 6 | 15 | 9 | BLO cuff at Rnd 9 |
| Thumb | 4 | 4 | 4 | Sewn to hand Rnds 4–5 |
All increase/decrease rounds in this pattern were verified at the instruction line. If a count is off mid-round, stop and recount that round before continuing — do not “ease” extra stitches, or the next decrease round will not land.
End of pattern.
Disclaimer: This pattern was generated by AI and should be reviewed for accuracy before use. While we strive for quality, AI-generated content may contain errors. Please verify measurements, stitch counts, charts, and instructions before beginning your project. Generated by purlJam.uk
Love this pattern?
Save this pattern to your free PurlJam libraryAccess your pattern anytime
Bookmark this page to access your pattern anytime