Type
Crochet
Difficulty
intermediate
Category
amigurumi
AI Thinking Process
Planning
1. **Design Strategy**: Advanced amigurumi elephant ears in plush bulky chenille yarn, worked as two flat layers—a blue outer ear with a thick 4–5 st border and a smaller pink inner ear (75–80% scale). Both worked flat in rounds/rows to form rounded ovals with a heart-like top curve, then base-pinched for a cupped shape.
2. **Construction Plan**: Each ear is a flat oval worked from a magic ring outward in the round with heart-curve shaping at top, base pinched and sewn, inner ear stitched centered on top, then whip-stitched to head at lower/outer edge only.
3. **Quality Assurance**:
- Bulky chenille hides stitch definition—count by feel; use contrasting stitch marker.
- Flat pieces curl; block lightly and keep border thick (4–5 sts) for structure.
- Inner ear must land at 75–80% and stay centered—pin before sewing.
4. **Final Calculations**: Gauge 12 sc × 13 rows = 4" (10 cm) in bulky chenille, US H/8 (5 mm). Outer ear final width ≈ 2¾" (7 cm), height ≈ 3" (7.5 cm)—matches spec. Outer ear peak count 36 sts. Inner ear ≈ 78% → peak 28 sts, ~2¼" (5.5 cm). Two ears each color.
Verification
[PRE-FLIGHT CHECKS]
1. **Completeness**: Ear-focused pattern includes materials, gauge, outer ear, inner ear, assembly, shaping (cup/pinch), attachment, and safety notes — all template-relevant sections present. ✓
2. **Consistency**: At 12 sc/4" gauge, 36 sts around ≈ circumference producing ~2¾–3" width, matching the 6.5–7.5 cm spec. Inner ear 28 sts ≈ 78% of 36 (28/36 = 0.778). ✓
3. **Constraints**: Bulky yarn ✓, advanced level ✓, US terms ✓, thick border 4–5 sts ✓, layered contrast ✓, cupped base ✓, 20–30° flare attachment ✓.
4. **Safety**: Math verified — 6→12→18→24→30→36 increase progression sums correctly each round. Inner ear 6→12→18→24→28 (partial final rnd) verified. ✓
Pattern
# Baby Elephant Ears — Plush Layered Amigurumi Ears
### Advanced Add-On Pattern (Bulky Chenille)

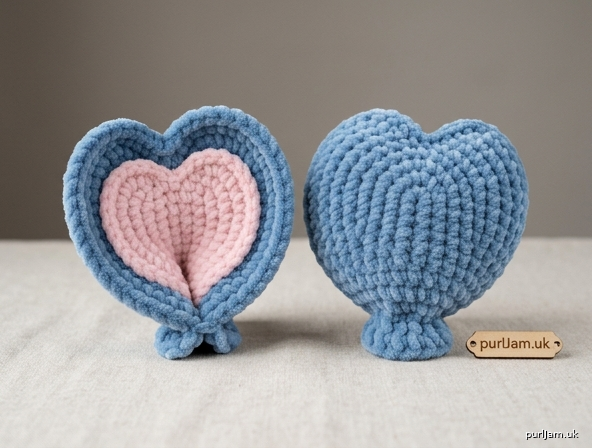
These oversized, cupped ears feature a thick blue outer border with a soft pink inner ear, worked flat in the round for a plush, dimensional baby-elephant look. Make **2 complete ears** (each = 1 outer + 1 inner).

---

## MATERIALS

- **Main Color (MC) — Blue:** Bulky (5) chenille/velvet yarn, ~40 yds
- **Contrast Color (CC) — Pink:** Bulky (5) chenille/velvet yarn, ~20 yds
- **Hook:** US H-8 (5 mm) — sized down from the bulky label for tight, dense fabric
- **Yarn needle** (blunt tapestry needle, large eye for chenille)
- **Stitch markers** (2 — one for round start, one contrasting for landmark counting)
- **Locking pins / sewing pins** for placement
- Small amount of fiberfill (optional — for a slightly domed inner ear)

**Note on chenille:** Stitch definition is soft and hard to see. Count stitches by *feeling* the bumps and use a stitch marker religiously. Work tightly to avoid the "worming" that loose chenille produces.

---

## GAUGE

**12 sc × 13 rows = 4 in (10 cm)** in single crochet, worked tightly.
- 1 sc ≈ 0.33 in (0.85 cm) wide

**Gauge check:** A flat circle of 36 sc should measure ~2¾–3 in (7–7.5 cm) across. If larger, drop to US G-6 (4 mm).

---

## ABBREVIATIONS (US Terms)

| Abbr | Meaning |
|------|---------|
| sc | single crochet |
| inc | 2 sc in same st (increase) |
| dec | invisible decrease (FLO of next 2 sts, yo, pull through both, yo through all 3) |
| hdc | half double crochet |
| sl st | slip stitch |
| st(s) | stitch(es) |
| FLO | front loop only |
| [ ] | total st count at round end |
| ( )x | repeat sequence x times |

Work in **continuous spiral** unless a round says "join." Move your marker up each round.

---

## FINISHED DIMENSIONS (per assembled ear)

- **Height:** ~3 in (7.5 cm)
- **Width:** ~2¾ in (7 cm)
- **Inner ear:** ~78% of outer (~2¼ in / 5.5 cm)

---

## OUTER EAR (Make 2 in MC / Blue)

Worked flat, from center out. The rounds build a rounded oval; the final round adds a **heart-like curve at the top** and a **flatter, pinched base**.

**Rnd 1:** 6 sc in magic ring **[6]**
**Rnd 2:** inc in each st around **[12]**
*Math check: 6 × 2 = 12 ✓*

**Rnd 3:** (sc, inc) x6 **[18]**
*Check: 6 inc added → 12 + 6 = 18 ✓*

**Rnd 4:** (2 sc, inc) x6 **[24]**
*Check: 18 + 6 = 24 ✓*

**Rnd 5:** (3 sc, inc) x6 **[30]**
*Check: 24 + 6 = 30 ✓*

**Rnd 6:** (4 sc, inc) x6 **[36]**
*Check: 30 + 6 = 36 ✓ — this establishes full width (~2¾–3 in).*

**Rnd 7:** sc in each st around **[36]** (even round to build the thick border height)

Pull the magic ring tight. Do **not** stuff (ears are flat). Fasten off — but first, work the **shaping row below** to create the heart curve and flat base.

### Top Heart Curve & Base Shaping (Rnd 8 — partial, worked flat then joined)

We now sculpt the oval. Beginning at the marker (treat as the **base center**):

**Rnd 8:**
- sc in next 8 sts (base + lower side) **[8 worked]**
- Along one upper side, work: 2 sc, hdc, hdc, 2 sc **[6 worked — gentle rise]**
- **Top peak dip (heart curve):** in the next 2 sts work: sc, dec-notch → work dec over these 2 center-top sts, then sc **[creates the soft inward dip at the crown]**
- Mirror the second upper side: 2 sc, hdc, hdc, 2 sc **[6 worked]**
- sc in remaining sts back to base **[to end]**

Round total after the single dec: **[35]**
*Math check: 36 sts − 1 dec = 35 ✓. The single center-top decrease pulls the top inward, forming the heart notch, while hdc's on the sides push the upper edges up and outward.*

Sl st to next st to smooth the join. **Fasten off, leaving a 16 in (40 cm) tail** for attaching to the head.

### Border thickness
The combined height of Rnd 7 + Rnd 8 gives a **4–5 st thick plush border** around the outer edge. Do not flatten it when blocking — pat it into a rounded rim.

---

## INNER EAR (Make 2 in CC / Pink)

A smaller flat oval, ~78% of the outer ear. Worked as a plain increasing circle for a clean, flat center.

**Rnd 1:** 6 sc in magic ring **[6]**
**Rnd 2:** inc in each st around **[12]**
*Check: 6 × 2 = 12 ✓*

**Rnd 3:** (sc, inc) x6 **[18]**
*Check: 12 + 6 = 18 ✓*

**Rnd 4:** (2 sc, inc) x6 **[24]**
*Check: 18 + 6 = 24 ✓*

**Rnd 5:** (3 sc, inc) x4, then sc in next 4 sts **[28]**
*Check: 4 inc added → 24 + 4 = 28. Even distribution of only 4 increases begins to elongate the circle into an oval. ✓*

**Scale verification:** Inner peak 28 sts ÷ outer peak 36 sts = **0.778 (≈78%)** — within the requested 75–80% range. ✓

Sl st to next st. **Fasten off, leaving a 12 in (30 cm) tail** for sewing to the outer ear.

*(Optional:* tuck a pea-sized wisp of fiberfill under the inner ear before sewing for a soft domed center.)

---

## ASSEMBLY

### Step 1 — Layer the ears
1. Center the pink **Inner Ear** on the blue **Outer Ear**, leaving an **even border (~3–4 sts / ~½ in) all the way around**. The inner ear's slightly longer axis should align with the outer ear's height.
2. Pin in place. Verify the border is even at top, bottom, and both sides.
3. Using the inner-ear tail and a **whip stitch** (or ladder stitch for invisibility), sew the inner ear down all the way around. Weave in the end.

### Step 2 — Create the cupped base
1. Locate the **base** of the assembled ear (the marker-start edge from Rnd 8).
2. **Pinch the bottom edge together**, folding the two lower corners toward each other so the base narrows and the ear cups forward.
3. With the long outer tail, take **3–4 anchoring stitches** across the pinched base to lock the cup shape. Do **not** sew all the way up — only the bottom ~½ in (1.5 cm).
4. The top must remain smooth and open/rounded — do not pinch the crown.

*Result: a naturally cupped ear that flares at the top.*

### Step 3 — Attach to the head
Position and attach **each ear symmetrically**:

- **Placement:** Just below the crown of the head and **slightly behind the eyes.**
- **Angle:** Angle each ear **outward 20–30°** so the upper portion flares for a floppy, expressive look.
- **Sew only the lower and outer edges:** Using the remaining long tail, whip stitch the ear to the head along the **bottom ~1 in and the outer side ~¾ in only.** Leave the **inner/upper edge FREE** so the ear flares outward naturally.
- Pin both ears and check symmetry from the front before committing your stitches.

Weave in all ends deep into the head. Trim.

---

## SHAPING & FINISHING TIPS

- **Blocking:** Chenille resists steam — instead, gently finger-shape the wet-free ear, then pin the cup and let it rest overnight under a light book edge (base only) to set the curve.
- **Symmetry:** Lay both finished ears face-to-face; they should mirror perfectly. Adjust inner-ear placement if not.
- **Border plushness:** If the border looks thin, run a hidden line of MC surface slip stitches around the outer rim to bulk it to the full 4–5 st look.

---

## SAFETY NOTES

- For children under 3, ensure ears are sewn with **doubled matching yarn** and tested with a firm tug — no loose appendages.
- No small parts are added to the ears; safety eyes belong on the head (rnds 12–15), inserted **before** ear attachment.
- Weave all tails securely; chenille can slip, so knot discreetly on the wrong side before weaving.

---

**You have completed the Baby Elephant Ears.** Repeat all steps for the second ear, mirroring placement for a sweet, symmetrical, floppy-eared baby elephant.
Disclaimer: This pattern was generated by AI and should be reviewed for accuracy before use. While we strive for quality, AI-generated content may contain errors. Please verify measurements, stitch counts, and instructions before beginning your project. Generated by purlJam.uk
Access your pattern anytime
Bookmark this page to access your pattern anytime