Type
Crochet
Difficulty
beginner
Category
amigurumi
AI Thinking Process
Planning
Verification
Pattern
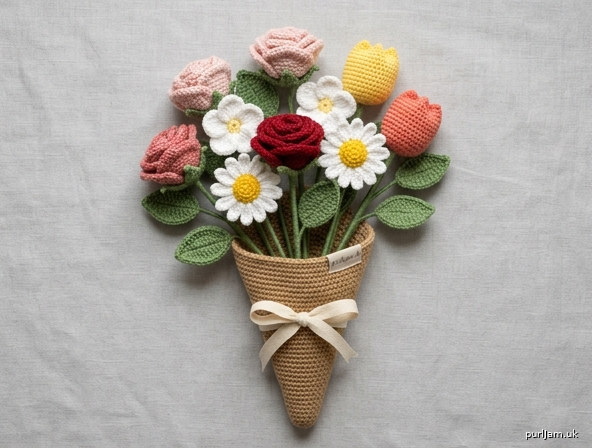
Beginner Crochet Flower Bouquet
A mixed posy of roses, five-petal blossoms, daisies, and tulips with leaves, stems, and a cone wrap. Every piece uses basic stitches and simple shapes — no complex joining, no colorwork charts.
Skill level: Beginner
Techniques used: Magic ring, chain, slip stitch, single crochet, half double crochet, double crochet, increase, decrease, sewing pieces together.
Finished measurements
- Bouquet: about 8–10" (20–25 cm) tall and 6" (15 cm) across after assembly
- Rose: about 2¼" (5.5 cm) across
- Five-petal blossom: about 2" (5 cm) across
- Daisy: about 2¾" (7 cm) across
- Tulip: about 2" (5 cm) tall (head only)
- Stem: 7" (18 cm)
- Leaf: about 2¼" (5.5 cm) long
- Wrap (opening): about 3¼" (8.5 cm) diameter, 5" (12.5 cm) tall
Size will vary slightly with stuffing, rolling tightness, and how closely you bundle the stems. Gauge is not critical.
Materials
Yarn: Worsted weight (category 4), acrylic or cotton. Approximate amounts for the suggested mix:
| Color | Role | Amount |
|---|---|---|
| A Blush pink | 2 roses | 30 yd (27 m) |
| B Red | 1 rose | 15 yd (14 m) |
| C White | 2 daisy petals + 1 blossom | 40 yd (37 m) |
| D Yellow | 2 daisy centers + 1 tulip | 25 yd (23 m) |
| E Lavender | 2 blossoms | 20 yd (18 m) |
| F Coral / peach | 1 tulip | 15 yd (14 m) |
| G Leaf green | Stems, leaves, calyxes | 90 yd (82 m) |
| H Cream or kraft tan | Bouquet wrap | 45 yd (41 m) |
One 3.5 oz (100 g) skein of green and small balls or leftover worsted in flower colors are plenty.
Hook: US G-6 (4.0 mm). If your fabric is very loose and floppy, drop to US F-5 (3.75 mm) or US E-4 (3.5 mm).
Notions:
- Polyester fiberfill (small amount, for tulips and optional stem stuffing)
- Yarn needle
- Stitch marker
- Scissors
- 8 pins or clips for assembly
- Optional: 10 floral wires or pipe cleaners, 8" (20 cm) each, for poseable stems
- Optional: 24" (61 cm) of ⅜–½" (1–1.3 cm) ribbon
Suggested make list (10 stems):
- 3 roses (2 Color A, 1 Color B)
- 3 five-petal blossoms (1 Color C, 2 Color E)
- 2 daisies (Color C petals, Color D centers)
- 2 tulips (1 Color D, 1 Color F)
- 10 stems (Color G)
- 8 leaves (Color G)
- 8 calyxes (Color G; skip on daisies if you prefer)
- 1 wrap (Color H)
Gauge
16 sc and 16 rnds = 4" (10 cm) worked in the round in sc, before stuffing.
Gauge is not critical. A slightly tighter fabric gives neater stems and tulips; a slightly looser fabric gives softer rose and daisy petals. Match the look you want rather than the number.
Abbreviations (US)
| Abb. | Meaning |
|---|---|
| ch | chain |
| sl st | slip stitch |
| sc | single crochet |
| hdc | half double crochet |
| dc | double crochet |
| inc | increase — 2 sc in the same stitch |
| dec | decrease — sc2tog (insert hook in next st, yarn over, pull up a loop, insert hook in following st, yarn over, pull up a loop, yarn over, pull through all 3 loops) |
| MR | magic ring (adjustable loop) |
| st(s) | stitch(es) |
| rnd(s) | round(s) |
| FO | fasten off |
| RS | right side |
Pattern notes
- Work amigurumi pieces (stems, tulips, wrap, daisy centers) in a continuous spiral unless the round says to join. Place a stitch marker in the first stitch of the round and move it up each round.
- Flat flowers (rose strip, blossom, daisy petals, leaves) are worked in rows or joined rounds as written.
- Counts at the end of a round or row are shown in brackets:
[12]. - “Inc around” means 2 sc in every stitch.
- Invisible decrease may be substituted for sc2tog on stems and tulips if you know it; it is not required.
- Magic ring alternative: ch 2, work the first-round stitches into the 2nd ch from the hook, then pull the starting tail to close the hole.
- Child-safe version: Skip floral wire. Stuff stems lightly as you go. Do not add wire, pipe cleaners, or glue.
- Decorative version: Encasing a wire in each stem lets the bouquet stand in the wrap and lets you bend stems into a rounder shape.
- Weave in ends as you finish each piece, leaving only the tails you need for sewing.
- Work petals a little looser than stems. If a flower looks stiff, go up half a hook size for that piece only.
Special stitch
Sc2tog (dec): Insert hook in next st, yarn over, pull up a loop (2 loops on hook); insert hook in following st, yarn over, pull up a loop (3 loops on hook); yarn over, pull through all 3 loops. Counts as 1 sc.
Flowers
Rose (make 3)
The rose is a single ruffled strip that you roll from the short-stitch end. No rounds to count.
With Color A or B, ch 46.
Row 1: Sc in 2nd ch from hook and in each of next 6 ch [7 sc], hdc in each of next 12 ch [12 hdc], dc in each remaining ch [26 dc]. [45 sts]
(Skipped 1 ch + 7 sc + 12 hdc + 26 dc = 46 ch used ✓)
FO, leaving an 18" (46 cm) tail.
Form the rose:
- Start at the sc end (the short stitches). Roll this end into a tight coil — this is the center bud.
- Keep rolling toward the dc end. The taller stitches naturally flare into outer petals.
- Let the strip sit slightly lower with each turn so the flower looks stacked, not like a cinnamon roll on its side.
- Thread the tail onto a yarn needle. Take several small stitches through all layers of the base (the chain edge), working in a circle. Pull snug so the roll cannot unwind.
- Leave the remaining tail attached — you will use it to sew the rose to its stem.
The finished rose should measure about 2–2½" (5–6.5 cm) across. If it is much larger and floppy, roll tighter and stitch the base more firmly. If it is tiny, you did not let the dc section flare — unroll one turn and restack it lower.
Five-petal blossom (make 3)
With flower color, make a magic ring.
Rnd 1: 5 sc in MR, sl st in first sc to join. [5]
(5 sc in ring ✓)
Rnd 2 (petals): *(Sc, hdc, 3 dc, hdc, sc) in next st; repeat from * in each of the 5 sts, sl st in first sc to join. [5 petals]
(1 petal in each of 5 sts → 5 petals ✓)
FO, leaving a 12" (30 cm) tail. Pull the magic-ring tail almost closed but leave a small hole if you plan to poke the stem through the center; otherwise pull it fully closed and weave it in.
The 3-dc cluster is the petal tip. Gently tug each tip so the petals sit open, not cupped shut.
Optional yellow center: With Color D, 6 sc in MR, sl st in first sc, FO. [6] Sew to the middle of the blossom with a few stitches, or embroider a small yellow satin-stitch dot.
Daisy (make 2)
Center
With Color D (yellow), work in a continuous spiral.
Rnd 1: 8 sc in MR. [8]
Rnd 2: Inc in each st around. [16]
(8 increases → 8 + 8 = 16 ✓)
Sl st in first sc to join. Do not fasten off if you are changing to white in the same joining stitch; or FO yellow and join white in any stitch.
The center is a flat (or very slightly domed) disk. Do not stuff it.
Petals
Join Color C (white) in any st of Rnd 2 if you fastened off.
Petal round: *Ch 8, sc in 2nd ch from hook, hdc in next ch, dc in each of next 2 ch, hdc in next ch, sc in next ch, sl st in last ch, skip 1 st of Rnd 2, sl st in next st of Rnd 2; repeat from * 7 more times. [8 petals]
Check:
- Each petal uses ch 8, then 7 stitches along the chain (sc, hdc, 2 dc, hdc, sc, sl st) → 7 chains worked ✓
- Each petal consumes 2 sts of the 16-st center (skip 1 + sl st in next) → 8 × 2 = 16 ✓
FO and weave in the white tail on the back. Weave the yellow tail on the back, leaving one yellow tail if you want extra stitches to sew the stem on.
Gently pinch each petal along its length so it looks like a daisy ray, not a tube.
Tulip (make 2)
A one-piece cone, lightly stuffed, with three tacks at the rim to form petal lobes.
With Color D or F, work in a continuous spiral.
Rnd 1: 6 sc in MR. [6]
Rnd 2: (Sc, inc) around. [9]
(3 increases → 6 + 3 = 9 ✓)
Rnd 3: (2 sc, inc) around. [12]
(3 increases → 9 + 3 = 12 ✓)
Rnd 4: (3 sc, inc) around. [15]
(3 increases → 12 + 3 = 15 ✓)
Rnd 5: (4 sc, inc) around. [18]
(3 increases → 15 + 3 = 18 ✓)
Rnds 6–11: Sc around. [18]
(6 even rounds at 18 sts ✓)
FO, leaving a 14" (36 cm) tail. Stuff the bottom half firmly and the top half only lightly so the rim can be shaped. Do not overstuff or the tulip will become a ball.
Shape 3 petals: Thread the tail. *Count 6 sts along the rim, pinch that stitch down about ½" (1.3 cm) toward the inside of the cup, and tack it with 2 small stitches; repeat from * twice more.
(18 sts ÷ 3 tacks = 6 sts between tacks ✓)
You now have three rounded lobes. Weave the remaining tail to the base (the magic-ring end) and leave it for sewing to the stem.
Stems, leaves, and calyx
Stem (make 10)
Version A — no wire (soft / child-safe)
With Color G, work in a continuous spiral.
Rnd 1: 6 sc in MR. [6]
Rnds 2–28: Sc around. [6]
Work even until the stem measures 7" (18 cm) from the magic ring — about 28 rounds at pattern gauge (28 rnds ÷ 16 rnds per 4" = 7" ✓). Stuff very lightly every 1" (2.5 cm) as you go; a densely stuffed stem will not bundle well.
FO, leaving a 10" (25 cm) tail. Do not close the hole; the open end is the top, where the flower sits.
Version B — with floral wire (decorative / poseable)
Cut wire to 8" (20 cm). Bend a tiny open hook at one end so it will not poke through the flower.
With Color G, ch 2.
Rnd 1: 4 sc in 2nd ch from hook. [4]
Lay the unbent end of the wire against the stitches. Continue in a spiral, working sc around so the wire is enclosed in the tube, until the crochet covers 7" (18 cm) of wire, leaving about 1" (2.5 cm) of the hooked end exposed at the top. Keep 4 sc per round. [4]
FO, leaving a 10" (25 cm) tail. The exposed hooked wire tucks into the flower head and is wrapped with the sewing tail so it cannot slip out.
Leaf (make 8)
Worked in one round around a chain.
With Color G, ch 10.
Sc in 2nd ch from hook, hdc in next ch, dc in each of next 5 ch, hdc in next ch, 3 sc in last ch (tip); rotate and work in the unused loops down the other side of the chain: hdc in next ch, dc in each of next 5 ch, hdc in next ch, sc in last ch, sl st in first sc to join.
Check:
- First side uses ch 2 through ch 10: sc + hdc + 5 dc + hdc + 3 sc at the tip ✓
- Return uses 8 unused loops (ch 9 back through ch 2): hdc + 5 dc + hdc + sc = 8 ✓
FO, leaving an 8" (20 cm) tail for sewing.
The 3-sc group is the leaf tip; the two sc that meet at the start/end are the base (attach this end to the stem).
Calyx (make 8, optional but recommended)
A small green star that sits under the flower head and hides the stem join. Skip on daisies if the yellow center already covers the back, or make them anyway for a finished look.
With Color G:
Rnd 1: 5 sc in MR. [5]
Rnd 2: *(Sl st, ch 2, sl st) in next st; repeat from * 5 times. [5 sepals]
(1 sepal in each of 5 sts ✓)
FO, leaving an 8" (20 cm) tail. Pull the ring closed just enough that a stem tip can still pass through the center.
Bouquet wrap
Cone wrap (make 1)
Worked in a continuous spiral. This is a standing holder — like a florist’s paper cone — not a stuffed toy.
With Color H:
Rnd 1: 6 sc in MR. [6]
Rnd 2: (Sc, inc) around. [9]
(3 increases → 6 + 3 = 9 ✓)
Rnd 3: (2 sc, inc) around. [12]
(3 increases → 9 + 3 = 12 ✓)
Rnd 4: (3 sc, inc) around. [15]
(3 increases → 12 + 3 = 15 ✓)
Rnd 5: (4 sc, inc) around. [18]
(3 increases → 15 + 3 = 18 ✓)
Rnd 6: (5 sc, inc) around. [21]
(3 increases → 18 + 3 = 21 ✓)
Rnd 7: (6 sc, inc) around. [24]
(3 increases → 21 + 3 = 24 ✓)
Rnd 8: (7 sc, inc) around. [27]
(3 increases → 24 + 3 = 27 ✓)
Rnd 9: (8 sc, inc) around. [30]
(3 increases → 27 + 3 = 30 ✓)
Rnd 10: (9 sc, inc) around. [33]
(3 increases → 30 + 3 = 33 ✓)
Rnd 11: (10 sc, inc) around. [36]
(3 increases → 33 + 3 = 36 ✓)
Rnd 12: (11 sc, inc) around. [39]
(3 increases → 36 + 3 = 39 ✓)
Rnd 13: (12 sc, inc) around. [42]
(3 increases → 39 + 3 = 42 ✓)
Rnds 14–20: Sc around. [42]
(7 even rounds ✓)
FO and weave in ends. Do not stuff. The cone should stand on its point (or rest in a cup) with an opening about 3¼" (8.5 cm) across (42 sc ÷ 16 sc per 4" = 10½" circumference → diameter ≈ 3¼" ✓).
If the cone curls or flares, block it lightly: dampen, shape over a funnel or rolled cardboard, and let dry.
Assembly
Work on a flat surface. Pin first, sew second. Use matching yarn tails unless noted.
1. Attach calyx to flower (if using)
Thread the calyx onto the top of a stem like a bead (stem tip through the magic-ring hole), sepals pointing up toward where the flower will sit. Do not sew it yet.
2. Sew each flower to a stem
Rose: Set the stem tip against the sewn base of the rose (center of the roll). Using the rose’s remaining tail, take 8–10 stitches through the rose base and the top 3–4 rounds of the stem. If using wire, bury the hooked wire end inside the rose base before stitching, then wrap yarn over it. Cinch the calyx up under the rose and tack the 5 sepals to the rose base.
Blossom: Poke the stem tip through the magic-ring hole from the back, or sew the stem to the back if the ring is fully closed. Stitch through the blossom center several times. Cinch the calyx up and tack.
Daisy: Sew the stem to the back of the yellow center with the yellow tail, taking stitches through the center disk only (not through the petals). Tack a calyx over the join if you made one.
Tulip: Sew the magic-ring (pointed) end of the tulip to the top of the stem, stitching around the stem so the cup sits upright. Cinch the calyx up under the tulip and tack.
Give each head a gentle tug. If it nods, add 3 more stitches through the stem.
3. Add leaves
Sew 8 leaves in total, bases only:
- 1 leaf on each of 6 flower stems, placed 1½–2" (4–5 cm) below the calyx, slightly off to one side
- 2 leftover leaves on two of the remaining stems, or both on one “filler” stem if you prefer a greener bundle
Stitch through the leaf base and 2–3 stem stitches. Do not sew the leaf tip down; it should stand away from the stem.
4. Bundle the bouquet
Hold all 10 stems together. Arrange so taller visual weight (roses, daisies) sits toward the outside and tulips nestle slightly lower in the mix. Twist the bundle gently so heads face out, not all in one direction.
Starting 2" (5 cm) below the lowest calyx, wrap Color G tightly around the stems 15–20 times to form a 1" (2.5 cm) band. Tie a firm square knot and weave the ends into the wrapping. This wrap is structural — pull it snug.
Optional: wrap the remaining lower stems with more green yarn for a clean column, or leave them as-is to drop into the cone.
5. Place in the wrap
Set the bundled stems into the cone. The yarn band should sit just inside the cone’s rim so the cone hides the wrapping. Adjust stem lengths if one flower sits far above the others: pull a stem up, or restitch a head a round lower on its stem.
Tie ribbon around the cone about 1" (2.5 cm) below the rim, in a simple bow. Tack the ribbon with a couple of hidden stitches if you want it permanent.
Finishing
- Weave in every remaining tail on the backs of flowers and inside the cone.
- Steam-block leaves and daisy petals from the wrong side if they curl (hover the iron; do not crush roses or tulips).
- For a rounder florist shape, bend wired stems outward; for a tight posy, keep them straight.
- Spot-clean only. Do not machine wash if the bouquet contains wire.
Make it your own
Romantic: All roses and blossoms in blush, dusty rose, and cream; skip the daisies; add extra leaves.
Sunshine: 4 daisies, 2 yellow tulips, 1 white blossom; no red.
Tiny posy (5 stems): 2 roses, 2 blossoms, 1 daisy; work stems 5" (12.5 cm); stop the wrap increases at Rnd 11 [36] and work 4 even rounds.
Keychain flower: Make one blossom or rose only, skip the stem, and sew a jump ring through the calyx.
Fuller rose: Start with ch 61 and work sc in 2nd ch and next 6 ch [7 sc], hdc in next 16 ch [16 hdc], dc in remaining 37 ch [37 dc] (7 + 16 + 37 = 60 sts, 61 ch used ✓).
Taller bouquet: Work stems to 9" (23 cm) and add 4 even rounds to the wrap.
Quick reference — what to make
| Piece | Qty | Color | Construction |
|---|---|---|---|
| Rose | 3 | A, A, B | Ch-46 strip, roll from sc end |
| Blossom | 3 | C, E, E | 5 sc ring + 5 petals |
| Daisy | 2 | D center, C petals | 16-st disk + 8 chain petals |
| Tulip | 2 | D, F | Cone to 18 sts, 3 rim tacks |
| Stem | 10 | G | 6-sc (or 4-sc) tube, 7" |
| Leaf | 8 | G | Ch-10 oval |
| Calyx | 8 | G | 5-point star |
| Wrap | 1 | H | Cone to 42 sts |
Happy stitching — and if a rose looks more like a cinnamon bun, unroll it and start the coil tighter. That one change fixes almost every beginner rose.
Disclaimer: This pattern was generated by AI and should be reviewed for accuracy before use. While we strive for quality, AI-generated content may contain errors. Please verify measurements, stitch counts, charts, and instructions before beginning your project. Generated by purlJam.uk
Love this pattern?
Save this pattern to your free PurlJam libraryAccess your pattern anytime
Bookmark this page to access your pattern anytime