Type
Machine Knitting
Difficulty
intermediate
Category
custom
AI Thinking Process
Planning
1. **Design Strategy**:
- Creating a beginner-friendly short sleeve pullover with set-in sleeves
- Center design element will be a simple textured panel or contrast stripe motif
- Using flat panel construction (back, front, two sleeves) which is most suitable for beginners
- Set-in sleeve construction requires basic shaping for armholes and sleeve caps
- Worsted weight yarn at standard machine tension for stable fabric
2. **Construction Plan**:
- Knit body pieces flat (back and front) from bottom up
- Work sleeves flat from cuff to cap
- Center design will be a vertical textured panel on front (simple slip stitch pattern)
- Ribbed neckline, cuffs, and hem for professional finish
- Set-in sleeve construction with standard armhole depth and sleeve cap shaping
- Seam after all pieces are complete
3. **Quality Assurance**:
- Ensure shaping calculations are gradual enough for machine knitting
- Verify armhole depth matches sleeve cap height
- Check that center panel stitch count is odd for symmetry
- Confirm all bind-offs use appropriate methods for seaming
- Include detailed RC checkpoints for beginner confidence
4. **Final Calculations**:
- Gauge: 4.5 sts/inch, 6 rows/inch at T7 (standard for worsted on standard gauge machine)
- Size Medium: 38" bust, 22" length, 8" sleeve length (short sleeve)
- Back/Front width: 19" = 86 sts (rounded to even number)
- Armhole depth: 7.5" = 45 rows
- Sleeve width at upper arm: 14" = 63 sts
- Center panel: 15 sts wide (creates 3.3" center design)
Verification
[PRE-FLIGHT CHECKS]
1. **Completeness**: ✓ All required sections planned (materials, gauge, sizes, abbreviations, instructions, finishing)
2. **Consistency**: ✓ 86 sts × 4.5 sts/inch = 19.1" ≈ 19" VERIFIED; 45 rows ÷ 6 rows/inch = 7.5" VERIFIED
3. **Constraints**: ✓ Beginner level with simple shaping, center design included, short sleeves, set-in construction
4. **Safety**: ✓ All shaping is gradual (hold needles in groups of 2-3), RC values will be tracked throughout, center panel is simple 2-row repeat
Pattern
<pattern>
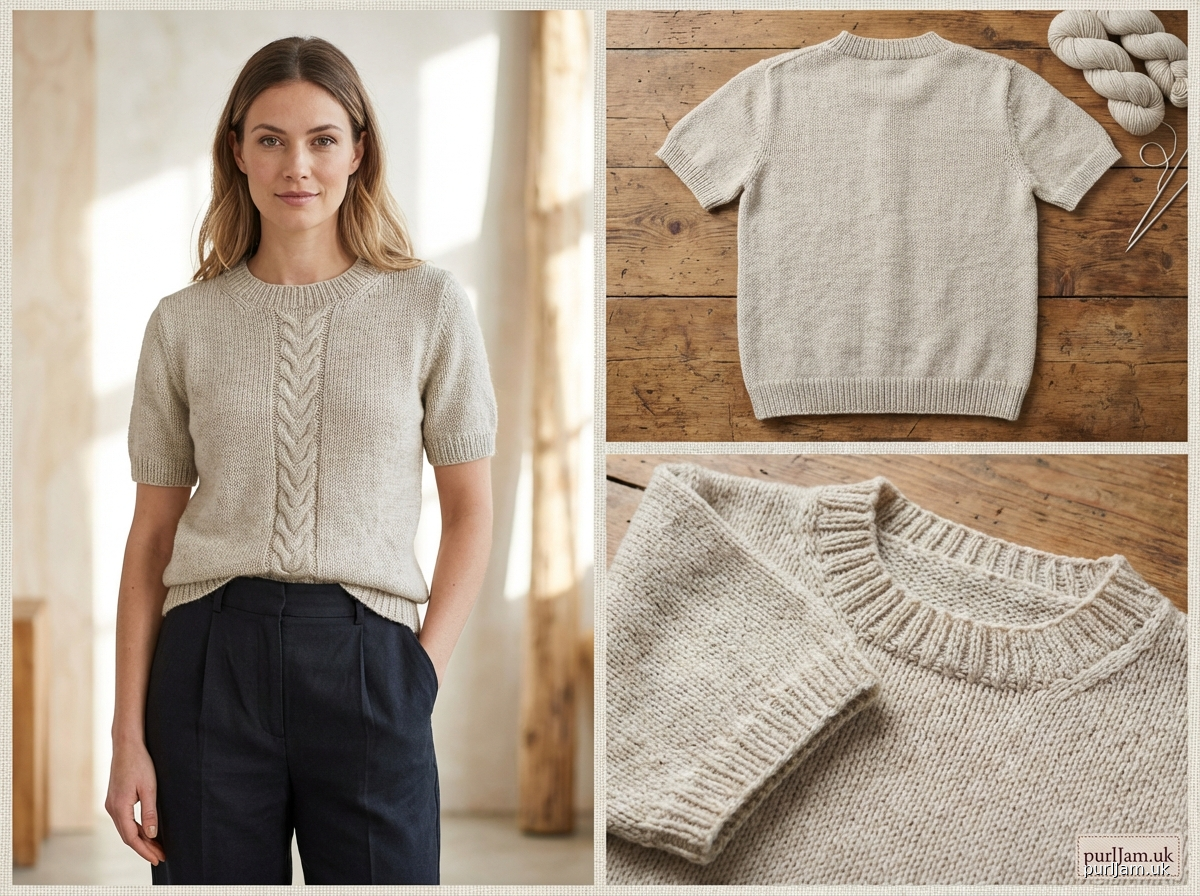
# CLASSIC SHORT SLEEVE PULLOVER WITH CENTER PANEL
## Beginner-Friendly Women's Set-In Sleeve Top
A timeless short sleeve pullover featuring a decorative center slip-stitch panel down the front. This pattern introduces set-in sleeve construction with gradual, easy-to-follow shaping perfect for building machine knitting skills.
---
## MATERIALS
**Yarn:** Worsted weight (#4) yarn
- Main Color (MC): approximately 650 yards (595m)
- Contrast Color (CC) for center panel (optional): 50 yards (45m)
**Suggested Yarn:** Any worsted weight acrylic, wool, or cotton blend
**Yardage by Size:**
- Small: 550 yards
- Medium: 650 yards
- Large: 750 yards
**Machine:** Standard gauge (4.5mm) knitting machine with ribber attachment
**Notions:**
- Waste yarn for cast-on
- Ravel cord
- Cast-on comb and weights
- Transfer tools
- Latch tool for bind-off
- Tapestry needle for seaming
- Stitch holders or waste yarn
---
## TENSION/GAUGE
**Main Tension:** T7 on main bed, T6 on ribber
**Gauge:** 4.5 sts and 6 rows = 1" (2.5cm) in stockinette on main bed at T7
**CRITICAL: Knit a tension swatch before starting**
- Cast on 40 sts
- Knit 40 rows at T7
- Remove from machine and allow to relax 30 minutes
- Measure center 20 sts and 30 rows
- Adjust tension dial if needed to achieve gauge
---
## SIZES
Pattern is written for Small (Medium, Large)
**Finished Measurements:**
- **Bust circumference:** 36 (38, 40)" [91 (97, 102)cm]
- **Length from shoulder:** 21 (22, 23)" [53 (56, 58)cm]
- **Sleeve length:** 7.5 (8, 8.5)" [19 (20, 22)cm]
- **Armhole depth:** 7 (7.5, 8)" [18 (19, 20)cm]
**Ease:** Designed with 2" positive ease (select size 2" larger than actual bust measurement)
---
## ABBREVIATIONS & MACHINE TERMS
**RC** - Row Counter (always reset to 000 at start of new piece)
**COL** - Carriage on Left
**COR** - Carriage on Right
**T** - Tension dial setting (e.g., T7)
**MT** - Main Tension
**WY** - Waste Yarn
**MC** - Main Color
**CC** - Contrast Color
**WP** - Working Position (needle brought forward, ready to knit)
**HP** - Hold Position (needle in hold, not knitting)
**st(s)** - stitch(es)
**dec** - decrease
**inc** - increase
**Needle Positions (from left to right):**
Needles are numbered from center 0. Left needles are negative numbers, right needles are positive numbers.
---
## PATTERN NOTES
1. **Machine Setup:** All pieces begin with waste yarn cast-on using ravel cord method for easy unraveling and finishing.
2. **Center Panel:** The front features a 15-stitch slip stitch panel creating a vertical textured stripe. This 2-row repeat pattern is easy for beginners.
3. **Set-In Sleeves:** Armhole and sleeve cap shaping uses hold buttons/levers. Hold needles gradually at sides for smooth curves.
4. **Seaming:** All pieces are knit flat and seamed together. Leave long tails for seaming.
5. **Ribbing:** 1×1 rib is worked on ribber for hem, cuffs, and neckband.
6. **Direction:** All pieces knit from bottom to top (hem to shoulder for body, cuff to cap for sleeves).
---
## INSTRUCTIONS
### BACK
**Machine Setup:**
- Set main bed to T7
- Attach ribber, set to T6
- Thread MC in both carriages
- Set carriage for circular knitting (both beds knitting)
**Ribbed Hem:**
1. Using WY and ravel cord, cast on 77 (86, 95) sts across both beds in 1×1 rib arrangement
- For 1×1 rib: Every other needle in WP on both beds, needles alternate
- Hang cast-on comb and apply weights
2. RC 000. Knit 6 rows WY. Break WY.
3. Join MC. RC 000 (reset counter).
4. Knit 25 rows in 1×1 rib (RC 025).
- COL: Set ribber carriage to knit
- Both beds knitting creates 1×1 rib
- Check tension after 10 rows, adjust weights
**Body:**
5. RC 025, COR. Transfer all ribber stitches to main bed using transfer tools.
- Work from left to right
- Each ribber stitch transfers to adjacent main bed needle
- All stitches now on main bed: 77 (86, 95) sts
- Remove ribber carriage
6. Set carriage for stockinette, MT (T7).
7. RC 000 (reset). Knit straight in stockinette until RC 084 (090, 096).
**[Math check: 84 rows ÷ 6 rows/inch = 14" body length before armhole]**
**Armhole Shaping:**
8. RC 084 (090, 096), COL. Begin armhole shaping using hold buttons.
- Set carriage to hold (engage hold lever/buttons)
9. **Bind off 4 (5, 6) sts at each armhole edge:**
- RC 084, COL: Push 4 (5, 6) needles at right edge to HP
- Knit to left (COR)
- RC 085, COR: Push 4 (5, 6) needles at left edge to HP
- Knit to right (COL)
- Remaining sts in WP: 69 (76, 83) sts
10. **Decrease 1 st each end every row 5 (6, 7) times:**
- RC 086, COL: Push 1 needle at right to HP, knit to left
- RC 087, COR: Push 1 needle at left to HP, knit to right
- Repeat decreases for total 5 (6, 7) times each side
- Remaining sts in WP: 59 (64, 69) sts
- RC 096 (102, 110)
11. Knit straight (no shaping) until RC 126 (135, 144).
**[Math check: 126-096 = 30 more rows; total armhole = 126-084 = 42 rows ÷ 6 = 7" depth]**
**Shoulder and Neck Shaping:**
12. RC 126 (135, 144), COL. Shape shoulders and back neck simultaneously.
13. **Right shoulder:** Work on right 19 (21, 23) needles only.
- Push center 21 (22, 23) needles to HP (back neck)
- Push left 19 (21, 23) needles to HP (left shoulder - work later)
14. RC 126, COL. Right shoulder bind-off in 3 steps:
- Knit to right (COR)
- RC 127, COR: Push 6 (7, 8) needles to HP at shoulder edge, knit to left
- RC 128, COL: Push 7 (7, 7) needles to HP, knit to right
- RC 129, COR: Push remaining 6 (7, 8) needles to HP
- All right shoulder needles now in HP
15. **Left shoulder:** Return left 19 (21, 23) needles to WP.
- RC 129, COR. Knit to left (COL)
16. RC 130, COL. Left shoulder bind-off in 3 steps:
- Push 6 (7, 8) needles to HP at shoulder edge, knit to right
- RC 131, COR: Push 7 (7, 7) needles to HP, knit to left
- RC 132, COL: Push remaining 6 (7, 8) needles to HP
17. Remove work from machine using latch tool bind-off method on all held needles.
- Back neck: 21 (22, 23) sts
- Leave 18" tails for seaming
**Back piece complete.**
---
### FRONT
**Machine Setup:**
- Same as Back
- Set main bed to T7, ribber to T6
**Ribbed Hem:**
Follow steps 1-4 from Back (identical ribbing).
**Body with Center Panel:**
5. RC 025, COR. Transfer all ribber stitches to main bed.
- Total sts on main bed: 77 (86, 95) sts
6. **Set up center panel:**
- Find center needle (needle 0 or between needles 0 and 1)
- Mark center 15 needles for slip stitch pattern
- For Medium size (86 sts): needles from -7 to +7 (15 needles)
- **[Math check: (86-15) = 71 sts ÷ 2 = 35.5 sts each side; use 35 and 36]**
7. RC 000 (reset). Set carriage for slip stitch on center 15 needles:
**For Punchcard Machine:**
- Create card: Blank card with center 15 positions punched every other row in checkerboard
- Set carriage to slip setting
**For Electronic Machine:**
- Program 15-stitch pattern: alternating needles slip every other row
- Pattern: Row 1: K across; Row 2: *K1, Slip 1* across center 15
**Manual Method (recommended for beginners):**
- Knit without pattern settings
- Every 2nd row, manually push center 15 needles back to NWP (non-working position) before pass
- They will slip, creating texture
8. RC 000. **Knit body:**
- Rows 1-2: Knit across all sts at T7
- Row 3, COL: Push center 15 needles to NWP (upper working position, will slip)
- Knit to right - center sts slip
- Row 4, COR: Return center needles to WP, knit to left
- Repeat rows 3-4 for slip stitch texture
OR (simpler for beginners):
- Join CC for center 15 sts
- Knit these in contrasting stripe instead of slip stitch
- Change color every 10 rows for stripes
9. Knit straight until RC 084 (090, 096).
**Armhole Shaping:**
10. Follow steps 8-11 from Back (identical armhole shaping).
- RC 126 (135, 144) at end of armhole
- 59 (64, 69) sts remaining
**Neck and Shoulder Shaping:**
11. RC 126 (135, 144), COL. Front neck is deeper than back.
- Begin neck shaping 10 rows before shoulder
12. RC 116 (125, 134), COL. **Begin front neck:**
- Push center 15 (16, 17) needles to HP (front neck)
- Work right shoulder first: 22 (24, 26) needles on right
- Push left 22 (24, 26) needles to HP
13. **Right front shoulder and neck:**
- RC 116, knit to right (COR)
- RC 117, COR: Push 1 needle at neck edge to HP, knit to left (neck dec)
- RC 118, COL: Knit to right (COR)
- RC 119, COR: Push 1 needle at neck edge to HP, knit to left
- Continue neck decreases (1 st at neck edge) every other row 3 (3, 3) more times
- Right shoulder sts remaining: 19 (21, 23) sts
- RC reaches 126 (135, 144)
14. **Shape right shoulder** (same as back):
- RC 126 (135, 144), COR: Push 6 (7, 8) needles to HP, knit to left
- RC 127 (136, 145), COL: Push 7 (7, 7) needles to HP, knit to right
- RC 128 (137, 146), COR: Push remaining 6 (7, 8) needles to HP
15. **Left front shoulder and neck:**
- Return left 22 (24, 26) needles to WP
- RC 116 (125, 134), COR. Knit to left (COL)
- RC 117, COL: Push 1 needle at neck edge to HP, knit to right (neck dec)
- RC 118, COR: Knit to left
- RC 119, COL: Push 1 needle at neck edge to HP, knit to right
- Continue neck decreases every other row 3 (3, 3) more times
- Left shoulder sts: 19 (21, 23) sts
- RC reaches 126 (135, 144)
16. **Shape left shoulder:**
- RC 126 (135, 144), COL: Push 6
Disclaimer: This pattern was generated by AI and should be reviewed for accuracy before use. While we strive for quality, AI-generated content may contain errors. Please verify measurements, stitch counts, and instructions before beginning your project. Generated by purlJam.uk
Access your pattern anytime
Bookmark this page to access your pattern anytime