Type
Crochet
Difficulty
intermediate
Category
amigurumi
AI Thinking Process
Planning
Verification
Pattern
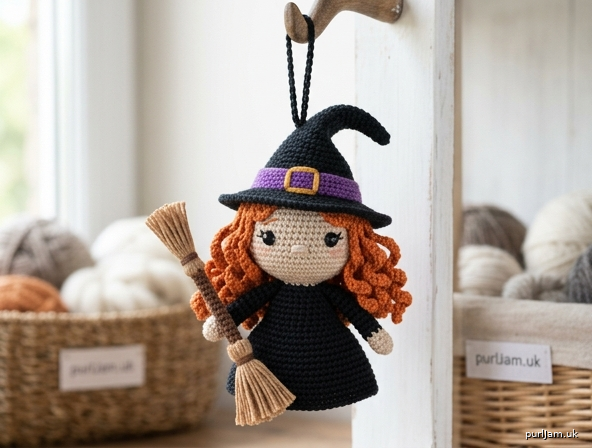
Crochet Witch Ornament
Finished Size: Approx. 4–4.75" (10–12 cm) tall, excluding hanging loop
Skill Level: Easy (Advanced Beginner)
Yarn Weight: Sport
Materials
- Sport-weight cotton yarn:
– Black (dress & hat) approx. 40 yd
– Beige (skin) approx. 15 yd
– Orange (hair) approx. 25 yd
– Purple (hat band) approx. 5 yd
– Mustard/Gold (buckle) approx. 2 yd
– Brown (broom handle) approx. 5 yd
– Light Brown / Tan (broom bristles) approx. 8 yd - 2.75 mm (US C-2) crochet hook (or size needed to obtain gauge)
- Polyester fiberfill stuffing
- 8 mm black safety eyes (1 pair)
- Yarn needle
- Stitch marker
- Black embroidery thread (optional eyelashes/nose)
- Hanging cord or matching yarn for loop
- Scissors
Gauge
6 sc and 6 rounds = 1" (2.5 cm) in continuous sc worked in the round.
Exact gauge is not critical but work tightly so stuffing does not show.
Abbreviations (US Terms)
MR = magic ring
sc = single crochet
inc = 2 sc in same stitch
dec = single-crochet 2 stitches together (sc2tog)
ch = chain
sl st = slip stitch
st(s) = stitch(es)
rnd(s) = round(s)
BLO = back loop only
FO = fasten off
[ ] = work instructions in brackets as a set
( ) = stitch count at end of round
Notes
- Work in continuous spirals unless stated otherwise; do not join rounds. Mark first st of each rnd with stitch marker.
- Stuff firmly as you go, especially head and body.
- Parenthetical math confirms counts (e.g., 6 inc → 6 + 6 = 12 ✓).
Pattern
Head & Body (start with beige)
Rnd 1: 6 sc in MR (6)
Rnd 2: inc in each st around (12) (6 inc → 6 + 6 = 12 ✓)
Rnd 3: [sc, inc] 6 times (18)
Rnd 4: [2 sc, inc] 6 times (24)
Rnd 5: [3 sc, inc] 6 times (30)
Rnds 6–10: sc in each st around (30) — 5 rnds
Insert 8 mm safety eyes between Rnds 8 and 9, approx. 6 sts apart.
Rnd 11: [3 sc, dec] 6 times (24)
Rnd 12: [2 sc, dec] 6 times (18)
Stuff head firmly.
Change to black.
Rnd 13: sc in each st around (18)
Rnd 14: [5 sc, inc] 3 times (21)
Rnd 15: sc in each st around (21)
Rnd 16: [6 sc, inc] 3 times (24)
Rnds 17–20: sc in each st around (24) — 4 rnds
Rnd 21: [6 sc, dec] 3 times (21)
Rnd 22: sc in each st around (21)
Rnd 23: [5 sc, dec] 3 times (18)
Stuff body firmly, shaping a gentle A-line / tiny rounded bottom.
Rnd 24: [sc, dec] 6 times (12)
Rnd 25: dec 6 times (6)
FO, weave yarn tail through remaining 6 sts and pull tight to close. Weave in end.
Optional face details
With black embroidery thread, add 2–3 tiny straight stitches above each eye for lashes and a 2-st horizontal stitch for nose if desired.
Arms (make 2)
With beige:
Rnd 1: 6 sc in MR (6)
Rnd 2: [sc, inc] 3 times (9)
Rnd 3: sc in each st around (9)
Change to black.
Rnds 4–9: sc in each st around (9) — 6 rnds
Lightly stuff hand only or leave unstuffed.
FO, leave 8" tail for sewing. Flatten open end.
Witch Hat (black)
Brim
Rnd 1: 6 sc in MR (6)
Rnd 2: inc in each st (12)
Rnd 3: [sc, inc] 6 times (18)
Rnd 4: [2 sc, inc] 6 times (24)
Rnd 5: [3 sc, inc] 6 times (30)
Rnd 6: [4 sc, inc] 6 times (36)
Rnd 7: sc in BLO of each st around (36)
Cone
Rnd 8: [4 sc, dec] 6 times (30)
Rnd 9: sc in each st around (30)
Rnd 10: [3 sc, dec] 6 times (24)
Rnd 11: sc in each st around (24)
Rnd 12: [2 sc, dec] 6 times (18)
Rnd 13: sc in each st around (18)
Rnd 14: [sc, dec] 6 times (12)
Rnd 15: sc in each st around (12)
Rnd 16: [sc, dec] 4 times (8)
Rnd 17: sc in each st around (8)
Rnd 18: [sc, dec] 2 times, sc in last 2 sts (6)
Rnd 19: sc in each st around (6)
FO, leave tail. Lightly stuff tip only; weave tail through final 6 sts, pull closed and shape a gentle curve to the tip. Weave in end.
Hat Band (purple)
Ch 28.
Row 1: sc in 2nd ch from hook and in each ch across (27).
FO, leave long tail. Wrap band around base of cone (just above brim) and sew ends together at back.
Buckle (mustard/gold)
With yarn needle and mustard yarn, embroider a small square (approx. ⅜" / 1 cm) centered on front of purple band: outline 4 straight stitches forming a square, then add a tiny horizontal bar in center if desired. Secure ends inside hat.
Hair Curls (orange, make 20–22)
For each curl:
Ch 12.
Work 2 sc in 2nd ch from hook and in each ch across (22 sc). The fabric will spiral naturally.
FO, leave 4" tail.
(Make 2–3 curls slightly longer—ch 14—for front face-framing pieces if desired.)
Broom
Handle (brown)
Rnd 1: 5 sc in MR (5)
Rnds 2–12: sc in each st around (5)
FO, leave tail. Insert a short length of floral wire or leave as soft tube; stuff lightly if desired.
Bristles (light brown/tan)
Cut 20 strands of yarn, each 4" long. Fold bundle in half. Using brown yarn, tie tightly around folded end approx. ½" from fold. Trim cut ends evenly to approx. 1¼" length so bristles flare.
Sew or wrap the tied end securely to one end of the handle.
Hanging Loop
With black (or matching cord): ch 22.
Sl st to first ch to form loop.
FO, leave tails to sew.
Assembly
- Sew arms to sides of body at approx. Rnd 14–15, angled slightly forward.
- Position and sew curls around back and sides of head (Rnds 5–10), concentrating density at crown and sides; leave face open. Use 20–22 curls total. Sew bases securely.
- Place hat on head over upper curls; tilt slightly if desired. Stitch brim to head in several places so it sits firmly.
- Sew broom handle into one hand (or both hands clasped); secure with a few stitches through hand and handle.
- Attach hanging loop to tip of hat with secure stitches.
- Weave in all remaining ends. Shape hat tip and curls with fingers.
Finishing
Check that eyes are locked, stuffing is even, and all sewn pieces are secure for hanging. Your witch ornament is ready for the tree or Halloween display!
© Pattern for personal use. Happy crocheting!
Disclaimer: This pattern was generated by AI and should be reviewed for accuracy before use. While we strive for quality, AI-generated content may contain errors. Please verify measurements, stitch counts, and instructions before beginning your project. Generated by purlJam.uk
Love this pattern?
Save this pattern to your free PurlJam libraryAccess your pattern anytime
Bookmark this page to access your pattern anytime