Type
Crochet
Difficulty
intermediate
Category
amigurumi
AI Thinking Process
Planning
Verification
Pattern
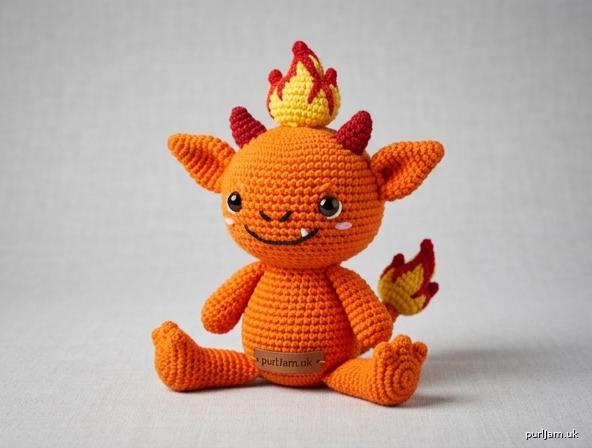
Cute Little Fire Goblin Amigurumi
Intermediate Crochet Pattern
A mischievous 6–7 inch (15–18 cm) sitting fire goblin with stubby limbs, pointed ears, tiny horns, and cheerful flame accents. Worked in continuous spirals of single crochet for a dense, huggable fabric.
Materials
- Worsted weight (4) yarn:
- Main Color (MC): Bright orange – approx. 80 yd (73 m)
- Contrast A (CA): Sunny yellow – approx. 30 yd (27 m)
- Contrast B (CB): Flame red – approx. 20 yd (18 m)
- Small amounts black and white for embroidery
- US E-4 (3.5 mm) crochet hook (or size needed for tight gauge)
- 9 mm safety eyes (pair)
- Polyester fiberfill stuffing
- Yarn needle
- Stitch marker
- Scissors
- Optional: pink embroidery floss for cheeks
Gauge
5 sc = 1 inch (2.5 cm) / 5 rounds = 1 inch (2.5 cm) in continuous sc. Gauge is critical: fabric must be dense so stuffing does not show. Go down a hook size if needed.
Finished Size
Approximately 6–7 inches (15–18 cm) tall when sitting.
Abbreviations (US Terms)
- MR: magic ring (adjustable ring)
- sc: single crochet
- inc: increase (2 sc in same stitch)
- dec: invisible decrease (insert hook in FLO of next 2 sts, yo, pull through both, yo, pull through all 3 loops)
- st(s): stitch(es)
- rnd(s): round(s)
- FLO: front loop only
- BLO: back loop only
- ch: chain
- sl st: slip stitch
- [ ]: total stitch count at end of round
- ( ) × n: repeat instructions in parentheses n times
- FO: fasten off
Pattern Notes
- Work in continuous spiral rounds unless stated. Do not join or turn.
- Place stitch marker in first st of each rnd and move up.
- Stuff firmly as you go, especially head and body, before opening becomes too small.
- Invisible decrease keeps surface smooth.
- Color changes: work last yarn-over of previous st in new color.
- All seam allowances use matching yarn and whip stitch or ladder stitch for invisible joins.
- Safety first: use safety eyes (not buttons) if gifting to children under 3; anchor all parts securely.
HEAD (make 1 – MC)
Rnd 1: 6 sc in MR [6] Rnd 2: inc in each st around [12] Rnd 3: (sc, inc) around [18] Rnd 4: (2 sc, inc) around [24] Rnd 5: (3 sc, inc) around [30] Rnds 6–12: sc in each st around [30] (7 rnds) — Insert 9 mm safety eyes between rnds 9 and 10, spaced 6 sts apart. — Rnd 13: (3 sc, dec) around [24] Rnd 14: (2 sc, dec) around [18] — Stuff head firmly. — Rnd 15: (sc, dec) around [12] Rnd 16: dec around [6] FO, leaving 8-inch tail. Thread tail through remaining 6 sts and pull closed. Weave in end.
BODY (make 1 – MC)
Rnd 1: 6 sc in MR [6] Rnd 2: inc in each st around [12] Rnd 3: (sc, inc) around [18] Rnd 4: (2 sc, inc) around [24] Rnd 5: (3 sc, inc) around [30] Rnd 6: (4 sc, inc) around [36] Rnds 7–14: sc in each st around [36] (8 rnds) Rnd 15: (4 sc, dec) around [30] Rnd 16: (3 sc, dec) around [24] Rnd 17: (2 sc, dec) around [18] — Stuff body very firmly, shaping a slightly flattened base for sitting stability. — Rnd 18: (sc, dec) around [12] Rnd 19: dec around [6] FO, leaving long tail for sewing. Close remaining hole and leave tail for attaching head.
ARMS (make 2 – MC)
Rnd 1: 6 sc in MR [6] Rnd 2: (sc, inc) around [9] Rnds 3–8: sc in each st around [9] (6 rnds) — Lightly stuff lower half only. — Flatten opening and sc across both layers (4–5 sc) to close. FO, leaving 10-inch tail for sewing.
LEGS (make 2 – MC)
Rnd 1: 6 sc in MR [6] Rnd 2: inc in each st around [12] Rnd 3: sc in each st around [12] Rnd 4: (2 sc, dec) around [9] Rnds 5–9: sc in each st around [9] (5 rnds) — Stuff lightly to moderately. — Flatten opening and sc across both layers to close. FO, leaving 10-inch tail for sewing.
EARS (make 2 – MC)
Rnd 1: 4 sc in MR [4] Rnd 2: (sc, inc) around [6] Rnd 3: (2 sc, inc) around [8] Rnd 4: sc in each st around [8] Rnd 5: (2 sc, dec) around [6] FO, leaving tail. Do not stuff. Flatten into pointed teardrop shape.
HORNS (make 2 – CB)
Rnd 1: 4 sc in MR [4] Rnd 2: (sc, inc) around [6] Rnd 3: sc in each st around [6] FO, leaving tail. Lightly stuff tip only. Shape into small cone.
HEAD FLAME (make 1 – worked flat in rows, CA and CB)
With CA: Row 1: ch 7, sc in 2nd ch from hook and each ch across [6], ch 1, turn Row 2: sc, hdc, dc, hdc, sc, sc [6], ch 1, turn Row 3: sc2tog, sc 2, sc2tog [4], ch 1, turn Change to CB: Row 4: sc, hdc, dc, sc [4] FO, leaving long tail. Weave ends; shape into flickering flame point. Optional: embroider tiny CB streaks on CA base for depth.
TAIL FLAME (make 1 – CA with CB tip)
With CA: Rnd 1: 6 sc in MR [6] Rnd 2: (sc, inc) around [9] Rnds 3–5: sc in each st around [9] Change to CB: Rnd 6: (sc, dec) around [6] Rnd 7: (sc, dec) around [4] FO, leave tail, close tip. Stuff lightly. Pinch and shape into a lively flame.
ASSEMBLY
- Head to Body: Pin head centered on body opening. Using body tail, whip-stitch securely all around, adding extra stuffing at neck for a firm join if needed.
- Legs (sitting pose): Position legs at lower front sides of body so goblin sits stably. Splay legs slightly outward and sew horizontally along body sides (rnds 15–18 area) with whip stitch. This creates a flat base and prevents rolling.
- Arms: Sew arms to upper sides of body (approx. rnds 8–10), angled slightly forward for a cute “ready-to-mischief” pose. Attach at shoulder level.
- Ears: Pin ears to sides of head (between rnds 6–10), angled slightly backward and upward. Sew firmly.
- Horns: Place horns on top of head, just inside ear line and slightly forward of center. Sew bases securely.
- Head Flame: Sew flame centered on crown of head, slightly behind horns, using the long tail. Stitch through base so it stands upright.
- Tail Flame: Attach to lower back of body (rnds 12–15), angled upward. Secure base well.
- Facial Features (black yarn/embroidery floss):
- Embroider a small curved mischievous smile 2 rnds below eyes (3–4 sts wide).
- Add two tiny vertical nostril dots above smile.
- Optional: white yarn highlight dots on outer top of each safety eye for sparkle.
- Optional: pink floss cheek circles just below and outside eyes.
- Weave in all remaining ends securely. Gently shape limbs, ears, and flames with fingers.
Finishing Touches & Care
- Check that all parts (especially eyes, horns, flames) are firmly attached and cannot be pulled off.
- Spot clean only; do not machine wash.
- To adjust pose, lightly bend stuffed limbs—the dense sc fabric holds shape well.
Your cute little fire goblin is ready to cause adorable chaos! Enjoy your new fiery friend.
Disclaimer: This pattern was generated by AI and should be reviewed for accuracy before use. While we strive for quality, AI-generated content may contain errors. Please verify measurements, stitch counts, and instructions before beginning your project. Generated by purlJam.uk
Love this pattern?
Save this pattern to your free PurlJam libraryAccess your pattern anytime
Bookmark this page to access your pattern anytime