Type
Crochet
Difficulty
beginner
Category
amigurumi
AI Thinking Process
Planning
Verification
Pattern
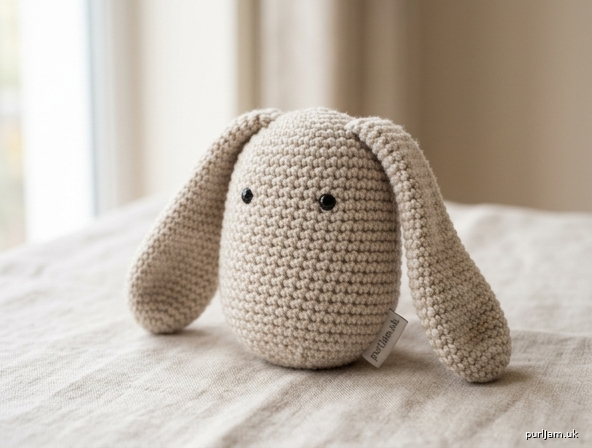
Floppy-Ear Bean Plush
Skill level: Beginner
Style: Simple stuffed oval with long Jellycat-style floppy ears
Finished size: About 3.5" (9 cm) tall body; ears about 3.25" (8 cm) long (with DK yarn and listed gauge)
This is a small, round “bean” plush—not a full animal. Two long, softly stuffed ears give the familiar floppy look.
Materials
- DK (3) yarn: Main Color (MC) about 40 yd (37 m); Contrast Color (CC) for inner ears about 15 yd (14 m) — or use MC for both
- US E-4 (3.5 mm) crochet hook (go down 1–2 sizes from the yarn label for a tight fabric)
- Polyester fiberfill
- Yarn needle
- Stitch marker
- Optional: 6 mm safety eyes or embroidery thread for a simple face
Gauge
24 sc and 24 rnds = 4" (10 cm) in single crochet, unstretched, in the round.
Work tightly so stuffing does not show. Exact gauge is not critical; a dense fabric matters more than matching size.
Abbreviations (US)
ch – chain
sc – single crochet
inc – 2 sc in same stitch
inv-dec – invisible decrease (insert hook in front loops of next 2 sts, yarn over, pull through both, yarn over, pull through 2)
st(s) – stitch(es)
rnd – round
sl st – slip stitch
FO – fasten off
MR – magic ring
Work in continuous spirals unless noted. Place a marker in the first stitch of each round and move it up.
Body (MC)
Stuff firmly as you go, especially before the last 3 rounds.
Rnd 1: 6 sc in MR. [6]
Rnd 2: inc in each st. [12] (6 inc → 6 + 6 = 12 ✓)
Rnd 3: (sc, inc) around. [18] (6 inc → 12 + 6 = 18 ✓)
Rnd 4: (2 sc, inc) around. [24] (6 inc → 18 + 6 = 24 ✓)
Rnds 5–12: sc around. [24] (8 even rounds)
Rnd 13: (2 sc, inv-dec) around. [18] (6 dec → 24 − 6 = 18 ✓)
Stuff firmly.
Rnd 14: (sc, inv-dec) around. [12] (6 dec → 18 − 6 = 12 ✓)
Rnd 15: inv-dec around. [6] (6 dec → 12 − 6 = 6 ✓)
FO, leaving a 8" (20 cm) tail. Thread tail through remaining 6 front loops, pull closed, weave in.
Ears (make 2)
Each ear is a long flattened oval. Work the first ear in MC. For a two-tone Jellycat look, work a second identical piece in CC and sew them together, or work both ears in MC only.
Outer ear (MC) — make 2
Ch 8.
Rnd 1: Sc in 2nd ch from hook, sc in next 5 ch, 3 sc in last ch; rotate to work along the other side of the chain: sc in next 5 ch, 2 sc in last ch (same ch as first sc). [16]
(1 + 5 + 3 + 5 + 2 = 16 ✓)
Rnd 2: inc, sc 5, inc × 3, sc 5, inc × 2. [22]
(1 + 5 + 3 + 5 + 2 = 16 start; 1 + 3 + 2 = 6 inc → 16 + 6 = 22 ✓)
Rnds 3–10: sc around. [22] (8 even rounds)
Rnd 11: sc 9, inv-dec, sc 9, inv-dec. [20] (22 − 2 = 20 ✓)
Rnd 12: sc around. [20]
Rnd 13: sc 8, inv-dec, sc 8, inv-dec. [18] (20 − 2 = 18 ✓)
Rnds 14–15: sc around. [18]
FO, leaving a 12" (30 cm) tail for sewing. Do not close the opening.
Lightly stuff the lower third only (the end nearest the opening). Leave the long tip empty so it flops.
Inner ear (CC, optional) — make 2
Work as Outer ear through Rnd 10 only (stop at 22 sts). FO, leaving a tail. Flatten. Whipstitch the inner piece onto the front of the outer ear, matching the long edges. Leave the stuffed base free for sewing to the body.
Assembly
- Flatten each ear so the opening is a short slit at the base.
- Pin ears to the top of the body, slightly toward the back, about 2–3 sts apart. They should hang down the sides.
- Sew through both layers of the ear opening and into the body, catching several rounds so the ears stay put.
- Optional face: insert safety eyes between Rnds 7–8, about 6 sts apart, before fully closing the body if you prefer; or embroider two tiny sts and a small smile after stuffing.
Weave in all ends. Steam-block ears lightly if they curl (do not crush the stuffing in the base).
Tips
- Invisible decreases keep the body smooth.
- If ears are too stiff, use less stuffing or go up half a hook size for ears only.
- For a larger bean, add even rounds after Rnd 4 (keep 24 sts) and add even rounds on the ears after Rnd 3.
Disclaimer: This pattern was generated by AI and should be reviewed for accuracy before use. While we strive for quality, AI-generated content may contain errors. Please verify measurements, stitch counts, charts, and instructions before beginning your project. Generated by purlJam.uk
Love this pattern?
Save this pattern to your free PurlJam libraryAccess your pattern anytime
Bookmark this page to access your pattern anytime