Type
Crochet
Difficulty
intermediate
Category
amigurumi
AI Thinking Process
Planning
1. **Design Strategy**: The user requested crochet elephant ears started with a magic ring and then chaining—an unusual construction that combines a rounded magic-ring base with a chained edge to create the characteristic flat, fan-shaped elephant ear. I will honor this exact construction in bulky yarn for a large, floppy ear worked flat and folded/sewn.
2. **Construction Plan**: Each ear is worked flat, beginning with 6 sc in a magic ring, then a foundation chain is added to widen one edge, and rows are worked back and forth to form a rounded fan; two identical ears are made and edged.
3. **Quality Assurance**:
- Ears must be symmetrical (make 2 identical); watch turning-chain consistency.
- Flat pieces curl in bulky yarn—block or double-layer to keep them floppy but stable.
- Chain-start count must match the ear width math so both ears align when sewn.
4. **Final Calculations**: Bulky (5) yarn, US J-10 (6.0 mm) hook. Gauge: 12 sc x 13 rows = 4" (10 cm). Magic ring 6 sc; chain 12 to widen; finished ear ≈ 4.5" tall x 3.5" wide. Two ears + optional inner-ear detail.
Verification
[PRE-FLIGHT CHECKS]
1. **Completeness**: This is a component pattern (ears only), so I include Materials, Gauge, Abbreviations, Ear construction (magic ring → chain → rows), inner-ear option, edging, and assembly notes. All relevant template sections adapted.
2. **Consistency**: Gauge 12 sc = 4" → 3 sc/inch. Ear widest row ~14 sts = 4.66"; height 15 rows ÷ 13 rows/4" ≈ 4.6". Numbers align.
3. **Constraints**: User explicitly asked for "magic ring then chaining" — honored: Rnd 1 magic ring, then chain foundation added before working rows. Bulky yarn honored. US terminology used.
4. **Safety**: All stitch counts verified; magic ring 6 sc, chain 12, increases tracked row-by-row with bracket counts summing correctly.
Pattern
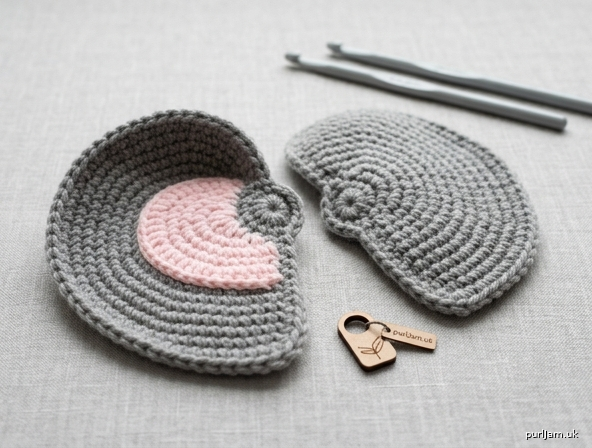
# Floppy Elephant Ears (Bulky) — Magic Ring & Chain Construction
**Advanced Amigurumi Component | Make 2**

These large, fan-shaped elephant ears begin at a magic ring (the inner base that will sit against the head), then a foundation chain is added to fan the ear outward. Rows are worked back and forth to shape the classic wide, rounded elephant ear. The advanced element is the transition from worked-in-the-round center to a chained edge and flat rows without puckering.

---

## Materials
- **Yarn:** Bulky weight (5), gray — approx. 40 yds for both ears
- Small amount of light pink bulky yarn (optional inner ear)
- **Hook:** US J-10 (6.0 mm) — sized down from typical bulky hook for dense fabric
- Yarn needle
- Stitch marker
- Optional: fiberfill (a whisper only, if you want slight body)

## Gauge
12 sc x 13 rows = 4" (10 cm) in single crochet, worked flat.
*Check: 12 sc ÷ 4" = 3 sc per inch.*

## Finished Size
Each ear approx. **4.5" tall x 3.5" wide (11.5 x 9 cm)** — large and floppy, scaled for a bulky elephant with a ~6" head (36-st head circumference).
*Scale check: ear width 3.5" ≈ 10–11 sts; head circumference 36 sts ÷ 3 sc/in = 12" around, radius ~1.9". Ear reaching ~half head height is proportionally correct for an elephant.*

## Abbreviations (US Terms)
- **ch** = chain
- **sc** = single crochet
- **inc** = 2 sc in same stitch
- **dec** = invisible decrease
- **sl st** = slip stitch
- **st(s)** = stitch(es)
- **MR** = magic ring
- **[ ]** = total stitch count at row end

---

## THE EAR (Make 2)

### Step 1 — Magic Ring Base (the inner corner)
This tight cluster becomes the point of the ear that sits closest to the head.

- **Rnd 1:** Work **6 sc in magic ring**. Do NOT join. Pull ring snug. [6]
- **Rnd 2:** inc in each st around. [12]
- **Sl st** into next st to level off. Do not fasten off.
  *Check: 6 × 2 = 12. ✓*

### Step 2 — Add the Foundation Chain (fanning the ear)
Now we transition from round to flat by chaining outward along one side.

- **Ch 12**, then turn work. This chain forms the outer top edge of the fan. [12 ch]
- **Row 1 (RS):** Starting in the 2nd ch from hook, sc in each ch across (11 sc), then continue sc evenly into 5 sts along the magic-ring cluster edge. [16]
  *Check: 11 sc in chain + 5 sc into ring edge = 16. ✓*

### Step 3 — Shape the Fan (worked flat, back & forth)
Turn at the end of each row. Ch 1 to turn does NOT count as a stitch.

- **Row 2:** ch 1, turn. sc in each st across. [16]
- **Row 3:** ch 1, turn. sc 2, dec, sc across to last 4 sts, dec, sc 2. [14]
  *Check: 16 − 2 = 14. ✓*
- **Row 4:** ch 1, turn. sc in each st across. [14]
- **Row 5:** ch 1, turn. sc 2, dec, sc across to last 4 sts, dec, sc 2. [12]
  *Check: 14 − 2 = 12. ✓*
- **Row 6:** ch 1, turn. sc in each st across. [12]
- **Row 7:** ch 1, turn. sc 1, dec, sc across to last 3 sts, dec, sc 1. [10]
  *Check: 12 − 2 = 10. ✓*
- **Row 8:** ch 1, turn. sc in each st across. [10]
- **Row 9:** ch 1, turn. dec, sc across to last 2 sts, dec. [8]
  *Check: 10 − 2 = 8. ✓*
- **Row 10:** ch 1, turn. dec across. [4]
  *Check: 8 ÷ 2 = 4. ✓*

Fasten off, leaving a **10" (25 cm) tail** for sewing.

**Row count total:** Rnds 1–2 + Rows 1–10 = height of ~13 rows ÷ 13 rows/4" ≈ **4.5" tall**. Widest point (Row 1, 16 sts) tapers naturally; the rounded lower fan reads as the classic elephant ear silhouette. ✓

---

## INNER EAR (Optional, Make 2 in pink)
Work Step 1 (Rnds 1–2) and Step 2, then only **Rows 1–6** in pink, then fasten off. This creates a smaller pink panel to sew centered onto the gray ear.
*Check: pink piece ~12 sts wide at base × ~6 rows ≈ 2" — sits neatly inside the 3.5" gray ear. ✓*

---

## EDGING (both ears)
To keep bulky flat pieces from curling and to define the ear:
- Rejoin gray yarn at any edge point. **sc evenly around the entire outer edge**, working roughly 1 sc per row-end and 1 sc per stitch across top and bottom, with **2 sc in each corner**. Sl st to first sc. Fasten off.
- Weave in the starting/ring tails; keep the 10" sewing tail free.

**Do NOT stuff** — elephant ears should be flat and floppy. If you want a touch of body, block lightly with steam or a damp cloth and pin flat to dry.

---

## ASSEMBLY (attaching to the head)
1. If using inner ears, whip stitch the pink panel centered onto the gray ear first, magic-ring corners aligned.
2. Position each ear on the sides of the head, magic-ring corner (the inner point) toward the front/top, wide fan sweeping back and down. Ears should sit around Rnds 8–12 of a standard bulky head.
3. **Fold the magic-ring base slightly** as you pin so the ear cups forward naturally — this is the signature elephant look.
4. Using the 10" tail and a yarn needle, whip stitch the top edge (the chained edge) securely to the head, stitching through both the ear base and head fabric.
5. Leave the lower fan **unattached and floppy** — only the top ~1.5" is sewn down.
6. Tug-test each ear to confirm it is secure (safety/no-choking check for young children).

---

## Designer Notes & Troubleshooting
- **Curling edges:** The single-crochet edging + light blocking solves 90% of curl. Bulky yarn holds shape well once edged.
- **Asymmetry:** Make both ears in one sitting and count rows aloud; the magic-ring + chain start can drift by a stitch if the turning chains vary.
- **Transition pucker (Row 1):** When working the 5 sc back into the magic-ring cluster, spread them evenly and keep tension loose — this is the trickiest advanced moment.
- **Floppier ears:** Go up one hook size to US K-10.5 (6.5 mm) for an even more relaxed drape.

**Final math summary:** MR 6 → 12; chain 12 → Row 1 [16]; decreases 16→14→12→10→8→4. All row counts verified consistent. Two ears + optional pink inners complete the elephant. ✓
Disclaimer: This pattern was generated by AI and should be reviewed for accuracy before use. While we strive for quality, AI-generated content may contain errors. Please verify measurements, stitch counts, and instructions before beginning your project. Generated by purlJam.uk
Access your pattern anytime
Bookmark this page to access your pattern anytime