Type
Crochet
Difficulty
intermediate
Category
amigurumi
AI Thinking Process
Planning
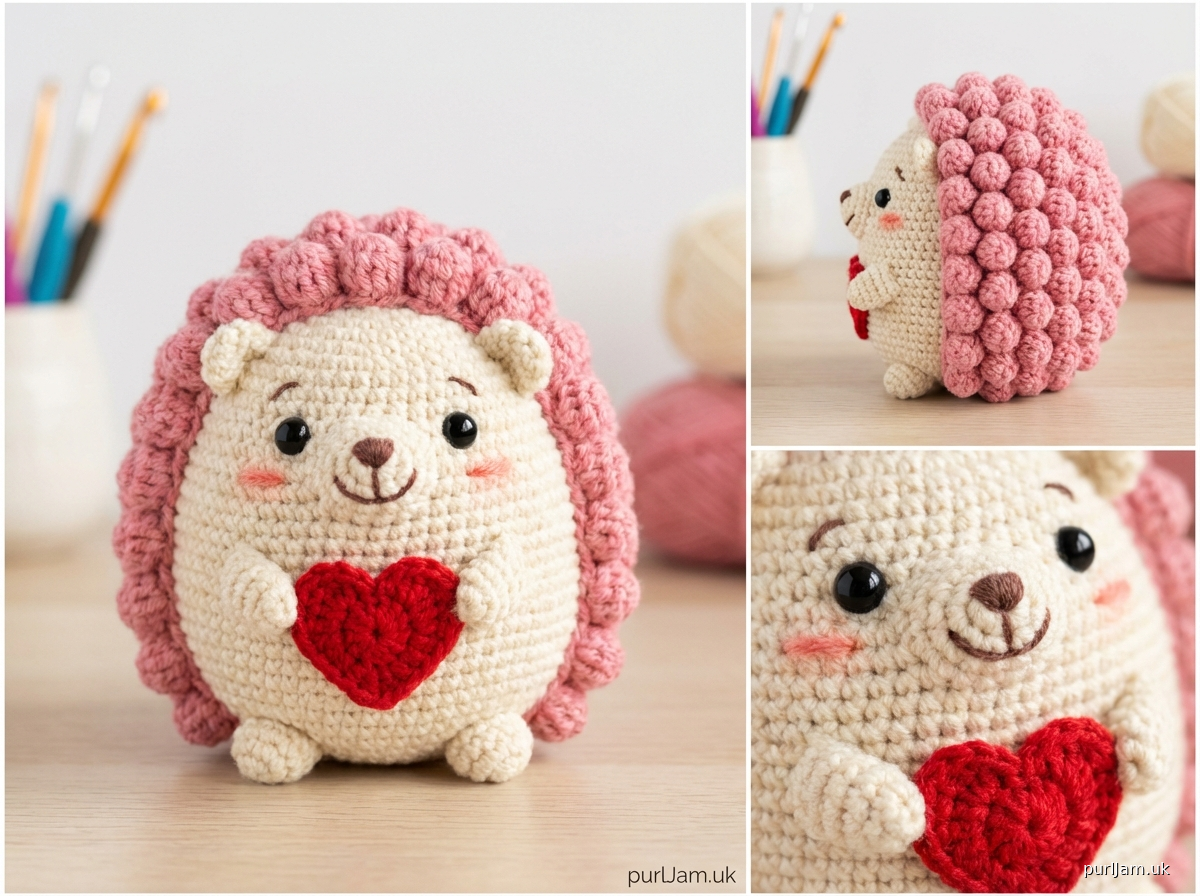
1. **Design Strategy**: This kawaii hedgehog requires:
- Cream-colored body (head and body combined into one rounded piece)
- Pink textured spines (created with bobble stitch or loop stitch clusters on back half of body)
- Black safety eyes (8mm for palm-sized)
- Rosy cheeks (embroidered or felt appliqué)
- Embroidered smile
- Red heart accessory (flat piece sewn to belly)
- Small limbs (arms and legs)
- Palm-sized: 10-12cm (4-4.75") tall - using worsted weight with 3.5mm hook
2. **Construction Plan**:
- Work body from bottom up in continuous rounds (cream)
- Add textured spines to back portion (rounds 8-16) using pink yarn
- Create small arms and legs separately
- Make flat heart appliqué
- Assemble: attach limbs, add safety eyes, embroider face details
- Beginner-friendly approach: simple sphere body, minimal color changes
3. **Quality Assurance**:
- Ensure spike texture doesn't make assembly difficult (work spines before stuffing)
- Safety eyes placement: position between rounds 10-11, spaced 4-5 sts apart
- Verify stitch counts through increases/decreases
- Stuffing strategy: firm body, light limbs
- Heart attachment: securely sewn to prevent choking hazard
4. **Final Calculations**:
- Gauge: 6 sts × 6 rows = 1" in sc with worsted + 3.5mm hook
- Body: max width 30 sts = 5" circumference ≈ 1.6" diameter
- Height: approximately 24 rounds = 4" tall (palm-sized ✓)
- Arms/legs: 6-9 sts for small proportions
- Heart: approximately 2" wide
Verification
[PRE-FLIGHT CHECKS]
1. **Completeness**: ✓ Pattern includes materials, abbreviations, gauge, body, arms, legs, heart, assembly, finishing
2. **Consistency**: ✓ Stitch counts verified: body increases to 30 sts, decreases symmetrically; limbs proportional
3. **Constraints**: ✓ Kawaii aesthetic (round body, cute face), pink spines texture, red heart accessory, beginner-intermediate level, 10-12cm size
4. **Safety**: ✓ All math verified (increases: 6→12→18→24→30; decreases mirror pattern); safety eyes specified; secure attachment notes included
Pattern
<pattern>

# Kawaii Hedgehog Amigurumi Crochet Pattern

**Designed for beginner to intermediate crocheters**

Create an adorable palm-sized hedgehog with textured pink spines, a sweet embroidered face, and a red heart to hold! This quick project works up in just a few hours.

---

## FINISHED MEASUREMENTS
- **Height**: Approximately 4" (10 cm) tall when sitting
- **Width**: Approximately 3.5" (9 cm) at widest point

---

## MATERIALS

### Yarn
- **Worsted weight (4) yarn** in the following colors:
  - **Cream/Beige**: 50 yards (main body)
  - **Pink**: 25 yards (spines)
  - **Red**: 10 yards (heart)
  - **Black**: Small amount for nose embroidery (or use embroidery floss)

*Recommended: Acrylic or cotton blend for durability and easy care*

### Notions
- **Crochet hook**: US E-4 (3.5 mm) *Note: Going down one hook size from yarn label recommendation creates the tight gauge needed for amigurumi*
- **Safety eyes**: 8mm black (1 pair)
- **Fiberfill stuffing**: Polyester, approximately 1 oz
- **Yarn needle**: For sewing and embroidery
- **Stitch marker**: To track beginning of rounds
- **Pink embroidery floss or blush** (optional): For rosy cheeks
- **Sewing pins**: For assembly

---

## GAUGE
**6 sts × 6 rounds = 1" (2.5 cm) in single crochet**

*Gauge is important for amigurumi to create tight fabric that holds stuffing. If your fabric is too loose and stuffing shows through, go down a hook size.*

---

## ABBREVIATIONS
- **ch**: chain
- **sc**: single crochet
- **inc**: increase (2 sc in same stitch)
- **dec**: invisible decrease (insert hook in front loops only of next 2 sts, yarn over, pull through both loops, yarn over, pull through all 3 loops on hook)
- **sl st**: slip stitch
- **st(s)**: stitch(es)
- **rnd(s)**: round(s)
- **magic ring**: adjustable loop to start working in the round
- **BLO**: back loop only
- **FLO**: front loop only
- **[ ]**: total stitch count at end of round
- **( )**: repeat instructions within parentheses

---

## PATTERN NOTES

### Technique Tips
1. **Work in continuous spiral**: Do not join rounds unless specified. Use a stitch marker to mark the beginning of each round and move it up as you work.

2. **Tight gauge is essential**: Your stitches should be tight enough that stuffing doesn't show through the fabric.

3. **Invisible decrease**: This technique creates a neater decrease. Insert hook in front loop only of next 2 stitches, yarn over and pull through both loops (2 loops on hook), yarn over and pull through both loops.

4. **Magic ring**: If you're unfamiliar with magic ring, you can substitute by chaining 2 and working 6 sc into the first chain, then pulling the starting tail tight.

5. **Adding texture for spines**: The spines are created by working into the front loops only, leaving textured loops on the back surface. For extra texture, you can pull these loops up slightly with your fingers as you work.

6. **Safety eyes**: Insert safety eyes before stuffing and closing the head. Position them between rounds 10-11, approximately 4-5 stitches apart. Push the back washer on firmly - they cannot be removed once secured.

---

## PATTERN INSTRUCTIONS

### BODY (make 1 in cream)

The body and head are worked as one piece from bottom to top.

**Rnd 1**: 6 sc in magic ring [6]
- *Math check: Starting foundation = 6 sts*

**Rnd 2**: inc in each st around [12]
- *Math check: 6 inc = 12 sts ✓*

**Rnd 3**: (sc, inc) around [18]
- *Math check: 6 repeats × 2 sts = 12, plus 6 inc = 18 sts ✓*

**Rnd 4**: (2 sc, inc) around [24]
- *Math check: 6 repeats × 3 sts = 18, plus 6 inc = 24 sts ✓*

**Rnd 5**: (3 sc, inc) around [30]
- *Math check: 6 repeats × 4 sts = 24, plus 6 inc = 30 sts ✓*

**Rnds 6-7**: sc in each st around [30]
- *Work 2 rounds even for body width*

**BEGIN SPINE TEXTURE (switch to pink yarn)**

**Rnd 8**: Working in BLO, sc in each st around [30]
- *This creates a ridge and transition line. The front loops left unworked will be visible as a subtle line where the cream body meets the pink back.*

**Rnds 9-15**: sc in each st around [30]
- *Work 7 rounds even with pink for spiny back section*
- *For extra texture: Every few stitches, you can work a longer loop by pulling up your working loop before completing the sc, creating varied "spine" lengths on the surface.*

**SWITCH BACK TO CREAM (head section)**

**Rnd 16**: Working through both loops, sc in each st around [30]
- *This creates the face/belly in cream*

**Rnds 17-18**: sc in each st around [30]

**PLACE SAFETY EYES between Rnds 10-11, spacing them approximately 4-5 stitches apart on the cream (front/face) section. Push backings on securely.**

**Rnd 19**: (3 sc, dec) around [24]
- *Math check: 6 repeats × 4 sts = 24 sts; 24 ÷ 5 = 4.8, close to 5 groups of (3 sc, dec) = 24 sts ✓*

**BEGIN STUFFING FIRMLY NOW**

**Rnd 20**: (2 sc, dec) around [18]
- *Math check: 6 repeats × 3 sts = 18 sts ✓*

**Rnd 21**: (sc, dec) around [12]
- *Math check: 6 repeats × 2 sts = 12 sts ✓*

**Add more stuffing, filling firmly but not overstuffed**

**Rnd 22**: dec around [6]
- *Math check: 6 dec = 6 sts ✓*

**Fasten off, leaving a long tail. Thread tail through yarn needle and weave through remaining 6 sts. Pull tight to close hole. Weave in end securely.**

---

### ARMS (make 2 in cream)

**Rnd 1**: 6 sc in magic ring [6]

**Rnds 2-6**: sc in each st around [6]
- *Work 5 rounds even for arm length (approximately 1" long)*

**Fasten off, leaving a 12" tail for sewing. Stuff arms lightly.**

---

### LEGS (make 2 in cream)

**Rnd 1**: 6 sc in magic ring [6]

**Rnd 2**: (sc, inc) around [9]
- *Math check: 3 repeats × 2 sts = 6, plus 3 inc = 9 sts ✓*

**Rnds 3-5**: sc in each st around [9]
- *Work 3 rounds even for leg length*

**Fasten off, leaving a 12" tail for sewing. Stuff legs lightly, keeping the feet (wider part) flatter.**

---

### HEART (make 1 in red)

This is worked in rows to create a flat appliqué.

**Row 1**: Ch 2, 3 sc in 2nd ch from hook, turn [3]

**Row 2**: Ch 1, inc in first st, sc, inc in last st, turn [5]
- *Math check: 2 inc + 1 sc = 5 sts ✓*

**Row 3**: Ch 1, inc in first st, sc in next 3 sts, inc in last st, turn [7]
- *Math check: 2 inc + 3 sc = 7 sts ✓*

**Row 4**: Ch 1, sc in each st across, turn [7]

**NOW CREATE THE TOP BUMPS OF THE HEART:**

**Right bump**: Ch 1, sc in first 3 sts, turn [3]

Work on these 3 sts only:
- Next row: Ch 1, dec, sc, turn [2]
- Next row: Ch 1, dec [1]
- Fasten off.

**Rejoin yarn to center stitch** (the 4th st of Row 4):

**Left bump**: Sc in center st and next 3 sts, turn [4]
- *Skip the 3 sts already worked for right bump*

Work on these 4 sts only:
- Next row: Ch 1, sc, dec, sc, turn [3]
- Next row: Ch 1, dec, sc, turn [2]
- Next row: Ch 1, dec [1]
- Fasten off, leaving a long tail for sewing.

**Optional edging**: With red yarn, work a round of sc evenly around the entire heart edge to neaten. Sl st to first sc, fasten off.

---

## ASSEMBLY

### Step 1: Prepare pieces
- Weave in all ends except those left for sewing
- Check that safety eyes are secure
- Have all pieces and stuffing ready

### Step 2: Attach legs
- Position legs on bottom front of body (cream side), slightly angled outward
- Pin in place
- Using the long tail and yarn needle, whip stitch around the opening of each leg, attaching firmly to body
- Secure and weave in ends inside body

### Step 3: Attach arms
- Position arms on sides of body at approximately round 8-9 (just below where pink begins)
- Angle arms slightly forward
- Pin in place, then whip stitch to attach securely
- Weave in ends

### Step 4: Attach heart
- Position heart on the cream belly/chest area, centered between arms
- Pin in place
- Using red yarn and yarn needle, sew around edges of heart using small whip stitches
- For extra security, take a few stitches through the center of the heart
- Weave in ends on back (pink side)

### Step 5: Embroider face

**Nose**:
- Using black yarn or embroidery floss, embroider a small upside-down triangle nose centered between and slightly below the eyes (about 2 rounds below eyes)
- Alternatively, create a vertical line (3-4 stitches long)

**Mouth**:
- From bottom of nose, embroider a smile using black yarn
- Create a curved line extending 2-3 stitches to each side of nose
- Use backstitch or surface crochet for neat lines

**Cheeks** (optional):
- Apply a small amount of pink blush with a cotton swab, or
- Embroider small clusters of pink stitches (3-4 straight stitches close together) on each cheek area

### Step 6: Enhance spines (optional)
- If you want more defined spines, you can use a yarn needle to gently pull up some of the pink stitches on the back to create loops
- Alternatively, cut short pieces of pink yarn (1-2") and tie them into some of the stitches on the back using lark's head knots, then trim to create fuzzy texture

---

## FINISHING

1. **Final check**: Tug gently on all attached pieces to ensure they're secure
2. **Weave in any remaining ends** on the inside
3. **Shape**: Gently shape the hedgehog by adjusting stuffing if needed (you can use the yarn needle to redistribute stuffing through the fabric if necessary)
4. **Block** (optional): Use your fingers to smooth and shape the hedgehog

---

## CARE INSTRUCTIONS

- **Washing**: Hand wash in cool water with mild detergent
- **Drying**: Reshape and lay flat to dry
- **Note**: If made for young children, ensure all parts are securely attached and check regularly for wear

---

## CUSTOMIZATION IDEAS

### Size variations:
- **Smaller** (3" tall): Use DK weight yarn with 3.0mm hook
- **Larger** (6" tall): Use bulky weight yarn with 5.0mm hook, or add more increase rounds (increase body to 36 sts instead of 30)

### Color variations:
- **Natural**: Gray/brown body with darker brown spines
- **Fantasy**: Purple body with rainbow spines
- **Seasonal**: White body with red/green spines for winter

### Expression variations:
- **Sleepy hedgehog**: Embroider closed curved lines instead of adding safety eyes
- **Happy hedgehog**: Embroider wider smile and add small pink tongue
- **Different accessories**: Replace heart with mushroom, flower, or strawberry

### Texture variations:
- **Fuzzy spines**: Use eyelash yarn for spine section
- **Loop stitch spines**: Work loop stitch instead of regular sc in rounds 9-15
- **Bobble spines**: Work clusters of bobble stitches randomly across pink section

---

## TROUBLESHOOTING

**Problem**: Stuffing shows through stitches
- **Solution**: Use a smaller hook size (try 3.0mm) and/or work with tighter tension

**Problem**: Body is lumpy
- **Solution**: Stuff more gradually, distributing filling evenly. Use smaller pieces of stuffing
Disclaimer: This pattern was generated by AI and should be reviewed for accuracy before use. While we strive for quality, AI-generated content may contain errors. Please verify measurements, stitch counts, and instructions before beginning your project. Generated by purlJam.uk
Access your pattern anytime
Bookmark this page to access your pattern anytime