Type
Crochet
Difficulty
beginner
Category
amigurumi
AI Thinking Process
Planning
Verification
Pattern
Lightning Race Car Plush
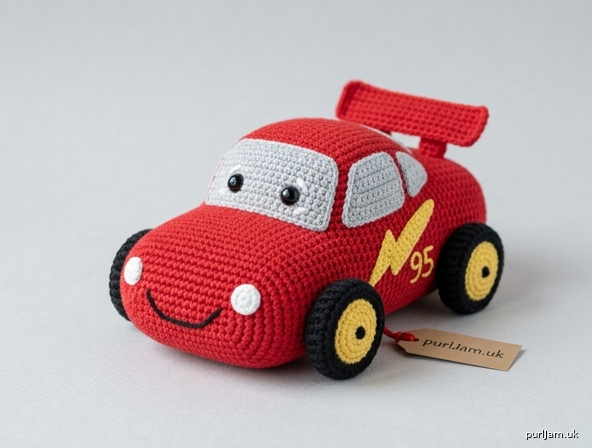
A beginner-friendly crocheted racing car soft toy, worked from simple amigurumi shapes. The red oval body, grey windscreen cabin, yellow-rimmed tyres and rear spoiler are sewn together, then finished with a yellow lightning bolt, racing number 95, headlights and a smile.
Skill level: Beginner
Techniques used: Magic ring, chain, double crochet, increase, decrease, back loop only, colour change, sewing pieces together, simple embroidery.
Finished measurements
Approximately 12 cm (4¾ in) long, 8 cm (3¼ in) wide and 6.5 cm (2½ in) tall, including wheels and spoiler, using sport-weight yarn and the stated tension.
Size will vary with yarn, hook and stuffing. To make a longer car, add even rounds on the body; to make a shorter car, work fewer even rounds.
Materials
Yarn — sport weight (5 ply), cotton or acrylic, approx. 160 m / 50 g:
| Colour | Amount | Use |
|---|---|---|
| Red | 40 g (about 130 m) | Body, spoiler |
| Black | 20 g (about 65 m) | Tyres, mouth |
| Yellow | 10 g (about 30 m) | Rims, lightning bolt, number 95 |
| Light grey | 10 g (about 30 m) | Cabin / windscreen |
| White | 5 g | Headlights, eyes |
| Blue | small amount | Irises |
Hook: 2.5 mm (go up to 3.0 mm only if your fabric is so tight you cannot work comfortably).
Notions:
- Polyester fibre fill
- Yarn needle
- Stitch marker
- Pins
- Scissors
- 2 × 9 mm safety eyes (optional; embroider eyes instead for under-3s)
Tension (gauge)
26 dc and 28 rnds = 10 cm (4 in) over dc worked in the round with a 2.5 mm hook, unblocked (firm amigurumi fabric).
Work more tightly than you would for a garment. If your tension is looser than this, use a smaller hook so stuffing will not show.
Abbreviations (UK)
- BLO — back loop only
- ch — chain
- dc — double crochet (US single crochet)
- dc2tog — double crochet 2 together (decrease)
- FO — fasten off
- inc — increase (2 dc in next st)
- MR — magic ring (adjustable ring)
- rnd(s) — round(s)
- sl st — slip stitch
- st(s) — stitch(es)
- yrh — yarn round hook
Pattern notes
- UK crochet terms are used throughout.
- Pieces in the round are worked in a continuous spiral (do not join or turn unless told). Mark the first stitch of every round and move the marker up as you go.
- The spoiler is worked in rows.
- Stuff as directed. The body should be firm but slightly flattened (wider than it is tall) so it looks like a car, not a tube.
- Invisible decrease (recommended): insert hook through the front loops only of the next 2 sts, yrh, pull through both loops, yrh, pull through 2 loops on hook. Count this as dc2tog.
- Colour change: work the last yrh of the last stitch in the old colour with the new colour, then continue.
- Stitch counts are given in square brackets at the end of each round or row.
- Leave long tails (20–30 cm / 8–12 in) on pieces that will be sewn on.
Safety: If the toy is for a child under 3 years, do not use safety eyes — embroider the eyes instead — and sew every piece on very firmly.
Body (red)
The foundation-chain end is the front of the car (slightly rounded nose). The open end will be sewn closed for the back.
With red, ch 15.
Rnd 1: 2 dc in 2nd ch from hook, 1 dc in next 12 ch, 4 dc in last ch, rotate to work along the opposite side of the foundation chain, 1 dc in next 12 ch, 2 dc in the same ch as the first 2 dc. [32]
(2 + 12 + 4 + 12 + 2 = 32 ✓; each end of the oval has 4 sts)
Rnd 2: inc in next 2 sts, 12 dc, inc in next 4 sts, 12 dc, inc in next 2 sts. [40]
(8 increases → 32 + 8 = 40 ✓; sts used: 2 + 12 + 4 + 12 + 2 = 32 ✓)
Rnds 3–32: dc in each st around. [40]
(30 rounds. Body should measure about 11 cm / 4¼ in from the foundation chain. Add or omit even rounds to reach this length.)
Rnd 33: dc2tog, dc2tog, 12 dc, (dc2tog) 4 times, 12 dc, dc2tog, dc2tog. [32]
(8 decreases → 40 − 8 = 32 ✓; sts used: 4 + 12 + 8 + 12 + 4 = 40 ✓)
Rnd 34: dc in each st around. [32]
Stuff firmly, flattening the oval as you go so the car is wide and low, not round. Keep stuffing denser at the ends so they do not dent.
FO, leaving a 30 cm (12 in) tail. Flatten the opening so the decrease groups sit at the left and right sides (matching the oval). Whip stitch the opening closed through both layers. Weave in the starting tail.
Cabin / windscreen (light grey)
A small oval sewn on top of the body. The long axis runs across the car so two eyes sit side by side.
With light grey, ch 6.
Rnd 1: 2 dc in 2nd ch from hook, 1 dc in next 3 ch, 4 dc in last ch, rotate to work along the opposite side of the foundation chain, 1 dc in next 3 ch, 2 dc in the same ch as the first 2 dc. [14]
(2 + 3 + 4 + 3 + 2 = 14 ✓)
Rnd 2: inc in next 2 sts, 3 dc, inc in next 4 sts, 3 dc, inc in next 2 sts. [22]
(8 increases → 14 + 8 = 22 ✓)
Rnd 3: (1 dc, inc) twice, 3 dc, (1 dc, inc) 4 times, 3 dc, (1 dc, inc) twice. [30]
(8 increases → 22 + 8 = 30 ✓)
Rnds 4–6: dc in each st around. [30]
FO, leaving a 25 cm (10 in) tail. Stuff lightly — keep the cabin flatter than a ball.
Eyes (do this before sewing the cabin down):
Option A — safety eyes: Insert 9 mm safety eyes on the long forward-facing side of the cabin, about 1 cm (⅜ in) apart, between Rnds 3 and 4. Fix the washers on the inside.
Option B — crocheted eyes (make 2):
With white, 6 dc in MR. [6]
Rnd 2: inc in each st. [12] (6 increases → 6 + 6 = 12 ✓)
Sl st in first dc, FO, leaving a tail.
With blue, 6 dc in MR, sl st in first dc, FO. [6]
Sew a blue circle onto each white circle, slightly off-centre. Add a tiny black stitch or French knot for the pupil, and a small white stitch for a highlight. Sew the eyes onto the forward face of the cabin.
Option C — embroidered eyes: With white, satin-stitch two ovals on the forward face; add blue irises and black pupils.
Wheels (make 4)
Yellow centre, black tyre. Yellow faces outwards when sewn on.
With yellow:
Rnd 1: 6 dc in MR. [6]
Rnd 2: inc in each st. [12] (6 increases → 6 + 6 = 12 ✓)
Rnd 3: (1 dc, inc) 6 times. [18] (6 increases → 12 + 6 = 18 ✓)
Change to black.
Rnd 4: (2 dc, inc) 6 times. [24] (6 increases → 18 + 6 = 24 ✓)
Rnd 5: BLO dc in each st around. [24] (this ridge is the edge of the tyre)
Rnd 6: dc in each st around. [24]
Rnd 7: (2 dc, dc2tog) 6 times. [18] (6 decreases → 24 − 6 = 18 ✓)
Rnd 8: (1 dc, dc2tog) 6 times. [12] (6 decreases → 18 − 6 = 12 ✓)
Stuff the wheel firmly, keeping it slightly flattened (a tyre, not a ball).
Rnd 9: (dc2tog) 6 times. [6] (6 decreases → 12 − 6 = 6 ✓)
FO, leaving a 20 cm (8 in) tail. Thread the tail through the front loops of the remaining 6 sts, pull closed, and weave in the end on the inner face (the side that will sit against the car). Optional: with black, add a small French knot in the centre of the yellow rim.
Spoiler (red)
Worked in rows.
With red, ch 13.
Row 1: 1 dc in 2nd ch from hook, 1 dc in each ch to end, turn. [12]
Rows 2–4: ch 1 (does not count as a st), 1 dc in each st to end, turn. [12]
FO, leaving a 25 cm (10 in) tail.
Headlights (make 2, white)
Rnd 1: 6 dc in MR, sl st in first dc to join. [6]
FO, leaving a 15 cm (6 in) tail.
Assembly
Pin every piece before sewing. Use matching yarn and a yarn needle. Whip stitch or mattress stitch as you prefer; take small, firm stitches.
1. Cabin. Place the cabin on top of the body, long axis running left to right across the car. The forward face (with the eyes) should sit about 2 cm (¾ in) back from the front (foundation-chain) end. The cabin sits in the front third of the body, not in the middle. Sew all around the lower edge, adding a pinch more stuffing if needed just before closing.
2. Wheels. Each wheel’s yellow rim faces out. Sew the inner face of each wheel to the lower side of the body:
- Front pair: about 2 cm (¾ in) from the front end, opposite each other.
- Rear pair: about 2 cm (¾ in) from the back end, opposite each other.
All four wheels should sit at the same height so the car rests level. The bottom of the tyres should sit just below the body. Sew firmly around the inner face.
3. Spoiler. Stand the rectangle up at the back of the car (sewn end), centred, with one long edge against the top-back of the body so the spoiler sticks up. Sew along that long edge. If the spoiler flops, take a couple of extra tacking stitches on the reverse, or sew a second identical rectangle and join the two for stiffness before attaching.
4. Headlights. Sew one white circle to each side of the front end, just below the cabin and slightly in from the sides.
Embroidery and details
Use a yarn needle and short lengths of yarn. Keep stitches on the surface; hide starts and ends inside the body.
Mouth (black): On the front of the body, below the cabin and between the headlights, embroider a wide, shallow curve (backstitch or chain stitch) for a smile. Lightning McQueen’s smile sits on the nose, not on the windscreen.
Lightning bolt (yellow): On the right side of the body (and optionally the left), embroider a lightning bolt in chain stitch or backstitch:
- Start near the rear wheel, level with the middle of the body.
- Work a long diagonal toward the front and slightly down.
- Add a short jagged zig, then a second long stroke toward the front wheel.
- Add one small “fork” branching off the main bolt.
Keep it bold and simple — a zigzag with one extra prong reads clearly at this size.
Number 95 (yellow): On each side of the body, on or just behind the lightning bolt, backstitch the number 95 about 1.5–2 cm (½–¾ in) tall. Optionally add a smaller 95 on the bonnet (the red area between cabin and smile).
Extra (optional):
- A short black backstitch line under the smile for a grille.
- A tiny white stitch on each eye for a highlight if using safety eyes.
- With yellow, a small dashed line along the lower side for a trim stripe.
Weave in all remaining ends, pulling them into the stuffing.
Finishing
- Check that the car sits level; adjust a wheel with a few extra stitches if it wobbles.
- Smooth the body with your hands so the oval stays flat-topped.
- Trim any stray fibres.
Care: Surface clean, or hand wash in cold water if the yarn allows. Do not tumble dry. Reshape and air dry.
Construction recap
| Piece | Shape | Colour | Count |
|---|---|---|---|
| Body | Oval tube | Red | 1 |
| Cabin | Small oval | Light grey | 1 |
| Wheels | Flattened spheres | Yellow + black | 4 |
| Spoiler | Rectangle | Red | 1 |
| Headlights | Tiny circles | White | 2 |
Only UK dc, inc, dc2tog, BLO and chains are used. Details are sewn or embroidered, so the pattern stays beginner-friendly while still reading as a red lightning race car.
Disclaimer: This pattern was generated by AI and should be reviewed for accuracy before use. While we strive for quality, AI-generated content may contain errors. Please verify measurements, stitch counts, charts, and instructions before beginning your project. Generated by purlJam.uk
Love this pattern?
Save this pattern to your free PurlJam libraryAccess your pattern anytime
Bookmark this page to access your pattern anytime