Type
Crochet
Difficulty
intermediate
Category
amigurumi
AI Thinking Process
Planning
Verification
Pattern
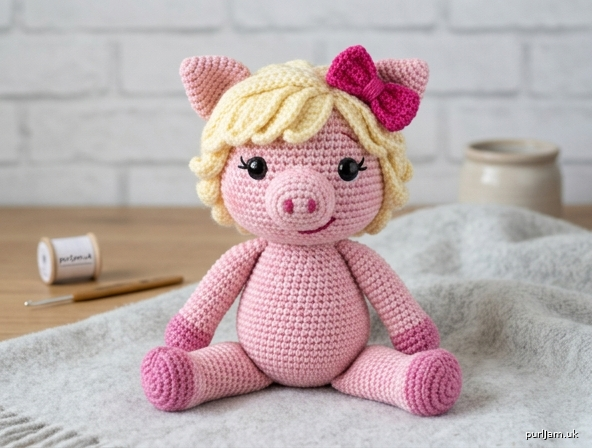
Miss Piggy Amigurumi
Intermediate crochet pattern – seated glam pig
A plush Miss Piggy-inspired pig worked in continuous rounds with a bold snout, pointed ears, blonde hair, and a signature bow. Finished size approximately 7–8 inches (18–20 cm) tall when seated.
Materials
- Worsted weight (4) yarn:
- Main color (MC): pink – approx. 120 yd (110 m)
- Contrast A (CA): light blonde or yellow – approx. 40 yd (37 m)
- Contrast B (CB): hot pink or magenta – small amount for bow
- Scrap black and dark pink/rose for embroidery
- Hook: US E-4 (3.5 mm) — or size needed for tight fabric (go down from yarn label)
- 9 mm or 10 mm safety eyes (pair)
- Polyester fiberfill
- Yarn needle
- Stitch marker
- Straight pins
- Optional: pink blush/pastel or fabric marker for cheeks; clear-drying craft glue for hair wisps
Gauge
5 sc and 5 rnds = 1 inch (2.5 cm) in continuous sc, unblocked. Gauge is for density, not drape. Fabric should be tight so stuffing does not show. Adjust hook if needed.
Abbreviations (US)
- MR: magic ring (adjustable ring)
- sc: single crochet
- inc: 2 sc in same stitch
- dec: invisible decrease (insert hook FLO of next 2 sts, yo, pull through both, yo, pull through 3 loops)
- ch: chain
- sl st: slip stitch
- st(s): stitch(es)
- rnd(s): round(s)
- FLO: front loop only
- BLO: back loop only
- [ ]: total stitches at end of round
- (… ) x N: repeat instructions in parentheses N times
- FO: fasten off
Notes
- Work in continuous spirals unless stated. Do not join rnds. Mark first st of each rnd and move marker up.
- Stuff firmly as you go, especially head and body, before openings become too small.
- Invisible dec keeps surface smooth.
- Safety eyes: install before closing head. For children under 3, embroider eyes instead and secure all parts very firmly.
- Seated pose: legs are attached angled forward/out so the toy sits stably.
Pattern
Head (MC – pink)
Rnd 1: 6 sc in MR [6] Rnd 2: inc in each st around [12] (6 inc → 6 + 6 = 12 ✓) Rnd 3: (sc, inc) x 6 [18] (6 inc → 12 + 6 = 18 ✓) Rnd 4: (2 sc, inc) x 6 [24] (6 inc → 18 + 6 = 24 ✓) Rnd 5: (3 sc, inc) x 6 [30] (6 inc → 24 + 6 = 30 ✓) Rnd 6: (4 sc, inc) x 6 [36] (6 inc → 30 + 6 = 36 ✓) Rnds 7–14: sc in each st around [36] (8 rnds even) Rnd 15: (4 sc, dec) x 6 [30] (6 dec → 36 − 6 = 30 ✓) Rnd 16: (3 sc, dec) x 6 [24] (6 dec → 30 − 6 = 24 ✓)
Place safety eyes between rnds 10 and 11, approximately 7–8 sts apart, centered on the face. Add a tiny horizontal black stitch above each eye for lashes if desired (or embroider after assembly).
Rnd 17: (2 sc, dec) x 6 [18] (6 dec → 24 − 6 = 18 ✓) Stuff head firmly, shaping a round cheeky face. Rnd 18: (sc, dec) x 6 [12] (6 dec → 18 − 6 = 12 ✓) Rnd 19: dec x 6 [6] (6 dec → 12 − 6 = 6 ✓) FO, leaving a 12 inch (30 cm) tail. Thread tail through FLO of remaining 6 sts and pull closed. Weave in end.
Snout (MC – pink)
Rnd 1: 6 sc in MR [6] Rnd 2: inc in each st around [12] Rnd 3: (sc, inc) x 6 [18] Rnd 4: sc in each st around [18] Rnd 5: (5 sc, dec) x 2, 4 sc [16] (2 dec → 18 − 2 = 16 ✓) Rnd 6: sc in each st around [16] FO, leaving a long tail for sewing. Stuff lightly–moderately so snout stays cylindrical but soft. Do not overstuff.
Nostrils (before or after attaching): With dark pink or black yarn, embroider two short vertical or slightly oval stitches on the front of the snout, centered, about 2 sts apart.
Ears (make 2 – MC pink)
Rnd 1: 4 sc in MR [4] Rnd 2: (sc, inc) x 2 [6] Rnd 3: (2 sc, inc) x 2 [8] Rnd 4: (3 sc, inc) x 2 [10] Rnd 5: sc in each st around [10] Rnd 6: (3 sc, dec) x 2 [8] Flatten ear (do not stuff). Sc across the opening through both layers to close (4 sc). FO, leaving a long tail for sewing.
Body (MC – pink)
Rnd 1: 6 sc in MR [6] Rnd 2: inc in each st around [12] Rnd 3: (sc, inc) x 6 [18] Rnd 4: (2 sc, inc) x 6 [24] Rnd 5: (3 sc, inc) x 6 [30] Rnd 6: (4 sc, inc) x 6 [36] Rnd 7: (5 sc, inc) x 6 [42] (6 inc → 36 + 6 = 42 ✓) Rnds 8–16: sc in each st around [42] (9 rnds even) Rnd 17: (5 sc, dec) x 6 [36] Rnd 18: sc in each st around [36] Rnd 19: (4 sc, dec) x 6 [30] Rnd 20: (3 sc, dec) x 6 [24] Stuff body very firmly, especially the base and middle, for a plump seated shape. Rnd 21: (2 sc, dec) x 6 [18] Rnd 22: (sc, dec) x 6 [12] FO, leaving a long tail for sewing to head. Add final stuffing through neck opening. Leave neck open for joining.
Arms (make 2 – MC pink)
Rnd 1: 6 sc in MR [6] Rnd 2: (sc, inc) x 3 [9] Rnds 3–10: sc in each st around [9] (8 rnds) Lightly stuff lower half only (hand/forearm); leave upper arm lightly filled or empty so arms drape. Flatten opening and sc across through both layers (4 sc) or FO and sew closed later. Leave long tail for sewing.
Legs (make 2 – MC pink)
Rnd 1: 6 sc in MR [6] Rnd 2: inc in each st around [12] Rnd 3: (3 sc, inc) x 3 [15] Rnds 4–5: sc in each st around [15] Rnd 6: (3 sc, dec) x 3 [12] Rnds 7–12: sc in each st around [12] (6 rnds) Stuff foot firmly and leg moderately. FO, leaving long tail. Leave top open for sewing to body.
Hair Cap (CA – blonde)
Worked as a shallow dome to cover the top/back of the head. Rnd 1: 6 sc in MR [6] Rnd 2: inc in each st around [12] Rnd 3: (sc, inc) x 6 [18] Rnd 4: (2 sc, inc) x 6 [24] Rnd 5: (3 sc, inc) x 6 [30] Rnd 6: (4 sc, inc) x 6 [36] Rnds 7–9: sc in each st around [36] FO, leaving a very long tail for sewing and for creating fringe/bangs if desired.
Optional bangs / side curls: Cut 8–12 strands of CA about 4–5 inches (10–13 cm) long. Latch-hook or sew them along the front edge of the hair cap (rnd 9 edge) and trim into soft bangs or cheek curls. Or embroider/loop long sts for a swept style.
Bow (CB – hot pink)
Center band: Ch 6, sc in 2nd ch from hook and each ch across [5]. Work 2 more rows of 5 sc. FO, leave short tails. Loops (make 2): Ch 10, join with sl st to first ch to form ring. Work 2 rnds of sc around the ring (approx. 10–12 sc per rnd — exact count flexible). FO. Pinch each loop in the middle, wrap the center band tightly around both loop middles and the bow center, stitch securely on the back. Leave a long tail on the finished bow for sewing to head/hair.
Assembly
- Snout: Pin snout to lower center of face (bottom edge near rnds 13–15 of head, top near rnds 11–12). Whip-stitch all around with MC tail, adding a pinch of stuffing if needed before closing. Embroider nostrils if not done.
- Eyes & expression: Confirm safety eyes are locked. Embroider simple upper lashes with black (2–3 tiny straight sts fanning up-out from each eye). With dark pink/rose, embroider a small closed-mouth smile or slight smirk under the snout (a shallow curve or two short sts). Optional: light blush on cheeks with pastel or fabric marker.
- Ears: Pin ears to sides of head, tops roughly at rnds 6–8, angled slightly up and forward (classic pig ear). Whip-stitch firmly along the flattened base.
- Hair: Place hair cap on top/back of head so front edge sits just above eyes (leave forehead/face open). Whip-stitch around the edge with CA. Style bangs/curls; secure any loose strands. Sew bow to one side of the head (top or just above one ear) with CB tail — classic Miss Piggy flair.
- Head to body: Add extra stuffing at neck. Pin head to body opening, centered. Whip-stitch securely all around with body tail (or matching MC). Reinforce join.
- Arms: Pin arms to upper sides of body (near neck join, roughly rnds 20–21 area of body). Attach at a slight downward/forward angle. Whip-stitch firmly; arms should be poseable but secure.
- Legs (seated pose): Pin legs to lower front-sides of body so the toy sits on its base. Splay legs slightly outward and forward (hips near rnds 8–11 of body). Whip-stitch openings closed against the body. This wider base prevents rolling and creates a stable seated Miss Piggy.
- Final: Weave in all ends. Tug and shape snout, cheeks, and hair. Check that eyes, ears, bow, and limbs cannot be pulled loose.
Finishing & Safety
- Size: ~7–8 inches (18–20 cm) seated with worsted + E-4 hook.
- For under age 3: replace safety eyes with embroidered eyes; omit or securely stitch any small bow parts; test all seams.
- Spot clean only; do not machine wash if safety eyes are used.
Stitch-count quick reference
| Piece | Max sts | Key shaping |
|---|---|---|
| Head | 36 | Inc to 36, even 7–14, dec to close |
| Snout | 18 | Short cylinder, light stuff |
| Ear | 10 | Flattened, unstuffed |
| Body | 42 | Inc to 42, even 8–16, dec to 12 |
| Arm | 9 | Light stuff |
| Leg | 15 | Firm foot, mod leg |
| Hair | 36 | Dome + fringe |
Enjoy your glamorous Miss Piggy amigurumi — perfect for display or gentle play. Adjust hair length and bow color to match your favorite look.
Disclaimer: This pattern was generated by AI and should be reviewed for accuracy before use. While we strive for quality, AI-generated content may contain errors. Please verify measurements, stitch counts, charts, and instructions before beginning your project. Generated by purlJam.uk
Love this pattern?
Save this pattern to your free PurlJam libraryAccess your pattern anytime
Bookmark this page to access your pattern anytime