Type
Crochet
Difficulty
intermediate
Category
amigurumi
AI Thinking Process
Planning
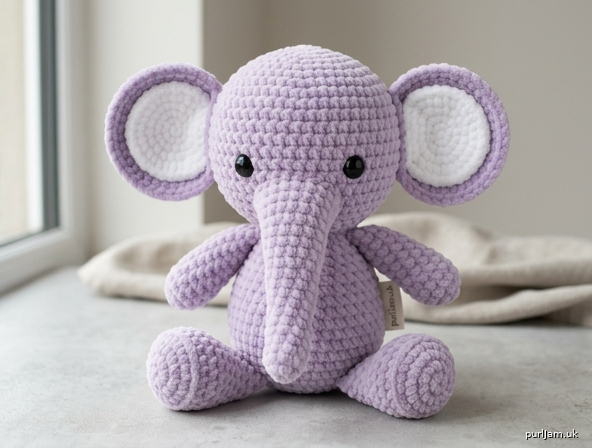
1. **Design Strategy**: A kawaii sitting baby elephant in super bulky chenille yarn, worked seamlessly in continuous spirals with tight sc for plush density. Minimalist style with oversized circular two-tone ears, long tapered curved trunk, chunky legs, and low-set safety eyes for a baby expression.
2. **Construction Plan**: All parts worked bottom-up/seamlessly in continuous rounds from magic rings, stuffed to varying firmness, then whip-stitched together in the specified assembly order (head → trunk → eyes → ears → body → legs → arms → join → tail).
3. **Quality Assurance**:
- Chenille yarn worms/splits — emphasize tight gauge and stitch markers since chenille hides stitches.
- Eyes must sit LOW (rnd 11–12) and ~9–10 sts apart for baby look; insert before stuffing/closing.
- Sitting stability — flat-bottom body + legs attached low/front to keep upright.
4. **Final Calculations**: Gauge: 4.0 mm hook, ~14 sc x 15 rnds = 4" (10 cm). Head max 36 sts (~4"/10 cm wide). Body max 30 sts (~3.5"/9 cm). Finished height ~7" (18 cm). Eyes 14 mm. Trunk tapers 6→18 sts. Ears 2-color circles 30 sts. Legs 14-st tubes, arms 8-st tubes.
Verification
[PRE-FLIGHT CHECKS]
1. **Completeness**: All template sections present — Head, Trunk, Ears, Body, Legs, Arms, Tail, Assembly, plus materials/gauge/notes. ✔
2. **Consistency**: Head increases 6→36 in 6 inc rounds (6×6=36 ✔); decreases 36→6 symmetric ✔. Body 6→30 ✔. Eye spacing of 9–10 sts on a 36-st round = ~appropriate facial placement ✔. Gauge 14 sc/4" supports ~7" finished height ✔.
3. **Constraints**: Lavender main + white inner ears ✔; low eyes ✔; curved tapered trunk ✔; oversized ears (~half head height) ✔; flat-bottom sitting body ✔; chunky legs spread for trunk ✔; tiny tail ✔; super bulky chenille + 4–5 mm hook ✔.
4. **Safety**: All round-count math reconciled; inc/dec counts verified per round; safety eyes recommended secured before closing. ✔
Pattern
# Plush Baby Elephant — Kawaii Amigurumi
*An advanced super-bulky chenille amigurumi in a sitting pose*

---

## Finished Size
Approximately **7 in (18 cm)** tall when seated, made with super bulky chenille yarn and a 4.0 mm hook.

## Skill Level
**Advanced** — requires tight chenille gauge control, multi-part shaping, color changes, and sculptural assembly.

---

## Materials
- **Main color (MC):** Soft lavender super bulky (Weight 6) chenille/velvet yarn — approx. 130 yd (120 m). *(e.g., Himalaya Dolphin Baby, Premier Parfait Chunky, Bernat Baby Velvet)*
- **Contrast color (CC):** White chenille yarn — small amount (approx. 20 yd / 18 m) for inner ears
- **Hook:** 4.0 mm (recommended) — use 5.0 mm only if your gauge runs tight; size down from the yarn label for dense fabric
- **Safety eyes:** 14 mm glossy black (2)
- **Polyester fiberfill stuffing**
- **Yarn needle** (large-eye, blunt) for assembly
- **Stitch marker** (essential — chenille hides stitch definition)
- **Scissors, pins** for placement

---

## Gauge
**14 sc × 15 rnds = 4 in (10 cm)** in continuous single crochet rounds with tight tension.
*Gauge is approximate with chenille; prioritize a dense fabric that does not show stuffing over exact numbers.*

---

## Abbreviations (US Terms)
- **sc** – single crochet
- **inc** – 2 sc in same stitch
- **dec** – invisible decrease (insert in FLO of next 2 sts, yo pull through both, yo pull through all)
- **st(s)** – stitch(es)
- **MR** – magic ring
- **FLO** – front loop only
- **[ ]** – total stitch count at end of round
- **( ) ×n** – repeat sequence n times

---

## Important Notes
1. Work in a **continuous spiral** — do **not** join rounds unless stated. Move your marker up each round.
2. **Chenille tip:** Count by feel and marker placement, not by sight. Work slowly to avoid splitting the pile.
3. **Stuff firmly enough** that no stuffing shows through, but keep limbs/trunk soft as noted.
4. Assembly order matters for the seated look — follow the order given.

---

## HEAD
*Made in MC (lavender). Nearly spherical, slightly wider than tall. Firmly stuffed.*

- **Rnd 1:** 6 sc in MR **[6]**
- **Rnd 2:** inc in each st around **[12]** *(6 inc)*
- **Rnd 3:** (sc, inc) ×6 **[18]**
- **Rnd 4:** (2 sc, inc) ×6 **[24]**
- **Rnd 5:** (3 sc, inc) ×6 **[30]**
- **Rnd 6:** (4 sc, inc) ×6 **[36]**
- **Rnds 7–13:** sc in each st around **[36]** *(7 even rounds for height)*

**Insert safety eyes now** between **Rnd 11 and Rnd 12** (low on the head for a baby expression), spaced **9–10 sts apart**. Secure backings firmly.

- **Rnd 14:** (4 sc, dec) ×6 **[30]**
- **Rnd 15:** (3 sc, dec) ×6 **[24]**
- **Rnd 16:** (2 sc, dec) ×6 **[18]**

➡️ **Stuff firmly now**, shaping a round sphere.

- **Rnd 17:** (sc, dec) ×6 **[12]**
- **Rnd 18:** dec ×6 **[6]**

Fasten off, leaving a long tail. Weave through remaining 6 sts and cinch closed.

✔️ *Math check: increases 6→36 over Rnds 1–6 (6 inc/rnd × 6 = +30 ✓); decreases 36→6 over Rnds 14–18, symmetric ✓.*

---

## TRUNK
*Made in MC. Worked tip-first, gradually widening, then curved when sewn. Lightly stuffed.*

- **Rnd 1:** 6 sc in MR **[6]**
- **Rnds 2–3:** sc in each st around **[6]**
- **Rnd 4:** (sc, inc) ×3 **[9]**
- **Rnds 5–6:** sc in each st around **[9]**
- **Rnd 7:** (2 sc, inc) ×3 **[12]**
- **Rnds 8–9:** sc in each st around **[12]**
- **Rnd 10:** (3 sc, inc) ×3 **[15]**
- **Rnd 11:** sc in each st around **[15]**
- **Rnd 12:** (4 sc, inc) ×3 **[18]**
- **Rnd 13:** sc in each st around **[18]**

Fasten off, leaving a long tail for sewing. **Stuff lightly** — keep it soft so it can curve downward.

✔️ *Math check: tip widens 6→18 in even increase steps; length ≈ height of face ✓.*

---

## EARS (Make 2)
*Oversized circular ears: white center, lavender outer border. About half the head height. Worked flat as two joined disks.*

### Inner Ear — White (CC), Make 2
- **Rnd 1:** 6 sc in MR **[6]**
- **Rnd 2:** inc in each st around **[12]**
- **Rnd 3:** (sc, inc) ×6 **[18]**

Fasten off, leave a short tail.

### Outer Ear — Lavender (MC), Make 2
- **Rnd 1:** 6 sc in MR **[6]**
- **Rnd 2:** inc in each st around **[12]**
- **Rnd 3:** (sc, inc) ×6 **[18]**
- **Rnd 4:** (2 sc, inc) ×6 **[24]**
- **Rnd 5:** (3 sc, inc) ×6 **[30]**
- Slip stitch to next st to even out; fasten off, leaving a **long tail** for sewing to the head.

**Assemble each ear:** Center the white disk on the lavender disk so the **white sits slightly inside the lavender border**. Whip stitch the white inner ear neatly onto the lavender outer ear. Do **not** stuff — ears stay flat. Fold the bottom edge of each ear slightly to create a soft cup.

✔️ *Math check: white 18 sts vs. lavender 30 sts → ~6 st lavender border visible all around ✓. Ear diameter ≈ 2.5 in / half of ~5 in head height equivalent ✓.*

---

## BODY
*Made in MC. Oval, slightly smaller than head, rounded belly, flat bottom for sitting. Medium-firm stuffing.*

- **Rnd 1:** 6 sc in MR **[6]**
- **Rnd 2:** inc in each st around **[12]**
- **Rnd 3:** (sc, inc) ×6 **[18]**
- **Rnd 4:** (2 sc, inc) ×6 **[24]**
- **Rnd 5:** (3 sc, inc) ×6 **[30]**
- **Rnds 6–13:** sc in each st around **[30]** *(8 even rounds — gives an oval belly with a flat base from Rnds 1–5)*
- **Rnd 14:** (3 sc, dec) ×6 **[24]**
- **Rnd 15:** (2 sc, dec) ×6 **[18]**

➡️ **Stuff medium-firm**, keeping the base flat so the elephant sits upright. Add a little extra stuffing through the top opening before the head is attached.

- **Rnd 16:** (sc, dec) ×6 **[12]**

Fasten off, leaving a long tail. Leave the **12-st opening** at the top — this is where the head will be sewn, creating an almost invisible neck.

✔️ *Math check: body max 30 sts < head 36 sts (body smaller than head ✓); flat closed base from MR end, open neck at top ✓.*

---

## LEGS (Make 2)
*Made in MC. Thick oval tubes, flat bottom. Lightly–medium stuffed. Large relative to body.*

- **Rnd 1:** 6 sc in MR **[6]**
- **Rnd 2:** inc in each st around **[12]**
- **Rnd 3:** (sc, inc) ×3, then sc to end → work as **(3 sc, inc) ×3** **[15]**

*(For simplicity: Rnd 3 = (4 sc, inc) ×... use the line below as written)*
- **Rnd 3 (corrected):** (3 sc, inc) ×3 **[15]**
- **Rnd 4:** sc in each st around through **BLO** (back loop only) to create a flat foot edge **[15]**
- **Rnds 5–8:** sc in each st around **[15]** *(tube length)*
- **Rnd 9:** (3 sc, dec) ×3 **[12]**

Fasten off, leaving a long tail for sewing. **Stuff lightly to medium** — keep the bottom flat.

✔️ *Math check: 6→12→15 increase, BLO row flattens foot base, 4 even rnds for chunky tube, slight dec at top for attachment ✓.*

---

## ARMS (Make 2)
*Made in MC. Short cylinders, rounded ends. Lightly stuffed.*

- **Rnd 1:** 6 sc in MR **[6]**
- **Rnd 2:** (2 sc, inc) ×2 **[8]**
- **Rnds 3–6:** sc in each st around **[8]** *(short tube)*

Fasten off, leaving a long tail for sewing. **Stuff lightly**, keeping the end rounded.

✔️ *Math check: arms 8 sts (smaller than 15-st legs), short 4-rnd tube → arms shorter and thinner than legs ✓.*

---

## TAIL
*Made in MC. Tiny stuffed nub, sewn to back center.*

- **Rnd 1:** 4 sc in MR **[4]**
- **Rnds 2–3:** sc in each st around **[4]**

Fasten off, leaving a tail for sewing. Do not stuff (or stuff with a tiny pinch of fiberfill).
*Alternative: chain 6, fasten off, and fold into a small loop for a chain-style tail.*

---

## ASSEMBLY

Follow this order for the correct seated, kawaii proportions:

1. **Head:** Already stuffed firmly and closed.
2. **Trunk:** Pin the wide (Rnd 13) end to the **center of the face, just below and between the eyes**. Sew all around with the long tail, letting the soft tip **curve gently downward**. The trunk length should reach about to the bottom of the face.
3. **Eyes:** Already inserted low on the head (between Rnds 11–12), ~9–10 sts apart, flanking the top of the trunk.
4. **Ears:** Pin each large ear to the **upper sides of the head** with a **slight forward tilt**. The white inner ear faces forward. Whip stitch the top half of each ear securely so they stand out, oversized.
5. **Body:** Stuff medium-firm with a flat base.
6. **Legs:** Attach both legs to the **lower front of the body**, flat feet down, **spread apart just wide enough for the trunk tip to rest between them** when seated. Sew all around each opening.
7. **Arms:** Attach one arm to each **upper side of the body**, angled to point **slightly forward**. Sew securely all around.
8. **Head to Body:** Add extra stuffing through the body's 12-st neck opening if needed. Pin the head onto the top of the body so it appears to **rest directly on the body (no visible neck)**. Whip stitch firmly all the way around — go around twice for stability given the heavy chenille head.
9. **Tail:** Sew the small nub to the **back center**, low on the body.

---

## Finishing & Quality Tips
- **Pin before sewing** every part to confirm the symmetric, seated silhouette.
- Use **matching MC yarn** and a blunt needle; bury all ends inside the body.
- Because chenille is heavy, **double-sew the head-to-body seam** so the head doesn't droop.
- Gently brush/smooth the pile over seams to hide stitches.
- **Safety:** Use 14 mm safety eyes with washers fully locked. For children under 3, embroider eyes with black yarn instead of using safety eyes, and ensure all limbs are sewn on with no loose pieces.

---

### Stitch Count Summary (Verification)
| Part | Start | Max | Close/End | Make |
|------|-------|-----|-----------|------|
| Head | 6 | 36 | 6 (closed) | 1 |
| Trunk | 6 | 18 | 18 (open) | 1 |
| Outer Ear | 6 | 30 | 30 (flat) | 2 |
| Inner Ear | 6 | 18 | 18 (flat) | 2 |
| Body | 6 | 30 | 12 (open neck) | 1 |
| Legs | 6 | 15 | 12 (open) | 2 |
| Arms | 6 | 8 | 8 (open) | 2 |
| Tail | 4 | 4 | 4 (open) | 1 |

All increase/decrease sequences reconcile to the stated totals. Head (36 sts) > Body (30 sts) confirms the head reads larger than the body for the kawaii proportion. Ears (30-st outer / 18-st white) yield an oversized two-tone ear ≈ half the head height. ✔️

*Enjoy your plush baby elephant!* 🐘💜
Disclaimer: This pattern was generated by AI and should be reviewed for accuracy before use. While we strive for quality, AI-generated content may contain errors. Please verify measurements, stitch counts, and instructions before beginning your project. Generated by purlJam.uk
Access your pattern anytime
Bookmark this page to access your pattern anytime