Type
Crochet
Difficulty
intermediate
Category
amigurumi
AI Thinking Process
Planning
Verification
Pattern
Pretty Dragon Stuffie
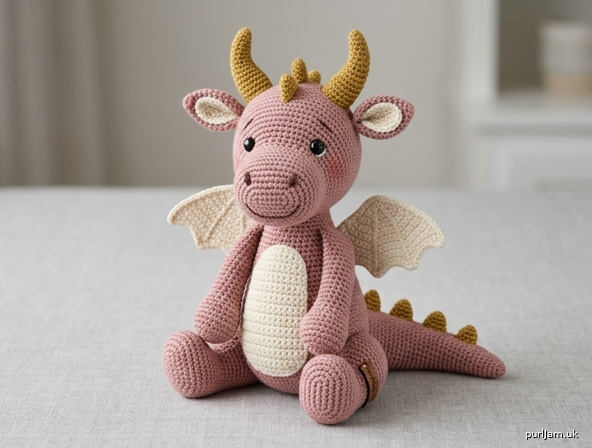
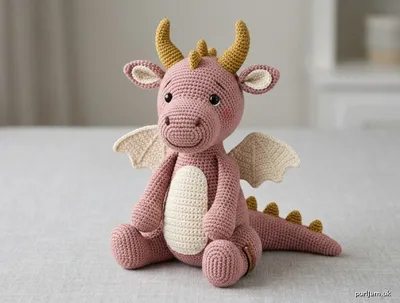
A seated dragon amigurumi with a gentle snout, cream belly, scalloped wings, and a gold spike crest.
Skill level: Intermediate
Finished size: About 9" (23 cm) tall sitting; 12" (30.5 cm) from snout to tail tip, at stated gauge.
Materials
Yarn — worsted weight (4 / medium):
- MC (body, head, legs, tail, outer ears): 180 yd (165 m). Sample: dusty rose.
- CA (belly, wings, ear lining, optional ruffle): 45 yd (41 m). Sample: cream.
- CB (horns, spikes): 30 yd (27 m). Sample: antique gold.
Other:
- US E-4 / 3.5 mm crochet hook (or size needed for a dense fabric)
- 12 mm safety eyes (1 pair)
- Polyester fiberfill
- Embroidery floss: dark brown or black; optional dusty pink for blush
- Yarn needle, stitch marker, scissors
- Optional: small amount of pink felt or cosmetic blush for cheeks
Pretty palettes: dusty rose / cream / gold (shown); sage / ivory / antique gold; periwinkle / lavender / gray.
Gauge
5 sc and 5 rnds = 1" (2.5 cm) in sc worked in the round.
Gauge is for fabric density, not fit. Stuffing must not show through. If it does, drop to US 4 / 3.25 mm.
Abbreviations (US)
| Term | Meaning |
|---|---|
| MR | magic ring |
| ch | chain |
| sc | single crochet |
| hdc | half double crochet |
| dc | double crochet |
| tr | treble crochet |
| inc | 2 sc in same st |
| invdec | invisible decrease |
| sl st | slip stitch |
| st(s) | stitch(es) |
| rnd(s) | round(s) |
| FO | fasten off |
| MC / CA / CB | main / contrast A / contrast B |
| FLO | front loop only |
Invisible decrease (invdec): Insert hook in FLO of next st, yo, pull up a loop; insert hook in FLO of following st, yo, pull up a loop; yo, draw through all 3 loops on hook. Use invdec for every “dec” in this pattern.
Notes
- Work in continuous spirals unless a row or joining round is specified. Do not join or turn unless told.
- Place a marker in the first st of every rnd and move it up.
- Stitch counts appear in parentheses at the end of each rnd.
- Stuff as you go: firm in snout, head, body, and feet; lighter in the tail tip, horns, and tops of the legs.
- Parentheses
( )enclose a set;× Nmeans work that set N times. - Safety eyes are a choking hazard. For children under 3 years, embroider eyes with yarn instead of using safety eyes.
Head
Worked from the snout toward the neck, in MC.
Rnd 1: 6 sc in MR. (6)
Rnd 2: Inc in each st. (6 increases → 6 + 6 = 12 ✓)
Rnd 3: (Sc, inc) 6 times. (6 increases → 12 + 6 = 18 ✓)
Rnd 4: (2 sc, inc) 6 times. (6 increases → 18 + 6 = 24 ✓)
Rnds 5–8: Sc in each st around. (24) — snout
Rnd 9: (3 sc, inc) 6 times. (6 increases → 24 + 6 = 30 ✓)
Rnd 10: (4 sc, inc) 6 times. (6 increases → 30 + 6 = 36 ✓)
Rnd 11: (5 sc, inc) 6 times. (6 increases → 36 + 6 = 42 ✓)
Rnds 12–19: Sc in each st around. (42) — 8 rnds
Safety eyes: Attach between Rnds 12 and 13, with 8 sts between the posts, centered on the face above the snout. (If you prefer embroidered eyes, mark these spots now and stitch them after stuffing.)
Rnd 20: (5 sc, invdec) 6 times. (6 decreases → 42 − 6 = 36 ✓)
Rnd 21: (4 sc, invdec) 6 times. (6 decreases → 36 − 6 = 30 ✓)
Rnd 22: (3 sc, invdec) 6 times. (6 decreases → 30 − 6 = 24 ✓)
Stuff the snout and head firmly, filling the cheeks so they are round.
Rnd 23: (2 sc, invdec) 6 times. (6 decreases → 24 − 6 = 18 ✓)
FO, leaving an 18" (46 cm) tail. Do not close the remaining 18 sts — this opening is sewn to the body.
Body
Worked from the base up to the neck, in MC.
Rnd 1: 6 sc in MR. (6)
Rnd 2: Inc in each st. (6 increases → 6 + 6 = 12 ✓)
Rnd 3: (Sc, inc) 6 times. (6 increases → 12 + 6 = 18 ✓)
Rnd 4: (2 sc, inc) 6 times. (6 increases → 18 + 6 = 24 ✓)
Rnd 5: (3 sc, inc) 6 times. (6 increases → 24 + 6 = 30 ✓)
Rnd 6: (4 sc, inc) 6 times. (6 increases → 30 + 6 = 36 ✓)
Rnd 7: (5 sc, inc) 6 times. (6 increases → 36 + 6 = 42 ✓)
Rnd 8: (6 sc, inc) 6 times. (6 increases → 42 + 6 = 48 ✓)
Rnds 9–15: Sc in each st around. (48) — 7 rnds
Rnd 16: (6 sc, invdec) 6 times. (6 decreases → 48 − 6 = 42 ✓)
Rnds 17–18: Sc in each st around. (42)
Rnd 19: (5 sc, invdec) 6 times. (6 decreases → 42 − 6 = 36 ✓)
Rnds 20–21: Sc in each st around. (36)
Rnd 22: (4 sc, invdec) 6 times. (6 decreases → 36 − 6 = 30 ✓)
Rnd 23: Sc in each st around. (30)
Rnd 24: (3 sc, invdec) 6 times. (6 decreases → 30 − 6 = 24 ✓)
Rnd 25: Sc in each st around. (24)
Stuff firmly, keeping the base flat so the dragon will sit.
Rnd 26: (2 sc, invdec) 6 times. (6 decreases → 24 − 6 = 18 ✓)
FO, leaving an 18" (46 cm) tail. Leave the 18-st opening open.
Front Legs (make 2)
MC.
Rnd 1: 6 sc in MR. (6)
Rnd 2: Inc in each st. (6 increases → 6 + 6 = 12 ✓)
Rnd 3: (3 sc, inc) 3 times. (3 increases → 12 + 3 = 15 ✓)
Rnds 4–5: Sc in each st around. (15)
Rnd 6: (3 sc, invdec) 3 times. (3 decreases → 15 − 3 = 12 ✓)
Rnds 7–13: Sc in each st around. (12) — 7 rnds
Stuff the paw firmly and the upper leg lightly so it sews flat.
FO, leaving a 12" (30 cm) tail.
Back Legs (make 2)
MC. The wider first rounds form a sitting thigh.
Rnd 1: 6 sc in MR. (6)
Rnd 2: Inc in each st. (6 increases → 6 + 6 = 12 ✓)
Rnd 3: (Sc, inc) 6 times. (6 increases → 12 + 6 = 18 ✓)
Rnd 4: (2 sc, inc) 6 times. (6 increases → 18 + 6 = 24 ✓)
Rnds 5–7: Sc in each st around. (24)
Rnd 8: (2 sc, invdec) 6 times. (6 decreases → 24 − 6 = 18 ✓)
Rnd 9: Sc in each st around. (18)
Rnd 10: (Sc, invdec) 6 times. (6 decreases → 18 − 6 = 12 ✓)
Rnds 11–15: Sc in each st around. (12) — 5 rnds
Stuff the thigh firmly and the lower leg moderately.
FO, leaving a 14" (36 cm) tail.
Tail
MC. Worked from the tip. Two increases per shaping rnd keep the tail slightly oval.
Rnd 1: 4 sc in MR. (4)
Rnd 2: (Sc, inc) 2 times. (2 increases → 4 + 2 = 6 ✓)
Rnd 3: Sc in each st around. (6)
Rnd 4: (2 sc, inc) 2 times. (2 increases → 6 + 2 = 8 ✓)
Rnd 5: Sc in each st around. (8)
Rnd 6: (3 sc, inc) 2 times. (2 increases → 8 + 2 = 10 ✓)
Rnd 7: Sc in each st around. (10)
Rnd 8: (4 sc, inc) 2 times. (2 increases → 10 + 2 = 12 ✓)
Rnds 9–10: Sc in each st around. (12)
Rnd 11: (5 sc, inc) 2 times. (2 increases → 12 + 2 = 14 ✓)
Rnds 12–13: Sc in each st around. (14)
Rnd 14: (6 sc, inc) 2 times. (2 increases → 14 + 2 = 16 ✓)
Rnds 15–16: Sc in each st around. (16)
Rnd 17: (7 sc, inc) 2 times. (2 increases → 16 + 2 = 18 ✓)
Rnds 18–20: Sc in each st around. (18)
Rnd 21: (8 sc, inc) 2 times. (2 increases → 18 + 2 = 20 ✓)
Rnds 22–25: Sc in each st around. (20)
Stuff as you go — light at the tip, firm at the base so the tail holds a gentle curve.
FO, leaving a 14" (36 cm) tail.
Wings (make 2)
Worked flat in rows with CA. The ch-1 at the start of each row does not count as a stitch.
Row 1: Ch 2, 3 sc in 2nd ch from hook, turn. (3)
Row 2: Ch 1, inc, sc, inc, turn. (2 increases → 3 + 2 = 5 ✓)
Row 3: Ch 1, inc, 3 sc, inc, turn. (2 increases → 5 + 2 = 7 ✓)
Row 4: Ch 1, inc, 5 sc, inc, turn. (2 increases → 7 + 2 = 9 ✓)
Row 5: Ch 1, inc, 7 sc, inc, turn. (2 increases → 9 + 2 = 11 ✓)
Row 6: Ch 1, inc, 9 sc, inc, turn. (2 increases → 11 + 2 = 13 ✓)
Row 7: Ch 1, inc, 11 sc, inc, turn. (2 increases → 13 + 2 = 15 ✓)
Rows 8–9: Ch 1, sc in each st across, turn. (15)
Row 10 (wing fingers): Ch 1, sc, hdc, dc, hdc, sl st, hdc, dc, tr, dc, hdc, sl st, hdc, dc, hdc, sc.
(4 + 1 + 5 + 1 + 4 = 15 sts used ✓)
Do not turn. Rotate the work and crochet along the side edge:
Border: 9 sc evenly down the first shaped edge, 3 sc in the starting tip, 9 sc evenly up the other shaped edge, sl st in the first st of Row 10.
FO, leaving a 14" (36 cm) tail for sewing.
The scalloped edge is the outer wing; the starting tip is sewn toward the spine.
Horns (make 2)
CB. Lightly stuffed with yarn tails only.
Rnd 1: 4 sc in MR. (4)
Rnd 2: Sc in each st around. (4)
Rnd 3: (Sc, inc) 2 times. (2 increases → 4 + 2 = 6 ✓)
Rnds 4–5: Sc in each st around. (6)
Rnd 6: (2 sc, inc) 2 times. (2 increases → 6 + 2 = 8 ✓)
Rnds 7–9: Sc in each st around. (8)
FO, leaving an 8" (20 cm) tail. Stuff lightly. Pinch the base flat for sewing.
Ears (make 2)
Each ear is two stacked petals.
Outer (MC): Ch 7, sc in 2nd ch from hook, hdc in next, dc in next 2, hdc in next, sc in last. (6) FO, leaving an 8" (20 cm) tail.
Inner (CA): Ch 6, sc in 2nd ch from hook, hdc in next, dc in next, hdc in next, sc in last. (5) FO, leaving a 6" (15 cm) tail.
Center the CA petal on the MC petal and sew it down. The wider MC edge is the base that sews to the head.
Spikes
Small (make 2), CB — head crest
Rnd 1: 4 sc in MR. (4)
Rnd 2: (Sc, inc) 2 times. (2 increases → 4 + 2 = 6 ✓)
Rnd 3: Sc in each st around. (6)
FO, leaving a 6" (15 cm) tail. Stuff with yarn ends and pinch the base closed.
Medium (make 5), CB — back and tail
Rnd 1: 4 sc in MR. (4)
Rnd 2: (Sc, inc) 2 times. (2 increases → 4 + 2 = 6 ✓)
Rnd 3: (2 sc, inc) 2 times. (2 increases → 6 + 2 = 8 ✓)
Rnd 4: Sc in each st around. (8)
FO, leaving an 8" (20 cm) tail. Stuff with yarn ends and pinch the base closed.
Belly Patch
CA. Worked in the round as an oval. Join and ch 1 at the start of Rnds 2–3, or work in a spiral if you prefer; counts are the same.
Setup: Ch 9.
Rnd 1: Sc in 2nd ch from hook, sc in next 6 ch, 3 sc in last ch; rotate to work along the opposite side of the chain, sc in next 6 ch, 2 sc in the same ch as the first sc. (7 + 3 + 6 + 2 = 18 ✓)
Rnd 2: Inc, 6 sc, inc in next 3 sts, 6 sc, inc in next 2 sts. (2 + 6 + 6 + 6 + 4 = 24 ✓)
Rnd 3: Sc, inc, 6 sc, (sc, inc) 3 times, 6 sc, (sc, inc) 2 times. (3 + 6 + 9 + 6 + 6 = 30 ✓)
FO, leaving an 18" (46 cm) tail.
Optional Neck Ruffle
CA. Work after the head is sewn to the body.
Join CA at the center front of the 18-st neck seam.
(Sc, hdc, dc, hdc, sc) in the next st, sl st in the next st; repeat from * 8 more times. (9 shells around 18 sts ✓)
FO and weave in ends.
Face Details
Work these after the head is stuffed and the eyes are in (or marked).
Nostrils: With dark brown floss, stitch 2 small vertical satin stitches on the snout between Rnds 5 and 6, about 3 sts apart and centered under the eyes.
Mouth: A shallow curved backstitch or split stitch from just below one nostril, down to Rnd 7, and up to the other nostril — a gentle smile, not a wide grin.
Lashes (optional): 2–3 short straight stitches fanning from the outer corner of each eye.
Blush (optional): A few tiny satin stitches in dusty pink yarn, or a whisper of cosmetic blush, on each cheek just below and outside the eyes.
Assembly
Pin every piece and check symmetry from the front before sewing. Use mattress stitch or whipstitch with matching yarn. Add a pinch of extra stuffing at each join as you close it.
1. Head to body.
Match the 18-st openings. The snout points forward; the body marker (or a yarn-tail join) sits at the back. Whipstitch through both loops all the way around. Pack extra stuffing into the neck before closing the last 4 sts so the head sits upright.
2. Belly patch.
Center the oval on the front of the body. The top edge sits about ½" (1.3 cm) below the neck seam. Sew around with CA.
3. Back legs (sitting pose).
Place the thighs on the lower sides of the body, widest part against Rnds 8–14 of the body, lower legs pointing forward and slightly out so the dragon sits. The inner edges of the thighs should be about 1" (2.5 cm) apart at the front. Sew firmly around the thigh; take a few extra stitches through the lower-leg side into the body if you want a planted sit.
4. Front legs.
Sew to the upper-front sides of the body, tops at about Rnd 22 (just below the neck), paws resting on the lap or the surface. Angle them slightly inward for a sweet pose.
5. Tail.
Sew the 20-st base to the lower back, centered, covering roughly Rnds 8–14. Curve the tail around one hip and tack it once at mid-length if you want it to stay wrapped.
6. Spikes.
Sew in a straight line down the spine, bases pinched closed:
- 2 small spikes on the head, between the horns, about ½" (1.3 cm) apart.
- 5 medium spikes from the nape, down the back, and onto the first third of the tail, spaced about ½" (1.3 cm) apart.
7. Wings.
Sew the starting tip (the 3-sc point) toward the spine, just below the nape, one wing on each side. The inner (bordered) edge follows the body for about 1½" (4 cm); the scalloped edge fans out and back. Keep them symmetric and high enough that they read as wings, not a cape.
8. Horns.
Sew to the top of the head, just behind the eye line, about 6 sts apart (measure across the top). Tilt them slightly back and out.
9. Ears.
Sew just below and outside the horns, CA inner facing forward, base spanning about ½" (1.3 cm). They should sit between the horns and the cheeks.
10. Optional ruffle.
Work the neck ruffle around the head/body seam as written above.
11. Toes (optional).
With MC or dark floss, stitch 2 short vertical lines on each paw to suggest three toes.
Weave in every remaining end. Steam-block the wings lightly if they curl (hover an iron; do not press stuffing). Shape the snout, cheeks, and sitting base with your fingers.
Finishing Checklist
- Eyes level, 8 sts apart, between Rnds 12 and 13
- Neck stuffed so the head does not nod
- Dragon sits without tipping (add stuffing to the body base if needed)
- Spikes in one straight dorsal line
- Wings mirrored
- All ends woven in
Your pretty dragon stuffie is ready to perch on a shelf or tuck under an arm.
Disclaimer: This pattern was generated by AI and should be reviewed for accuracy before use. While we strive for quality, AI-generated content may contain errors. Please verify measurements, stitch counts, charts, and instructions before beginning your project. Generated by purlJam.uk
Love this pattern?
Save this pattern to your free PurlJam libraryAccess your pattern anytime
Bookmark this page to access your pattern anytime