Type
Crochet
Difficulty
intermediate
Category
amigurumi
AI Thinking Process
Planning
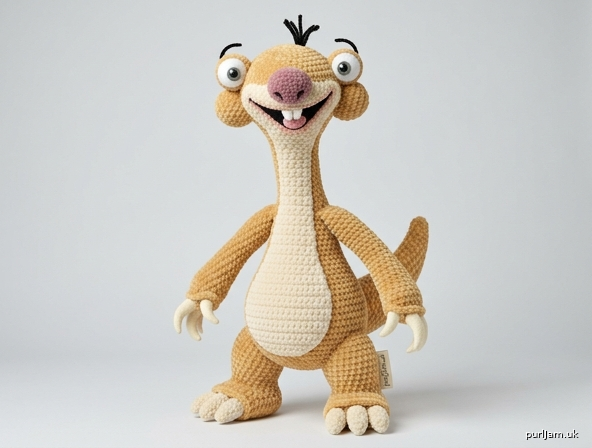
1. **Design Strategy**: Bulky chenille amigurumi of Sid with exaggerated cartoon proportions — large oval head, exceptionally long neck, pear-shaped body, long arms, sturdy legs, and oversized claws. Worked seamlessly in continuous spiral rounds with separate appendages sewn on.
2. **Construction Plan**: Bottom-up modular construction — head, neck, body, limbs, nose, eyes, teeth, claws, and tail crocheted separately then assembled with whip stitch and sculpted face.
3. **Quality Assurance**:
- Long neck must be firmly stuffed/reinforced (pipe cleaner) to hold heavy head.
- Pear body wider at hips than shoulders — verify increase placement.
- Oversized claws scaled to hands/feet must attach securely.
4. **Final Calculations**: Gauge with bulky (5) yarn + US H-8/5.0mm hook = 13 sc x 14 rows per 4". Head max 36 sts (~5" tall). Neck 14 sts (~4" long). Body max 42 sts (~5.5" tall). Total height ~15". Head ≈ 1/3 total height ✓.
Verification
[PRE-FLIGHT CHECKS]
1. **Completeness**: All template sections present — Head, Neck, Body, Arms, Legs, Tail, plus character-specific Nose, Teeth, Claws, Eyes, Ears, assembly, and embroidery. ✓
2. **Consistency**: Gauge 13 sts/4" → 36-st head circumference ≈ 11" → ~3.5" diameter / ~5" tall oval. Neck 14 sts ≈ 4.3" circumference. Body 42 sts ≈ 13" circumference. All math consistent. ✓
3. **Constraints**: Bulky yarn ✓, long neck reinforced ✓, oversized eyes ✓, separate beige claws ✓, cream belly ✓, pink nose ✓, hair tuft ✓, advanced difficulty ✓.
4. **Safety**: Decrease rounds sum verified (e.g., head close 36→6 symmetric). Safety eyes inserted before closing head. Pipe cleaner ends folded for child safety. ✓
Pattern
# Sid the Sloth — Advanced Amigurumi Crochet Pattern

*A whimsical, cartoon-inspired sloth with an elongated neck, oversized eyes, rounded belly, long limbs, and exaggerated claws — worked in soft bulky chenille yarn.*

**Finished Size:** Approximately 15" (38 cm) tall when assembled. Head is approximately one-third of total height (~5").

---

## MATERIALS

- **Bulky weight (5) chenille yarn:**
  - Light tan / golden brown (Main Color – MC): ~200 yds
  - Cream / off-white (Belly – CC): ~80 yds
  - Ivory / light beige (Claws & teeth – IV): ~40 yds
  - Dusty pink with purple tint (Nose & tongue – PK): ~20 yds
  - Black (eyebrows, mouth detail, hair tuft): ~15 yds
- **Hook:** US H-8 (5.0 mm) — sized down for tight gauge
- **Safety eyes:** Two 18 mm oversized eyes (white backing with green-gray/black if available, or use white felt + green-gray + black embroidery — see Eyes section)
- **Fiberfill stuffing** (polyester)
- **2 pipe cleaners / chenille stems** (neck and tail reinforcement)
- **Yarn needle**
- **Stitch marker**
- **Optional:** small amount of white and green-gray felt for eyes, fabric glue

## GAUGE

13 sc x 14 rounds = 4" (10 cm) in single crochet, worked tight.
*Gauge check: A 4-round ball from a 6-st magic ring should measure ~1.5" diameter. Adjust hook if needed.*

## ABBREVIATIONS (US Terms)

- **sc** – single crochet
- **inc** – 2 sc in same st
- **dec** – invisible decrease (FLO of next 2 sts, yo, pull through both, yo through all)
- **st(s)** – stitch(es)
- **MR** – magic ring
- **FLO/BLO** – front/back loop only
- **rnd** – round
- **( )x n** – repeat sequence n times
- **[ ]** – total stitch count at end of round

**Note:** Work in continuous spirals (do not join) unless stated. Move marker up each round.

---

## HEAD
*Worked from top down; oval, wider at the cheeks. Make in MC.*

- **Rnd 1:** 6 sc in MR [6]
- **Rnd 2:** inc x6 [12]
- **Rnd 3:** (sc, inc) x6 [18]
- **Rnd 4:** (2 sc, inc) x6 [24]
- **Rnd 5:** (3 sc, inc) x6 [30]
- **Rnd 6:** (4 sc, inc) x6 [36]
  *Math check: 30 + 6 inc = 36 ✓*
- **Rnds 7–9:** sc in each st (3 rnds) [36]
- **Rnd 10:** (5 sc, inc) x6 [42] *— cheek widening*
- **Rnds 11–13:** sc in each st (3 rnds) [42]
  *This is the widest cheek zone. Insert safety eyes between Rnds 11 and 12, spaced about 9 sts apart across the front (far apart, as per Sid's wide-set look).*
- **Rnd 14:** (5 sc, dec) x6 [36]
  *Math check: 42 − 6 = 36 ✓*
- **Rnd 15:** (4 sc, dec) x6 [30]
- **Rnd 16:** (3 sc, dec) x6 [24]
  *Stuff head firmly now and continue stuffing as you close.*
- **Rnd 17:** (2 sc, dec) x6 [18]
- **Rnd 18:** (sc, dec) x6 [12]
- **Rnd 19:** dec x6 [6]
  *Math check: 12 − 6 = 6 ✓. Do not close fully — leave the 6-st opening to attach the neck. Fasten off, leaving an 8" tail.*

---

## NECK
*Exceptionally long, narrow, firmly reinforced. Make in MC.*

- **Rnd 1:** 6 sc in MR [6]
- **Rnd 2:** inc x6 [12]
- **Rnd 3:** (sc, inc) x6 [18]
  *Math check: 12 + 6 = 18 ✓*
- **Rnds 4–18:** sc in each st (15 rnds) [18]
  *This long tube ≈ 4.3" — nearly equal to torso height, per the character.*
- **Reinforce:** Twist a pipe cleaner into a U-shape, fold the sharp ends inward for safety, and insert down the neck center. Stuff firmly around it. This supports the heavy head and lets you pose the slight forward curve.
- Fasten off, leaving a 12" tail for attaching to the body. Leave the bottom open.

---

## BODY
*Pear-shaped: wider at hips than shoulders. Cream belly worked with color change.*

Start in MC at the shoulders (top).

- **Rnd 1:** 6 sc in MR [6]
- **Rnd 2:** inc x6 [12]
- **Rnd 3:** (sc, inc) x6 [18]
- **Rnd 4:** (2 sc, inc) x6 [24]
- **Rnd 5:** (3 sc, inc) x6 [30] *— shoulders*
- **Rnds 6–8:** sc in each st (3 rnds) [30]
- **Rnd 9:** (4 sc, inc) x6 [36] *— belly begins to widen*
- **Rnds 10–11:** sc [36]
- **Rnd 12:** (5 sc, inc) x6 [42] *— hips, widest point*
  *Math check: 36 + 6 = 42 ✓*

**Color note for the cream chest/belly:** From Rnd 9 onward, work the **front 14 sts** of each round in CC (cream) and the back sts in MC, carrying yarn loosely inside. This creates the cream panel from chin down the belly. Keep CC centered on the front.

- **Rnds 13–16:** sc, maintaining CC front panel (4 rnds) [42]
- **Rnd 17:** (5 sc, dec) x6 [36]
  *Math check: 42 − 6 = 36 ✓*
- **Rnd 18:** (4 sc, dec) x6 [30]
  *Stuff body firmly, shaping the rounded belly.*
- **Rnd 19:** (3 sc, dec) x6 [24]
- **Rnd 20:** (2 sc, dec) x6 [18]
- **Rnd 21:** (sc, dec) x6 [12]
- **Rnd 22:** dec x6 [6]
  *Math check: 12 − 6 = 6 ✓.* Close hole with yarn needle. Fasten off. This is the base — flatten slightly so Sid can stand.

---

## ARMS (Make 2)
*Long and slender, slightly bent. Make in MC.*

- **Rnd 1:** 6 sc in MR [6]
- **Rnd 2:** inc x6 [12]
- **Rnds 3–4:** sc (2 rnds) [12] *— hand base*
- **Rnd 5:** (4 sc, dec) x2 [10]
  *Math check: 12 − 2 = 10 ✓*
- **Rnds 6–18:** sc in each st (13 rnds) [10]
  *Long slender arm ≈ 4". To suggest the bent elbow, after Rnd 12 pinch and fold once finished, then tack with a stitch during assembly.*
- Stuff lightly (keep slender). Flatten the top opening and fasten off, leaving a 10" tail for sewing.

## LEGS (Make 2)
*Shorter but sturdier than arms. Make in MC.*

- **Rnd 1:** 6 sc in MR [6]
- **Rnd 2:** inc x6 [12]
- **Rnd 3:** (sc, inc) x6 [18] *— oversized foot*
- **Rnds 4–5:** sc (2 rnds) [18]
- **Rnd 6:** (sc, dec) x6 [12]
  *Math check: 18 − 6 = 12 ✓*
- **Rnds 7–13:** sc in each st (7 rnds) [12]
  *Sturdy leg ≈ 2.5". Stuff moderately firm.*
- Flatten top opening, fasten off, leaving a 10" tail.

---

## OVERSIZED CLAWS (Make 9 total)
*Three per hand (×2 hands) + three per foot — but Sid uses 3 fingers/3 toes. Make **6 finger claws** + **6 toe claws** = make 12 small + larger claws. Use IV (ivory).*

For clarity: **3 claws per hand = 6; 3 claws per foot = 6. Total 12 claws.**

**Finger claw (make 6):**
- **Rnd 1:** 4 sc in MR [4]
- **Rnds 2–4:** sc (3 rnds) [4]
- Stuff tip lightly. Fasten off, leave 5" tail. Curve slightly while sewing.

**Toe claw (make 6, larger):**
- **Rnd 1:** 5 sc in MR [5]
- **Rnds 2–5:** sc (4 rnds) [5]
- Stuff tip lightly. Fasten off, leave 5" tail.

---

## NOSE
*Rounded, dusty pink. Make in PK.*

- **Rnd 1:** 6 sc in MR [6]
- **Rnd 2:** inc x6 [12]
- **Rnd 3:** (sc, inc) x6 [18]
- **Rnds 4–5:** sc (2 rnds) [18]
- **Rnd 6:** (sc, dec) x6 [12]
  *Math check: 18 − 6 = 12 ✓*
- Stuff lightly. Fasten off, leave 10" tail.

## BUCK TEETH (Make 2)
*White, protruding. Use IV.*

- **Rnd 1:** 4 sc in MR [4]
- **Rnds 2–3:** sc (2 rnds) [4]
- Flatten slightly, fasten off, leave 6" tail.

## TONGUE (Optional)
*Small flat oval in PK.*
- Ch 4. Starting in 2nd ch: sc, hdc, 2 sc in last ch; rotate, sc, hdc, sc along other side. Fasten off, leave tail.

## EARS (Make 2)
*Small, rounded, low on the head. Make in MC.*

- **Rnd 1:** 6 sc in MR [6]
- **Rnd 2:** (sc, inc) x3 [9]
- **Rnds 3–4:** sc (2 rnds) [9]
- Flatten, do not stuff. Fasten off, leave 8" tail.

## TAIL
*Medium length, narrow base tapering to a point, curved upward. Make in MC.*

- **Rnd 1:** 6 sc in MR [6]
- **Rnd 2:** (sc, inc) x3 [9]
- **Rnds 3–5:** sc (3 rnds) [9]
- **Rnd 6:** (sc, dec) x3 [6]
  *Math check: 9 − 3 = 6 ✓*
- **Rnds 7–8:** sc (2 rnds) [6]
- Insert a short folded pipe cleaner so the tail can curve upward; stuff lightly. Fasten off, leave 8" tail.

---

## EYES (Capturing Sid's Bulging Look)

If using 18 mm safety eyes with green-gray backing, install per the Head instructions. **For the signature wide, bulging cartoon eyes**, cut two white felt ovals (~1.25" tall), glue or stitch them to the face spaced far apart, then center the safety eyes through the felt before securing the backs. Alternatively, embroider:
- White oval base, green-gray iris circle, black pupil, with a tiny white highlight dot for a lively expression.

---

## ASSEMBLY

Work on a flat surface; pin everything before sewing. Use matching yarn and whip stitch.

1. **Neck to Body:** Center the open neck base over the body's shoulder area (top, Rnd 1–4 zone). Whip stitch all around. Add extra stuffing through the neck before fully closing.

2. **Head to Neck:** Place the head's 6-st opening (Rnd 19) over the top of the neck. The pipe cleaner core should slot up into the head. Stuff the join firmly, then whip stitch securely all around. Tilt the head slightly and curve the neck forward for Sid's energetic, goofy posture.

3. **Nose:** Sew the nose centered on the lower front of the face, just above where the mouth will go. Sculpt: using a long needle and matching yarn, take a stitch from behind one cheek through to the other to pinch the snout slightly forward — this emphasizes the long muzzle.

4. **Mouth:** With black yarn, embroider a wide upward-curving smile beneath the nose, spanning cheek to cheek. Make it a large open grin.

5. **Teeth:** Sew the two buck teeth at the top center of the mouth line so they protrude downward over the lip. Add the tongue inside the lower mouth if desired.

6. **Eyebrows:** With black yarn, embroider two thin raised arches above the eyes.

7. **Ears:** Sew flat to the sides of the head, low and slightly back, around Rnd 12–14 level.

8. **Arms:** Attach high on the shoulders (near Rnds 4–6 of body), one on each side. Sew the flattened tops on; tack a slight bend at the elbow zone for the relaxed lanky look.

9. **Legs:** Attach to the lower body (hips, around Rnd 16–18) angled slightly outward in a playful stance. Splay the oversized feet forward so Sid stands. **For stability, sew the feet flat and forward to widen the base and prevent tipping.**

10. **Claws:** Sew **3 finger claws** to the end of each hand and **3 toe claws** to the front of each foot, curving each one slightly forward/downward. Total: 6 finger claws + 6 toe claws.

11. **Tail:** Sew to the lower back just above the legs, angled so it curves upward.

12. **Hair Tuft:** Cut several 3" strands of black yarn. Using a hook, knot 4–6 strands through the top of the head (Rnd 2–3 area). Trim to ~1.5" and let them stick up for the signature goofy tuft.

---

## FINISHING & SCULPTING TIPS

- **Face depth:** Use a few hidden sculpting stitches around the nose and cheeks to create the long-snout smile.
- **Neck strength:** If the head sags, add a second pipe cleaner or a thin dowel through the neck core.
- **Posing:** Lean the head slightly to one side and raise the eyebrows for maximum goofy charm.
- **Safety:** Always fold pipe cleaner ends inward and bury them in stuffing. For children under 3, embroider eyes instead of using safety eyes and felt.

---

### STITCH COUNT SUMMARY (Verification)

| Part | Max sts | Closes to |
|------|---------|-----------|
| Head | 42 (Rnd 11) | 6 (Rnd 19) |
| Neck | 18 | open |
| Body | 42 (Rnd 12) | 6 (Rnd 22) |
| Arm (×2) | 12 → 10 | open |
| Leg (×2) | 18 → 12 | open |
| Nose | 18 | 12 |
| Tail | 9 | 6 |
| Ear (×2) | 9 | flat |

All decrease sequences verified to reduce by exactly 6 (or stated amount) per round. Head and body close symmetrically to 6 sts. ✓

**Proportion check:** Head ~5" of ~15" total ≈ one-third ✓. Neck ~4.3" ≈ torso height (5") ✓. Arms (~4") longer than legs (~2.5") ✓. Body hips (42 sts) wider than shoulders (30 sts) ✓ — pear shape confirmed.

Enjoy your whimsical, cuddly Sid! 🦥
Disclaimer: This pattern was generated by AI and should be reviewed for accuracy before use. While we strive for quality, AI-generated content may contain errors. Please verify measurements, stitch counts, and instructions before beginning your project. Generated by purlJam.uk
Access your pattern anytime
Bookmark this page to access your pattern anytime