Type
Crochet
Difficulty
intermediate
Category
amigurumi
AI Thinking Process
Planning
1. **Design Strategy**: A chubby, squat plush duck in super bulky chenille yarn worked seamlessly bottom-to-top for a soft, market-make look. UK crochet terms (dc = US sc) with invisible decreases for clean shaping; beak/wings/feet/tufts sewn on for a low-sew finish.
2. **Construction Plan**: Body and head worked as one continuous spiral from base to crown; small parts made flat/round and sewn on.
3. **Quality Assurance**:
- Keep body squat: more increase rounds at base, fewer straight rounds before head taper.
- Plush yarn hides stitches — mark round starts to avoid miscounting.
- Verify every inc/dec round math matches stated counts.
4. **Final Calculations**: Tension ~ 11 dc x 12 rounds = 10 cm with 5 mm hook. Start 6-dc magic ring, peak body width 36, head peak 30. Finished height ~16–18 cm (6–7 in). All rounds verified below.
Verification
[PRE-FLIGHT CHECKS]
1. **Completeness**: All template sections present — Title, Size, Skill, Materials, Abbreviations, Notes, Body/Head, Beak, Wings, Feet, Hair Tuft, Blush, Assembly, Finishing, Customisations. ✓
2. **Consistency**: Body 6→12→18→24→30→36, head taper 36→30→24→18→12→6. Each inc/dec round math checked inline. ✓
3. **Constraints**: Seamless body+head, UK terms, metric-first, plush size 6 yarn, 5 mm hook, safety eyes + embroidery alternative, oversized beak, toe bumps, three tufts, blush. ✓
4. **Safety**: Baby-safe embroidered eye option included; all decrease counts confirmed divisible. ✓
Pattern
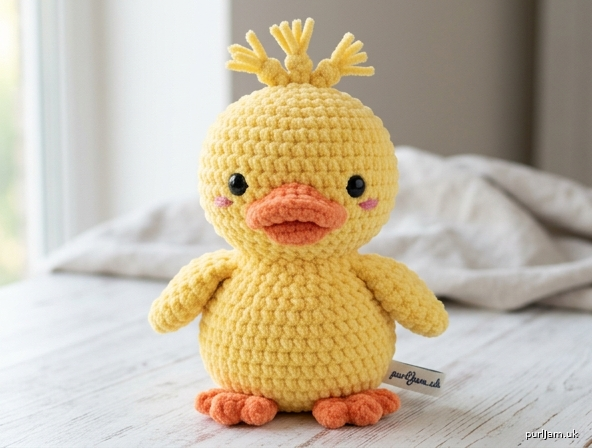
# 🦆 Sir Quackleton — The Silly Squishy Plush Duck

A chubby, pouty, gloriously goofy chenille duck with three silly hair tufts. Worked seamlessly from the bottom of the body up through the head, then finished with a few sewn-on parts. UK crochet terminology throughout.

---

## Finished Size
Approximately **16–18 cm (6–7 in) tall**, depending on your yarn and tension. Plush yarn varies — embrace the squish.

## Skill Level
**Confident beginner.** You need: magic ring, double crochet (dc), increases, invisible decreases, and basic sewing.

---

## Materials

- **Yarn:** Super bulky chenille / plush yarn (weight category 6).
  - Yellow — main colour (body, head, wings): approx. 1 ball (~80–100 g)
  - Orange — beak and feet: small amount (~15–20 g)
  - A short length of contrasting yellow (or the same yellow) for hair tufts
- **Hook:** 5 mm crochet hook (or size needed to give a firm, gap-free fabric with your plush yarn)
- **Safety eyes:** Black, 10–12 mm — **or** black embroidery thread for a baby-safe version
- **Pink embroidery floss or yarn** for blush
- **Toy stuffing** (polyester fibrefill)
- **Stitch marker** (essential — plush hides your stitches)
- **Tapestry/yarn needle** with a large eye
- **Scissors**

---

## Abbreviations (UK terms)

| Abbrev | Meaning |
|--------|---------|
| ch | chain |
| dc | double crochet (= US single crochet) |
| dc2tog | double crochet 2 stitches together (invisible decrease) |
| inc | 2 dc into the same stitch (increase) |
| st(s) | stitch(es) |
| sl st | slip stitch |
| rnd | round |
| FO | fasten off |
| MR | magic ring |
| ( ) x n | repeat sequence n times |
| [ ] | total stitch count at end of round |

> **Note for US crocheters:** UK **dc** = US **sc**. This whole pattern is worked in UK double crochet.

---

## Pattern Notes

- Work in **continuous spirals** (do not join or turn) unless told otherwise. Use your stitch marker in the first st of each round and move it up as you go.
- **Tension (gauge):** Roughly **11 dc x 12 rounds = 10 cm** with the 5 mm hook. Tension is not critical, but aim for a **firm, tight fabric** so stuffing doesn't show through. If you see gaps, go down a hook size.
- **Shaping for a squat duck:** The body widens fast and low, stays straight only briefly, then domes up smoothly into the head with no neck seam. Stuff firmly and roundly as you go.
- Stitch counts in **[brackets]** are confirmed at the end of every round.
- An **inc** adds 1 st; a **dc2tog** removes 1 st. All round maths are shown inline.

---

## 🟡 Body & Head (worked as ONE continuous piece)

Start with **yellow** yarn.

**Rnd 1:** 6 dc into MR. **[6]**
**Rnd 2:** inc in each st around. (6 inc = +6 → 6+6) **[12]**
**Rnd 3:** (1 dc, inc) x 6. (6 inc = +6 → 12+6) **[18]**
**Rnd 4:** (2 dc, inc) x 6. (6 inc = +6 → 18+6) **[24]**
**Rnd 5:** (3 dc, inc) x 6. (6 inc = +6 → 24+6) **[30]**
**Rnd 6:** (4 dc, inc) x 6. (6 inc = +6 → 30+6) **[36]**

> This wide flat base keeps the duck squat. Check: 6→12→18→24→30→36 ✓

**Rnds 7–12:** dc in each st around (6 rounds, no shaping). **[36]**

> The body is now a wide barrel. Insert safety eyes later; for now keep going.

**Begin the gentle taper into the head:**

**Rnd 13:** (4 dc, dc2tog) x 6. (6 dec = −6 → 36−6) **[30]**
**Rnd 14:** dc in each st around. **[30]**

> **Stuff the body firmly now** and continue stuffing as the head forms. Keep it round and plump.

**Rnd 15:** (3 dc, dc2tog) x 6. (6 dec = −6 → 30−6) **[24]**

> This is the "waist" between body and head — keep it subtle so there's no harsh neck.

**Rnd 16:** dc in each st around. **[24]**
**Rnd 17:** (3 dc, inc) x 6. (6 inc = +6 → 24+6) **[30]** ← head widens back out
**Rnd 18:** dc in each st around. **[30]**

**This is your eye/beak placement round zone (see below). Insert eyes between Rnd 18 and Rnd 19 before closing.**

**Rnds 19–20:** dc in each st around (2 rounds). **[30]**

**Now close the head:**

**Rnd 21:** (3 dc, dc2tog) x 6. (6 dec = −6 → 30−6) **[24]**
**Rnd 22:** (2 dc, dc2tog) x 6. (6 dec = −6 → 24−6) **[18]**

> **Finish stuffing the head firmly and roundly** before it gets too small to reach inside.

**Rnd 23:** (1 dc, dc2tog) x 6. (6 dec = −6 → 18−6) **[12]**
**Rnd 24:** dc2tog x 6. (6 dec = −6 → 12−6) **[6]**

FO, leaving a long tail. Thread the tail through the front loops of the remaining 6 sts and pull tight to close. Weave in the end.

> ✅ Body & head complete: a squat, round, neckless duck silhouette.

---

## 👀 Eye & Beak Placement (do this while the head is still open at Rnd 18)

- **Safety eyes:** Place between **Rnd 18 and Rnd 19**, set **wide apart** for a silly look — leave **6 sts between the two eyes** across the front. Push posts through and secure washers from inside before final stuffing.
- **Beak:** Sits **centred between and just below the eyes**, spanning roughly **Rnds 16–18** on the front. Sew on after the head is closed (see Assembly).
- **Baby-safe alternative:** Skip safety eyes. After finishing, **embroider each eye** as a small satin-stitch oval in black yarn/floss in the same position (between Rnds 18–19, 6 sts apart). Pull stitches snug for a glossy bump.

---

## 🟧 Beak (make 1, oversized & pouty) — orange

The beak is a flattened oval, worked in rounds then pinched flat.

**Rnd 1:** 6 dc into MR. **[6]**
**Rnd 2:** (1 dc, inc) x 3. (3 inc = +3 → 6+3) **[9]**
**Rnd 3:** (2 dc, inc) x 3. (3 inc = +3 → 9+3) **[12]**
**Rnd 4:** dc in each st around. **[12]**
**Rnd 5:** (2 dc, dc2tog) x 3. (3 dec = −3 → 12−3) **[9]**

FO, leaving a long sewing tail.

**Shaping:** Add only a **tiny pinch of stuffing** (or leave unstuffed for a flat pouty look). Flatten the opening and squash the oval so it's wide and slightly droopy — that's the pout. Do not over-stuff; the beak should look soft and squishable.

---

## 🟡 Wings (make 2) — yellow

Small, rounded, flattened teardrops.

**Rnd 1:** 6 dc into MR. **[6]**
**Rnd 2:** (1 dc, inc) x 3. (3 inc = +3 → 6+3) **[9]**
**Rnd 3:** dc in each st around. **[9]**
**Rnd 4:** (1 dc, dc2tog) x 3. (3 dec = −3 → 9−3) **[6]**

FO, leaving a long tail. **Do not stuff.** Flatten so each wing is a small rounded paddle/teardrop. The wider end is the "shoulder" you'll sew on.

---

## 🟧 Feet (make 2) — orange

Small rounded paddles with three tiny toe bumps.

**Rnd 1:** 6 dc into MR. **[6]**
**Rnd 2:** (1 dc, inc) x 3. (3 inc = +3 → 6+3) **[9]**
**Rnd 3:** dc in each st around. **[9]**

**Toe bumps (worked across the front edge of the foot):**
Flatten the foot first. Along the front (toe) edge, work **three little bumps** like so:
- Into the next st: **(1 dc, ch 2, sl st back into the same st)** = bump 1
- Into the next st: **(1 dc, ch 2, sl st back into the same st)** = bump 2
- Into the next st: **(1 dc, ch 2, sl st back into the same st)** = bump 3
- dc in the remaining sts around back to the start.

FO, leaving a long tail. **Do not stuff** — feet should be flat paddles. The three ch-2 loops form the cute webbed toes.

---

## 🪶 Hair Tufts (3 silly tufts) — yellow

Two easy options — pick your favourite:

**Option A — Chain-loop tufts (tidy & springy):**
- Cut a length of yarn. Insert hook into a single stitch at the very top centre of the head.
- Work **ch 6**, then sl st back into the same stitch to form a loop. FO and tie off securely on the inside.
- Repeat in **two more adjacent stitches** so you have **three loops** standing up in a little cluster.

**Option B — Knotted strand tufts (goofy & frayed):**
- Cut **three pairs** of short yarn strands (~5 cm each).
- Using your hook, fold one pair in half, pull the fold through a top-centre stitch to make a loop, then pull the loose ends through the loop and tighten (a simple lark's-head knot).
- Repeat for the other two pairs in adjacent stitches. Trim and gently fray for maximum silliness.

Place all three tufts **at the very crown (around Rnds 23–24)**, clustered close together and pointing up.

---

## 🌸 Blush

Using pink floss/yarn, embroider a **small cluster of 3–4 short straight stitches** (or one tiny satin-stitch oval) on **each cheek**, positioned **just below and slightly outside each eye** (around Rnd 17–18, about 1–2 sts to the outside of each eye). Keep them small and rosy.

---

## 🧷 Assembly

1. **Eyes:** If using safety eyes, they're already in (between Rnds 18–19, 6 sts apart). Otherwise embroider them now.
2. **Beak:** Pin the beak **centred between and just below the eyes**, spanning **Rnds 16–18** on the front. Sew all around the flattened edge with the orange tail, keeping the pouty droop facing down. Hide knots inside the seam.
3. **Wings:** Sew one wing to **each side of the body**, around **Rnds 9–11**, with the rounded paddle pointing slightly down and back. Sew along the top (shoulder) edge only so the wing flaps slightly.
4. **Feet:** Position the two feet at the **bottom front** of the body, on the underside front edge (around **Rnd 6**, where the base meets the body), spaced a couple of stitches apart with toe bumps pointing forward. Sew flat so the duck can "stand."
5. **Hair tufts:** Already attached at the crown — fluff and arrange.
6. **Blush:** Already embroidered on the cheeks.

---

## ✨ Finishing Notes

- Weave in **all** ends into the body interior so nothing peeks out of the plush.
- Give the whole duck a gentle squish-and-roll to even out the stuffing and round the silhouette.
- **Baby-safe reminder:** For under-3s, **always** embroider eyes (no safety eyes), use only securely sewn, non-detachable parts, and tug-test every sewn piece firmly.
- For a smoother surface on plush yarn, sew with a **split length** of the same yarn or a matching cotton thread.

---

## 🎨 Optional Customisation Ideas

- **🍓 Strawberry Hat Duck:** Crochet a small red dome (Rnds 1–4 of the body pattern, 6→12→18→24, then 2 straight rounds) with embroidered seeds and a green ch-loop leaf top; pop it on the head.
- **🧥 Raincoat Duck:** Work a short yellow or blue collared "cape" in rows of dc around the body (Rnds 13–15 area), add a tiny hood, and embroider button dots.
- **💛 Emotional Support Duck:** Embroider a tiny heart on the chest (Rnd 9) and add a removable felt tag that says "you've got this."
- **😴 Sleepy Duck:** Replace eyes with **curved closed-eye lines** (long straight stitches with a slight upward curve) and add a tiny crocheted nightcap.
- **😠 Angry Eyebrow Duck:** Keep the round eyes but embroider two short **angled eyebrows** above them (slanting inward) for a grumpy little frown.

---

### Quick Stitch-Count Recap (Body & Head)
6 → 12 → 18 → 24 → 30 → 36 → (×6 straight) → 30 → 30 → 24 → 24 → 30 → 30 → 30 → 30 → 24 → 18 → 12 → 6 ✓

Enjoy your silly squishy duck! 🦆💛
Disclaimer: This pattern was generated by AI and should be reviewed for accuracy before use. While we strive for quality, AI-generated content may contain errors. Please verify measurements, stitch counts, and instructions before beginning your project. Generated by purlJam.uk
Access your pattern anytime
Bookmark this page to access your pattern anytime